Table of Contents
Advertisement
Quick Links
Advertisement
Table of Contents

Related Manuals for Fortis CITY BREEZE+


Summary of Contents for Fortis CITY BREEZE+
- Page 1 FORTIS 26" CITY BREEZE+ LADIES ELECTRIC BIKE FS26LDEBKPA...
-
Page 3: Safety And Warnings
SAFETY & WARNINGS Electric Assisted Bike Regulations The EN 15194 EU standard or EPAC (Electric Power Assisted Cycle) conforms to the following characteristics for electric power assisted bikes: • Motor assistance only starts when the cyclist pedals. • The assistance cuts out as soon as the cyclist stops pedalling. •... - Page 4 14. Store the battery in a dry place after having completely recharged it. Avoid extreme temperatures (both low and high) as they can damage the battery. Optimal operating range: -10°C to 35°C. Cleaning and Maintenance • Use a damp cloth with neutral detergent to clean the bike frame. Do not use any detergents or cleaning liquids liable to deteriorate the frame or components.
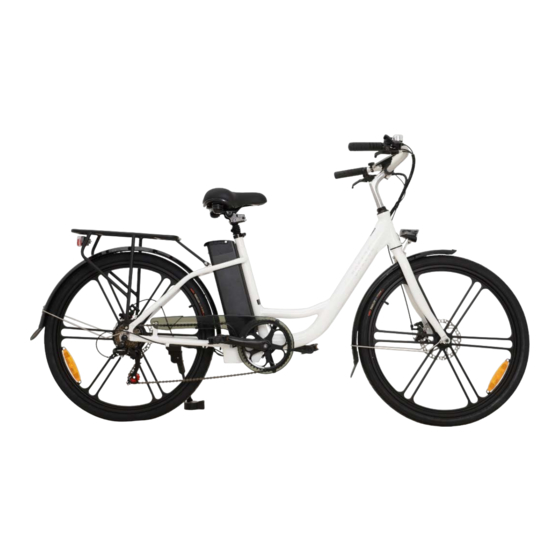
- Page 5 OVERVIEW Handle grips Bell Control pad Seat Handlebars Brake lever Handlebar stem Battery Headlight Rack Seatpost clamp Bike frame Fork Rear sprocket Front brakes Rear derailleur Pedals Front wheel Rear wheel Crankset Chain...
- Page 6 ASSEMBLY Stem & Handlebar Assembly WARNING To prevent steering system damage and possible loss of control, the stem must be inserted enough so that the minimum insertion marks are completely covered (see Figure 1). Minimum insertion mark Figure 1 Remove the plastic shipping cap from the bottom of the stem; insert the stem and handlebar assembly into the fork, making sure the stem wedge is loose.
- Page 7 Wheel Mounting Make sure the brakes are loose enough to allow the wheel to pass through the brake pads easily. If not already loose, disconnect the front brake by detaching the cable guide from the carrier. Place wheel into fork dropouts (Figure 3a) Install retaining washers with raised lip pointed towards the fork and insert into the small hole of the fork blade.
- Page 8 Seat Assembly Insert the seat stem into the frame (see Figure 5). Pull the quick-release lever free and insert the seat-post to the minimal insertion marker indicated on the seat-post. Insert at least to the minimal indication on the seat stem using rotary movements. You can use grease to help assembly.
-
Page 9: Before First Use
BEFORE FIRST USE Recommendations and Component Control before Use Before using your bicycle for the first time, you must check that all adjustments have been correctly made. • Check that the front and rear brakes work, check brake pads for wear. •... - Page 10 Bearings • Check that all bearings are properly adjusted, and apply lubricant if needed. • Ensure they are not too loose, and that they have not seized up. • Check steering bearings, wheel bearings, pedal bearings and bottom bracket bearings. Crank set and Pedals •...
-
Page 11: Operation
OPERATION Presentation and Electrical Start-Up ELECTRONIC PAD LAYOUT Up: More assistance Mode Down: Less assistance Mode: On/Off Mode Down Starting System • Hold Up button for 3 seconds to turn on the light, hold for another 3 seconds to turn off the light •... - Page 12 Front Light Battery Level Multi-Function Display Area Upon start-up, press the Mode button to switch between: • ODO (total mileage) • TRIP (single mileage) • TM (running time) • VOL (digital voltage) • MAX (maximum speed), and • AVG (average speed) interface cycles. Speed Display Area Current Speed: SPEED, unit: MPH, KM/H The meter will calculate the true speed based on...
- Page 13 CHARGING Battery Mounting and Locking Use the battery key which supplied in carton to take out the battery. Use the battery key to fix the battery. Press the power display button on the battery to check the battery volume. Battery Charging With the supplied charger, you can charge the battery directly whilst it is on the bike or use the key to take out the battery;...
-
Page 14: Cleaning And Care
CLEANING & CARE Care and Lubrication Only use specific bicycle lubricants. Pedals A few drops every 6 months on the axle. Chain Spray the whole surface every 6 months. Bottom bracket Every 6 months, please check with your authorised dealer. Motor Every year, please check with your authorised dealer. -
Page 15: Troubleshooting
TROUBLESHOOTING Error Meaning Troubleshooting Code The brake is in a power-off state. Check whether the left and right brake levers are reset. Check if the fault Brake failure disappears after opening the junction box and unplugging the power-off switch. Contact Kogan.com for support if problem persists. - Page 16 Need more information? We hope that this user guide has given you the assistance needed for a simple set-up. For the most up-to-date guide for your product, as well as any additional assistance you may require, head online to help.kogan.com.
Need help?
Do you have a question about the CITY BREEZE+ and is the answer not in the manual?
Questions and answers