Advertisement
Quick Links
Advertisement

Related Manuals for Fortis FS20FATEBKC


Summary of Contents for Fortis FS20FATEBKC
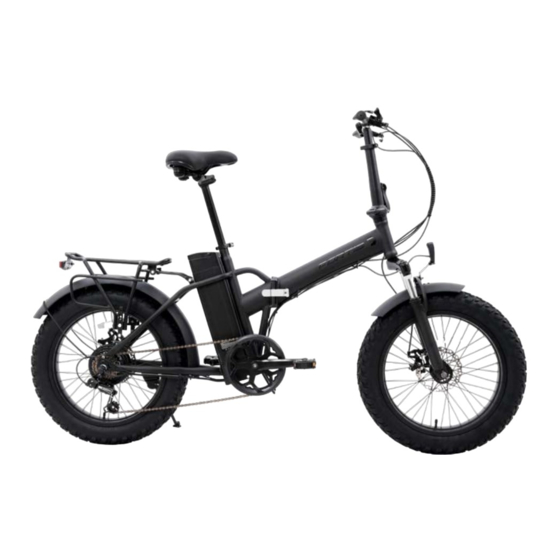
- Page 1 20” FAT TYRE FOLDABLE ELECTRIC BIKE FS20FATEBKC...
-
Page 2: Table Of Contents
Safety & warnings Overview Assembly Operation Cleaning & care Troubleshooting... -
Page 3: Safety & Warnings
SAFETY & WARNINGS • Read all of the following instructions before use. Keep this user guide for future reference. Do not skip, substitute or modify any steps or procedures in this guide, as doing so could result in personal injury or product damage. •... - Page 4 • For your safety, it is highly recommended that you wear a certified helmet. • When used during heavy rain, snow, in slippery conditions or in the case of low visibility, be careful and adjust your speed. • At night, ride using the lights and wear bright clothing to help make you visible to others.
- Page 5 Safety ride • It is highly recommended that you do not overload your pedal-assisted bicycle as you could damage the electrical components or cause malfunctions, like overheating of the battery or the motor. • Do not store the battery in excessively hot or cold places. •...
-
Page 6: Overview
OVERVIEW Front hub Freewheel Rear motor Bottom Bracket set Spoke Rear derailleur Crank set Tire Shift cable Handlebar Front light Right shifter Rear light Front brake Brake lever Rear brake Saddle Suspension fork Carrier Seat post Foldable stem... - Page 7 Kickstand Seat clamp Front fender Grip Rear fender Fender support sheet Display Wrapping tape Pedal Frame buckle Controller Disc brake rotor Chain Nylon cable tie Rear fender support Wheel reflector Front brake cable Headset Rear brake cable Tools supplied 3mm Allen 4mm Allen Key 5mm Allen 6mm &...
-
Page 8: Assembly
ASSEMBLY Step 1: Getting Started Remove the e-bike and all accessories from the packaging. DO NOT dispose of the original packaging until assembly is complete. Check all packaging to ensure all necessary components are found before beginning assembly. Step 2: Handlebar/Stem WARNING: To prevent steering system damage and possible loss of control, the stem must be inserted enough so that the minimum insertion marks are completely covered (Figure 1). - Page 9 Unfold the stem and lock the folding buckle. (Figure 4-5) Figure 4 Figure 5 Notes: If the steering stem is loose, fasten the steering stem lock screw and make sure that it is securely fastened. (Figure 6). Figure 6...
- Page 10 Step 3: Unfolding Bike Unfold the bike. Lock the folding buckle back into place to prevent the bike from collapsing. Refer to the below images for the correct positioning for locking the folding buckle after unfolding the bike. (Figure 7) Figure 7 To fold the bike, lift the handle up and fold the bike frame in half.
- Page 11 Step 4: Seat and Seat Post • Insert the seat post into the frame. Ensure the seat post is inserted to the minimal indication on the seat stem. • Tighten the quick-release clamp and then fold the lever to the closed position. The minimal torque specification is 19.5Nm.
- Page 12 Step 6: Rear Light • The rear seat light comes pre-assembled on the electric bike. Before using the bike, remove the “PULL” sticker. • To turn the light on, press the button under the light. (Figure 11) Figure 11 Battery Installation Install: Press the release button under the saddle to fold it forward.
- Page 13 Figure 12 Battery Charging Battery removal: Press the release button under the saddle to fold the saddle forward. Turn the key counter clockwise twice to the UNLOCK position, then grab the battery handle and lift it up. Charging: Open the dust cover on the battery to expose the charging port. Insert the low- voltage output plug of the charger into the battery charging port and insert the charger into an electrical outlet.
- Page 14 Note: • Ensure the charge plug is always securely in place to prevent humidity entering. • Do not charge the battery for more than 10 hours to avoid overcharging and damaging the battery. After the light turns green, the charger enters trickle charging and will slowly maintain the state of charge.
-
Page 15: Operation
OPERATION Display ELECTRONIC PAD LAYOUT A: On/Off Mode B: More assistance C: Less assistance LCD Screen Setup and Assistance Level Notes: Turn battery lock key to “ON” position before starting system operation. Press the On - Off button (A) for 2 seconds in order to start the system or shut the system off. - Page 16 Press the on-off button (A) and the "+" button(B) at the same Max speed time to display the highest speed of this cycling. Press again to exit max speed display. Hold + button (B) for 2 seconds to turn on/off the light. Front light This symbol lights up to indicate that the headlights are on.
- Page 17 Parameter Setting Press the + (B) - (C) button together for 2 seconds, to enter/exit the setting interface. Press + (B) and - (C) to adjust parameter, press on-off button (A) to switch menu. • P01 backlight brightness: 1 is darkest, 3 is brightest (default is 2) •...
-
Page 18: Cleaning & Care
CLEANING & CARE Care and Lubrication Only use specific bicycle lubricants. Pedals: A few drops every 6 months on the axle. Chain: Spray the whole surface every 6 months. Bottom bracket: Every 6 months, please check with your authorised dealer. Motor: Every year, please check with your authorised dealer. -
Page 19: Troubleshooting
TROUBLESHOOTING Error Code Indication Solution • Check whether the motor waterproof cable is loose and re-plug the motor waterproof cable. Motor Failure • Check whether the motor lead wire is damaged. • Replace the motor; • Open the junction box to check whether the instrument wire plug is loose Controller Failure •... - Page 20 Need more information? We hope that this user guide has given you the assistance needed for a simple set-up. For the most up-to-date guide for your product, as well as any additional assistance you may require, head online to help.kogan.com...
Need help?
Do you have a question about the FS20FATEBKC and is the answer not in the manual?
Questions and answers