
Subscribe to Our Youtube Channel
Related Manuals for Gorenje KC621USC


Summary of Contents for Gorenje KC621USC
- Page 1 Instructions for use, installation, and connection Combined and gas built-in cooking hob...
-
Page 2: Table Of Contents
Combined and gas built-in cooking hob Dear customer! Combined and gas built-in hob is intended for use in households. Our products are packed in environment-friendly materials which can be recycled, disposed of, or destroyed without imposing any burden on the environment. Instructions for use Instructions for use are intended for the user. -
Page 3: Important - Read Before Using
Important - Read before using the appliance Safety percautions • This appliance can be used by children aged from 8 years and above and persons with reduced physical, sensory or metal capabilities or lack of experience and knowledge if they have been given supervision or instruction concerning use of the appliance in a safe way and understand the hazards involved. - Page 4 • Unauthorized service and repair can result in risk of explosion, electric shock, or short circuit and consequently personal injury and damage to the appliance. Such tasks may only be carried out by an authorized expert. • Before installing and connecting the appliance, make sure the local connection conditions and characteristics (gas type and pressure) are compatible with the appliance set-up.
-
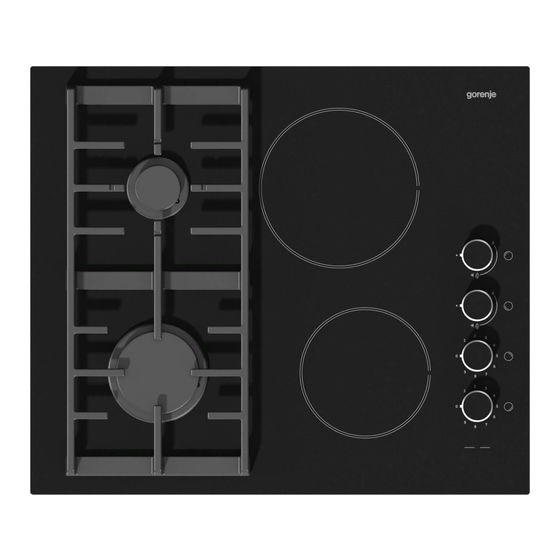
Page 5: Appliance Description
Appliance description (equipment - depending on the model) Upper side of a combined cooker with Upper side of a combined cooker with gas and electric cooking zones gas cooking zones 1. Cooking zone rear left 2. Cooking zone rear right 3. - Page 6 Electric 1- 6 power levels 1- 9 power levels gas valve is closed maximum power minimum power...
-
Page 7: Cooking Zones
Cooking zones A) Electric cooking zones After you receive your appliance, please wipe the entire cooking hob, including the cooking zones, with a damp cloth. Before using the Turn on the cooking zones for 3 to 5 minutes and select the appliance for the fi... - Page 8 Energy saving • Pan bottom diameters should match the diameter of the cooking zone. If the pan is too small, some heat is wasted; furthermore, using a too small pan can damage the cooking zone. • Whenever possible given the cooking process, use a lid. •...
- Page 9 Cookware • Correctly selected cookware will enable optimum cooking time and gas consumption. Pan diameter is the most important parameter. • Flames that reach over the edge of a pan that is too small, can damage the cookware; furthermore, gas consumption is higher in such cases.
-
Page 10: Operating The Electric Cooking Zones
Operating the electric cooking zones • Turn on the cooking zone using the knobs installed on the control panel. • The symbol next to each knob indicates which cooking zone is operated by it. • Cooking zone power level can be set continuously (1-9) or stepwise (1-6). -
Page 11: Operating The Gas Burners
Operating the gas burners Ignition and operation of Models with two gas burners: the burners • Operate the gas burners using the knobs on the hob. Power levels are indicated on the knobs by large and small fl ame symbols (see section Appliance description). •... -
Page 12: Cleaning And Maintenance
Cleaning and maintenance Cleaning After each use of the glass-ceramic hob, wait for it to cool down and clean it; otherwise, even the smallest food residue will be burnt onto the hot surface next time you use the appliance. For regular cleaning and maintenance of the glass-ceramic surface, use special conditioning agents which form a protective layer on the surface, shielding it from dirt. -
Page 13: Special Warnings And Fault Reporting
residues or use of cookware made of materials such as aluminum or copper; these stains are diffi cult to remove. Warning: All damage described above predominantly relates to the aesthetics, i.e. appearance of the appliance and do not aff ect its functionality directly. -
Page 14: Installation
What happened...? Possible cause What to do? The burners will not burn Flame is uneven due to a Have an expert check he gas The fl ame is uneven / unstable wrong gas power setting. pipeline! The fl ame from the burners Wrongly assembled parts of the Assemble the burner correctly. - Page 15 • Use of massive wood decoration plates or boards on the worktops behind the cooking hob is permitted, if the minimum distance remains the same as indicated in the installation drawings. • Minimum distance between the built-in cooking hob and the rear wall is indicated on the installation drawing.
- Page 16 • Only type EVP4.., EVP3.., EVP2.., ovens fi tted with a cooling fan may be installed underneath this cooking hob. • Before installing an oven, the rear wall of the kitchen furniture element should be removed in the area of the cooking hob cutout.
-
Page 17: Connecting The Appliance To The Power Mains
Connecting the appliance to the power mains (Only for models supplied without mains cord and plug) Important warnings • The appliance may only be connected by an authorized skilled technician. • Electric system protection should comply with all relevant regulations. •... -
Page 18: Connecting The Cooking Hob To The Gas Supply
NOTE: Connection bridges are already installed on their respective places on the clip. Screws of the connection terminals are open, which means they do not have to be unfastened or unscrewed any further. When fastening the screws, you may hear a slight ‘click’, which means that the screws should be fastened / screwed in completely. - Page 19 • For sealing of the connection joints, use a non-metal approved gaskets and approved sealants. • The gaskets should only be used once. The thickness of the fl at non-metal gaskets should not be deformed more than by 25 percent. •...
- Page 20 Cooker burner 1 Burner crown cover 2 Burner crown with cover support 3 4 5 3 Thermo-element (only in protected burners, only available in some models) 4 Spark plug 5 Nozzle Adjustment elements To leave the adjustment elements accessible, please observe the following instructions: •...
-
Page 21: Nozzle Table
Nozzle table gas type, pressure Auxiliary burner Normal burner Large burner Natural gas H Nom. therm. load (kW) 0,36 1,75 0,46 0,76 Wo=45,7÷54,7 MJ/ m Consumption (l/h) 95,21 34,4 166,62 4308 285,64 72,4 Natural gas E , Nozzle type (1/100mm) Natural gas E+ Nozzle code Wo=40,9÷54,7 MJ/m... -
Page 22: Technical Characteristics
H Factory settings for gas type WE RESERVE THE RIGHT TO MAKE ANY CHANGES THAT DO NOT AFFECT THE FUNCTIONALITY OF THE APPLIANCE. Instructions for use of the appliance can also be found on our website at www.gorenje.com / < http://www.gorenje.com />... - Page 24 PVK_KVK4K en (02-19)
Need help?
Do you have a question about the KC621USC and is the answer not in the manual?
Questions and answers