Table of Contents
Advertisement
Quick Links
Advertisement
Table of Contents

Related Manuals for Uovision GLORY LTE CELLULAR


Summary of Contents for Uovision GLORY LTE CELLULAR
- Page 1 User Manual GLORY LTE CELLULAR (BLACK FLASH / NO GLOW) + built-in viewer...
-
Page 2: Table Of Contents
Contents 1 Camera Overview ......................1 2 Power..........................2 3 Installing your SIM card and SD card ................2 3.1 Formatting the SD card..................3 4 Download Tool (U Set.exe) ....................3 4.1 Setup with PC / laptop ....................4 4.2 Send a Test Photo ....................8 5 Camera Mode Settings...................... -
Page 3: Camera Overview
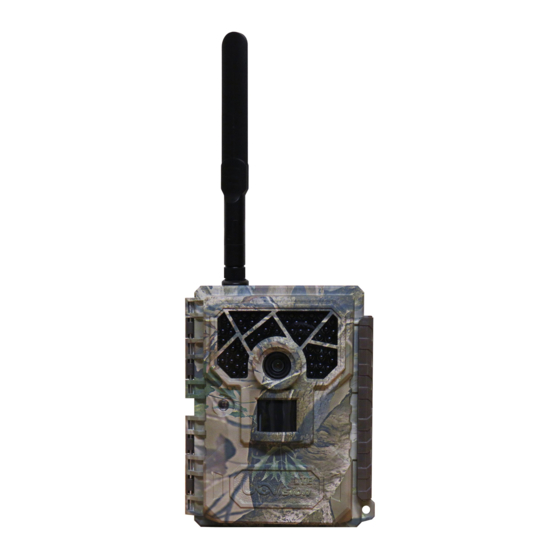
1 Camera Overview (10) (11) Front View LTE main antenna Black Flash (no glow) LED's Lens SIM card slot Bottom (12) Power switch View MENU Keyboard SD card slot Battery tray (AA size x 12) Light sensor (10) Colour 2.0" programming / playback screen (11) Battery tray eject button (13) -
Page 4: Power
2 Power To supply power for the camera, 4, 8 or 12 size AA batteries are needed. Notice ·Do not mix different types of batteries ·Please do not mix the old batteries with the new batteries The following batteries can be used: ·High-density and high-performance AA size alkaline or 1.5v Lithium batteries (Recommended) ·Rechargeable 6V external SLA battery (Sealed Lead Acid) or solar panel ·Rechargeable NiMH AA size batteries (at least 2500mAh) -
Page 5: Formatting The Sd Card
The camera is designed to instantly transmit triggered footage once the photo or video is taken by using available cellular network signal and you can choose either of the following; Images / short video clips (max 10 sec length) to up to 4 x different email address (uses DATA). MMS photos to up to 4 different cell phone numbers or (uses AIRTIME);... -
Page 6: Setup With Pc / Laptop
4.1 Setup with PC / laptop Switch camera OFF and take out SD card and insert into Windows PC / laptop. Open up the SD card drive and double click the U Set.exe program (you may see a warning box like below. Choose YES to continue). - Page 7 Send Mode: Instant - Select 'ON' to have the footage immediately transmitted to you or OFF to disable the transmission feature. Number of transmissions: You can limit the number of transmissions you receive if required - if not, select '0' for unlimited. Daily Report - This option will only send you the last photo taken each day with a report of all the other activity captured during the day at preset time that you choose.
- Page 8 SOUTH AFRICAN CELL NETWORK PARAMETERS: Vodacom Telkom (8ta) CellC Send To / SMS Control: Phone: Sends triggered footage as MMS's (images only) to cell phones (up to 4). Email: Sends triggered footage as Email attachments (images or video clips) to Email addresses (up to 4) Input phone numbers with no country prefixes and no spaces.
- Page 9 Sending via Email: Select the Send To 'Email' option and then click the 'Email Setting' button and a separate window will open allowing you to input the SENDING parameters for the camera footage. Some of the main service providers are also listed here.
-
Page 10: Send A Test Photo
After you have finished customising all the settings, make sure to save your path directly to the SD card root directory. Locate your SD card be pressing the '...' button. • It will then generate a ‘profile.bin’ file on SD card. [Please ensure the file is labeled 'profile.bin' and not 'profile(1).bin' or 'profile(2).bin' or profile(3).bin' etc. - Page 11 Photo or Video Mode Select if you want the camera to record Photos or Videos. To customize these Photo or Video settings, select 'Custom Settings'. Page 9...
-
Page 12: Pir Tab
5.2 PIR TAB Trigger Mode: Choose if you want PIR triggered footage, Timelapse triggered footage or Both. PIR Sensitivity: Choose between Low / Auto or High PIR sensitivity PIR Interval: This is the time delay of the PIR sensor to set after each trigger & transmission (for security applications its best to have a short time setting). -
Page 13: Sys Tab
5.3 SYS TAB Set Clock: Enter to set the date and time. Password:You can set a Password to prevent anyone from accessing the camera menu options in the field. Make sure you write down your password or save it to your mobile phone so you can still access your camera if you ever forget your password. -
Page 14: Remote Control Of Camera By App / Sms
The number which has control of this function (command phone number) is the one in the first position of the phone number list. Android APP [called CamCtrl_M]: Please search ’UOVision’ or ’CamCtrl_M ’in the Google play store and install the APK file to your smart phone. - Page 15 CamCtrl_M App Press to ADD NEW CAMERA Input the cell number of the camera's SIM card (no spaces or country prefix codes) via the App. Once loaded - select your camera and there are a great settings / commands that can be set / changed Note: If you set Wireless Status to OFF, you will not receive photos or Daily reports to your phone or e‐mail.
- Page 16 If you want to send SMS commands to the camera by normal text messages, below are a number of the most commonly used SMS commands: SMS Command Function Page 14...
-
Page 17: View Or Delete Photos On The Color Display
7 View or Delete photos on the color display You can view your photos on the color display when in the field. If you want to do this, make sure the Power switch is setted to SETUP. Press the Play button. You can use the ◄► buttons to toggle through the photos. If you see photos you want to delete, press the DEL button. -
Page 18: Mounting Tips
9 Mounting tips Mount the camera approximately 1.4m off the ground facing straight forward as level as possible. For instance, place the camera 7m-10m from a field edge facing the woods. If positioning the camera in a bushy area, position it facing a thicket approximately 7m-10m away. -
Page 19: Appendix Ⅰ: Technical Specifications
Appendix Ⅰ: Technical Specifications Picture Resolution 20MP, 16MP, 12MP, 8MP, 5MP, 3MP Lens F/NO=2.2 FOV(Field of View)=58° UMTS/HSPA+: 900/2100MHz GSM/ Frequency Bands EDGE:850/900/1800/1900MHz0 IR-Flash (No glow) (Low) 6m-12m, (High) 12m-25m Display Screen 2.0” LCD Memory Card Up to 32GB standard size SD card Video Resolution WVGA,720P,1080P PIR Sensor... -
Page 20: Appendix Ⅱ: Parts List
Appendix Ⅱ: Parts List Part Name Quantity Digital Camera Mounting Strap User Manual Quick Start Antenna Declaration of Conformity to Directive 2014/53/EU CE Caution: Hereby, the manufacturer declares that this camera is in compliance with the essential requirements and other relevant provisions of Directive 2014/53/EU. - Page 21 CAMERA TRAPS cc info@cameratraps.co.za www.cameratraps.co.za +27 (0)83 560 0555 | +27 (0)82 422 0356...
- Page 22 Customer Name: Contact Tel: Date of Purchase: Series No: Fault Description: Retailer: The camera manufacturer provides 24 months of warranty service for this product against manufacturing defects or malfunctions. If your camera fails to function under normal use within 2 years, the camera manufacturer will repair or replace the camera at no charge.
Need help?
Do you have a question about the GLORY LTE CELLULAR and is the answer not in the manual?
Questions and answers