Table of Contents
Advertisement
USER MANUAL
Uovision Compact LTE 4G 20MP Cloud
Declaration of Conformity to Directive 2014/53/EU
CE Caution: Hereby the manufacturer declares that this Uovision
Compact LTE Wireless Trail Camera is in compliance with the
essential requirements and other relevant provisions of Directive
2014/53/EU. A copy of the DOC, Declaration of Conformity to
Directive 2014/53/EU, may be obtained thru the local distributor.
Advertisement
Table of Contents

Subscribe to Our Youtube Channel
Related Manuals for Uovision Compact LTE 4G 20MP Cloud


Summary of Contents for Uovision Compact LTE 4G 20MP Cloud
- Page 1 USER MANUAL Uovision Compact LTE 4G 20MP Cloud Declaration of Conformity to Directive 2014/53/EU CE Caution: Hereby the manufacturer declares that this Uovision Compact LTE Wireless Trail Camera is in compliance with the essential requirements and other relevant provisions of Directive 2014/53/EU.
-
Page 2: Table Of Contents
Content CAMERA INTRODUCTION ..........1 1.1 HOW THE CAMERA WORKS ..........1 1.2 CAMERA OVERVIEW ............2 1.3 BUTTON INSTRUCTION ............ 3 PREPARATION ..............4 2.1 INSTALLING BATTERIES ........... 4 2.2 INSERTING MICRO SD CARD ........... 4 2.3 INSERT NANO SIM CARD ..........5 SETTING CAM WITH WEB PORTAL OR APP .... - Page 3 STARTING THE CAMERA..........15 OTHER OPERATIONS ............17 8.1 LOG FILE................17 APPENDIX Ⅰ: TECHNICAL SPECIFICATIONS ...... 18 APPENDIX Ⅱ: PARTS LIST ............. 19...
-
Page 4: Camera Introduction
CAMERA INTRODUCTION 1.1 HOW THE CAMERA WORKS Uovision Compact LTE Wireless Trail Camera is using high-speed 4G LTE connection thru the LinckEazi cloud platform. It has max 20MP resolution and max Full HD (1080P) video with audio. Camera is having small compact size and it is easy to use. User can review the photos and videos via LinckEazi Cloud platform. -
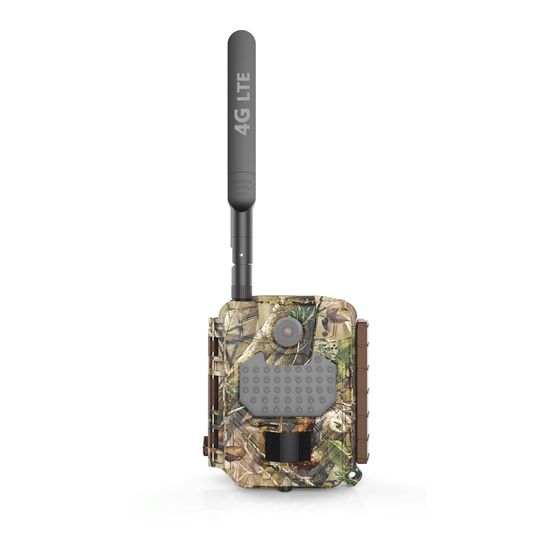
Page 5: Camera Overview
1.2 CAMERA OVERVIEW 1. Switch 2. Reset 3. Micro SD slot 4. Nano SIM slot 5. 4G Antenna 6. ”PIR & Power” LED 7. "Network Status" 8. MIC 9. PIR detector 10. Lens 11. Flash 12. 6V Power Port 13. Tripod / Wall Mount Threads... -
Page 6: Button Instruction
1.3 BUTTON INSTRUCTION Button Function description ON: Working mode (camera active) OFF: Power Off ①:Press the RESET button and the camera will take a manual photo and automatically send to the app (LinckEazi account needs opened first, and insert camera serial number & IMEI code to your own account) -
Page 7: Preparation
Sound information Beeps 2 times: no SIM card Beeps 3 times: no Micro SD card Beeps 1 time: upgrade is completed PREPARATION 2.1 INSTALLING BATTERIES This camera can function on 8 AA alkaline batteries. Pay attention to the (+) or (-) molded into each sleeve to determine, if you insert the positive or negative end into the sleeve first. -
Page 8: Insert Nano Sim Card
a Micro SD card. Insert a Micro SD card (up to 32G) into the Micro SD card slot with the label side facing upwards. 2.3 INSERT NANO SIM CARD This product supports following Networks FDD-LTE:B1/B3/B5/B7/B8/B20; TDD-LTE: B38/B40/B41; WCDMA: B1/B5/B8; GSM: 900/1800 ... -
Page 9: Setting Cam With Web Portal Or App
SIM card should support high-speed 4G LTE data transmission and SMS text message receiving SETTING CAM WITH WEB PORTAL OR APP 3.1 DOWNLOADING THE APP Search “Linckeazi”in your Google Play Store or Apple Store. You can also scan below QR code and install the APK file to your smart phone: Android APP IOS APP... -
Page 10: Linckeazi Cloud Login
3.2 LOGIN Open your browser access address: https://www.linckeazi.com If you already have an account just login in. If not, click ‘Sign up’ on the page to pop up the registration page. Please register your account with an email address, and fill out the necessary information. - Page 11 Name your CAM, and add location description if necessary. The Serial Number and IMEI code can be found inside your Camera: SN (serial number) & IMEI Code...
-
Page 12: Choose A Sim Card And Plan
3.3 CHOOSE A PLAN Click “Choose a plan” button to select the type of plan you’d like to add. Free plan provides recent 10 days pictures and videos. 3.4 SETTING CAM The Camera can be set up conveniently with either website or APP. - Page 13 Please click ‘Apply to Device’ when you finish the settings.
-
Page 14: Settings
SETTINGS CAMERA MODE Photo Size 3M/5M/8M/12M/16MP/20MP Flash Power Low/High Photo Burst 1-10 Photo Burst speed Fast/ Slow Sending Option 1-10 Shutter Speed Normal/Fast Flash Power Low/High Video Size WVGA/720P/1080P Video Video Length 5s-60s Photo Burst: It’s the taken number of pictures when a triggering. If photo burst is 3, it means the camera will take 3 pictures after one triggering. - Page 15 TRIGGER MODE Auto/Low /High PIR Sensitivity PIR Trigger 5s - 60min PIR Interval Time Lapse 3Min-24Hour Both PIR Interval:It means how often the PIR sensor can be allowed to work. This prevents the card from filling up with too many redundant images.
- Page 16 Over Write Off/On Location (aGPS) On/Off Send Mode: Enable the instant transmission. 0-99 means the number of photos which is allowed to send out per day. Remote Control: You can remote control your camera via mobile phone or web-portal. Please note if you choose Real Time, the power consumption will be huge as the wireless module will keep awake.
-
Page 17: Camera Lights
CAMERA LIGHTS “PIR&Power” Light (Light 1) “Network Status” Light (Light 2) Color Flash slowly Steady Flash fast Light1 PIR is working Low power Green Good signal Sending Yellow- Weak pictures Light2 Searching for signal green signal No signal The camera goes to Active Mode when the two lights are off. -
Page 18: Manual Photo
MANUAL PHOTO You can manually take a picture and check if your APP has successfully received the photo. Press the “RST” button when the light 2 is green or yellow-green. Camera will shoot a picture at once and send to cloud platform. The cloud platform will receive the photo within 30 seconds if the camera has a good signal. - Page 19 - The signal search can take a few minutes STEP 3: The “Network Status” light will be steady which means the camera is registered online. - Steady Green: Good signal - Steady Yellow-Green: Weak signal - Steady Red: No signal STEP 4: After the camera is registered online, there will be 60 seconds for the camera to prepare to enter into Active Mode.
-
Page 20: Other Operations
OTHER OPERATIONS 8.1 LOG FILE If the manual sending will fail, there will be a log file generated on your Micro SD Card. You can send the Log file for trouble shooting to your local distributor. -
Page 21: Appendix Ⅰ: Technical Specifications
APPENDIX Ⅰ: TECHNICAL SPECIFICATIONS Image Quality 3/5/8/12/16/20MP F=1.85 FOV (Diagonal Field of View)=64° Lens (FOV10m: 7.72meter) PIR Detection Range (meter) PIR angle 54° @ 4meter Video Quality WVGA/720P/1080P with Audio Trigger Time 0.4s Trigger Interval 5s-60min Time Lapse 3min-24hours Work Time Up to Four operation settings Photo Burst 1–10... -
Page 22: Appendix Ⅱ: Parts List
Location (aGPS) Support 8*AA batteries (not included) Power Supports 6V external power Other Interface Micro SD card (Up to 32GB), Nano SIM Operation/Stora -20 - +60°C / -25 -+60°C ge Tem Operation 5% - 90% Humidity WeatherProof IP66 Grade Mounting Belt/Cable Lock/Threaded/Adjustable angle bracket Size... - Page 23 This camera is warranted to be free from defects in material and workmanship for 1 year from the original date of purchase when purchased through an authorized dealer. Uovision Distributor will, at its option, repair or replace your camera with the same or...
- Page 24 Uovision Technical service center or acts beyond the manufacturer's control. Should your product prove defective during this warranty period, please contact your local distributor prior to returning the defective unit.
Need help?
Do you have a question about the Compact LTE 4G 20MP Cloud and is the answer not in the manual?
Questions and answers