Advertisement
Quick Links
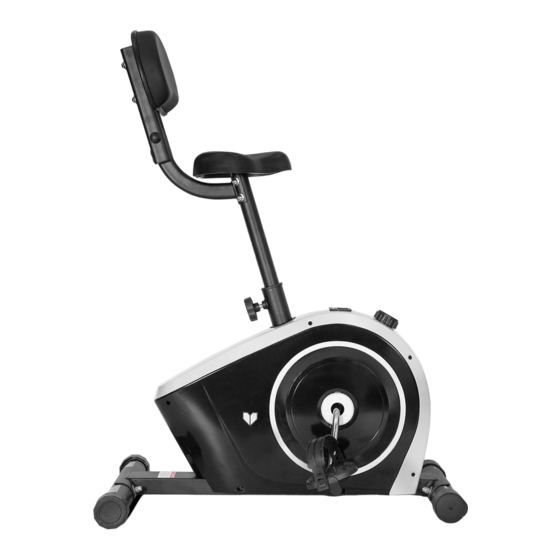
LFE01 Cyclestation 3
Read all instructions carefully before using this product.
Retain this owner's manual for future reference.
IMPORTANT
All nuts and bolts are to be checked and tightened on a regular basis. This includes pedals and
other moving parts. Failure to do so may cause damage to your threads and void your warranty.
NOTE:
Product may vary slightly from the item pictured due to model upgrades. This manual may be subject to updates or changes.
Up to date manuals are available through our website at www.lifespanfitness.com.au
USER MANUAL
Advertisement

Related Manuals for LifeSpan LFE01 Cyclestation 3


Summary of Contents for LifeSpan LFE01 Cyclestation 3
- Page 1 LFE01 Cyclestation 3 USER MANUAL Read all instructions carefully before using this product. Retain this owner’s manual for future reference. IMPORTANT All nuts and bolts are to be checked and tightened on a regular basis. This includes pedals and other moving parts. Failure to do so may cause damage to your threads and void your warranty.
-
Page 2: Table Of Contents
TABLE OF CONTENTS Important Safety Instructions ....... 03 II. Care Instructions ..........04 III. -
Page 3: Important Safety Instructions
I. IMPORTANT SAFETY INSTRUCTIONS WARNING: Read all instructions before using this machine. Thank you for purchasing the Cyclestation 3 Exercise Bike! For your safety and benefit, please read this manual carefully before using the machine. Prior to assembly, remove components from the box and verify that all the listed parts were supplied. Assembly instructions are described in the following steps and illustrations. -
Page 4: Care Instructions
• People such as children and handicapped persons should only use the machine in the presence of another person who can give aid and advice. • The power of the machine increases with increasing the speed, and the reverse. The machine is equipped with adjustable knob which can adjust the resistance. -
Page 5: Exploded Diagram
III. EXPLODED DIAGRAM 26 26 16 15 EXPLODED DIAGRAM |... -
Page 6: Parts List
IV. PARTS LIST Part No. Description Main frame Saddle Post Backrest Support Backrest Frame Front Stabilizer Rear Stabilizer Carriage Bolt M8XL74 Arc Washer Φ8.5 X Φ1.5 X Φ25 X R33.5 Acorn Nut Crank Hex Bolt M10x85 Inner Hex Bolt M8x50 Inner Hex Bolt M8x16 Arc Washer Φ8.5 X Φ1.5 X Φ20 X R25 Nylon Nut M10... - Page 7 NOTE Most of the listed assembly hardware has been packaged separately, but some hardware items have been pre-installed in the identified assembly parts. In these instances, simply remove and reinstall the hardware as assembly is required. Please reference the individual assembly steps and make note of all preinstalled hardware. PREPARATION Before assembling, make sure that you will have enough space around the item.
-
Page 8: Assembly Instructions
V. ASSEMBLY INSTRUCTIONS STEP 1 1. Attach the front stabilizer (5) and rear stabilizer (6) to the main frame (1) with the acorn nuts (9), arc washers (8) and carriage bolts (7) as shown. | ASSEMBLY INSTRUCTIONS... - Page 9 STEP 2 1. Attach the pedals (19L/R) to the Crank (10) respectively, viewed from the rider’s exercising position. Always make sure the pedals are securely tightened before any exercise. Note: Both pedals are labeled L FOR LEFT and R FOR RIGHT. Tighten the left pedal COUNTERCLOCKWISE and the right pedal CLOCKWISE.
- Page 10 STEP 3 1. Insert the saddle post (2) into the main frame (1), then lock it tightly with the knob (24) at a proper height as shown. 2. Attach the backrest Support (3) to the saddle Post (2) with Inner hex bolt (13) and Arc Washer (14). | ASSEMBLY INSTRUCTIONS...
- Page 11 STEP 4 1. Attach the saddle (20) to the saddle post (2) with nylon nut (29) and flat washer (28). 2 Attach the backrest (25) to the backrest frame (4) with Inner hex bolt (12) and arc washer (14). ATTENTION: Always make sure the Saddle (20) is securely tightened to Saddle Post (2) before you start workout.
-
Page 12: Exercise Guide
VI. EXERCISE GUIDE PLEASE NOTE: Before beginning any exercise program, consult your physician. This is important especially if you are over the age of 45 or individuals with pre-existing health problems. The pulse sensors are not medical devices. Various factors, including the user’s movement, may affect the accuracy of heart rate readings. - Page 13 COOL DOWN Finish each workout with a light jog or walk for at least 1 minute. Then complete 5 to 10 minutes of stretching to cool down. This will increase the flexibility of your muscles and will help prevent post- exercise problems.
-
Page 14: Warranty
Any claim against this warranty must be made through your original place of purchase. Proof of purchase is required before a warranty claim may be processed. If you have purchased this product from the Official Lifespan Fitness website, please visit https://lifespanfitness.com.au/warranty-form For support outside of warranty, if you wish to purchase replacement parts or request a repair or service, please visit https://lifespanfitness.com.au/warranty-form and fill in our Repair/Service... - Page 16 WWW.L IFES PA N FI TN E S S . C OM .A U...
Need help?
Do you have a question about the LFE01 Cyclestation 3 and is the answer not in the manual?
Questions and answers