Table of Contents
Advertisement
Quick Links
Advertisement
Table of Contents

Related Manuals for Colorful iGame Z370 Vulcan X


Summary of Contents for Colorful iGame Z370 Vulcan X
- Page 1 Z370 Vulcan X...
-
Page 2: Table Of Contents
Z370 Vulcan X 目录 第一章 简介 ......................1 1-1 主板特色 ....................1 1-2 主板规格 ....................1 1-3 主板布局图 ....................3 1-4 introduction ....................5 第二章 硬件安装 ....................9 2-1 基本硬件安装 ................... 9 2-2 按钮设置 ....................13 2-3 连接器和引脚连接头 ................15 2-4 背板接口介绍... - Page 3 根据中华人民共和国信息产业部发布的《电子信息产品污 染控制管理办法》 所展开的 SJ/T11364-2006 标准要求, 本产品污染控 制标识以及有毒有害物质或元素标识说明如下: 产品有毒有害物质或元素标识: 产品中有毒有害物质或元素的名称及含量 有毒有害物质或元素 部件名称 铅(Pb) 汞(Hg) 镉(Cd) 六价铬 多溴联苯 多溴二苯醚 (Cr(VI)) (PBB) (PBDE) PCB 板 × ○ ○ ○ ○ ○ 结构件 ○ ○ ○ ○ ○ ○ 芯片 ○ ○ ○ ○ ○...
- Page 4 版权 本手册版权属于世和资讯公司所有,未经本公司书面许可,任何人不得对此说 明书和其中所包含的任何资料进行复制、拷贝或翻译成其它语言。 声明 本用户手册没有任何形式的担保、立场表达或其它暗示。若有任何因本用户手 册或其所提到之产品的所有信息,所引起直接或间接的数据流失、利益损失或 事业终止,七彩虹及其所属员工恕不为其担负任何责任。除此之外,本用户手 册所提到的产品规格及信息仅供参考,内容亦会随时升级,恕不另行通知。本 用户手册的所有部分,包括硬体及软体,若有任何错误,七彩虹没有义务为其 担负任何责任。 商标版权 本手册使用的所有商标均属于该商标的持有者所有。 AMD, Athlon , Athlon XP, Thoroughbred 和 Duron ™ 是 Advanced Micro Devices 的注册商标。 Intel® 和 Pentium® 是 Intel Corporation 的注册商标。 PS/2 和 OS® 2 是 International Business Machines Corporation 的注册商标。 Windows®...
- Page 5 访问七彩虹的官方网站 (http://www.colorful.cn/) 获取产品和驱动程序等信息支持, 还可以登录七彩虹官方论坛(http://bbs.colorful.cn),获取技术指导。 通过拨打 400-678-5866 客户服务热线进行咨询,此外还可以直接与七彩虹各属 地平台服务中心联系,具体联系方法如下: 七彩虹科技全国区域售后服务平台业务范围及联系方式 平台名称 服务范围 联系方法 北京、天津、河北、河南、 北京服务平台 010—51261907 山东、山西、内蒙古 沈阳服务平台 辽宁、吉林、黑龙江 024—31321755 武汉服务平台 湖北、湖南、江西 027—87865811 南京服务平台 江苏、安徽、浙江 025—83611912 上海服务平台 上海 021—64681880 广州服务平台 广东、广西、福建、海南 020—85276624 成都服务平台 四川、重庆、云南、贵州、西藏 028—85240735 西安服务平台 陕西、甘肃、宁夏、青海、新疆 029—87895086 深圳服务平台 深圳地区 0755—33083060 注意:以上电话如有变动,请拨打...
- Page 6 在您开始之前 主板包装盒内附标准组件 在您打开本主板包装盒之后,请马上检查下面所列出的各项标准配件 是否齐全。 1 块 iGame Z370 Vulcan X 主板 6 条 SATA 数据线 1 张驱动光盘 1 片后置面板 IO 档板 1 本主板中英文使用手册 注意:以上配件仅供参考, 请以实物为准,七彩虹科技保留修改的权利。 Note: 若以上列出的任何一项配件有损坏的情形, 请尽快与您的经销 商联络或致电七彩虹客服。 注意: 产品规格/CPU 支持/产品附件以产品发布之时为准。...
-
Page 7: 第一章 简介
第一章 简介 感谢您购买七彩虹主板,该主板提供了非常优越的性能和品质保证。 1-1 主板特色 iGame Z370 Vulcan X 主板采用 Intel Z370 芯片组, 支持 Intel LGA1151 Coffee Lake 系列处理器,支持双通道 DDR4-3200(OC)/3000(OC)/2933(OC) /2800 ( OC) /2666 ( OC) /2600 ( OC) /2400/2133MHz 规格内存, 支持 PCI-E3.0 规范。 主板提供 4 个 DDR4 内存条插槽、1 组 HDMI+DP+SPDIF 接口、6 个 SATA3.0 接口、... - Page 8 Z370 Vulcan X 存储设备 主板提供 6 个 SATA3.0 6Gb/s 硬盘接口 8 声道音频设备 整合 Realtek ALC1150 8 声道高清晰数字音频控制器 支持 8 声道 3D 环绕声效 网络功能 主板采用 Killer E2500 千兆网卡 支持 10/100/1000Mbps 数据传输率 USB 接口 主板提供 7 个 USB2.0、2 个 USB3.1 接口和 6 个 USB3.0 接口(含...
-
Page 9: 主板布局图
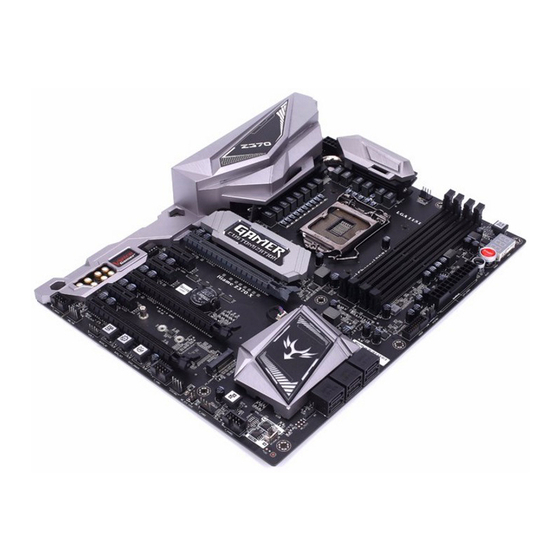
简介 1-3 主板布局图 ○ ○ ○ ○ ○ ○ ○ ○ ○ ○ ○ ○ ○ ○ ○ ○ ○ ○ ○ ○ ○ ○ ○ ○ ○ ○ ○ ○ ○ (仅供参考)... - Page 10 Z370 Vulcan X 主板布局图介绍: 1、8P 12V 电源插座 2、LGA1151 处理器插槽 3、CPU 风扇插座 4、DDR4 内存条插槽 5、板载数码卡显示功能切换按钮 6、板载数码卡 7、开关机按钮 8、重启按钮 9、24P 电源插座 10、辅助风扇插座 11、USB3.0 接口扩展连接头 12、SATA3.0 6Gb/s 硬盘插座 13、喇叭插针 14、M.2 插槽 15、双 BIOS 切换开关 16、前面板开关机/重启/指示灯插针 17、USB2.0 接口扩展连接头 18、诊断卡连接头 19、一键更新 BIOS 按钮 20、自动进入 BIOS 界面按钮...
-
Page 11: Introduction
简介 1-4 introduction Motherboard features iGame Z370 Vulcan X motherboard based on Intel Z370 chipset, support Intel LGA1151 Coffee Lake processors, support dual channel DDR4-3200(OC) /3000 (OC) /2933 (OC) /2800 (OC) /2666 (OC) /2600 (OC) /2400/2133MHz memory, support PCI-E3.0. The motherboard has 4*DDR4 memory slots 、 1*HDMI+DP+SPDIF port 、... - Page 12 Z370 Vulcan X Onboard Killer E2500 1000M LAN Provides 10/100/1000Mb Ethernet USB ports 7*USB2.0、6*USB3.0 and 2*USB3.1 ports The USB3.0 header (the silk-screen on the motherboard PCB board is“USB3F”)support power-off charge and fast charge! Onboard header/jumper/button 1*9-pin Front panel audio connector(F_AUDIO) 1*System Panel connector(F_PANEL) 2*USB2.0 header(F_USB1,F_USB2)...
- Page 13 简介 Motherboard layout ○ ○ ○ ○ ○ ○ ○ ○ ○ ○ ○ ○ ○ ○ ○ ○ ○ ○ ○ ○ ○ ○ ○ ○ ○ ○ ○ ○ ○ (This is for your reference only)...
- Page 14 Z370 Vulcan X Motherboard layout introduction: 1、8P ATX 12V Power connector 2、LGA 1151 socket 3、CPU FAN header 4、DIMM4 slots 5、Onboard debug card display 6、Onboard debug card function switch button 7、Power on/power off button 8、Reset button 9、24-pin ATX Power connector 10、System FAN Connector...
-
Page 15: 第二章 硬件安装
第二章 硬件安装 请参照以下步骤,完成电脑的安装: 安装中央处理器(CPU) 安装内存 装入机箱 安装所有扩展卡 连接所有讯号线、排线、电源线及面板控制线 2-1 基本硬件安装 安装中央处理器和风扇 本主板具备一个 Socket 1151 处理器插槽,本插槽是专为 Intel LGA1151 接口 处理器所设计。请依照以下步骤安装处理器和风扇: 1. 找到位于主板上的处理器插槽, 将 CPU 插座旁的锁定杆从锁定状态 拔到未锁定状态。 2. 安装 CPU, 将 CPU 的金色三角形标示对准主板 CPU 插槽上的三角形 标示, 确定针角 1 的方向正确, 不要用力插 CPU, 确信 CPU 完全插入插 槽中, 将锁定杆从未锁定状态拔到锁定状态。(这一过程非常重要, 如... - Page 16 Z370 Vulcan X...
- Page 17 硬件安装 安装内存 主板提供 4 个 DDR4 内存条插槽。下图所示为 DDR4 内存条插槽在主板上 的位置。 一条内存: 你可以插入到任何一个内存条插槽。 两条内存: 插入到 DIMM1 和 DIMM3 插槽,或 DIMM2 和 DIMM4 插槽, 以组建双通道。. 三条内存: 不要安插 3 条内存,可能会引起故障。 四条内存: 插入到 DIMM1、DIMM2、DIMM3、DIMM4 插槽。 CAUTION: 1.请选择使用相同的内存模组安装到双通道。2. 如果您正确 插入了内存模组,您将不会看到金手指部分。 安装显卡 主板提供 3 个 PCI Express 3.0x16 插槽,用于安装显卡。安装时,将显卡垂 直压入插槽中,直到其牢固固定于插槽中为止。...
- Page 18 Z370 Vulcan X 构建 AMD CrossFire™/NVIDIA® SLI™系统 1、主板提供3个PCI Express3.0 x16插槽,支持3-Way/2-Way AMD CrossFire ™ 及 2-Way NVIDIA® SLI ™ 技术。请参照下列方法构建AMD CrossFire /NVIDIA® SLI ™ 系统。 系统需求 操作系统 Windows10/8.1/8/7 具备相同品牌、相同型号且支持 CrossFire/SLI 功能的显卡以及其驱动 程序 电力足够的电源供应器 2、连接显卡 将显卡分别安装至主板上的 PCI Express x16 插槽。(注:若要构建 2-Way 系统,请将显卡安装在 PCIEX16 及 PCIEX8 插槽)...
-
Page 19: 按钮设置
硬件安装 2-2 按钮设置 双 BIOS 切换器:SPIROM_SW 主板提供 1 个双 BIOS 切换器,用于切换 SPIROM_A 和 SPIROM_B。 自动超频按钮:QUICK_OC 主板提供一个 CPU 自动超频按钮, 系统下按此键, 并重新启动计算机, CPU 将自动超频。有了该旋钮,超频 DIY 更加智能化! - Page 20 Z370 Vulcan X 自动进入 BIOS 界面按钮:BIOS_SET 主板提供一个自动进入 BIOS 界面按钮,系统下按此键,关机后开机或 重启后将自动进入 BIOS 设定画面。 一键更新 BIOS 按钮:BIOS_UPDATE 将 BIOS 文件命名为 EBOOT.ROM,放入 U 盘根目录,系统下按此键, 重新启动将自动进入 BIOS 更新界面。...
-
Page 21: 连接器和引脚连接头
硬件安装 80P_SW 按钮: 主板提供一个板载数码卡,用于侦测 DEBUG/CPU 电压/内存电压/CPU 温度/芯片组温度。80P_SW 按钮则用于切换数码卡的这些显示功能。 出货时,数码卡默认为侦测 DEBUG。按下该按钮,即可按 DEBUG/CPU 电压/内存电压/CPU 温度/芯片组的顺序,切换数码卡的显示功能。 2-3 连接器和引脚连接头 电源连接器:ATX_POWER,ATX_12V 在与电源适配器相连时,请务必确认,电源适配器的接头安装方向正 确,针脚对应顺序也准确无误。8-Pin 电源接口用于为 CPU 供电。 注意: 如果要安装功率消耗较大的硬件设备,请使用高功率的电源。... - Page 22 Z370 Vulcan X 前面板开关和指示灯连接:F_PANEL PWR_ON:ATX 电源开关。短接此引脚可以开机。 RST:重启开关。短接此引脚,不需要关闭系统电源即可重新启动计算 机。 PWR_LED:电源指示灯。当系统电源开启时,此灯会亮起。 HD_LED: 硬盘指示灯。对硬盘进行数据存取时,此灯会亮起。 SATA 端口连接器:SATA1-6 主板提供 6 个 SATA3.0 6Gb/s 硬盘接口。...
- Page 23 硬件安装 M.2 插槽 主板提供 2 个 M.2 插槽,其中,丝印为“M2_2280M_1”的插槽支持 PCIE 通道的 M.2 SSD, 丝印为 “M2_2280M” 的插槽支持 PCIE 和 MSATA 通道的 M.2 SSD。2 个 M.2 插槽支持 2242/2260/2280 尺寸的 SSD,数 据传输率最高可达 32Gb/s。 两个 M.2 插槽都支持 Intel OPTANE 技术。Intel OPTANE 技术是 Intel 最 新推出的非易失性存储技术,是一种介于传统内存、固态硬盘之间, 性能极高,延迟极低的技术。当使用...
- Page 24 Z370 Vulcan X 前置音频接口连接:F_AUDIO 您可以在前置面板接口上连接一个音频接口,它是和 I/O 前置面板连 接规格兼容的。 USB2.0 接口扩展连接头:F_USB1,F_USB2 主板提供 2 个 USB2.0 连接头,可扩展至 3 个 USB2.0 接口。USB2.0 接 口传输速率最高可达到 480Mbps,可以提供高速的互联网连接、互动 式电脑游戏,还可以同时运行高速的外围设备。...
- Page 25 硬件安装 USB3.0 接口扩展连接头:USB3F 主板提供 1 个 USB3.0 连接头, 可扩展至 2 个 USB3.0 接口。 扩展后的 USB3.0 接口支持关机充电和快速充电!USB3.0 数据传输速率最高可达到 5Gbps。 USB3.0 可向下兼容 USB 2.0 和 USB 1.1 设备。 风扇插座:CPUFAN1,CPUFAN2,SYSFAN1,SYSFAN2,PWR_FAN 主板共提供 5 个风扇插座,用来降低 CPU 和系统的温度。其中 CPUFAN1 和 CPUFAN2 是 CPU 风扇插座,连接 CPU 风扇,用来降低 CPU 温度。...
-
Page 26: 背板接口介绍
Z370 Vulcan X 2-4 背板接口介绍 后置面板提供丰富的输入和输出接口。 1、PS2 鼠标/键盘通用端口:将 PS2 鼠标/键盘插头连接到此连接端口。 2、CLR_CMOS 按钮:后置清 CMOS 按钮。 3、光纤 SPDIF 数字音频输出连接端口:这个端口可连接您的电脑至扩 大机、耳机或是 Sony/Philips 数字连接格式(S/PDIF)兼容之设备。 4、USB3.1 设备连接端口(蓝色):可连接到使用 USB3.1/3.0/2.0/1.1 接 口的硬件设备。 5、USB3.0 设备连接端口(蓝色):可连接到使用 USB3.0/2.0/1.1 接口 的硬件设备。 6、网络连接端口:连接网线。请参考下表中各灯的说明。 信号状 说明 态 亮橘色 传输速率 灯 1 Gbps 亮绿色... -
Page 27: Hardware Installation
硬件安装 10、麦克风接口:此接口连接至麦克风。 11、后置环绕喇叭接口:本接口在 4/6/8 声道设置下是用来连接后置环 绕喇叭。 12、侧边喇叭输出接口:本接口在 8 声道设置下用来连接侧边喇叭。 13、魔音 USB2.0 连接端口(红色):采用独立的电源线路,有效地减 少潜在的电流异常波动,为 USB 音频设备提供更纯净、无噪声的电源 供应。 14、HDMI 连接端口:高清晰度多媒体接口。兼容 HDCP,可播放 HD DVD,Blu-Ray 与其他保护内容。 15、DisplayPort 接口:DisplayPort 是一种高清数字显示接口,可以连接 电脑和显示器, 也可以连接电脑和家庭影院。 和 HDMI 一样, DisplayPort 也允许音频与视频信号共用一条线缆传输,支持多种高质量数字音频。 但比 HDMI 更先进的是, DisplayPort 在一条线缆上还可实现更多的功能。 在四条主传输通道之外,DisplayPort 还提供了一条功能强大的辅助通 道。该辅助通道的传输带宽为 1Mbps,最高延迟仅为 500μs,可以直 接作为语音、视频等低带宽数据的传输通道,另外也可用于无延迟的... - Page 28 Z370 Vulcan X Installing the CPU The motherboard shipped in the box does not contain a CPU or memory. You need to purchase a CPU, a CPU fan assembly, and memory to complete this installation. Be very careful when handling the CPU. Make sure not to bend or break any pins on the back.
- Page 29 硬件安装 The CPU fits in only one correct orientation. DO NOT force the CPU into the socket to prevent bending the connectors on the socket and damaging the CPU! Installing Memory DIMMs Your new motherboard has 4 slots for DDR4 memory. They support dual channel DDR4 memory technology.
- Page 30 Z370 Vulcan X Use the following procedure to install memory DIMMs into the slots on the motherboard. Note that there is only one gap near the center of the DIMM slot. This slot matches the slot on the memory DIMM to ensure the component is installed properly.
- Page 31 硬件安装 Installing the I/O Shield The motherboard kit comes with an I/O shield that is used to block radio frequency transmissions, protects internal components from dust and foreign objects, and promotes correct airflow within the chassis. Before installing the motherboard, install the I/O shield from the inside of the chassis.
- Page 32 Z370 Vulcan X Expansion slots ATX power connectors (24-pin ATXPWR, 8-pin ATX12V) These connectors are for an ATX power supply. The plugs from the power supply are designed to fit these connectors in only one orientation. Find the proper orientation and push down firmly until the connectors completely fit.
- Page 33 硬件安装 USB 3.0 connectors This connector is for USB 3.0 devices. USB2.0 connectors These connectors are for USB 2.0 ports. Connect the USB module cable to any of these connectors, then install the module to a slot opening at the back of the system chassis. These USB connectors comply with the USB 2.0 specification that supports up to 480Mbps connection speed.
- Page 34 Z370 Vulcan X Front panel audio connector This connector is for a chassis-mounted front panel audio I/O module that supports either High Definition Audio or AC`97 audio standard. Connect one end of the front panel audio I/O module cable to this connector.
- Page 35 硬件安装 Hard disk drive activity LED (2-pin IDE_LED) This 2-pin connector is for the HDD Activity LED. Connect the HDD Activity LED cable to this connector. The IDE LED lights up or flashes when data is read from or written to the HDD. System warning speaker (4-pin SPEAKER) This 4-pin connector is for the chassis-mounted system warning speaker.
- Page 36 Z370 Vulcan X PCI Express x1 Slot The PCI Express x1 slots that are designed to accommodate less bandwidth-intensive cards, such as a modem or LAN card. The x1 slot provides 250 MB/sec bandwidth. PCI Express x16 Slot The PCI Express x16 slot is reserved for a graphics or video card. The bandwidth of the x16 slot is up to 4GB/sec (8GB/sec concurrent).
- Page 37 硬件安装 Dual BIOS switch:SPIROM_SW The motherboard has one bios switch, switch to SPIROM_A or SPIROM_B, choose which bios to use。 Auto overclocking button:QUICK_OC The motherboard has one CPU Auto overclocking button,press this button,the operating system will restart, the CPU will Auto overclocking。...
- Page 38 Z370 Vulcan X Auto enter bios interface button:BIOS_SET press this button,when boot up or restart will auto enter bios interface。 One key update bios button:BIOS_UPDATE put The BIOS file named EBOOT.ROM in the U disk under the root directory, press this button to restart the operating system, will...
- Page 39 硬件安装 80P_SW button: the motherboard has debug card LED light,can detect DEBUG/CPU Voltage/Memory Voltage/CPU temperature/Chipset temperature 。 80P_SW this button can switch these functions. the default is the debug function。 M.2 Slot the motherboard has two M.2 slots,screen printing as "M2_2280M_1" slot, support PCIE channel M.2 SSD, silk screen as "M2_2280M"...
- Page 40 Z370 Vulcan X Back Panel IO Connector Parts PS/2 Mouse/ Keyboard This connector is for a PS/2 mouse/Keyboard. Connector LAN Jack The standard RJ-45 jack is for connection to single Local Area Network (LAN). You can connect a network cable to it.
-
Page 41: 第三章 驱动程序安装说明
第三章 驱动程序安装说明 插入七彩虹主板驱动程序安装光盘, 安装程序会自动运行, 弹出下面窗口。 CAUTION: 安装完成硬件后, 必须安装对应的驱动程序, 才能发挥主板 的强劲性能。 (请以实物为准) 驱动光盘能自动检测主板所使用的芯片组型号、声卡型号、板载显卡型号 或者板载网卡型号,点击相应的按钮安装相应的驱动。... -
Page 42: 第四章 Bios 设置
第四章 BIOS 设置 该章介绍如何通过 BIOS 设置来更改系统设置,详细内容请参考此章。 该章包含下列内容: Main(系统信息) Advanced(高级 BIOS 设置) Chipset(芯片组设置) C.Oclock(超频设置) Security(安全设定) Boot(启动设置) Exit(退出设置) 注意: 由于主板的 BIOS 版本在不断的升级,所以,本手册中有关 BIOS 的 描述仅供参考。 4-1 进入 BIOS 主界面 本章提供了 BIOS Setup 程序的信息,让用户可以自己配置优化系统设置。 如下情形您需要运行 SETUP 程序: 注意: 1. 系统自检时屏幕上出现错误信息,并要求进入 SETUP 程序。2. 您想根据客户特征更改出厂时的默认设置。 进入设定程序... - Page 43 BIOS 设置 如果此信息在您做出反应前就消失了,您可以关机后再开机或按机箱上的 Reset 键,重启您的电脑,也可以同时按下 <Ctrl> + <Alt>+<Delete> 来重 启电脑。 控制键位 < ↑↓← → > 向前、后、左、右移动选项 < Enter > 选定此选项 < Esc > 退出菜单或者从子菜单回到主菜单 < F1 > 主题帮助,仅在状态显示菜单和选择设定菜单有效 < F7> 从 CMOS 中恢复前次的 CMOS 设定值 < F8> BIOS 界面截屏 < F9> 载入优化缺省值...
-
Page 44: Bios 主界面
Z370 Vulcan X 子菜单 如果你发现在左边某一区域有向右的指针符号(如上图所示),这就 意味此项附加了子菜单。 选中此项, 按下回车即可进入此选项子菜单。 然后您可以使用控制键在子菜单直接移动并改变设定值。 回到主菜单, 按下<Esc>。 主题帮助 BIOS 设定程序提供了帮助屏幕。你可以通过简单地按下<F1>键从任何 菜单中调出此帮助屏幕。此帮助屏幕列出了相应的键和可能的选择项 目。按下<Esc>退出帮助屏。 4-2 BIOS 主界面 Main(系统信息) 使用此菜单可查看 BIOS 和内存的基本信息, 并设置 BIOS 时间和日期。 Advanced(高级 BIOS 功能设定) 使用此菜单可对系统的高级特征进行设定。 Chipset(高级芯片组功能设定) 使用此菜单可以对芯片组进行相应的设定,优化系统的性能表现。 C.Oclock(超频设置) 使用此菜单可以对 CPU/芯片组以及内存进行超频, 优化系统的性能表 现。 Security(安全设置) 使用此菜单可以对 BIOS 密码进行相应的设定。... -
Page 45: 系统信息(Main
BIOS 设置 4-3 系统信息 (Main) Advanced Chipset C.Oclock Security Main Boot Exit BIOS Information →←Select Screen ↑↓/Click:Select Item System Language English Enter/ Dbl Click: Select System Date Fri 15/09/2017 +/-: Change Opt System Time 16:27:21 F1: General Help BIOS Version 16.12.09 F7: Previous Values F8: Screen Shot... -
Page 46: 高级 Bios 设置(Advanced
Z370 Vulcan X 4-4 高级 BIOS 设置 (Advanced) Advanced Chipset C.Oclock Security Main Boot Exit 》LAN Configuration 》PC Health status 》Power Management setup →←Select Screen 》ACPI Settings ↑↓/Click:Select Item 》CPU Configuration Enter/ Dbl Click: Select 》SATA Configuration +/-: Change Opt 》USB Configuration... - Page 47 BIOS 设置 Smart Fan Mode 设置智能风扇模式。设定值有:Normal(正常)、Quiet(静音)、Silent (无声)、Manual(手动)、Disabled(禁用)。 CPU/ System Temperature 显示当前 CPU/系统的温度。 CPU Fan / System Fan Speed 显示当前 CPU 风扇/系统风扇运行的转速。 Core /DIMM / VCCSA/VCCIO/PCH Voltage 显示“Core /内存/ VCCSA/VCCIO/PCH”电压监控。 TCC Activation Temperature 显示 TCC 启动温度值。 Power Management Setup(电源管理设置) Resume By PME 设置...
- Page 48 Z370 Vulcan X ACPI Settings(ACPI 高级配置) ACPI Sleep State 选择 OS 下待机模式。 设定值有: Suspend Disabled、 S3 (Suspend to RAM) 。 CPU Configuration(CPU 设置) Active Processor Cores 设置激活处理器核心个数。设定值有:ALL、1、2、3、4、5。 Limit CPUID Maximum 设置开启或关闭最大 CPUID 指令限制。设定值有:Disabled、 Enabled。 Intel Virtualization Technology 设置开启或关闭 Intel 虚拟化技术。 Intel 虚拟化技术让您可以在同一平台的...
- Page 49 BIOS 设置 Legacy USB Support 设置开启或关闭传统 USB 设备功能。使用 USB 键盘鼠标必须设置为 “Enabled”。设定值有: Enabled、Disabled。 USB3.1 Controller 设置是否开启 USB3.1 功能。设定值有:Disabled、 Enabled。 Super IO Configuration(超级 IO 配置) Serial Port 启动和关闭串口控制器。设定值有:Disabled、Enabled。 Change Settings(更改设置) 此选项用来改变串口地址。 Trusted Computing(可信计算) TPM Support 开启或关闭 TPM(系统下内置加密)功能。TPM 标准的安全芯片,能有效 地保护 PC、防止非法用户访问。设定值有:Disabled、Enabled。...
-
Page 50: 芯片组设置(Chipset
Z370 Vulcan X 4-5 芯片组设置 (Chipset) Advanced Chipset C.Oclock Security Main Boot Exit 》System Agent Configuration →←Select Screen 》PCH Configuration ↑↓/Click:Select Item 》ME Configuration Enter/ Dbl Click: Select +/-: Change Opt F1: General Help F7: Previous Values F8: Screen Shot F9: Optimized Defaults F10: Save &... -
Page 51: 超频设置(C.oclock
BIOS 设置 ME Configuration(ME 设置) ME Control 设置开启或关闭 ME 固件。设定值有:Disabled、Enabled。 ME FW Version 显示 ME FW 版本。 4-6 超频设置 (C.Oclock) Advanced Chipset C.Oclock Security Main Boot Exit 》CPU OverClocking Configuration →←Select Screen 》Memory Configuration ↑↓/Click:Select Item 》Intel Graphics Configuration Enter/ Dbl Click: Select 》Over Voltage Configuration +/-: Change Opt 》LED light Configuration... - Page 52 Z370 Vulcan X 升性能;相反,需要多个核心时,动态开启相应的核心,智能调整频率。 这样,在不影响 CPU 的 TDP 情况下,能把核心工作频率调得更高。设定值 有:Disabled、 Enabled。 Power Limit 1-4 Override 设置 CPU 功率限制 1-4 档。 Boot performance Mode 设置启动性能模式。 设定值有: Max Non-Turbo Performance (最大非 Turbo 效能)、Max Battery(最大电池)、Turbo Performance(Turbo 效能)。 TDP LOCK 设置 TDP 功耗限制。设定值有:Disabled、 Enabled。...
- Page 53 BIOS 设置 tRAS 此项控制 S D R A M 内存时钟周期数的 R A S 最小值。 tFAW 设置同一 rank 中允许同时发送大于四个行激活命令的间隔时间。 tRFC 该字段用于选择自动刷新周期时间。 tRRD 选择不同 b a n k 的列与列间的延迟时间。 tRTP 选择预充电时间。 Over Voltage Configuration(电压设置) CPU/ VCCSA / VCCIO / DIMM/CPU VDroop Voltage 设置...
-
Page 54: 安全设置(Security
Z370 Vulcan X Profile Configuration(配置文件设置) save Profile 设置是否保存存储文件。 Restore last setting 设置还原到之前的设置。设定值有:Disabled、 Enabled。 4-7 安全设置 (Security) Administrator Password 本项目用于设置系统管理员密码。请按照下列步骤操作: 1. 选择“Administrator Password” 项目并按下“Enter”键。 2. 当“Greate New Password”窗口出现时,输入欲设置的密码,可 以是六个字节内的英文、数字与符号,输入完成按下“Enter”键。 3. 按下“Enter”键后会出现“Confirm New Password”窗口,再一次 输入密码以确认密码正确。若出现“Invalid Password”提示信息,代 表于密码确认时输入错误,需重新操作。 若要更改系统管理员的密码,请依照上述程序再运行一次密码设置。 按“F10”键保存后退出,密码设置即可生效。 User Password Status 此选项用于设置普通用户密码。请按照下列步骤操作:... -
Page 55: 启动设置(Boot
BIOS 设置 4-8 启动设置 (Boot) Advanced Chipset C.Oclock Security Main Boot Exit Boot Configuration Operating system select Windows 7 or other OS Launch Storage OpROM Enabled →←Select Screen Bootup Numlock State ↑↓/Click:Select Item Quiet Boot Enabled Enter/ Dbl Click: Select Update System BIOS Disabled +/-: Change Opt... -
Page 56: 退出设置(Exit
Z370 Vulcan X Set Boot Priority 启动设备优先权设置。如果用户要安装操作系统, 请把“Boot Option #1”设为你的光驱设备(CD-ROM)或你的 U 盘设备(前提是你的光驱里 面的光盘有操作系统或者是你的 U 盘里有 PE 系统), 设置完成后按 “F10”键保存退出, 系统会从你的光驱或 U 盘启动。 4-9 退出设置 (Exit) 退出选项包括:保存并退出设置/不保存并退出设置/保存设置并重启/ 不保存设置并重启/保存设置/不保存设置/载入优化缺省值。 Save Changes and Exit(退出设置程序并储存设置) 若当你选择“Save Changes and Exit”,就会出现如下的信息: Save configuration and Exit ?... - Page 57 BIOS 设置 (Press the <F1> key to enter BIOS Setup,Press the <F2> key to Load default values and enter the system) When the boot self test (POST) program is completed,if you want to enter the BIOS, please press the DEL key, enter the BIOS main menu. If the boot self test (POST) program information is disappeared before you respond,you can turn it off and then turn on,or press the Reset button on the chassis to restart your computer, can...
- Page 58 Z370 Vulcan X Using this menu, the chip group can be set to optimize the performance of the system C.Oclock(OverClock Settings) Using this menu,the CPU/chipset and memory can be overclocking to optimize the performance of the system Security(security settings)...
- Page 59 BIOS 设置 System Language Selects the default language used by the BIOS. The set values are: English, Chinese, etc. System Date Set the date, the date format is <week><month><date><year> Week:from Sun.to Sat.,defined by the BIOS, read-only Month:from Jan.to Dec. Date:from 1 to 31,can be modified with numeric keys Year:user set the year fields System Time Set the time,the time format is<hour><minute><second>。...
- Page 60 Z370 Vulcan X LAN Configuration Onboard LAN Controller Select to open or close the onboard network card controller. The set values are: Disabled and Enabled。 Launch PXE OpROM Select to open or close diskless booting. The set values are: Disabled and Enabled.。...
- Page 61 BIOS 设置 Resume By USB Set USB wake-up.The set values are:Disabled、Enabled。 Resume By PS2 KB Set PS2 keyboard wake-up.The set values are:Disabled、Enabled。 Resume By PS2 MS Set PS2 mouse wake-up.The set values are:Disabled、Enabled。 Resume By RTC Alarm Set definite time wake-up.The set values are:Disabled、 Every Day、 Enabled。 if select “...
- Page 62 Z370 Vulcan X Package C State limit Set C State limit.For example, if you limit to C2, you can't go to C3 more energy efficient state,default is auto. Enhanced Halt(C1E) Set the enhanced C states.The set values are:Disabled、Enabled。 Intel (R) Speed Shift Technology Set whether to open Intel (R) Speed Shift Technology.
- Page 63 BIOS 设置 The set values are:Disabled、Enabled。 Change Settings This option is used to change the serial address. Trusted Computing TPM Support Open or close the TPM (system under the built-inencryption) function.TPM standard security chip, and can effectively protect the PC, to prevent illegal users access.
- Page 64 Z370 Vulcan X IGD Multi-Monitor Set IGD Multi-Monitor.The set values are:Disabled、Enabled。 PCH Configuration(South Bridge Configuration) Azalia HD Audio Open or close the hi-fi audio controller. The set values are:Disabled、Enabled。 Case Open Warning Set the alarm when the case has been opened.
- Page 65 BIOS 设置 CPU OverClocking Configuration EIST EIST,the full name of “Enhanced Intel SpeedStep Technology”,It is an intelligent downfrequency technology, It can automatically adjust the voltage and frequency of the processor according to different system workload,to reduce electricity consumption and heat。The set values are: Disabled、 Enabled。...
- Page 66 Z370 Vulcan X Memory Configuration(Memory overclocking function settings) Memory Profiles(memory parameter setting) Set memory timings. The set values are:Default Profile(AUTO)、Custom Profile(custom)、XMP Profile1。 The full name of XMP is Extreme Memory Profile, It is a memory overclocking mode proposed by Intel, that is, the memory overclocking frequency and parameters are set in the memory of the SPD module.
- Page 67 BIOS 设置 Over Voltage Configuration CPU/ VCCSA / VCCIO / DIMM/CPU VDroop Voltage Set CPU/VCCSA/VCCIO/DIMM/CPU VDroop Voltage. LED Light Configuration LED Light Sets whether to turn on the LED light, referring to the ribbon of the audio section of the motherboard. The set values are:Disabled、...
- Page 68 Z370 Vulcan X Security(security settings) Administrator Password This project is used to set the system administrator password. Please follow these steps: 1.Select“Administrator Password”and press the "Enter" button. 2. When“Greate New Password”appears,enter the password you want to set, which can be in six bytes in English, numbers and symbols, and then press the "Enter"...
- Page 69 BIOS 设置 Boot(Startup Settings) Advanced Chipset C.Oclock Security Main Boot Exit Boot Configuration Operating system select Windows 7 or other OS Launch Storage OpROM Enabled →←Select Screen Bootup Numlock State ↑↓/Click:Select Item Quiet Boot Enabled Enter/ Dbl Click: Select Update System BIOS Disabled +/-: Change Opt Boot mode select...
- Page 70 Z370 Vulcan X Set Boot Priority Boot device priority settings.If the user wants to install the operating system, please set "Boot Option #1" as your drive device (CD-ROM) or your U disk device (provided that your CD-ROM drive has an operating system or your U disk has an PE system), When setup is complete, press the "F10"...
- Page 71 Copyright Notice The material in this document is the intellectual property of Colorful Technology and Development CO, LTD. We take every care in the preparation of this document, but no guarantee is given as to the correctness of its contents. Our products are under continual improvement and we reserve the right to make changes without notice.
- Page 72 Or our engineer, send the follow information to us! Customer name___ Purchase date___ Contacts_________ Contact phone___ Contact address___ Product model___ Product SN ___ Dealer name___ Dealer phone ___ Dealer address ___ Website: www.colorful.cn Service hotline: +86400-678-5866...
Need help?
Do you have a question about the iGame Z370 Vulcan X and is the answer not in the manual?
Questions and answers