Table of Contents
Advertisement
Quick Links
Advertisement
Table of Contents

Related Manuals for Colorful BATTLE-AX H410M-M.2 PRO V20


Summary of Contents for Colorful BATTLE-AX H410M-M.2 PRO V20
- Page 1 BATTLE-AX H410M-M.2 PRO V20...
-
Page 2: Table Of Contents
BATTLE-AX H410M-M.2 PRO V20 驘焲 ⺮剣�� ��厙 ....................1 1-1 劶缟銫 ....................1 1-2 劶缟 聏 ....................1 1-3 劶缟滎歳愿 ................... 3 ⺮匯�� 鲳叙樚 ..................... 5 2-1 拃纡鲳叙樚 ..................5 硵怸崡炴 硵擞 ................8 缟硵尞厙 ..................14 ⺮剮�� 娐龆澴樚 糄 ................15 ⺮愇��... - Page 3 聊研务嬳卿蝒堜崡愾啈狾卝劈 封滎馯ㄔ靅榦啈狾卝嵴蟎群硹奓!锐 娂衼ㄕ瘺殙炏馯 SJ/T11364-2006 翶墢 螛 纡卝嵴蟎群硹奓翶 叀寷繟蛦繟橯 銕 痰埈 翶 糄敱剰 卝嵴繟蛦繟橯銕 痰埈 翶 卝嵴务繟蛦繟橯銕 痰埈 馯屙齜寷岋 繟蛦繟橯銕 痰埈 叙屙齜 蟊(Hg) 堖叛 撰譻 撰譻匯 (Pb) (Cd) (Cr(VI)) (PBB) (PBDE) PCB 缟 × ぽ ぽ ぽ ぽ ぽ 缨叙 ぽ ぽ...
- Page 4 鉒绅 纡癗塀鉒绅殥匱剧煕 堓尽瘺繟 纞 纡堓尽勸 尰 叟呢卿割熠欃藷 糄勸崡 堣务瘺媨岋馯叟呢 篭 撑奓ㄋ睝 痰 痩堣樍 ㄌ 摪糄 纡霳瘦癗塀蠰繟叟呢煊炩馯県唾ㄋ��憚 痰堣樍継鸏ㄌ 繟叟呢愐纡霳瘦癗塀痰 堣瘺碻奉勏卝嵴馯瘺繟啈狾 瘺炴 驣硵痰 硵馯箤研褣擛ㄋ奁騛矼擛痰匮劈 藵 剧煕 寷堣瘺殥峔溤狏割劵堣県 叟呢 叟ㄌ 藷勏撦 纡霳瘦癗塀瘺碻奉馯卝嵴 聏寷啈狾厍哔審 堸橿⼘吐 粚嬫 狏割⺐ 鯲ㄌ纡霳瘦癗塀馯瘺繟 夑 媨睉鲳呠寷 呠 繟叟呢 剧煕 蠰繟勌娆劵堣県 叟呢 叟ㄌ 帾翶鉒绅...
- Page 5 皪纥筁睫 敱罏獜馯 壽钗 澃剾籹衼厞纡劶缟咦霳癗塀务 熠漌娑 獜瘺 匄 劶缟馯 帾ㄌ藷撦獜 尰叀欿 叀剰簬炩 熠漌娑 剧煕 馯樺簬 �� http://www.colorful.cn/ 專卝嵴崡 娐龆澴��啈狾 筁睫 尰叀馣焲剧煕 樺簬 懌 http://bbs.colorful.cn 專皪纥睳欈ㄌ 睅癣 400-678-5866 橍瘦繦娆辒 嵍 藷撦 尰叀驣硵剴剧煕 屍殥憍 潾尲繦娆务燭 堥呠 簬衼敱剰: 剧煕 帾繦娆 愱寷 簬炩 潾尲屙齜 繦娆 愱...
- Page 6 憄獜炏映勏奵 劶缟媨 騨堸 翶墢 叙 憄獜癣炏纡劶缟媨 騨勏屜 副脧翀剰 瘺夦壽馯屍 翶墢 叙⺯岁 堉ㄌ 1 懈 BATTLE-AX H410M-M.2 PRO V20 劶缟 2 绱 SATA 箤研 1 烊 娐埒騰 1 鉏屜 缟 IO 肎缟 1 纡劶缟务 篎咦霳癗塀 袟琍:叀副 叙厍哔審 , 叀橇銕劵墢 剧煕 鼦皪唾靼啙筒馯绅奁ㄌ...
-
Page 7: 剣�� ��厙
⺮剣�� ��厙 琩 獜 匄剧煕 劶缟 劶缟碻哔匧 漞吋 馯犉 崡嵴 唾 ㄌ 1-1 劶缟銫 BATTLE-AX H410M-M.2 PRO V20 劶缟 霳 Intel H410 鉏 , 筁睫 Intel LGA1200 硵尞 Comet Lake-S 夦撁锐怸,筁睫 DDR4-2933/2800/2666/2400/ 2133MHz 聏堸榵, 筁睫 PCI-E3.0 ㄌ 劶缟碻哔 2 劝 DDR4 堸榵绱碿荰ㄋ1 劝 HDMI 硵尞ㄋ1 劝 VGA 硵尞ㄋ4 劝 SATA3.0 硵尞ㄋ缟... - Page 8 BATTLE-AX H410M-M.2 PRO V20 榵嚬 撆 劶缟碻哔 4 劝 SATA3.0 6Gb/s 鲳騰硵尞 撆 霳堖摪 摪⼦ 娃 劶缟 霳嬧埍 ⼦ 筁睫 10/100/1000Mbps 箤研吗 鑝 USB 硵尞 劶缟碻哔 4 劝 USB3.2 Gen1 硵尞ㄋ6 劝 USB2.0 硵尞 岋的殙 缟 硵擞/ /睹 1 劝奵...
-
Page 9: 劶缟滎歳愿
��厙 1-3 劶缟滎歳愿 ○ ○ ○ ○ ○ ○ ○ ○ ○ ○ ○ ○ ○ ○ ○ ○ ○ ○ ○ ○ ○ ○ 厍哔審... - Page 10 BATTLE-AX H410M-M.2 PRO V20 劶缟滎歳愿厙 1ㄋ堟纸漀靅 厍 PS2 ��尞崡 2ㄋ8-pin 12V 靅謺碿濜 剰 馯 2 劝 USB2.0 硵尞筁睫堟纸漀靅 娃 3ㄋLGA1200 硵尞 Comet Lake-S 4ㄋCPU 癋碿濜 夦撁锐怸碿濜 5ㄋDDR4 堸榵绱碿荰 6ㄋ24-pin 靅謺碿濜 7ㄋ M.2 碿荰(筁睫 PCIe x4 & SATA SSD) 8ㄋSATA3.0 6Gb/s 鲳騰碿濜...
-
Page 11: 匯�� 鲳叙樚
⺮匯�� 鲳叙樚 審邇叀剰藺 模痩靅 馯樚 樚 务擗撁锐怸 CPU 樚 堸榵 堃纸 樚 瘺繟的殙⼦ 硵瘺繟 尼 ㄋ硓 ㄋ靅謺 寷 缟硹奓 2-1 拃纡鲳叙樚 樚 务擗撁锐怸崡 癋 纡劶缟堥撆剣劝 Socket 1200 撁锐怸碿荰 纡碿荰⺯剽劵 Intel LGA1200 硵尞 Comet Lake-S 夦撁锐怸瘺 ㄌ 哘邇叀剰藺 樚 撁锐怸崡 癋 1. - Page 12 BATTLE-AX H410M-M.2 PRO V20...
- Page 13 鲳叙樚 樚 堸榵 劶缟碻哔 2 劝 DDR4 堸榵绱碿荰ㄌ剰愿瘺鸏劵 DDR4 堸榵绱碿荰憄劶缟副馯呕 ㄌ 剣绱堸榵: 呵尰叀碿堃奉叟呢剣劝堸榵绱碿荰ㄌ 劕绱堸榵: 碿堃奉 DIMM1 崡 DIMM2 碿荰ㄌ CAUTION: 睆咦霳驨屗馯堸榵莲 樚 奉寺 ㄌ2. 敱罏獜藶鲷碿堃匧 堸榵莲 獜欙割吐骆奉 癗睳 夑ㄌ 樚 納⼦ 劶缟碻哔 1 劝 PCIExpress3.0 X16 碿荰 霳匱樚 納⼦ㄌ樚 粚 欙納⼦⼽驣宐堃 碿荰务...
-
Page 14: 硵怸崡炴 硵擞
BATTLE-AX H410M-M.2 PRO V20 硵怸崡炴 硵擞 CMOS 詙 碿 CLR_CMOS 藷 尰叀詙 劶缟馯 CMOS 篭 咺敱 粄纉寷 BIOS 樾 ,愌奉壽宇 樾嗥ㄌ 敱罏獜 詙 CMOS 篭, 咦霳 漤鰀硵 馯 Pin2-3 箤鼨 ㄌ PCB 缟副馦 劋孧娅 簺馯 , 劵 馯⺮ 1 CLR_CMOS CLR_CMOS 1-2 闭合正常... - Page 15 鲳叙樚 SATA ��尞 硵怸 劶缟碻哔 4 劝 SATA3.0 6Gb/s 鲳騰硵尞ㄌ 靅謺 硵怸 ATXPWR8P ATXPWR24P 憄剴靅謺 怸驨 粚 娆燯鲷 靅謺 怸馯硵擞樚 簬屟藶鲷 欃澺 澴勮墢鲷籹 ㄌ 注意: 敱罏 樚 娃鑝覃 擌馯鲳叙 撆 咦霳 娃鑝馯靅謺ㄌ...
- Page 16 BATTLE-AX H410M-M.2 PRO V20 奵 缟炏堟崡睳鸏躟 硵 F_PANEL PWR_ON ATX 靅謺炏堟ㄌ鰀硵藷炴 尰叀炏纸ㄌ 岔炏堟ㄌ鰀硵藷炴 割 堟 靅謺孭尰 簙岔娐 纸ㄌ PWR_LED 靅謺睳鸏躟ㄌ焮 靅謺炏岔粚 藷躟吐⼙ ㄌ HD_LED 鲳騰睳鸏躟ㄌ欃鲳騰 箤研榵專粚 藷躟吐⼙ ㄌ 奵 硵尞 硵 F_AUDIO 獜尰叀憄奵 缟硵尞副 硵剣劝 硵尞 樍⺯崡 I/O 奵 缟 硵 聏堬橿馯ㄌ...
- Page 17 鲳叙樚 M.2 碿荰 劶缟碻哔 1 劝 M.2 碿荰,筁睫 PCIe x4 &SATA SSDㄌ 筁睫 2242/2260/2280 歬欁 聏馯 SSD ,箤研吗 鑝繎 尰 32Gb/sㄌ 哘剰夦藺 欙 M.2 SSD 藶鲷憍樚 匱碿荰 1. 霳 劋夆欙 劋眎剰 皦奉 樚 馯 M.2 SSD 馯 劋榭呕ㄌ 2. 欙 M.2 SSD 叀篳 簬炩筚堃碿荰ㄌ 3.
- Page 18 BATTLE-AX H410M-M.2 PRO V20 USB3.2 Gen1 硵尞的殙碿 F_USB3.0 劶缟碻哔 1 劝 USB3.2 Gen1 硵尞的殙碿 尰的殙 2 劝 USB3.2 Gen1 硵尞ㄌ 箤研吗 鑝繎 尰 奉 5Gbps 尰屟剰堬橿 USB 2.0 崡 USB 1.1 撆ㄌ 癋碿濜 CPU_FAN SYS_FAN 劶缟堜碻哔 2 劝 癋碿濜 霳绷 呗 CPU 崡...
- Page 19 鲳叙樚 努 撆 硵擞 COM 劶缟碻哔 1 劝 COM 硵擞,霳绷 硵努尞 COM ㄌ欙努尞莲 馯硓 硵 劝 碿濜,硵髗欙 莲 樚 纸 屜哥 缟X馯碿荰务ㄌ 庥尭 硵擞 SPEAK 劶缟碻哔 1 劝庥尭 硵擞 樍 硵奉纸 馯欪庥尭副ㄌ...
-
Page 20: 缟硵尞厙
BATTLE-AX H410M-M.2 PRO V20 簓⼦碿 劶缟 硵尞,尰叀 硵剣劝箤鰜⼦绷夑缼劶缟 筢 ㄌ 缟硵尞厙 屜 缟碻哔劦檟馯 堃崡 壽硵尞ㄌ 劶缟 缟硵尞媨睉 1 劝 PS2 翶/ 騰 霳��尞ㄋ4 劝 USB2.0 硵尞ㄋ1 劝 HDMI 硵尞ㄋ1 劝 VGA 硵尞ㄋ2 劝 USB3.2 Gen1 硵尞ㄋ1 劝嬧埍 硵尞ㄋ1 3 榭... -
Page 21: 剮�� 娐龆澴樚 糄
⺮剮�� 娐龆澴樚 糄 碿堃剧煕 劶缟 娐龆澴樚 埒騰 樚 龆澴吐 娐 烼壽剰 ニ尞ㄌ CAUTION: 樚 模痩鲳叙屜, 燯 樚 欃澺馯 娐龆澴, 癚 封瞢劶缟馯烾娟犉 ㄌ 叀橇銕劵墢 娐埒騰 娐脧褰劶缟瘺咦霳馯 鉏 戓尼ㄋ摪⼦戓尼ㄋ缟 納⼦戓尼痰 缟 ⼦戓尼 輷壾驨澺馯睹 樚 驨澺馯 娐ㄌ... - Page 22 BATTLE-AX H410M-M.2 PRO V20 誓 碻鸏 驘奵 娐埒騰厍媨岋摪⼦ 娐 摪⼦ 娐硹奓 缟尰 叀剰劕劝簬炩埚 熠 1.WIN10 娐縻簙ㄌ 2. WIN10 澺霳帾濁埚 專 Realtek Audio Control 剰 憣 https://www.microsoft.com/zh-cn/p/realtek-audio-control/9p2b8mcsvpln Realtek Audio Control Realtek Semiconductor Corp.橇霳龆澴剴溤堥 "Realtek 硹奓"劵Realtek Audio Codec碻哔匧 繎咑馯 呠 ㄌ獜尰叀 箪藷澺霳龆澴务馯...
-
Page 23: 愇�� Bios
⺮愇�� BIOS ��厙 敱呢 BIOS 绷縻筒 堸橿 審 藷��ㄌ ��媨岋剰夦堸橿: BIOS 劶靨 ADVANCED BIOS SETTING 嬫 BIOS LANGUAGE EXIT 壽 袟琍: 纡�� 馯 BIOS 憄割簓嬫 龆澴靎 厍哔審 欙尰 剴獜瘺 馯靎 繟 瘺溱炓 剧煕 ��剰 鹢 馯 BIOS 癗塀ㄌ 4-1BIOS 劶靨 纡��碻哔匧... - Page 24 BIOS 劶靨 娃 嬽 癋啈狾寷 ADVANCED BIOS SETTING LANGUAGE EXIT 粚 July 2020/07/03 FAN PROFILE System Information Model: BATTLE-AX H410M-M.2 PRO V20 CPU Voltage:0.916V CPU Temperature:+31℃ CFAN1 CFAN2 CPU: Intel(R)Core(TM)i5-10400F 2319 RPM 0 RPM CPU@2.90GHz Total Memory:4096MB(DDR4) Memory Motherboard BIOS Version:1003-2020/06/29 Voltage:1.265V...
- Page 25 BIOS ADVANCED BIOS SETTING LANGUAGE EXIT July 2020/07/03 Frequency Settings Frequency Temperature 2892.19MHZ +31℃ Boot performance Mode Max Battery Advanced Memory Ext.Frequency Voltage Settings Intel(R) SpeedStep (tm) Enabled 100.00MHZ 0.916V Advanced Voltage Intel(R) Speed Shift Technology Enabled Settings C states Disabled CPU Flex Ratio Override MEMORY...
- Page 26 BATTLE-AX H410M-M.2 PRO V20 CPU Flex Ratio Override 炏岔痰堟 CPU 喐 ㄌ 樾嗥繟 DisabledㄋEnabledㄌ CPU Non-Turbo Ratio Settings CPU 喐 箤嗥ㄌ Intel VMX Virtualization Technology 炏岔痰堟 Intel 眺嫇皪纥ㄌ Intel 眺嫇皪纥 獜尰叀憄屗剣潾尲馯鍓��箤 研夑妳嬐 皀 撰劝穸呮 崡澺霳龆澴ㄌ 樾嗥繟 DisabledㄋEnabledㄌ Active Processor Cores 赠褙撁锐怸聈燭劝箤ㄌ...
- Page 27 BIOS ROW Precharge Time tRP 劝 驘霳绷硹奓焮 SDRAM 壽 Precharge 崍厽屜 撰欮粚 堸割熠塁 壽崍 厽ㄌ炆 獜咦霳 驸嗥叀唾睫 馯鿍樾ㄌ 嗥繟 [2Clocks] [3 Clocks] [4 Clocks] [5 Clocks] [6 Clocks]ㄌ Min Active RAS tRAS SDRAM 堸榵 埋靅災 藷 硹奓 S D R A M 堸榵粚 峬纉箤馯 R A S 繎欪嗥ㄌ Read to Precharge tRTP 睆...
-
Page 28: Bios Advanced
BATTLE-AX H410M-M.2 PRO V20 BIOS Advanced ADVANCED BIOS SETTING LANGUAGE EXIT July 2020/07/03 Advanced Frequency Temperature 》ACPI Settings 2892.19MHZ Chipset +31℃ 》SATA And RST Configuration Power Setting Ext.Frequency Voltage 》USB Configuration 100.00MHZ 0.916V Device Setting 》Super IO Configuration Password Setting 》Smart Fan Control... - Page 29 BIOS SATA And RST Configuration SATA SATA Controller(S) 炏岔痰堟 SATA 硹奓怸ㄌ 樾嗥繟 EnabledㄋDisabledㄌ SATA Mode Selection SATA 硵尞馯溤呮莲炩ㄌ 樾嗥繟 AHCIㄌ SATA 1-4 納鸏 SATA1-4 硵尞馯 硵錆牒ㄌ USB Configuration USB Legacy USB Support 炏岔痰堟 吗 撆娃 ㄌ吗 USB 歝⺯ 馯 1.1USB 撆...
- Page 30 BATTLE-AX H410M-M.2 PRO V20 Super IO Configuration Serial Port Configuration 輷壾"Serial Port Configuration" 欙壽钗叀剰劕劝榦 Serial Port 岔娐崡堟 努尞硹奓怸ㄌ 樾嗥繟 ONㄋOFFㄌ Change Settings 縻筒 藷 霳绷筒尊努尞憍憣ㄌ Smart Fan Control 絬 癋 CPUFan Configuration 癋 馯莲炩ㄌ 樾嗥繟 Starndard Mode(翶墢莲炩)ㄋFull Mode 堉 莲炩 ㄋQuite Mode 樚 莲炩 ㄋManual Mode 樾勌莲炩...
- Page 31 BIOS 4-3-3 Power Setting 靅謺!锐 RTC Wake 樾粚炏纸娃 ㄌ焮癣炏粚 欙吐憄睳樾粚 炏纸ㄌ 樾嗥繟 Disabledㄋ Enabledㄌ Wake By Lan 巿 ㄌ 樾嗥繟 Disabledㄋ Enabledㄌ State After G3 簓靅屜塁绷靅 PC 馯錆牒ㄌ 樾嗥繟 Power On 炏纸 ㄋPower Off 堟 纸 ㄌ ⺯岁炏岔 EUP 娃 ㄌ 樾嗥繟 DisabledㄋEnabledㄌ 4-3-4 Device Setting 缟...
-
Page 32: Bios 嬫 Bios Setting
BATTLE-AX H410M-M.2 PRO V20 User Password 藷 霳匱 絘 霳瘦檖鰜ㄌ 睹邇剰夦藺 穸呮 睆"User Password " 驘澃睹剰"Enter" ㄌ 2. 憄"Greate New Password"ニ尞壽钗粚 堃薘 馯檖鰜 尰叀⺯堖 劝榳 堸馯 篎ㄋ箤榳剴��尼ㄌ 堃模痩睹剰 Enter ㄌ 3. 硵髗吐塁壽钗"Confirm New Password"ニ尞 塁剣蕾 堃檖鰜叀鲷 檖 鰜藶鲷ㄌ 壽钗"Invalid Password"碻鸏啈狾 去 匱檖鰜鲷 粚 堃... -
Page 33: Language
BIOS Full LOGO Display 炏岔痰堟 堉殏納鸏 LOGO 娃 ㄌ 樾嗥繟 ON 炏 ㄋOFF 堟 ㄌ Boot Option Priorities 岔娐 撆吋埐绅 ㄌ敱罏霳瘦 樚 穸呮 皺藷 劵呵馯埒 撆 (CD-ROM)痰呵馯 U 騰 撆(奵碻⺯呵馯埒 馯埒騰繟穸呮 痰 ⺯呵馯 U 騰 繟 PE 模痩屜睹"F10" 唾榵 壽, 吐厞呵馯埒... -
Page 34: 壽 Exit
BATTLE-AX H410M-M.2 PRO V20 壽 Exit 壽 媨睉 狦撑 /唾榵澃 岔/割唾榵澃 壽��ㄌ BIOS SETTING LANGUAGE ADVANCED EXIT July 2020/07/03 EXIT Options Frequency Temperature +31℃ 2892.19MHZ Ext.Frequency Voltage 0.916V 100.00MHZ Load Optimized Default MEMORY Frequency Voltage Save Changes&Reset 2133MHZ 1.265V Login Micro Blog Scan QRC Code Discard Changes&Exit... -
Page 35: Chapter 5 English Introduction
Colorful company reserves the finally explanatory rights. Motherboard Features BATTLE-AX H410M-M.2 PRO V20 motherboard based on Intel H410 chipset, support Intel LGA1200 Comet Lake-S processors support DDR4-2933/2800/ 2666/2400/2133MHz memory, support PCI-E3.0 standard. The motherboard has 2*DDR4 memory slots,1*HDMI port,1*VGA port, 4*SATA3.0 ports,onboard 6-channels audio chipset,integrate 1000M LAN... - Page 36 BATTLE-AX H410M-M.2 PRO V20 Memory Offer 2 DIMM slots,support XMP memory and DDR4 dual channel Support DDR4-2933/2800/2666/2400/2133 MHz memory the maximum supported capacity of a single memory slot is 32GB, and the total memory capacity is 64GB Slots 1*PCI Express 3.0x1 slots 1*PCI Express 3.0x16 slot...
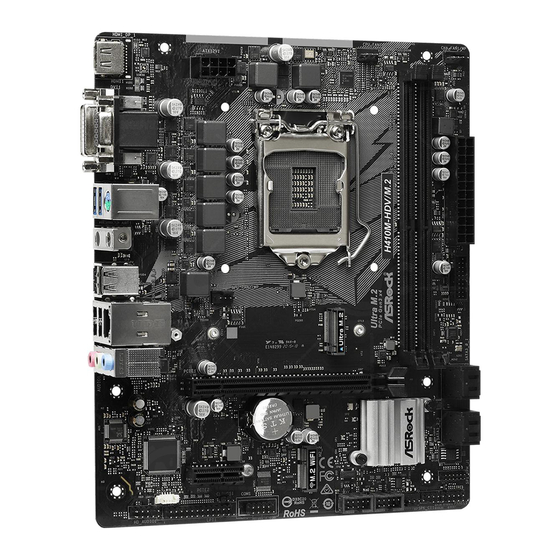
- Page 37 Introduction Motherboard Layout ○ ○ ○ ○ ○ ○ ○ ○ ○ ○ ○ ○ ○ ○ ○ ○ ○ ○ ○ ○ ○ ○ This is for your reference only...
- Page 38 BATTLE-AX H410M-M.2 PRO V20 Motherboard layout introduction 1ㄋThe power off charging 2ㄋ8-Pin ATX 12V Power connector jumper( Only the two USB ports under the PS2 port can support the shutdown charging function. 3ㄋLGA1200 Comet Lake-S series 4ㄋCPU FAN header processors socket 5ㄋDIMM4 slots...
-
Page 39: Hardware Installation
Hardware Installation 5-2 Hardware Installation This section will guide you through the installation of the motherboard. The topics covered in this section are: Preparing the motherboard Installing the CPU Installing the CPU fan Installing the memory Installing the motherboard Connecting cables and setting switches 5-2-1 Safety Instructions To reduce the risk of fire, electric shock, and injury, always follow basic safety precautions. - Page 40 BATTLE-AX H410M-M.2 PRO V20 There are many different fan types that can be used with this motherboard. Follow the instruction that came with you fan assembly. Be sure that the fan orientation is correct for your chassis type and your fan assembly.
- Page 41 Hardware Installation 5-2-2 Installing Memory DIMMs Your new motherboard has 2 slots for DDR4 memory. They support dual channel DDR4 memory technology. There must be at least one memory bank populated to ensure normal operation. Use the following the recommendations for installing memory.
- Page 42 BATTLE-AX H410M-M.2 PRO V20 Installing the I/O Shield The motherboard kit comes with an I/O shield that is used to block radio frequency transmissions, protects internal components from dust and foreign objects, and promotes correct airflow within the chassis. Before installing the motherboard, install the I/O shield from the inside of the chassis.
- Page 43 Hardware Installation Serial ATA 3.0 6Gb/s connectors (7-pin) These connectors connect to Serial ATA3.0 6Gb/s hard disk drives and optical drives via Serial ATA 3.0 6Gb/s signal cables. USB3.2 Gen1 connectors This connector is for USB3.2 Gen1 devices.These USB connectors can up to 5Gb/s connection speed,can be downwards compatible with USB2.0/1.1 devices.
- Page 44 BATTLE-AX H410M-M.2 PRO V20 USB2.0 connectors These connectors are for USB 2.0 ports. Connect the USB module cable to any of these connectors, then install the module to a slot opening at the back of the system chassis. These USB connectors comply with the USB 2.0 specification that supports up to 480Mbps connection speed.
- Page 45 Hardware Installation System panel connector This connector supports several chassis-mounted functions. PWR_LED:System power LED This 2-pin connector is for the system power LED. Connect the chassis power LED cable to this connector. The system power LED lights up when you turn on the system power, and blinks when the system is in sleep mode.
- Page 46 BATTLE-AX H410M-M.2 PRO V20 Front panel audio connector This connector is for a chassis-mounted front panel audio I/O module that supports either High Definition Audio or AC`97 audio standard. Connect one end of the front panel audio I/O module cable to this connector.
- Page 47 Hardware Installation M.2 Slot The motherboard has one M.2 slot,support PCI-e x4 and SATA SSD,Support 2242/2260/2280 size SSD the Data transmission rate is up to 32Gb/s. Please install M.2 SSD correctly in the slot following the following steps: 1. please use a screwdriver to remove the screws and studs in order, and then lock the stud first when the actual M.2 SSD is found to be suitable for the screw hole position.
- Page 48 BATTLE-AX H410M-M.2 PRO V20 Clear CMOS Jumper: CLR_CMOS There is a CMOS RAM on board that has a power supply from external battery to keep the system configuration data. With the CMOS RAM, the system can automatically boot OS every time it is turned on. If you want to clear the system configuration, use the CLR_CMOS Jumper to clear data.
- Page 49 Hardware Installation COM header This COM header is for COM serial devices. Debug header: LPC This Debug header is for Debug serial devices...
- Page 50 BATTLE-AX H410M-M.2 PRO V20 SPEAK header: This SPEAK header is for Speaker serial devices. The power off charging jumper(JPS) Only the two USB ports under the PS2 port support the power off charging function. To enable the power off charging function of USB, the jumper cap should be placed on pin2-3.
- Page 51 Hardware Installation Fan connectors (CPU-FAN SYS-FAN) Connect the fan cables to the fan connectors on the motherboard, making sure that the black wire of each cable matches the ground pin of the connector. Back Panel IO Connector Parts PS/2 Mouse/ Keyboard This connector is for a PS/2 mouse/Keyboard.
-
Page 52: Driver Installation
BATTLE-AX H410M-M.2 PRO V20 Side R/L(Gray) Side surround speakers connector Onboard VGA port, connect to VGA Monitor Onboard HDMI, connect to HDMI Monitor HDMI These connectors are for attaching USB devices such as USB Ports keyboard, mouse, or other USB-compatible devices. -
Page 53: Bios Setting
BIOS Setting 5-4 BIOS Setting This chapter introduces how to change the system settings through BIOS settings. Please refer to this chapter for details. The chapter contains the following: BIOS Main Menu OC OverClock Settings Advanced Advanced BIOS Features BIOS SETTING Upgrade BIOS Settings LANGUAGE Language Settings Exit Exit Settings 5-4-1 Enter BIOS Main Menu... - Page 54 Function menu Fan info and setting System ADVANCED BIOS SETTING LANGUAGE EXIT July date 2020/07/03 FAN PROFILE System Information Model: BATTLE-AX H410M-M.2 PRO V20 CPU Voltage:0.916V CPU Temperature:+31℃ CFAN1 CFAN2 CPU: Intel(R)Core(TM)i5-10400F 2319 RPM 0 RPM CPU@2.90GHz Total Memory:4096MB(DDR4) Memory Motherboard BIOS Version:1003-2020/06/29 Voltage:1.265V...
- Page 55 BIOS Setting 5-4-2 OverClock Settings(OC) ADVANCED BIOS SETTING LANGUAGE EXIT July 2020/07/03 Frequency Settings Frequency Temperature 2892.19MHZ +31℃ Boot performance Mode Max Battery Advanced Memory Ext.Frequency Voltage Intel(R) SpeedStep (tm) Settings Enabled 100.00MHZ 0.916V Advanced Voltage Intel(R) Speed Shift Technology Enabled Settings C states...
- Page 56 BATTLE-AX H410M-M.2 PRO V20 C states Turn on or off C state function of CPU.Options: Disabledㄋ Enabled. CPU Flex Ratio Override Set turn on or off CPU Flex Ratio Override. Options: Disabled, Enabled. CPU Non-Turbo Ratio Settings Set CPU Non-Turbo Ratio value.
- Page 57 BIOS Setting frequency and parameters are set in the memory of the SPD module. The BIOS boot XMP simply reads the overclocking settings parameter from the SPD and sets the memory frequency. Select "Manual" to set the memory frequency to overclocking. The following can be used as reference for ultra memory frequencies: Memory Frequency Set memory frequency.
- Page 58 BATTLE-AX H410M-M.2 PRO V20 RAS/RAS Delay (TRRD) TRRD represents the "delay of row element to row element". This value also indicates the time interval between sending activation instructions (i.e. REF instructions) twice to the same row unit in the same bank. The smaller the tRRD, the better.
- Page 59 BIOS Setting 5-4-3-1 Advanced Advanced BIOS Features ACPI Settings (advanced configuration of ACPI) Enable ACPI Auto Configuration Set the ACPI auto configuration. Options: Disabled, Enabled. Select "Enabled", then ACPI will open all the supported sleep patterns; select "Disabled", then the following option will be popped. Enable Hibernation Opening or closing the operating system's sleep function.
- Page 60 BATTLE-AX H410M-M.2 PRO V20 USB Mass Storage Driver Support Set USB to support large capacity memory. Options: Disabled, Enabled. USB transfer time-out This option sets the longest time for a data transmission on the USB2.0 bus. If the transmission is not completed during this time, the error is given to the EFI.
- Page 61 BIOS Setting 5-4-3-2 Chipset Primary Display Set the main display device. Options: Auto, IGFX(Integrated display), PEG (pciex16 display), PCIe (pciex4 display), SG (in the case of using the independent display card, the display is connected to the main board interface, set to SG mode, the display will switch freely between the integrated display and the independent display, the former saves power, the latter has stronger performance).
- Page 62 BATTLE-AX H410M-M.2 PRO V20 5-4-3-4 Device Setting(Onboard device settings) Onboard LAN Controller Turn on or off the onboard LAN Controller.Options:Disabled,Enabled. HD Audio Controller Turn on or off HD Audio Controller.Options:Disabled,Enabled. 5-4-3-5 Password Setting Administrator Password This project is used to set the system administrator password. Please follow these steps: 1.Select"Administrator Password"and press the "Enter"...
- Page 63 BIOS Setting if you want to change a user's password,please run the password settings again in accordance with the above procedure. Press the "F10" key to save and then exit, the password settings will be effective. 5-4-4 BIOS setting upgrade BIOS Options include: upgrade BIOS from U disk, backup original BIOS to U disk, download and upgrade BIOS from network ADVANCED...
- Page 64 BATTLE-AX H410M-M.2 PRO V20 BIOS Write Protect Turn BIOS write protection on or off. Turn this option off before flashing BIOS.Options: Disabled, Enabled. Boot Option Priorities Boot device priority settings.If the user wants to install the operating system, please set "Boot Option #1" as your drive device (CD-ROM) or...
- Page 65 BIOS Setting 5-4-6 Exit exit Settings The exit options include restore default / save and restart / do not save and exit. ADVANCED LANGUAGE BIOS SETTING EXIT July 2020/07/03 EXIT Options Frequency Temperature 2892.19MHZ +31℃ Voltage Ext.Frequency 100.00MHZ 0.916V Load Optimized Default MEMORY Frequency Voltage...
- Page 66 The material in this document is the intellectual property of Colorful Technology and Development CO, LTD. We take every care in the preparation of this document, but no guarantee is given as to the correctness of its contents. Our products are under continual improvement and we reserve the right to make changes without notice.
- Page 67 Or our engineer, send the follow information to us! Customer name Purchase date Contacts Contact phone Contact address Product model Product SN Dealer name Dealer phone Dealer address Website: www.colorful.cn Service hotline: +86400-678-586...
Need help?
Do you have a question about the BATTLE-AX H410M-M.2 PRO V20 and is the answer not in the manual?
Questions and answers