
Subscribe to Our Youtube Channel
Related Manuals for Moxa Technologies MC-5150-DC


Summary of Contents for Moxa Technologies MC-5150-DC
- Page 1 MC-5150-AC/DC User’s Manual Edition 4.0, February 2017 www.moxa.com/product © 2017 Moxa Inc. All rights reserved.
- Page 2 MC-5150-AC/DC User’s Manual The software described in this manual is furnished under a license agreement and may be used only in accordance with the terms of that agreement. Copyright Notice © 2017 Moxa Inc. All rights reserved. Trademarks The MOXA logo is a registered trademark of Moxa Inc. All other trademarks or registered marks in this manual belong to their respective manufacturers.
-
Page 3: Table Of Contents
Table of Contents Introduction ............................1-1 Overview ............................1-2 Package Checklist ..........................1-2 Product Features ..........................1-2 Hardware Specifications ........................1-3 Hardware Block Diagram ........................1-4 Hardware Introduction ........................2-1 Appearance ............................2-2 AC/DC Model Front View ......................2-2 AC Model Rear View ........................2-2 DC Model Rear View ........................ - Page 4 Adjusting the Audio Mixer Function ....................B-1 Smart Recovery ..........................C-1 Changing OS Configurations and Enable Check Point Function ..............C-1 Recovery Procedure ..........................C-3 Check the Following Items for Hard Disk Recovery .................. C-9 Check the Following Items for LAN Recovery ..................C-10...
-
Page 5: Introduction
Introduction The MC-5150-AC/DC computer is based on the Intel Core™ i5 520E processor and comes with 4 serial ports, 2 Gigabit Ethernet ports, 6 USB hosts, 8 NMEA ports , and offers high performance and versatile peripherals for various industrial applications. The MC-5150-AC/DC’s rugged and fanless design and 1G anti-vibration make it particularly well-suited for bridge systems in marine applications. -
Page 6: Overview
MC-5150-AC/DC Introduction Overview The MC-5150-AC/DC series computer is based on the Intel Core™ i5 520E processor and comes with 4 serial ports, 2 Gigabit Ethernet ports, 6 USB hosts, and 8 NMEA ports, along with versatile, high performance peripherals for marine applications. Users can easily install Windows 7, Windows XP SP3, or Windows XP Embedded to provide a flexible and friendly environment for system development and application implementation. -
Page 7: Hardware Specifications
MC-5150-AC/DC Introduction Hardware Specifications Computer CPU: Intel® Core™ i5 520E (BGA CPU package), 2.4 GHz processor OS: Windows 7, Windows XP SP3, Windows XP Embedded (must be installed by the user) System Chipset: Intel® QM57 Express Chipset DRAM: dpt2012 USB: USB 2.0 hosts x 6, Type A connectors Storage Storage Support: •... -
Page 8: Hardware Block Diagram
MC-5150-AC/DC Introduction Ambient Relative Humidity: 5 to 95% (non-condensing) Anti-vibration: • 0.7 g @ DNV 2.4 (Class A), sine wave, 2-100 Hz, 1 Oct./min., 1.5 hr per axis • 1 grms @ DNV 2.4, random wave, 3-100 Hz, 2.5 hr per axis •... -
Page 9: Hardware Introduction
Hardware Introduction The MC-5150-AC/DC computer is compact, well-designed, and built rugged enough for industrial applications. LED indicators help you monitor performance and identify trouble spots, multiple serial ports allow you to connect different devices for wireless operation, and the reliable and stable hardware platform lets you devote your attention to developing your applications. -
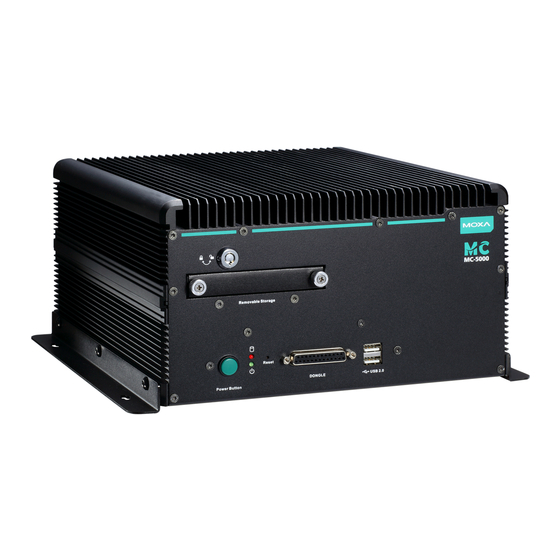
Page 10: Appearance
MC-5150-AC/DC Hardware Introduction Appearance AC/DC Model Front View AC Model Rear View... -
Page 11: Dc Model Rear View
MC-5150-AC/DC Hardware Introduction DC Model Rear View Dimensions... -
Page 12: Led Indicators
MC-5150-AC/DC Hardware Introduction LED Indicators LED Name LED Color LED Function Power Green Power is on and functioning normally Power is off or a power error exists Storage Red (on) SSD is inserted and detected Red (blinking) SSD is reading/writing No activity Green 100 Mbps Ethernet mode... -
Page 13: Hardware Connection Description
Hardware Connection Description In this chapter, we show how to connect the embedded computers to the network and to various devices. The following topics are covered in this chapter: Installing the MC-5150-AC/DC Wiring Requirements Connecting the Power ... -
Page 14: Installing The Mc-5150-Ac/Dc
MC-5150-AC/DC Hardware Connection Description Installing the MC-5150-AC/DC Wall or Cabinet Mounting The MC-5150-AC/DC has been pre-installed with two brackets on both ends of the computer. Use two screws per side to attach the MC-5150-AC/DC to a wall or cabinet. Use two screws for each bracket and attach the bracket to the rear of the MC-5150-AC/DC. Wiring Requirements This section describes how to connect serial devices to the embedded computer. -
Page 15: Connecting The Power
Connecting the Power The MC-5150-DC model offers 24 VDC power input (with tolerance from 18 to 30 VDC) with the terminal block, and the MC-5150-AC model offers 100 to 240 VAC. If the power is supplied properly, the Power LED will light... -
Page 16: Connecting To A Serial Device
MC-5150-AC/DC Hardware Connection Description 10/100 Mbps 1000 Mbps ETx+ TRD(0)+ ETx- TRD(0)- ERx+ TRD(1)+ – TRD(2)+ – TRD(2)- ERx- TRD(1)- – TRD(3)+ – TRD(3)- Connecting to a Serial Device The serial ports use DB9 connectors. COM1 and COM2 can run with RS-232, RS-422, or RS-485, and COM3 and COM4 run with RS-232. -
Page 17: Connecting To The Usb Device
MC-5150-AC/DC Hardware Connection Description Connecting to the USB Device The MC-5150-AC/DC comes with 2 USB 2.0 hosts on the front panel, and 4 USB 2.0 hosts on the rear panel. The hosts can be used for an external flash disk or hard drive for storing large amounts of data. You can also use these USB hosts to connect to a keyboard or a mouse. -
Page 18: Connecting To A Speaker Or A Headphone
MC-5150-AC/DC Hardware Connection Description Connecting to a Speaker or a Headphone The MC-5150-AC/DC comes with audio input and output interfaces on the rear panel for connecting a microphone and speaker or headphones. Installing the Removable SATA Storage Drive IMPORTANT! Moxa is continually testing SSDs for compatibility with MC-51XX computers. As of June 2012, the Memoright MRSAJ6C064GC125C00 and Memoright MRSAD4B060GC225C00 models of SSD have been fully approved for use with MC-51XX devices. -
Page 19: Installing The Internal Sata Storage Drive
MC-5150-AC/DC Hardware Connection Description Installing the Internal SATA Storage Drive The MC-5150-AC/DC has an internal SATA slot for expanding the computer’s storage capacity; this slot is accessible via a screw-fastened plate (philips head) on the bottom panel of the computer. To access the storage expansion slot, turn over the MC-5150-AC/DC model and remove the four screws on the cover plate. -
Page 20: Upgrading The Memory Module
MC-5150-AC/DC Hardware Connection Description 4. Replace the storage drive into the computer and secure it using the four mounting screws you removed in step 1. 5. Replace and secure the storage drive slot cover to complete the installation Upgrading the Memory Module The MC-5150-AC/DC has pre-installed with 2 GB DDR3 SDRAM onboard, and supports up to 8 GB DDR3 SDRAM. - Page 21 MC-5150-AC/DC Hardware Connection Description 3. Remove the black tape on the storage tray, and remove the peripheral I/O board. See the following figure for detailed location. 4. Remove the four screws on the removable storage tray.
- Page 22 MC-5150-AC/DC Hardware Connection Description 5. When finished, remove the storage tray, and you can see the location of the memory module. 6. There are two clutches on both sides of the module. Click the clutches, and the memory module will pop up. Gently remove the module.
-
Page 23: Bios Setup
BIOS Setup This chapter describes the BIOS settings of the MC-5150-AC/DC computer. The BIOS is a set of input/output control routines for peripherals. The BIOS is used to initialize basic peripherals and helps boot the operating system before the operating system is loaded. The BIOS setup allows the user to modify the system configurations of these basic input/output peripherals. -
Page 24: Entering The Bios Setup Utility
MC-5150-AC/DC BIOS Setup Entering the BIOS Setup Utility To enter the BIOS setup utility, press the “F2” key while the system is booting up. The main BIOS Setup screen will appear. A basic description of each function key is listed at the bottom of the screen. Refer to these descriptions to learn how to scroll about the screen, how to select by pressing “Enter,”... -
Page 25: Modifying The Bios Main Settings
MC-5150-AC/DC BIOS Setup Modifying the BIOS Main Settings Advanced Settings The “Advanced Features” screen will appear when choosing the “Advanced” item from the main menu. Boot Configuration This item allows users to enable the keypad at boot. Option: On (default), Off. -
Page 26: Peripheral Configuration
MC-5150-AC/DC BIOS Setup Peripheral Configuration This item allows you to configure the parallel port and audio device. Parallel Port This item allows you to enable the parallel port. Options: 378/IRQ7 (default), Disabled Mode This setting allows you to select the parallel port mode. Options: SPP (default), EPP, ECP, EPP+ECP Audio The item allows you to configure the system to automatically detect the Audio codec. -
Page 27: Ide Configuration: Storage Device Bios Settings
MC-5150-AC/DC BIOS Setup IDE Configuration: Storage Device BIOS Settings The IDE configuration section is where the BIOS settings for all storage devices are configured. There are three basic operation modes for storage drives: IDE (default), AHCI, and RAID. Most current systems will use AHCI or RAID mode. - Page 28 MC-5150-AC/DC BIOS Setup To enable a RAID array, two SATA storage drives must be installed on the first two ports. AHCI SALP may also be enabled from the RAID screen. Serial ATA Port 0 to 3 This setting allows you to configure the type of the storage drive installed in the computer. Navigate the list with the up and down arrows and press “Enter”...
-
Page 29: Thermal Configuration
MC-5150-AC/DC BIOS Setup Thermal Configuration T his item allows you to enable/disable hotplug functionality (the ability to remove the drive while the computer is running) of installed storage drives. Options: Disable (default), Enabled This item allows you to configure the Digital Thermal Sensor (DTS) function. Options: Critical Reporting (default), Disabled, Enabled Thermal Mode This setting allows you to configure the thermal mode. -
Page 30: Intelligent Power Sharing
MC-5150-AC/DC BIOS Setup Intelligent Power Sharing This item allows you to enable Intelligent Power Sharing (IPS). IPS is an Intel technology that provides intelligent power sharing across cores. Performance for the processor and graphics processor can be scaled up or down, depending on system activity and thermal tolerances giving stellar performance and prudent power use. -
Page 31: Usb Configuration
MC-5150-AC/DC BIOS Setup IGD—DVMT Pre-Allocated Options: 32 MB (default), 64 MB, 96 MB, 128 MB, 160 MB, 224 MB, 257 MB, 352 MB From Intel: DVMT is a BIOS solution where “the optimum amount of memory is dynamically allocated and de-allocated as needed for balanced graphics and system performance, through Intel®... -
Page 32: Chipset Configuration
MC-5150-AC/DC BIOS Setup Chipset Configuration This item allows you to configure the chipset settings. Power ON after Power Fail T his item allows you to enable/disable power to automatically come on after a power failure. Options: ON (default), OFF, Last State Hardware Monitor This item allows you to view stats like CPU and system temperature, voltage levels, and other chipset information. -
Page 33: Security Settings
MC-5150-AC/DC BIOS Setup Security Settings The section allows users to configure security settings with supervisor password and user password. Set Supervisor Password This item allows you set the supervisor password. Select and then enter the password, and then confirm the password again. -
Page 34: Power Settings
MC-5150-AC/DC BIOS Setup Power Settings The section allows users to configure power settings. Advanced CPU Control P-States (IST) This item allows you to enable/disable Processor Performance States (P-States) function. Options: Disabled (default), Enabled CMP Support This item allows you to configure the Core™ Multi-Processing (CMP) function. Options: Auto (default), Disabled HT Support This item allows you to configure the Hyper-Threading (HT) function. -
Page 35: Boot Settings
MC-5150-AC/DC BIOS Setup Turbo Mode This item allows you to configure the processor Turbo Mode function. Options: Enable (default), Disabled Boot Settings The section allows users to configure boot settings. Quick Boot This item allows you to enable/disable quick boot function. Options: Enabled (default), Disabled PXE Boot to LAN This item allows you to enable/disable PXE boot to LAN function. -
Page 36: Wdt Timeout
MC-5150-AC/DC BIOS Setup WDT Timeout This item allows you to set up WDT (Watchdog Timer) timeout after OS boots up. Options: Disabled (default), 1 minute, 2 minutes, 3 minutes, 4 minutes, 5 minutes, 6 minutes, 7 minutes, 8 minutes, 9 minutes, 10 minutes Boot Redirection This item allows you to set up boot to selected device when WDT timeout event trigger, it can co-work with recovery tools to build smart recovery function. -
Page 37: Exit Saving Changes
MC-5150-AC/DC BIOS Setup Exit Saving Changes This item allows you to exit the BIOS environment and save the values you have just configured. Options: Yes (default), No Save Change Without Exit This item allows you to save changes without exiting the BIOS environment. Options: Yes (default), No Exit Discarding Changes This item allows you to exit without saving any changes that might have been made to the BIOS. - Page 38 MC-5150-AC/DC BIOS Setup 1. Copy DOS system files kernel.sys and command.com to a specified directory (C:\FreeDOS in this example). 2. Start the HP USB Disk Storage Format Tool and select the USB device that you want to use as a bootable disk in the Device drop down box.
- Page 39 MC-5150-AC/DC BIOS Setup 3. When boot up finishes, DOS screen will show up. Go to the directory where the upgrade file is located. For example, if the upgrade file is stored in the MC_5150 folder, type cd MC_5150. C:\cd MC_5150 4.
-
Page 40: Regulatory Approval Statement
Regulatory Approval Statement This device complies with part 15 of the FCC Rules. Operation is subject to the following two conditions: (1) This device may not cause harmful interference, and (2) this device must accept any interference received, including interference that may cause undesired operation. -
Page 41: Adjusting The Audio Mixer Function
Adjusting the Audio Mixer Function This chapter describes how to adjust the audio settings for Mixer function of the MC-5150-AC/DC in the Windows XP and Windows XP Embedded operating systems. Since the Mixer function is enabled by default, you need modify the default settings of the Realtek audio device so that sounds picked up from the microphone will not be recorded. - Page 42 MC-5150-AC/DC Adjusting the Audio Mixer Function 3. Select Realtek HD Audio Input from the Mixer device drop-down list, and check Stereo Mix. Click OK to continue. 4. Uncheck the Select checkbox under Stereo Mix and check the Select checkbox under Mix Volume to complete the configuration.
-
Page 43: Smart Recovery
Smart Recovery The MC-5150 provides the Smart Recovery tool that allows users to perform system recovery when the operating system crashes. File loss and operating system corruption can be a nightmare for computer users. Usually, users find it difficult to fix the problem when the system crashes. Smart Recovery can create a back-up system to restore the operating system automatically. - Page 44 MC-5150-AC/DC Smart Recovery 1. Select Startup and Recovery from My Computer System Properties Advanced. 2. Uncheck Automatically restart. 3. Copy checkpoint utility W_BRFLAG from software CD path: CD\utility_tools\Smart Recovery to system startup...
-
Page 45: Recovery Procedure
MC-5150-AC/DC Smart Recovery 4. The check point function will be enabled each time the system boots up Recovery Procedure Refer to the following steps for system recovery. 1. Prepare your USB drive a. start tuxboot-windows-23.exe and click Pre Download b. Select ISO file in the directory next to tuxboot-windows-23.exe. - Page 46 MC-5150-AC/DC Smart Recovery c. Select USB Drive type and select Drive and then click OK. d. The boot files will then copy to your USB drive e. Click Exit to close the program. 2. Change the BIOS setting to boot from USB disk To let system boot from USB disk, we need to change the boot priority.
- Page 47 MC-5150-AC/DC Smart Recovery b. Select Boot Type Order and press Enter. c. Press + to select USB as the first boot device type. Press F10 and then press Enter to save and exit BIOS setup. When the system boots up, it will read the recovery files from the USB disk. Follow the steps below: 1.
- Page 48 MC-5150-AC/DC Smart Recovery 3. Enter Y to save the process. 4. Wait for the process to be complete. 5. Select (0) to power off the computer after restore process is complete. 6. The system will save into the os_image folder of the USB disk \home\partimag\.
- Page 49 MC-5150-AC/DC Smart Recovery Follow the steps below to modify the USB disk to an auto-execute restore disk: 1. Copy syslinux.cfg from software CD path: CD\utility_tools\Smart Recovery to USB \syslinux and overwrite it. 2. Copy L_BRFLAG from the software CD path: CD\utility_tools \Smart Recovery to USB \live 3.
- Page 50 MC-5150-AC/DC Smart Recovery 4. Users can normally use their OS and AP to meet the special function. 5. If the OS boot-up fails, system will display the blue screen. In this case, the watchdog timer will be counting down. 6. When the watchdog timer is up, the system will automatically restart and boot to the USB disk 7.
-
Page 51: Check The Following Items For Hard Disk Recovery
MC-5150-AC/DC Smart Recovery 8. When the process is complete, the operating system will automatically restart and operate the normal boot to the hard disk. Check the Following Items for Hard Disk Recovery 1. Format the hard disk to FAT32 as disk1. -
Page 52: Check The Following Items For Lan Recovery
MC-5150-AC/DC Smart Recovery 2. In Tuxboot, change the target drive to hard disk. 3. Build the hard disk recovery image as USB. The boot redirection setting is different. 4. When the system has powered on, press F2 to enter BIOS setup utility, check the hard disk connection port, set WDT timeout to a suitable time length, and set Boot Redirection to the mapped port. - Page 53 MC-5150-AC/DC Smart Recovery 2. Set PXE Boot to LAN Enabled, WDT Timeout as suitable time length and Boot Redirection to LAN. 3. Refer to the Clonezilla web site about remote server settings: http://clonezilla.org/ 4. When all settings have been done, it can work as an USB/SSD. C-11...
Need help?
Do you have a question about the MC-5150-DC and is the answer not in the manual?
Questions and answers