Advertisement
Quick Links
Check the latest version of this installation
guide by scanning the QR code below.
PLEASE READ FIRST
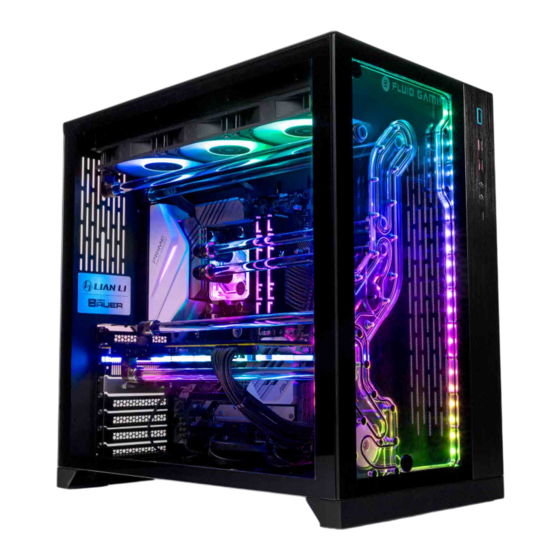
Congratulations on taking your first steps into liquid cooling with the EK Barebones Kit, designed from the ground up by our
expert team of engineers to be an easy to follow set of instructions that will walk you through every step to assemble your
first liquid cooled masterpiece. The following step by step guide will walk you through installing the included water blocks on
your preferred CPU and GPU, and wrapping it all up with assembling your full custom loop in the Lian-LI PC-011 Dynamic Chassis.
Thank you for choosing EK for your Liquid cooling solution, if you run into any issues please don't hesitate to contact our first-class Support.
Please note coolant is NOT included with the EK Barebones Kit and is required BEFORE starting your PC. We recommend 2 Liters of
EK-CryoFuel in your choice of color (CryoFuel solid is not compatible)
EK-Liquid Cooling Barebone
& Lian Li PC-O11 Dynamic D-RGB
INSTALLATION AND ASSEMBLY GUIDE
Advertisement

Related Manuals for ekwb Barebones


Summary of Contents for ekwb Barebones
- Page 1 Thank you for choosing EK for your Liquid cooling solution, if you run into any issues please don’t hesitate to contact our first-class Support. Please note coolant is NOT included with the EK Barebones Kit and is required BEFORE starting your PC. We recommend 2 Liters of...
- Page 3 These instructions apply to both versions of the Barebones: Barebone - basic Barebone - upgraded version Fans Radiator Additional Radiator Distribution Plate DDC Pump SPC Pump Additional Fans (mounted by the customer) Additional Fans...
- Page 5 EK-Liquid Cooling Barebone & Lian Li PC-O11 Dynamic D-RGB Assembly Instructions Your new EK-Liquid Cooling Barebone & Lian Li PC-O11 Dynamic D-RGB is already partly assembled with the radiator, fans, pump and reservoir securely fitted and tested. All that’s left for you to do now is install your chosen components and fill the loop! Please, read this entire guide before starting to assemble your computer.
- Page 6 CONTENTS I. CPU Intel 115x – Assembly II. CPU AMD AM4 – Assembly III. GPU – ASSEMBLY IV. FINAL ASSEMBLY...
- Page 7 I. CPU Intel 115x – Assembly I. CPU INTEL 115X – ASSEMBLY Outer Part STEP 1 Install your CPU and any M.2 drives in accordance with the instructions in your motherboard manual and then place the mother-board face down on an even surface.
- Page 8 I. CPU Intel 115x – Assembly STEP 6 Before proceeding with the installation It is mandatory to remove the protective Thumb nut foil from the backside of the water block. Align the water block over the mounting screws on the motherboard and posi- Coiled spring tion it on top of the CPU.
- Page 9 II. CPU AMD AM4 – Assembly II. CPU AMD AM4 – ASSEMBLY Hold-down AMD® factory Backplate UNC 6-32 Clamps STEP 1 Screws Removing of the original plastic hold-down clamps and the factory backplate: Using Philips-head screwdriver remove the four UNC 6-32 screws securing the original plastic hold-down clamps around the socket as shown on the sketch.
- Page 10 II. CPU AMD AM4 – Assembly STEP 5 Cleaning the CPU: Wipe the CPU’s contact surface (using the non-abrasive cloth or Q-tip, as shown in the sample photo). Non-abrasive Applying the thermal compound: EK recommends blob or line method Cloth of applying the enclosed thermal compound to the CPU heat spreader (IHS) - see sample photo on right.
- Page 11 - CONNECTING THE D-RGB LED STRIP And continue to follow the instructions from this installation manual with step 2. EK-AC Radeon RX 6800/6900 D-RGB GPU Waterblock & Backplate: https://www.ekwb.com/shop/EK-IM/EK-IM-3831109834930.pdf EK-AC GeForce RTX 3080/3090 D-RGB GPU Waterblock: https://www.ekwb.com/shop/EK-IM/EK-IM-3831109833698.pdf EK-AC GeForce RTX 3080/3090 – Backplate Backplate: https://www.ekwb.com/shop/EK-IM/EK-IM-3831109833674.pdf...
- Page 12 V. Final Assembly IV. FINAL ASSEMBLY STEP 1 Remove the remaining panels from the chassis and unscrew each ALU-HDC compression ring from the distribution plate. Put the 4 loose O-rings to the side until tube installation. By default, the distribution plate is configured for the most common Intel/AMD mainstream motherboards that use slot 2 for the primary graphics card.
- Page 13 V. Final Assembly STEP 6 First Cut USE AND CUTTING OF PRE-BENT TUBES FOR ALIGNING Second Cut CPU BLOCK TUBES WITH DISTRIBUTION PLATE Once you have measured the vertical variance, cut the tube according to the following instructions: Cut following length of the short end Variance mm / Inch bend (1st CUT): If vertical...
- Page 14 V. Final Assembly STEP 7 CUTTING STRAIGHT TUBES FOR THE CPU BLOCK Distribution Plate If there is no vertical variance or if it is smaller than 5 mm you just need to make one cut at the correct length to get the exact horizontal length of the straight tube.
- Page 15 V. Final Assembly STEP 11 Screw the adapters into each water block port by rotating the knurled section. Tighten in a clockwise direction until the seal underneath is compressed. STEP 11 STEP 12 Now tighten the compression rings on the distribution plate to complete the loop and secure all of the tubing in place.
- Page 16 V. Final Assembly EK-AC GeForce RTX 3080/3090 D-RGB ALU-HDC Fitting ALU-HDC Fitting ALU-AF 90° Adapter GPU side Distribution Plate side STEP 13 EK-AC Radeon RX 6800/6900 D-RGB GPU side Distribution Plate side STEP 13...
- Page 17 V. Final Assembly EK-AC Twin Edge RTX 3070 D-RGB GPU side Distribution Plate side STEP 13 EK-AC TUF RTX 3060/3060TI/3070 D-RGB GPU side Distribution Plate side STEP 13...
- Page 18 V. Final Assembly EK-AC Radeon RX 6700 XT D-RGB GPU side Distribution Plate side STEP 13 STEP 14 – only applies to “Barebone - upgraded version” Use eight Self-Tapping Fan Mounting Screws to install two fans onto the chassis. Self-Tapping Fan Mounting Screws (8 pcs) STEP 14...
- Page 19 V. Final Assembly STEP 15 Before installing any cables or further components, it is advised that you bleed and inspect the cooling components. Fill the provided bottle with mixed coolant and begin to fill the system using the top port on the outside of the chassis. STEP 16 Install your PSU into the chassis and connect the supplied bridging plug.
- Page 20 Need help with this product? Visit us at: www.ekwb.com/support Or e-mail us at: support@ekwb.com For hardware compatibility please visit: www.ekcoolingconfigurator.com...
Need help?
Do you have a question about the Barebones and is the answer not in the manual?
Questions and answers