Advertisement
Quick Links
Advertisement

Related Manuals for fantastic furniture MELODY QUEEN BED


Summary of Contents for fantastic furniture MELODY QUEEN BED
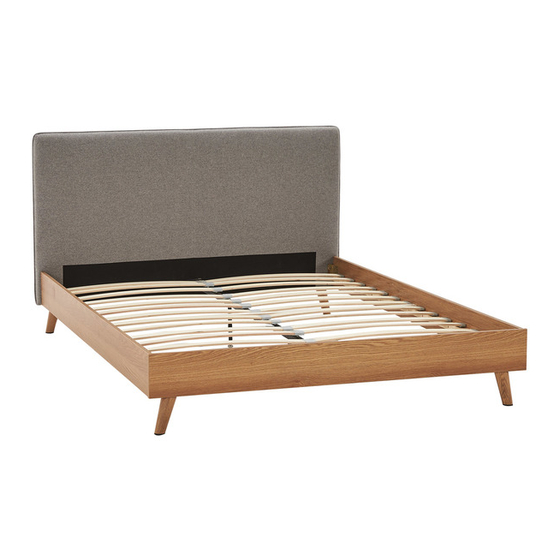
- Page 1 MELODY QUEEN BED...
-
Page 3: Assembly Checklist
Assembly checklist Read through the instructions carefully ad through the instructions care Make sure you have all the required tools. sure you have all the required before you begin. before you begin. Never use power tools unless instructed. r use power tools unless instruc Unless instructed, do not fully tighten screws nstructed, do not fully tighten Identify and lay out all of the components... - Page 4 Headboard (P1) Side Rail (P6) Timber Cross Rail Headboard/Footboard (P5) Leg (P3) Footboard Side Rail (P6) (P2) Centre Rail (P7) Footboard Leg Support Wood (P4) Support Leg (P8) Headboard/Footboard Support Leg (P8) Leg (P3) Parts list Box 1 : Footboard(P2) ; Headboard/Footboard Legs(P3) ; Foodboard Leg Support Woods(P4) ; Timber Cross Rail(P5) ; Side Rails(P6) ; Center Rail(P7) ; Support Legs(P8) ;...
- Page 5 6 x Washer M8 6 x Bolt 55mm Allen Key (H4) (H7) (H2) Phillips head 4 x Screw 38mm 6 x Spring Washer screwdriver (H8) (H5) (not provided) (P2) (P2) (P4) (H4) (H8) (H7) (H5) (H2) Attach the footboard leg support woods (P4) to the footboard (P2) with 6 x bolts 55mm (H7), 6 x washers (H4) and 6 x spring washers (H8) by using Allen Key (H2).
- Page 6 Allen Key 8 x Bolt 16mm (H1) (H2) (H1) (P1) (P6) (H2) (P6) (P2) Install the bolts (H1) to the brackets by using Allen Key (H2) as shown, do not tighten the bolts and keep them 8 mm loose. Then attach side rails (P6) to headboard (P1) and footboard (P2) by slotting the bracket on the side rails (P6) over the bolt as shown.
- Page 7 (H2) 2 x Washer M8 2 x Bolt 20mm Allen Key (H4) (H3) (H2) (H3) (H4) (P7) (P8) Attach the support legs (P8) to the centre rail (P7) with 2 x bolts (H3) and 2 x washers (H4) by using Allen Key (H2). Step 5 4 x Washer M8 4 x Bolt 20mm...
- Page 8 Step 6 14 x Center 28 x End Connectors Connectors (P9) (P10) (P10) (P9) (P9) 28 x Slats (P11) Push 2 End Connectors (P9), 2 pcs Slats (P11) and a Centre Connector (P10) together. PAGE 8...
- Page 9 Step 7 Phillips head 2 x Screw 38mm screwdriver (H5) (H5) (not provided) (H2) (P5) Felt Pad Allen Key 1 x 40 x 20mm (H2) (H6) (P1) Make sure screw is tighten. (P6) (P2) (P5) (H6) (P7) Make sure the inner space is square. Attach the felt pad (H6) to the centre of centre rail (P7).
- Page 10 Step 8 PAGE 10...
- Page 12 Enjoy Your purchase from Australia’s Best Value Furniture Store www.fantasticfurniture.com.au PAGE 2...
-
Page 13: Useful Information
Assembly checklist Read through the instructions carefully Make sure you have all the required tools. before you begin. Never use power tools unless instructed. Unless instructed, do not fully tighten screws Identify and lay out all of the components until the item is fully assembled. before you begin assembly. - Page 29 Assembly checklist Read through the instructions carefully Make sure you have all the required tools. before you begin. Never use power tools unless instructed. Unless instructed, do not fully tighten screws Identify and lay out all of the components until the item is fully assembled. before you begin assembly.
Need help?
Do you have a question about the MELODY QUEEN BED and is the answer not in the manual?
Questions and answers