Advertisement
Quick Links
Advertisement

Related Manuals for fantastic furniture MEMPHIS


Summary of Contents for fantastic furniture MEMPHIS
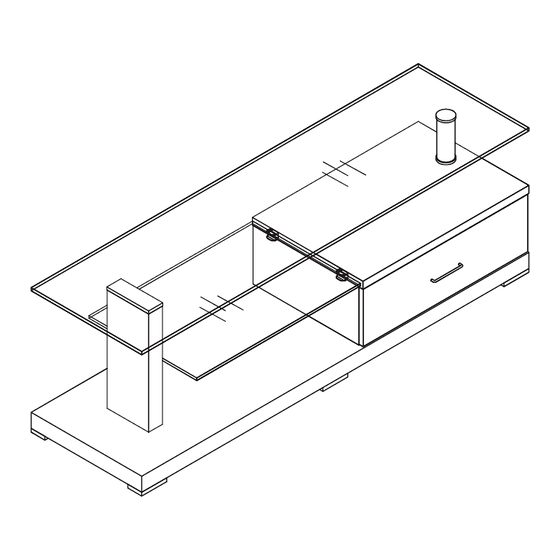
- Page 1 Lowline 1400mm ver3.6...
- Page 2 WA RNI NG WA RN NG FAILURE TO FOLLOW THESE BASIC STEPS CAN LEAD TO DAMAGE THAT IS NOT COVERED BY YOUR WARRANTY Lay out all of the components on a soft surface Read Instructions carefully. as if you were preparing to do a jigsaw puzzle. Check no parts are missing.
-
Page 3: What You Need
What You Need Top Glass BackPanel (P7) (P4) (tools not provided) Drawer Top Panel Phillips Head Srewdriver (P5) Flat Head Screwdriver Side Panels Mallet (P3) Lower Glass Drawer Back (P8) Panel Glass Divider (P13) (P6) Drawer Support Drawer Shelf Long Base Panel (P11) (P12) (P1) - Page 4 12 x Dome Head Screws (P1) (H1) Carefully align the edges of the Wooden Blocks (P2) with the edges of Long Base Panel (P1), then fix with 12 x Dome Head Screws (H1) (P3) 4x Small Cam Bolts (P3) (H2) (H2) Insert 4x Small Cam Bolts (H2) into 2x Side Panels (P3) Step 3...
- Page 5 Step 4 (H3) (H2) (H4) You will need: (H4) 2 x Small Cam (H3) Bolts (H2) (H2) Mallet 4 x Big Cam Bolts (H3) (H3) (H4) (H4) 4 x Wooden (H3) Dowels (H4) (P1) Insert 2x Small Cam Bolts (H2), then 4x Big Cam Bolts (H3) and 4x Wooden Dowels (H4) into the Long Base Panel (P1).
- Page 6 Step 6 front You will need: 6 x Short Timber Screws (H5) 2 x Drawer Runner Tracks (H6) (H5) (H5) (H5) Attach 2x Drawer Runner Tracks (H6), (H6) (H5) (H5) to Side Panels with 6x Short Timber Screws (H5). (H5) Note: Attach screws loosely.
- Page 7 Step 9 (P5) You will need: (H7) 2x Glass Clamps (H7) Tighten with phillips head screwdriver Fix 2x Glass Clamps (H7) to Drawer Top Panel (P5) Step 10 (P6) You will need: 2x Glass Clamps (H7) (H7) Tighten with phillips head screwdriver Fix 2X Glass Clamps (H7) to Panel Glass Divider (P6).
- Page 8 Step 12 note: Position the Panel Glass Divider with the Glass Clamp as shown. 1x Stainless Steel Tube (H10) 1x Tube Cover (H11) (H10) 2x Wooden Dowels (H4) (H4) (P6) Place Stainless Steel Tube (H10) and Tube Cover (H11) over Short Threaded Rod.
- Page 9 Step 14 (P8) Use stubby phillips head screw driver Two people carefully turn over the assembled body, then insert Lower Glass (P8) into position as shown. Tighten Glass Clamps with stubby Phillips Head screwdriver. Now Assemble the Drawer Step 15 (H2) (H2) You will need:...
- Page 10 Step 16 You will need: (P11) (P10) 5 x Small Cam Nuts (H2) (P10) (H2) (P9) (H2) (H2) Insert the 5x Small Cam Nuts (H2) into the Drawer Sides (P10) and Drawer Support (P11). Rotate the cam nuts so the arrows point towards the incoming cam bolts. Push the Drawer Side and Drawer Support into place and tighten the cam nuts.
- Page 11 Step 19 2 x Bolts (H16) (H16) 1 x Drawer Handle (H17) (H17) Attach Drawer Handle (H17) to drawer with 2x Bolts (H16). Insert drawer into assembled unit. The job is now complete! In the interest of our environment please dispose of all packaging thoughtfully. Page 11...
- Page 12 TO ADJUST YOUR DRAWER FRONTS TO MAKE THE GAPS MORE EVEN (OPTIONAL). Remove front screw. Take out drawer. Loosen middle and back screw a little. Replace drawer. Replace screw in adjustable hole as shown (leave it slightly loose), Adjust runner to right position(see step 3a & 3b) tighten front screw first, then tighten other screws.
Need help?
Do you have a question about the MEMPHIS and is the answer not in the manual?
Questions and answers