Table of Contents
Advertisement
Quick Links
Advertisement
Table of Contents

Related Manuals for IEI Technology Mustang-V100-MX4


Summary of Contents for IEI Technology Mustang-V100-MX4
- Page 1 Mustang-V100-MX4 Mustang-V100-MX4 CPU Ca MODEL: Mustang-V100-MX4 ® ® Intel Vision Accelerator Design with Intel Movidius™ VPU Powered by Open Visual Inference & Neural Network Optimization (OpenVINO™) toolkit User Manual Page I Rev. 1.00 - July 22, 2019...
- Page 2 Mustang-V100-MX4 Revision Date Version Changes July 22, 2019 1.00 Initial release Page II...
- Page 3 Mustang-V100-MX4 Copyright COPYRIGHT NOTICE The information in this document is subject to change without prior notice in order to improve reliability, design and function and does not represent a commitment on the part of the manufacturer. In no event will the manufacturer be liable for direct, indirect, special, incidental, or consequential damages arising out of the use or inability to use the product or documentation, even if advised of the possibility of such damages.
- Page 4 Mustang-V100-MX4 Manual Conventions WARNING Warnings appear where overlooked details may cause damage to the equipment or result in personal injury. Warnings should be taken seriously. CAUTION Cautionary messages should be heeded to help reduce the chance of losing data or damaging the product.
-
Page 5: Table Of Contents
Mustang-V100-MX4 Table of Contents 1 INTRODUCTION ......................1 1.1 I ......................2 NTRODUCTION 1.2 F ........................3 EATURES 1.3 D ....................... 4 IMENSIONS 1.4 T ..................5 ECHNICAL PECIFICATIONS 2 UNPACKING ......................... 6 2.1 A ..................7 STATIC RECAUTIONS 2.2 U .................. - Page 6 Mustang-V100-MX4 4.6.3 Set the Environment Variables ................. 34 4.6.4 Configure the Model Optimizer ............... 35 4.7 S ® V ® M ™ VPU TEPS FOR NTEL ISION CCELERATOR ESIGN WITH NTEL OVIDIUS -V100-MX4 D .............. 37 USTANG RIVER NSTALLATION 4.8 U ........
- Page 7 Mustang-V100-MX4 5.7 I ® V ® NSTALLATION TEPS FOR NTEL ISION CCELERATOR ESIGN WITH NTEL ™ VPU -V100-MX4 ..............79 OVIDIUS USTANG 5.8 U ........79 SE THE CRIPTS TO ERIFY NSTALLATION 5.8.1 Run the Image Classification Demo ..............81 5.8.2 Run the Inference Pipeline Demo ..............
- Page 8 Mustang-V100-MX4 List of Figures Figure 1-1: Mustang-V100-MX4 ..................... 2 Figure 1-2: Dimensions (mm) ......................4 Figure 3-1: Remove One Blank Bracket ..................13 Figure 3-2: Change to Full-height Bracket ................. 13 Figure 3-3: Change to Full-height Bracket ................. 14 Figure 3-4: Assign a Card ID ....................... 14...
-
Page 9: Introduction
Mustang-V100-MX4 Chapter Introduction Page 1... -
Page 10: Ntroduction
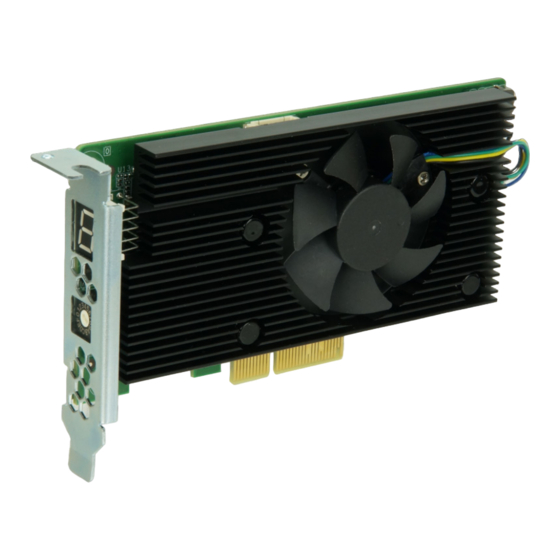
The Mustang-V100-MX4 is a deep learning convolutional neural network acceleration card for speeding up AI inference, in a flexible and scalable way. Equipped with Intel® Movidius™ Myriad™ X Vision Processing Unit (VPU), the Mustang-V100-MX4 PCIe card can be used with the existing system, enabling high-performance computing without costing a fortune. -
Page 11: Features
Mustang-V100-MX4 1.2 Features Mustang-V100-MX4 features are listed below: Intel® Movidius™ Myriad™ X Vision Processing Unit Interface: PCIe 2.0 x2 Dimensions: 113 mm x 56 mm x 23 mm Cooling: Active fan OpenVINO™ Toolkit, AI edge computing ready device ... -
Page 12: Dimensions
Mustang-V100-MX4 1.3 Dimensions The dimensions of the board are listed below: Figure 1-2: Dimensions (mm) Page 4... -
Page 13: Technical Specifications
Mustang-V100-MX4 1.4 Technical Specifications Mustang-V100-MX4 technical specifications are listed below. Specification Mustang-V100-MX4 Main Chip Four Intel® Movidius™ Myriad™ X MA2485 VPU Operating Systems Ubuntu 16.04.3 (LTS), 64-bit, CentOS 64-bit Windows10 64-bit PCIe 2.0 x2 Interface Active fan DIP Switch / LED Indicator... -
Page 14: Unpacking
Mustang-V100-MX4 Chapter Unpacking Page 6... -
Page 15: Anti-Static Precautions
Only handle the edges of the PCB: Don't touch the surface of the motherboard. Hold the motherboard by the edges when handling. 2.2 Unpacking Precautions When the Mustang-V100-MX4 is unpacked, please do the following: Follow the antistatic guidelines above. Make sure the packing box is facing upwards when opening. -
Page 16: Packing List
If any of the components listed in the checklist below are missing, do not proceed with the installation. Contact the IEI reseller or vendor the Mustang-V100-MX4 was purchased from or contact an IEI sales representative directly by sending an email to sales@ieiworld.com. -
Page 17: Hardware Installation
Mustang-V100-MX4 Chapter Hardware Installation Page 9... -
Page 18: Anti-Static Precautions
Mustang-V100-MX4 and severe injury to the user. Electrostatic discharge (ESD) can cause serious damage to electronic components, including the Mustang-V100-MX4. Dry climates are especially susceptible to ESD. It is therefore critical that whenever the Mustang-V100-MX4 or any other electrical component is handled, the following anti-static precautions are strictly adhered to. - Page 19 ESD from the body and helps prevent ESD damage. Turn off system: When installing the Mustang-V100-MX4, make sure that the system to be connected is disconnected from all power supplies and that no electricity is being fed into the system.
-
Page 20: Hardware Installation
Step 3: Locate available PCIe slots and remove the blank brackets. The Mustang-V100-MX4 is compatible with PCIe x2 slots, and only needs one PCIe slot for installation. Remove a blank bracket panel on the back of the computer that aligns with the PCIe slot for installing the Mustang-V100-MX4. Save the bracket screw. -
Page 21: Figure 3-1: Remove One Blank Bracket
Step 5: Install and secure the Mustang-V100-MX4 to the system. Align the Mustang-V100-MX4 to the PCIe slot. Press down gently, but firmly, to seat the Mustang-V100-MX4 correctly in the slot. Install the bracket screw to secure the Mustang-V100-MX4 to the system’s chassis. -
Page 22: Figure 3-3: Change To Full-Height Bracket
Figure 3-3: Change to Full-height Bracket Step 6: Assign a card ID to the Mustang-V100-MX4 by adjusting the rotary switch. The card ID number assigned here will be shown on the LED display of the card after power-up. NOTE: The LED digit only displays 0 through 7; if switched to 8, the LED will display 0;... -
Page 23: Openvino™ Toolkit Installation (Linux)
Mustang-V100-MX4 Chapter OpenVINO™ Toolkit Installation (Linux) Page 15... -
Page 24: System Requirements
Mustang-V100-MX4 4.1 System Requirements Linux Ubuntu 16.04.3 LTS 64-bit 4.2 Online Installation Guide Go to https://software.intel.com/en-us/openvino-toolkit. Click “Get Started” then choose your configuration from “Development Environment Installation Guides & Videos”. Follow the instruction to complete the installation procedure. Page 16... -
Page 25: Installation - Step By Step (2019 R1)
Mustang-V100-MX4 4.3 Installation - Step by Step (2019 R1) This guide assumes you downloaded the Intel Distribution of OpenVINO toolkit for Linux* OS. If you do not have a copy of the toolkit package file, download the latest version and then return to this guide to proceed with the installation. -
Page 26: Install The Intel® Distribution Of Openvino™ Toolkit Core Components
Mustang-V100-MX4 4.3.1 Install the Intel® Distribution of OpenVINO™ Toolkit Core Components If you have a previous version of the toolkit installed, rename or delete two directories: • /home/<user>/inference_engine_samples • /home/<user>/openvino_models To install the OpenVINO™ core components: 1. Choose one of the installation options below and run the related script with root or regular user privileges. - Page 27 Mustang-V100-MX4 3. Click Next. 4. The Installation summary screen shows you the default component set to install: If you used root privileges to run the installer, it installs the Intel Distribution of OpenVINO toolkit in this directory: /opt/intel/computer_vision_sdk_<version>/ For simplicity, a symbolic link to the latest installation is also created:...
- Page 28 Mustang-V100-MX4 Click Next to save the installation options and show the Installation summary screen. 6. On the Installation summary screen, press Install to begin the installation. 7. When the first part of installation is complete, the final screen informs you that the...
-
Page 29: Set The Environment Variables
Mustang-V100-MX4 8. Click Finish to close the installation wizard. A new browser window opens to the next section of the installation guide to set the environment variables. You are in the same document. The new window opens in case you ran the installation without first opening this installation guide. -
Page 30: Configure The Model Optimizer
Mustang-V100-MX4 (Optional) The Intel Distribution of OpenVINO toolkit environment variables are removed when you close the shell. As an option, you can permanently set the environment variables as follows: 1. Open the .bashrc file in <user_directory>: vi <user_directory>/.bashrc 2. Add this line to the end of the file: source /opt/intel/openvino_<version>... - Page 31 Mustang-V100-MX4 Use this tool on models trained with popular deep learning frameworks such as Caffe*, TensorFlow*, MXNet*, and ONNX* to convert them to an optimized IR format that the Inference Engine can use. This section explains how to use scripts to configure the Model Optimizer either for all of the supported frameworks at the same time or for individual frameworks.
-
Page 32: Steps For Intel ® Vision Accelerator Design With Intel ® Movidius ™ Vpus
The demo scripts are required since they perform additional configuration steps. Continue to the next section. 4.4 Steps for Intel® Vision Accelerator Design with Intel® Movidius™ VPUs Mustang-V100-MX4 Driver Installation 1. Install dependencies: sudo apt install libusb-1.0-0 libboost-program-options1.58.0 libboost-thread1.58.0 libboost-filesystem1.58.0 libssl1.0.0... - Page 33 Now, the Mustang-V100-MX4 drivers are installed. 8. Modify the device number on your host Change the total device numbers of “hddl_autoboot.config”. Each Mustang-V100-MX4 contains 4 devices, therefore, user has to change device number from default 8 to 4. Page 25...
-
Page 34: Use The Demo Scripts To Verify Your Installation
Mustang-V100-MX4 4.5 Use the Demo Scripts to Verify Your Installation Important: This section is required. In addition to confirming that your installation was successful, the demo scripts perform additional steps, such as setting up your computer to use the Model Optimizer samples. -
Page 35: Run The Image Classification Demo
Mustang-V100-MX4 Note: The paths in this section assume you used the default installation directory to install the Intel Distribution of OpenVINO toolkit. If you installed the software to a directory other than /opt/intel/, update the directory path with the location where you installed the toolkit to. -
Page 36: Run The Inference Pipeline Demo
Mustang-V100-MX4 3) Assign Mustang-V100-MX4 (-d HDDL) and run demo /demo_squeezenet_download_convert_run.sh -d HDDL 3. The Image Classification demo uses the Model Optimizer to convert a SqueezeNet model to .bin and .xml Intermediate Representation (IR) files. The Inference Engine component uses these files. - Page 37 Mustang-V100-MX4 3. Assign Mustang-V100-MX4 (-d HDDL) and run demo /demo_security_barrier_camera.sh –d HDDL 4. This demo uses car.png in /opt/intel/computer_vision_sdk/deployment_tools/demo/ to show an inference pipeline. This demo uses three pre-trained models. The demo uses vehicle recognition in which vehicle attributes build on each other to narrow in on a specific attribute.
- Page 38 6. Close the image viewer screen to end the demo. In this section, you saw a preview of the Intel Distribution of OpenVINO toolkit capabilities. You have completed all the required installation, configuration, and build steps to work with your trained models using the Mustang-V100-MX4. Page 30...
-
Page 39: Installation - Step By Step (Openvino 2018 R5)
Mustang-V100-MX4 4.6 Installation - Step by Step (OpenVINO 2018 R5) This guide assumes you downloaded the Intel Distribution of OpenVINO toolkit for Linux* OS. If you do not have a copy of the toolkit package file, download the latest version then return to this guide to proceed with the installation. -
Page 40: Install The Intel® Distribution Of Openvino™ Toolkit Core Components
Mustang-V100-MX4 5. Go to the l_openvino_toolkit_p_<version> directory: cd l_openvino_toolkit_p_<version> 6. Run a script to automatically download and install external software dependencies. These dependencies are required for the Intel-optimized version of OpenCV, the Deep Learning Inference Engine, and the Deep Learning Model Optimizer tools. - Page 41 Mustang-V100-MX4 2. Follow the instructions on your screen. Watch for informational messages such as the following in case you must complete additional steps: 3. Click Next. 4. The Installation summary screen shows you the default component set to install: If you used root privileges to run the installer, it installs the Intel Distribution of OpenVINO toolkit in this directory: /opt/intel/computer_vision_sdk_<version>/...
-
Page 42: Set The Environment Variables
Mustang-V100-MX4 6. On the Installation summary screen, press Install to begin the installation. 7. When the first part of installation is complete, the final screen informs you that the core components have been installed and additional steps still required: 8. Click Finish to close the installation wizard. A new browser window opens to the next section of the installation guide to set the environment variables. -
Page 43: Configure The Model Optimizer
Mustang-V100-MX4 (Optional) The Intel Distribution of OpenVINO toolkit environment variables are removed when you close the shell. As an option, you can permanently set the environment variables as follows: 1. Open the .bashrc file in <user_directory>: vi <user_directory>/.bashrc 2. Add this line to the end of the file: source /opt/intel/computer_vision_sdk/bin/setupvars.sh... - Page 44 Mustang-V100-MX4 Use this tool on models trained with popular deep learning frameworks such as Caffe*, TensorFlow*, MXNet*, and ONNX* to convert them to an optimized IR format that the Inference Engine can use. This section explains how to use scripts to configure the Model Optimizer either for all of the supported frameworks at the same time or for individual frameworks.
-
Page 45: Steps For Intel ® Vision Accelerator Design With Intel ® Movidius ™ Vpus
The demo scripts are required since they perform additional configuration steps. Continue to the next section. 4.7 Steps for Intel® Vision Accelerator Design with Intel® Movidius™ VPUs Mustang-V100-MX4 Driver Installation 1. Install dependencies: sudo apt install libusb-1.0-0 libboost-program-options1.58.0 libboost-thread1.58.0 libboost-filesystem1.58.0 libssl1.0.0... - Page 46 Now, the Mustang-V100-MX4 drivers are installed. 8. Modify the device number on your host Change the total device numbers of “hddl_autoboot.config”. Each Mustang-V100-MX4 contains 4 devices, therefore, user has to change device number from default 8 to 4. Page 38...
-
Page 47: Use The Demo Scripts To Verify Your Installation
Mustang-V100-MX4 4.8 Use the Demo Scripts to Verify Your Installation Important: This section is required. In addition to confirming that your installation was successful, the demo scripts perform additional steps, such as setting up your computer to use the Model Optimizer samples. -
Page 48: Run The Image Classification Demo
Mustang-V100-MX4 Note: The paths in this section assume you used the default installation directory to install the Intel Distribution of OpenVINO toolkit. If you installed the software to a directory other than /opt/intel/, update the directory path with the location where you installed the toolkit to. -
Page 49: Run The Inference Pipeline Demo
Mustang-V100-MX4 3) Assign Mustang-V100-MX4 (-d HDDL) and run demo /demo_squeezenet_download_convert_run.sh -d HDDL 3. The Image Classification demo uses the Model Optimizer to convert a SqueezeNet model to .bin and .xml Intermediate Representation (IR) files. The Inference Engine component uses these files. - Page 50 Mustang-V100-MX4 Search MYRIAD and modify to HDDL then save 3. Assign Mustang-V100-MX4 (-d HDDL) and run demo /demo_security_barrier_camera.sh –d HDDL 4. This demo uses car.png in /opt/intel/computer_vision_sdk/deployment_tools/demo/ to show an inference pipeline. This demo uses three pre-trained models. The demo uses vehicle recognition in which vehicle attributes build on each other to narrow in on a specific attribute.
- Page 51 6. Close the image viewer screen to end the demo. In this section, you saw a preview of the Intel Distribution of OpenVINO toolkit capabilities. You have completed all the required installation, configuration, and build steps to work with your trained models using the Mustang-V100-MX4. Page 43...
-
Page 52: Openvino™ Toolkit Installation (Windows 10)
Mustang-V100-MX4 Chapter OpenVINO™ Toolkit Installation (Windows 10) Page 44... -
Page 53: System Requirements
Mustang-V100-MX4 5.1 System Requirements Windows 10 64-bit 5.2 Online Installation Guide Go to https://software.intel.com/en-us/openvino-toolkit. Click “Get Started” then choose your configuration from “Development Environment Installation Guides & Videos”. Follow the instruction to complete the installation procedure. Page 45... -
Page 54: Installation - Step By Step (2019 R1)
Mustang-V100-MX4 5.3 Installation - Step by Step (2019 R1) 5.3.1 Install the Intel® Distribution of OpenVINO™ Toolkit Core Components 1. If you have not downloaded the Intel® Distribution of OpenVINO™ toolkit, download the latest version.. By default, the file is saved to the Downloads directory as w_openvino_toolkit_p_<version>.exe. - Page 55 Mustang-V100-MX4 of your choice. Click Next. 6. If you are missing external dependencies, you will see a warning screen. Write down the dependencies you are missing. You need to take no other action at this time. After installing the Intel® Distribution of OpenVINO™ toolkit core components, you will be provided instructions to install the missing dependencies.
-
Page 56: Install The External Software Dependencies
Mustang-V100-MX4 9. Click Finish to close the installation wizard. A new browser window opens to the next section of the installation guide to install the dependencies. You are in the same document. The new window opens in case you ran the installation without first opening this installation guide. -
Page 57: Microsoft Visual Studio* With C++ And Msbuild
Mustang-V100-MX4 If you have no missing dependencies, skip ahead to Configure the Model Optimizer. 5.3.2.1 Microsoft Visual Studio* with C++ and MSBuild Microsoft Visual Studio with Visual Studio C++ is required for building the Intel® Deep Learning Deployment Toolkit samples and demonstration applications. You can install the free Community version of Microsoft Visual Studio. - Page 58 Mustang-V100-MX4 6. Under the Individual components tab, select MSBuild: The Installation details at the right side of the screen displays your installation selections: Page 50...
-
Page 59: Install Cmake* 3.4 Or Higher
Mustang-V100-MX4 Make no other changes. Click Install. The installation begins and takes around 30 minutes to complete. If you see a prompt to restart your computer after the installation completes, dismiss it. You have completed the Microsoft Visual Studio 2019 installation. - Page 60 Mustang-V100-MX4 NOTE: If you want to use Microsoft Visual Studio 2019, you are required to install CMake 3.14. Go to the CMake download site. Under the heading Get the Software, click the link for latest stable in the first paragraph. Your screen displays Latest Release information.
-
Page 61: Install Python* 3.6.5
Mustang-V100-MX4 Click Finish when the installation completes. You have completed the CMake installation. Next, install Python 3.6.5 if the Intel® Distribution of OpenVINO™ toolkit installation indicated you are missing the software. 5.3.2.3 Install Python* 3.6.5 Python 3.6.5 with pip is required to run the Model Optimizer. Use these steps to install the correct version of the Python software. -
Page 62: Set The Environment Variables
Mustang-V100-MX4 IMPORTANT: At the bottom of the install screen, select Add Python 3.6 to PATH. Click Install Now near the top of the install screen and let the installation complete. When the installation finishes, click Close. You have completed the Python installation and are ready to set environment variables. -
Page 63: Configure The Model Optimizer
Mustang-V100-MX4 variables manually. The environment variables are set. Continue to the next section to configure the Model Optimizer. 5.3.4 Configure the Model Optimizer Important: These steps are required. You must configure the Model Optimizer for at least one framework. The Model Optimizer will fail if you do not complete the steps in this section. -
Page 64: Model Optimizer Configuration Steps
Mustang-V100-MX4 manually configure the Model Optimizer instead of using scripts, see the Using Manual Configuration Process section in the Model Optimizer Developer Guide. For more information about the Model Optimizer, see the Model Optimizer Developer Guide. 5.3.4.1 Model Optimizer Configuration Steps You can configure the Model Optimizer either for all supported frameworks at once or for one framework at a time. - Page 65 Mustang-V100-MX4 2. Go to the Model Optimizer prerequisites directory. cd C:\Program Files (x86)\IntelSWTools\openvino\deployment_tools\model_optimizer\i nstall_prerequisites 3. Run the following batch file to configure the Model Optimizer for Caffe*, TensorFlow*, MXNet*, Kaldi*, and ONNX*:: install_prerequisites.bat Option 2: Configure the Model Optimizer for each framework separately: 1.
- Page 66 Mustang-V100-MX4 o For ONNX: install_prerequisites_onnx.bat o For Kaldi: install_prerequisites_kaldi.bat The Model Optimizer is configured for one or more frameworks. Success is indicated by a screen similar to this: You are ready to use two short demos to see the results of running the Intel Distribution of OpenVINO toolkit and to verify your installation was successful.
-
Page 67: Installation Steps For Intel ® Vision Accelerator Design With Intel
Download and install Visual C++ Redistributable for Visual Studio 2015 You are done installing your device driver and are ready to use Mustang-V100-MX4. 5.5 Use the Demo Scripts to Verify Your Installation Important: This section is required. In addition to confirming your installation was successful, demo scripts perform other steps, such as setting up your computer to use the Model Optimizer samples. - Page 68 Mustang-V100-MX4 Note: To run the demo applications on Intel® Processor Graphics, Intel® Movidius™ Neural Compute Stick or Intel® Neural Compute Stick 2, make sure you completed the Additional Installation Steps first. learn more about demo applications, README.txt C:\Intel\computer_vision_sdk_<version>\deployment_tools\demo\. For detailed description of the pre-trained object detection and object recognition models, go to C:\Intel\computer_vision_sdk_<version>\deployment_tools\intel_mode...
-
Page 69: Run The Image Classification Demo
Mustang-V100-MX4 1. Open a command prompt window. 2. Go to the Inference Engine demo directory: C:\Intel\computer_vision_sdk_<version>\deployment_tools\demo\ 3. Run the demos by following the instructions in the next two sections. 5.5.1 Run the Image Classification Demo 5.5.2 Set Up a Neural Network Model... - Page 70 Mustang-V100-MX4 \models\FP32\classification\squeezenet\1.1\caffe\squeezenet1 .1.caffemodel" --data_type FP16 --output_dir "C:\Users<username>\Documents\squeezenet1.1_FP16" The squeezenet1.1.labels file contains the classes that ImageNet uses. This file is included so that the inference results show text instead of classification numbers. Copy squeezenet1.1.labels to your optimized model location: copy "C:\Users<username>\Documents\Intel\OpenVINO\openvino_models \ir\FP32\classification\squeezenet\1.1\caffe\squeezenet1.1.l...
- Page 71 4. Close the image viewer window to end the demo. In this section, you saw a preview of the Intel® Distribution of OpenVINO™ toolkit capabilities. You have completed all the required installation, configuration, and build steps to work with your trained models using the Mustang-V100-MX4. Page 63...
-
Page 72: Installation - Step By Step (2018 R5)
Mustang-V100-MX4 5.6 Installation - Step by Step (2018 R5) 5.6.1 Install the Intel® Distribution of OpenVINO™ Toolkit Core Components 1. If you have not downloaded the Intel® Distribution of OpenVINO™ toolkit, download latest version. By default, the file is saved to the Downloads directory as w_openvino_toolkit_p_<version>.exe. - Page 73 Mustang-V100-MX4 4. Click Next. 5. You are asked if you want to provide consent to gather information. Choose the option of your choice. Click Next. 6. If you are missing external dependencies, you will see a warning screen. Write down the dependencies you are missing.
- Page 74 Mustang-V100-MX4 7. Click Next. 8. When the first part of installation is complete, the final screen informs you that the core components have been installed and additional steps still required: Page 66...
- Page 75 Mustang-V100-MX4 9. Click Finish to close the installation wizard. A new browser window opens to the next section of the installation guide to install the dependencies. You are in the same document. The new window opens in case you ran the installation without first opening this installation guide.
-
Page 76: Install The External Software Dependencies
Mustang-V100-MX4 5.6.2 Install the External Software Dependencies If the installation process indicated if you are missing dependencies, you must install each missing dependency. Click the link for the first dependency you must install: Microsoft Visual Studio* with C++ 2017 or 2015 with MSBuild... - Page 77 Mustang-V100-MX4 An executable file named vs_community__313888930.1524151023.exe, or similar, is saved in your Downloads folder. 3. Double-click the executable file to launch the Visual Studio Community 2017 installer. 4. From the Workloads tab, use the check boxes to select Universal Windows Platform development and Desktop development with C++.
- Page 78 Mustang-V100-MX4 The Summary at the right side of the screen displays your installation selections: 6. Make no other changes. Click Next. The installation begins, and takes around 30 Page 70...
-
Page 79: Install The Build Tools For Visual Studio 2017
Mustang-V100-MX4 minutes to complete. 7. If you see a prompt to restart your computer after the installation completes, dismiss Continue to the next section to install the Build Tools for Visual Studio 2017. 5.6.2.2 Install the Build Tools for Visual Studio 2017 The Build Tools for Visual Studio 2017 is the second part of the Microsoft Visual Studio dependency. -
Page 80: Install Cmake* 3.4 Or Higher
Mustang-V100-MX4 6. Click Install. 7. When the installation completes, restart your computer if prompted to do so. You have completed the Visual Studio 2017 installation. Install your next dependency: CMake 3.4 or higher • Python 3.6.5 • Or if you have installed all the dependencies, you are ready to configure the Model Optimizer. -
Page 81: Install Python* 3.6.5
Mustang-V100-MX4 5. Go to the Downloads folder. 6. Double-click the file to launch the installer. Note: If you have a previous version of CMake installed, you are prompted to uninstall it. You must uninstall the previous version before installing the new version. Follow the instructions on the screen and then launch the installer again to install the new version. - Page 82 Mustang-V100-MX4 2. Double-click the file to launch the installation. 3. Make sure the top of the screen shows Python 3.6.5 (64-bit). 4. IMPORTANT: At the bottom of the install screen, select Add Python 3.6 to PATH. Page 74...
-
Page 83: Set The Environment Variables
Mustang-V100-MX4 5. Click Install Now near the top of the install screen and let the installation complete. 6. When the installation finishes, click Close. You have completed the Python installation and are ready to set environment variables. Continue to the next section. -
Page 84: Model Optimizer Configuration Steps
Mustang-V100-MX4 .xml: Describes the network topology • .bin: Contains the weights and biases binary data • The Inference Engine reads, loads, and infers the IR files, using a common API across the CPU, GPU, or VPU hardware. The Model Optimizer is a Python*-based command line tool (mo.py), which is located in C:\Intel\computer_vision_sdk_<version>\deployment_tools\model_optimizer, where... - Page 85 Mustang-V100-MX4 Option 1: Configure the Model Optimizer for all supported frameworks at the same time: 1. Open a command prompt. To do so, type the following in your Search Windows box and then press Enter: 2. Type commands in the opened window: 3.
- Page 86 Mustang-V100-MX4 o For Caffe: install_prerequisites_caffe.bat o For TensorFlow: install_prerequisites_tf.bat o For MXNet: install_prerequisites_mxnet.bat o For ONNX: install_prerequisites_onnx.bat o For Kaldi: install_prerequisites_kaldi.bat The Model Optimizer is configured for one or more frameworks. Success is indicated by a screen similar to this:...
-
Page 87: Installation Steps For Intel
2) Right click on the hddlsmbus.inf file and choose Install from the pop up menu. 3. Download and install Visual C++ Redistributable for Visual Studio 2015 You are done installing your device driver and are ready to use Mustang-V100-MX4. 5.8 Use the Demo Scripts to Verify Your Installation Important: This section is required. - Page 88 Mustang-V100-MX4 Note: To run the demo applications on Intel® Processor Graphics, Intel® Movidius™ Neural Compute Stick or Intel® Neural Compute Stick 2, make sure you completed the Additional Installation Steps first. learn more about demo applications, README.txt C:\Intel\computer_vision_sdk_<version>\deployment_tools\demo\. For detailed description of the pre-trained object detection and object recognition models, go to C:\Intel\computer_vision_sdk_<version>\deployment_tools\intel_mode...
-
Page 89: Run The Image Classification Demo
Mustang-V100-MX4 1. Open a command prompt window. 2. Go to the Inference Engine demo directory: C:\Intel\computer_vision_sdk_<version>\deployment_tools\demo\ 3. Run the demos by following the instructions in the next two sections. 5.8.1 Run the Image Classification Demo This demo serves two purposes: •... -
Page 90: Run The Inference Pipeline Demo
Mustang-V100-MX4 Note: performance here is only for reference, it should base on the benchmark app result. This demo is complete. Leave the console open and continue to the next section to run the Inference Pipeline demo. 5.8.2 Run the Inference Pipeline Demo 1. - Page 91 Mustang-V100-MX4 vehicle attributes, including the license plate. 3) The attributes identified as the license plate are used as input to the third model, which recognizes specific characters in the license plate. For more information, see the Security Camera Sample. 3. When the demo completes, you have two windows open: o A console window that displays information about the tasks performed by the demo.
- Page 92 Mustang-V100-MX4 In this section, you saw a preview of the Intel® Distribution of OpenVINO™ toolkit capabilities. You have completed all the required installation, configuration, and build steps to work with your trained models using the Mustang-V100-MX4. Page 84...
-
Page 93: A Performance Test
Mustang-V100-MX4 Appendix Performance Test Page 85... - Page 94 Mustang-V100-MX4 ./perfcheck -m <model_Dir> -inputs_dir<image_Dir> -num_requests 8 -d HDDL Note: suggest -num_requests # = 4xVPU qty. (Mustang-V100-MX4=> 8) Ex. squeezenet1.1.xml Page 86...
-
Page 95: B Regulatory Compliance
Mustang-V100-MX4 Appendix Regulatory Compliance Page 87... - Page 96 Mustang-V100-MX4 DECLARATION OF CONFORMITY This equipment has been tested and found to comply with specifications for CE marking. If the user modifies and/or installs other devices in the equipment, the CE conformity declaration may no longer apply. FCC WARNING This equipment complies with Part 15 of the FCC Rules. Operation is subject to the...
-
Page 97: C Product Disposal
Mustang-V100-MX4 Appendix Product Disposal Page 89... - Page 98 Mustang-V100-MX4 CAUTION: Risk of explosion if battery is replaced by an incorrect type. Only certified engineers should replace the on-board battery. Dispose of used batteries according to instructions and local regulations. Outside the European Union–If you wish to dispose of used electrical and ...
-
Page 99: D Hazardous Materials Disclosure
Mustang-V100-MX4 Appendix Hazardous Materials Disclosure Page 91... - Page 100 Mustang-V100-MX4 The details provided in this appendix are to ensure that the product is compliant with the Peoples Republic of China (China) RoHS standards. The table below acknowledges the presences of small quantities of certain materials in the product, and is applicable to China RoHS only.
- Page 101 Mustang-V100-MX4 此附件旨在确保本产品符合中国 RoHS 标准。以下表格标示此产品中某有毒物质的含量符 合中国 RoHS 标准规定的限量要求。 本产品上会附有”环境友好使用期限”的标签,此期限是估算这些物质”不会有泄漏或突变”的 年限。本产品可能包含有较短的环境友好使用期限的可替换元件,像是电池或灯管,这些元 件将会单独标示出来。 部件名称 有毒有害物质或元素 铅 汞 镉 六价铬 多溴联苯 多溴二苯 (Pb) (Hg) (Cd) (CR(VI)) (PBB) 醚 (PBDE) 壳体 显示 印刷电路板 金属螺帽 电缆组装 风扇组装 电力供应组装 电池 O: 表示该有毒有害物质在该部件所有物质材料中的含量均在 SJ/T 11363-2006 (现由 GB/T 26572-2011 取代) 标准规定的限量要求以下。...
Need help?
Do you have a question about the Mustang-V100-MX4 and is the answer not in the manual?
Questions and answers