Table of Contents
Advertisement
Quick Links
Advertisement
Table of Contents

Related Manuals for Datavideo HDR-60


Summary of Contents for Datavideo HDR-60
- Page 1 HD/SD DIGITAL VIDEO RECORDER HDR-60 Instruction Manual...
-
Page 2: Table Of Contents
HD / SD Recorder HDR-60 Contents FCC COMPLIANCE STATEMENT ......................4 WARNINGS AND PRECAUTIONS ......................4 WARRANTY ............................5 ........................5 TANDARD ARRANTY ........................5 HREE ARRANTY DISPOSAL ............................6 PRODUCT OVERVIEW ........................7 ............................7 EATURES ....................8 IST OF... - Page 3 SERVICE & SUPPORT ........................36 Disclaimer of Product & Services The information offered in this instruction manual is intended as a guide only. At all times, Datavideo Technologies will try to give correct, complete and suitable information. However, Datavideo Technologies cannot exclude that some information in this manual, from time to time, may not be correct or may be incomplete.
-
Page 4: Fcc Compliance Statement
7. This product should only be operated from the type of power source indicated on the marking label of the AC adapter. If you are not sure of the type of power available, consult your Datavideo dealer or your local power company. -
Page 5: Warranty
HDR-60 Warranty Standard Warranty Datavideo equipment is guaranteed against any manufacturing defects for one year from the date of purchase. The original purchase invoice or other documentary evidence should be supplied at the time of any request for repair under warranty. -
Page 6: Disposal
HD / SD Recorder HDR-60 Disposal For EU Customers only - WEEE Marking This symbol on the product or on its packaging indicates that this product must not be disposed of with your other household waste. Instead, it is your responsibility to dispose of your waste equipment by handing it over to a designated collection point for the recycling of waste electrical and electronic equipment. -
Page 7: Product Overview
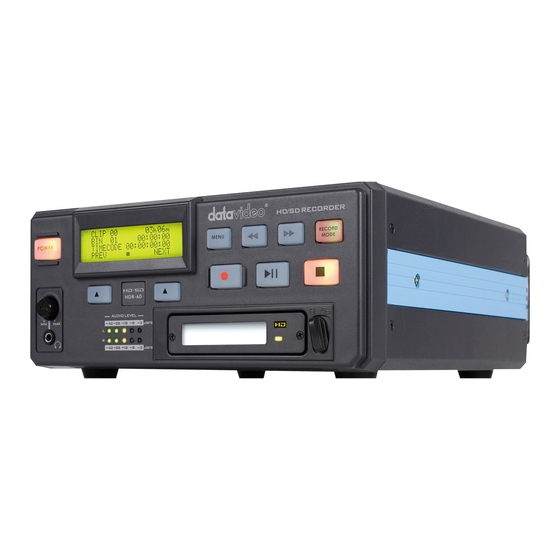
HD / SD Recorder HDR-60 Product Overview The Datavideo HDR-60 is a hard drive based Features video recorder with removable hard drive enclosure. The HDR-60 can be used as a Backlit LCD display and soft keys for desktop stand alone recorder in the studio or track confirmation and menu navigation. -
Page 8: List Of Recommended Hard Drives
HD / SD Recorder HDR-60 List of Recommended Hard Drives This list below contains compatible drive information. Please contact your local dealer or Datavideo office should you need more information. Brand / Model Type WD3200BEKT HITACHI 7K320-320 WD5000BEKT WD5000BPKT WD7500BPKT... - Page 9 HD / SD Recorder HDR-60 2. Place a 2.5” SATA HDD on the PCB and then turn it over so you can secure the drive to the PCB by screwing the four screws (supplied) into the holes as shown in the diagram on the left.
-
Page 10: Connections And Controls
The main power on /off switch is on the rear panel. Display Panel. Displays the status of the HDR-60. The display will show Bin Number, time code, or if the Menu Button is pressed the Menu Display. Menu Button. -
Page 11: Rear Panel
HD / SD Recorder HDR-60 Rear panel Mini XLR inputs and Outputs for Balanced Audio Connection. Note: The recorder needs a video source in order to record files. page 21 also. The GPI socket can be used for simple external control. The recorder can accept pulse or level trigger inputs, which can trigger record or playback and pause commands. -
Page 12: Switching The Recorder On
Ensure the HDR-60 power supply is connected to the rear panel of the recorder and a HE-3 removable drive enclosure is fitted and locked in place. The HDR-60 has a power ON/OFF switch which is located on the rear panel. To turn the unit ON depress the dot side of this switch. -
Page 13: Menu Overview And Menu Navigation
HD / SD Recorder HDR-60 Menu Overview and Menu Navigation Your HDR unit is a menu driven unit; there are several menus which are used to initially set up the unit. The menu settings are non-volatile, so they are stored even when the unit is switched off. Many of these settings, such as file type and bit rate, may only need to be set once. -
Page 14: Record Setup
HD / SD Recorder HDR-60 Record Setup This menu allows you to configure the HDR-60 so that the unit is ready to record the incoming video signal. The options within this menu are: MAIN MENU SUB MENU 1 SUB MENU 2... -
Page 15: Set Sd Encode Format
It is recommended to have the recorder match the aspect ratio of the source equipment being recorded. Note: If you choose the wrong aspect ratio people or objects within the recorded HDR-60 SD footage may be changed to appear tall and thin or short and fat. -
Page 16: Before Recording
The HDR-60 is primarily a capture device, as confirm your choice. opposed to an archiving device, and it is best to start out with a fresh HDR-60 HE-3 drive. If you Select your time code source have video clips already recorded on the HE-3 Use the LCD menu path [MENU] >... -
Page 17: Recording
HD / SD Recorder HDR-60 Recording Before starting a new recording ensure the Record Pause recorder is set up correctly, please read pages 12 There are several ways of pausing a record to 15 first. session depending how the recorder is configured. -
Page 18: Special Record Functions
If SET TIMELAPSE FRAME is set to 2 frames and SET TIMELAPSE CYCLE is set to 15 seconds then the HDR-60 will display: CYCLE: 02 FRM / 15 S So 2 frames [FRM] of video will be added to the current BIN after each 15 second [S] cycle until the recording session is stopped. -
Page 19: Playback
Playback Select a recorded BIN to Play Playback in BIN or CLIP centric back mode You can think of a video BIN as being like a folder Depending on how the Play Setup menu options for holding a single or group of related video CLIPS. -
Page 20: System Set Up
System Set Up SYSTEM SETUP menu has the following options MAIN MENU SUB MENU 1 SUB MENU 2 TOOL SETUP STATUS RECORD SETUP PLAY SETUP SYSTEM SETUP SET AUDIO MONITOR See below section. SAVE SETUP SELECT AUDIO SOURCE page RECALL SETUP SET TIME CODE page SET GPI... -
Page 21: Select Audio Source
HD / SD Recorder HDR-60 Select Audio Source Use the LCD menu path [MENU] > SETUP > SYSTEM SETUP > SELECT AUDIO SOURCE This recorder can accept audio signals which are already embedded in the SDI / HD-SDI video input. The recorder can alternatively accept analogue audio from the rear panel Balanced mini XLR audio inputs. -
Page 22: Gpi Control
HD / SD Recorder HDR-60 GPI Control GPI Trigger cabling and circuit connected GPI cabling is then pressed forcing the unit into record pause mode for the length of the press. The recorder has a GPI socket on its rear panel. The... -
Page 23: Transferring Files To A Computer
Transferring files to a computer Recorder File System limitations All bins that contain video will appear to the computer as folders named BINxx. Where xx This recorders NTFS format is fully compatible represents the BIN number ranging from 01 to 99. with PCs and is read compatible with Macs. -
Page 24: Safely Dis-Mounting The He-3 Drive From A Computer
HD / SD Recorder HDR-60 The drive will appear on the computer as a volume called HDR-SERIES. Safely dis-mounting the HE-3 drive from a computer In order not to cause damage to the spinning drive within the HE-3 drive do not immediately disconnect the USB 2.0 cable straight away. -
Page 25: Updating The Firmware
If CODEC version is D10B, use “HDR70_flash_C3DB_host_C215_codec_C4_ifpga_32_no_NTT.bin” to update the firmware. 3. Use a USB cable to connect the hard disk (HE-3) removed from the HDR-60/70 to the PC containing the downloaded firmware file. 4. Rename the latest firmware file to “flash.bin” before copying it to the hard disk. -
Page 26: Set Buzzer
[MENU] > SET UP > SYSTEM SET UP > SET BUZZER This setting when enabled or selected provides the user with an alarm feature if there is an “un- recoverable” defect detected in the HDR-60. Set Long Time Stop Use the LCD menu path [MENU] >... -
Page 27: Rs-232 Controller Command Set
HD / SD Recorder HDR-60 RS-232 Controller Command Set Connector Pin Assignment Interface : 9 pin D-Sub female to 9 pin D-Sub female The pin assignment of the Controller and recorder is shown in the following table: 9 Pin D-Sub... -
Page 28: System Control
HD / SD Recorder HDR-60 System Control 00h, 11h Device Type request The response is 00, 00 indicating Quick Capture 00h, F1h Next Bin When this command is issued from the Idle state the next bin is selected. If the present bin is 99 then the next bin is 1. -
Page 29: Transport Control
HD / SD Recorder HDR-60 24h, F5h, nn Play to Offset nn Content of the present bin is played at 1x speed starting from present Frame Offset until Frame Offset nn at which point it pauses. Frame Offset nn is 4 bytes and starts with the LSB. This command may be issued from the idle state or any other Play state. - Page 30 HD / SD Recorder HDR-60 Command Name Response Data 20h, 02h, 22h Record 10h, 01h, 11h Common Trick Play 21h, 11h,, 00h, 32h Play Pause 10h, 01h, 11h 20h, 10h, 30h Fast Forward 10h, 01h, 11h 21h, 13h,, nn, csum...
- Page 31 60/70 used as DEVICE. When the DEVICE receives this command, it attaches 2-bytes specification data to “12h 11h : DEVICE TYPE” and sends the information to the CONTROLLER. HDR-60/70: 12h , 11h, 00h, 00h, csum, 4. Return Data 21h 13h nn csum : Shuttle Forward...
- Page 32 HD / SD Recorder HDR-60 5. Return Data 21h, F1h, 02h, 14h : Next Clip 21h, F2h, 02h, 15h : Previous Clip Note: Only can do clip-change at play-pause 6. Firmware Revision Sense Data [7bytes] Firmware Revision Sense (Recorder) Byte[0]: ROM...
- Page 33 HD / SD Recorder HDR-60 File Length byte 0 Length Byte 1 Length Byte 2 Length Byte 3 Revision History: Revision 00 30(01/10/2014) 1. Add HD long GOP 50Mb 2. Add Trick play command 3. Add select clip command 4. Busy bit will be set at change status 5.
-
Page 34: Dimensions & Weight
HD / SD Recorder HDR-60 Dimensions & Weight Unit: mm Depth [Front to Rear] : 288.4mm Width : 481mm / Standard 19” with rack ears Height : 49mm / Standard 1RU without feet 211mm (W) x 285mm (D) x 87mm (H) / 3Kgs? Gross weight [Packed] : 4.86 Kg / 10.71 lbs... -
Page 35: Specifications
HD / SD Recorder HDR-60 Specifications HDD: 250 / 320 / 500 / 750 GB HDD Size SSD: 120GB/240 GB HD/SD-SDI Video Input Time code HD/SD-SDI Video Output HDMI Time code Time code IN/OUT Balance Audio Analog 2-CH Audio Input... -
Page 36: Service & Support
Aug-01.2019 Datavideo Technologies Co., Ltd. All rights reserved 2020 Version E6...
Need help?
Do you have a question about the HDR-60 and is the answer not in the manual?
Questions and answers