
Related Manuals for Datavideo DN-500


Summary of Contents for Datavideo DN-500
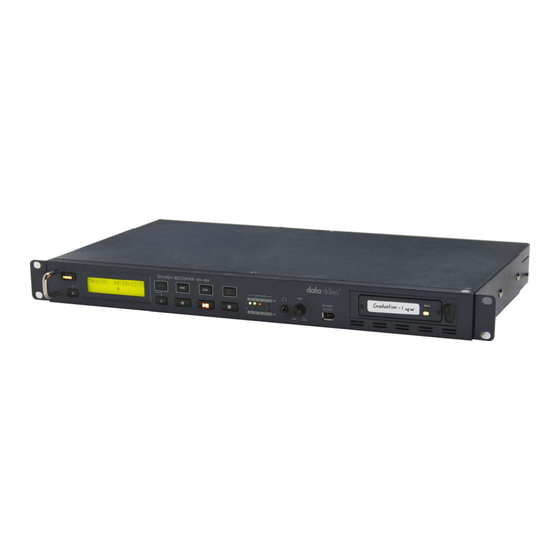
- Page 1 DV / HDV Hard Disk Recorder DN-500 INSTRUCTION MANUAL (Preliminary) www.datavideo-tek.com...
-
Page 2: Table Of Contents
Packing List ------------------------------------------------------------------------------------------------------6 Introduction -------------------------------------------------------------------------------------------------------6 Features -----------------------------------------------------------------------------------------------------------6 How to Assemble 2.5" HDD in Removable Rack -------------------------------------------------------7 Connections & Controls ---------------------------------------------------------------------------------------8 DN-500 Front Panel -------------------------------------------------------------------------------------8 DN-500 Rear Panel --------------------------------------------------------------------------------------9 Powering On --------------------------------------------------------------------------------------------------- 10 Menu Options - Overview------------------------------------------------------------------------------------ 10 HDD Mode Menu --------------------------------------------------------------------------------------- 11... - Page 3 Playing a Track ----------------------------------------------------------------------------------------- 24 Connecting to a Computer ---------------------------------------------------------------------------------- 24 Connecting to a PC------------------------------------------------------------------------------------- 25 Connecting to a MAC ---------------------------------------------------------------------------------- 26 DV File Converter Software --------------------------------------------------------------------------------- 28 Installation ------------------------------------------------------------------------------------------------ 28 Registration----------------------------------------------------------------------------------------------- 29 Operation ------------------------------------------------------------------------------------------------- 30 RS 422 Command Set / Protocol -------------------------------------------------------------------------- 33 Specification ---------------------------------------------------------------------------------------------------- 37 Service and Support ------------------------------------------------------------------------------------------ 38...
-
Page 4: Warnings And Precautions
7. This product should only be operated from the type of power source indicated on the marking label of the AC adapter. If you are not sure of the type of power available, consult your Datavideo dealer or your local power company. -
Page 5: Warranty
Equipment that fails after the warranty period, has been operated or installed in a manner other than that specified by Datavideo, or has been subjected to abuse or modification, will be repaired for time and material charges at the Buyer’s expense. -
Page 6: Packing List
Drag and Drop file transfer to PC or MAC via IEEE-1394. 2.5" Removable HDD Rack, SATA & USB interface connecting to a PC for file transfer. N.B. The DN-500 cannot be operated as a DV Device from a PC - The AVC Command set is not supported. -
Page 7: How To Assemble 2.5" Hdd In Removable Rack
2. Assemble four screws to fasten 2.5" HDD on PCB. 3. Push PCB into the HDD rack 4. Assemble two screws to fasten HD rack front cover. 5. Push 2.5" HDD Removable rack into DN-500 then turn button to left lock the rack. -
Page 8: Connections & Controls
/ off switch is on the rear panel. Display Panel. Displays the status of the DN-500. The display will show Track Number, timecode, or if the Menu Button is pressed the Menu Display. -
Page 9: Dn-500 Rear Panel
- It is not possible to record or playback M2T (HDV) files via the Analogue Inputs / Outputs The GPI socket can be used for simple external control. The DN-500 can accept pulse or level trigger inputs, which can trigger record or playback and pause commands See GPI Mode &... -
Page 10: Powering On
Menu Options The DN-500 is a menu driven unit; there are 18 menus which are used to initially set up the unit. The menu settings are non-volatile (they are stored even when the unit is switched off), so many of the settings, such as date and time, you will only need to set once. -
Page 11: Hdd Mode Menu
PC or MAC. The files appear in the root directory of the DN-500 hard disk, and are numbered with the track number that appears in the LCD display when you are recording or playing back the track. -
Page 12: Record Formats Menu
500 can then be used just like any external drive. See Connecting to a PC / Connecting to a MAC for more details. To return the DN-500 to Deck Mode either use “Safely Remove Hardware” with a PC, or with a MAC use “Eject” or Drag the DN-500 Drive to “Trash”. Once un-mounted the DN-500 display will return to Track Display. -
Page 13: Input Video Standard Menu
NTSC Setup Level Menu The NTSC Setup Level Menu sets the DN-500 either 0 ire or 7.5 ire - This is not necessary for PAL inputs. 7.5 ire is most commonly used in the U.S.A. and Canada and 0 ire in far eastern countries such as Japan. If you are unsure which to set, please consult your dealer. -
Page 14: Video Input Source Menu
Then press the Menu Button to leave menu mode Video Input Source Menu The Video Input Source Menu sets the analogue input mode of the DN-500. The DN-500 has Composite (CVBS), S-Video (Y/C) and Component (YPbPr) analogue inputs. N.B. It is only possible to record RAW DV (DV) from the analogue inputs - M2T (HDV) can only be recorded from a HDV stream via IEEE-1394 (iLink, FireWire). -
Page 15: Gpi Mode & Function Menus
GPI Mode & Functions Menus The DN-500 can be set to receive either pulse or level GPI triggers, which can be set to activate Play / Pause or Rec / Pause. To select the GPI Mode: Press the Menu Button, to enter menu mode Press the FWD (►►) Button to navigate the menus until SET GPI TRIGGER MODE is displayed... -
Page 16: Set Date & Time Menu
Set Date & Time Menu To set the Date & Time on the DN-500 Press the Menu Button, to enter menu mode Press the REW (◄◄) Button to navigate the menus until SET DATE & TIME is displayed Press the Next (▲) Button(right) to enter the SET Date & Time menu You will see a flashing cursor on the date value. -
Page 17: Format Hard Disk Menu
You will see ARE YOU SURE? displayed Press the Next (▲) Button(right) again to confirm that you want to format the hard disk. After a few seconds the DN-500 will reboot and the display will return to normal Erase Track Menu Erase Track is used for deleting individual tracks from the DN-500. -
Page 18: Convert Dv To Avi Menu
Convert DV to AVI Menu The DN-500 has a built in file conversion utility which can convert .dv files to .avi files (type 1 or type 2). You can choose the format that best suits your NLE platform. N.B. The DN-500 requires sufficient HDD space to create the .avi file. For example a One GB .dv file will require at least One GB of free space on the DN-500 for the .avi file to be created. -
Page 19: Hdd Surface Scan Menu
Press the Next (▲) Button(right) to exit the surface scan. A txt file called Result will have been created in the root directory of the DN-500 HDD, this can be accessed via a PC, by connecting the DN-500 as a HDD. -
Page 20: Operation With A Dv Camcorder / Deck / Vision Mixer
Recording a track To record from a DV Camcorder / Deck / Vision Mixer connect the DV device to the DN-500 via an IEEE- 1394 (iLink, FireWire) cable. You can connect to either of the rear 6 Pin ports, or to the front mounted 4 Pin port, but only connect one DV device to the DN-500 at a time. -
Page 21: Playing A Dv Track
(►II) Button. It is also possible to set the DN-500 to loop play. In loop play the track will seamlessly looped until stopped. To set up loop play press the Menu Button to enter menu mode and then the FWD (►►) Button until SETUP LOOP PLAY is displayed. -
Page 22: Operation With A Hdv Camcorder / Deck
The track you have selected on the DN-500 is empty. The counter next to the TrackNo. on the LCD display should b showing 00:00:00:00. There is some available space on the DN-500 Hard Disk - Go to the FREE SPACE Menu and check that the DN-500 is not full. -
Page 23: Playing A M2T Track
(►II) Button. It is also possible to set the DN-500 to loop play. In loop play the track will seamlessly looped until stopped. To set up loop play press the Menu Button to enter menu mode and then the FWD (►►) Button until SETUP LOOP PLAY is displayed. -
Page 24: Playing A Track
The track you have selected on the DN-500 is empty. The counter next to the TrackNo. on the LCD display should b showing 00:00:00:00. There is some available space on the DN-500 Hard Disk - Go to the FREE SPACE Menu and check that the DN-500 is not full. -
Page 25: Connecting To A Pc
Folder to View Files. The drive should also appear in My Computer as an internal HDD. Once connected the DN-500 can be used just like any HDD. You can select the required files and drag and drop them to the required destination. -
Page 26: Connecting To A Mac
Once un-mounted from the PC the DN-500 display will leave HDD Mode and return to Track Display. Connecting to a MAC NB: Although a MAC may see the DN-500 as an AVC compliant DV Device it is not intended to be operated as such. - Page 27 The MAC should see the DN-500 as a HDD and the files will appear in the root directory of the drive. You can select the required files and drag and drop them to the required destination. To un-mount the DN-500 from your MAC either “Eject” the drive, or drag it to the Trash Can. Once the DN-...
-
Page 28: Dv File Converter Software
DV File Converter Software DV File Converter is an easy to use utility for converting native DV files to the file format best suited to your NLE system. It is a PC based program with minimal system requirements: Intel Pentium III 500 Mhz processor or faster Windows 98/ME/2000/XP DirectX 128MB of RAM... -
Page 29: Registration
Registration Once installed open the program and select the Registration Tab. Enter your name, organisation and key, (the key can be found on the disc or disc sleeve) and then click on the Register button. -
Page 30: Operation
Operation Open File Converter. Click on the operation button to select the required file type. In this example we have chosen QuickTime. Now click on Output Folder and select the destination to which you want the files to be delivered. In this example we have chosen our F:\Media Folder. - Page 31 Now connect your DN-500 to the PC and enable HDD Mode. Click on the Add button and find the DN-500 drive, in this example it is drive G:. Use Shift + Left Mouse Click to highlight all the files that you want to convert, then click on Open The selected files will appear in the Files window.
- Page 32 The finished files will be delivered to your destination folder. The original DV files will remain on the DN-500, these file scan be deleted once the conversion has been completed, or backed up to your PC if they are valuable.
-
Page 33: Rs 422 Command Set / Protocol
CMD-1: classifies commands into the main groups which indicates the function and direction of commands as follows. CMD-1 Function Initiator System Control Controller System Control Return Device (DN-500) Transport Control Controller Preset And Select Control Controller Sense Request Controller Sense Return Device (DN-500) Data Count: DATA COUNT indicates the number of dat words attached to the command. - Page 34 CONTROLLER detects a communication error, and must execute an appropriate process. 5. When a DEVICE (DN-500) detects a communication error, it must immediately transmit a NAK to the CONTROLLER. (The content of an error is shown on the COMMAND tables.) When the CONTROLLER receives a NAK, if must immediately stop transmission of the block.
- Page 35 Command Table COMMAND RETURN 00.11 : Device Type Request 12.11.20.41 NTSC Mode 12.11.21.41 PAL Mode 20.00 : Stop 10.01 : Acknowledge 20.01 : Play 10.01 : Acknowledge 20.02 : Rec 10.01 : Acknowledge 20.10 : Fast Forward 10.01 : Acknowledge 2x.13 : Shuttle Forward 10.01 : Acknowledge 20.20 : Rewind...
- Page 36 40.51:Decrease Track Number 41.52:Set Track Number 61.0C:Current Time Sense 61.20 : Status Sense Status Return Data BIT 7 BIT 6 BIT 5 BIT 4 BIT 3 BIT 2 BIT 1 BIT 0 Data 0 Busy Local Enable Data 1 Standby On Stop Rewind Fast...
-
Page 37: Specification
Power - 12V 4.2A Dimensions - 482mm (W) x 293mm (D) x 44mm (H) Weight - 7 Kg All the trademarks are the properties of their respective owners. Datavideo Technologies Co., Ltd. All rights reserved 2007. Specifications are subject to change without notice... -
Page 38: Service And Support
It is our goal to make your products ownership a satisfying experience. Our supporting staff is available to assist you in setting up and operating your system. Please refer to our web site www.datavideo-tek.com for answers to common questions, support requests or contact your local office below.
Need help?
Do you have a question about the DN-500 and is the answer not in the manual?
Questions and answers