Table of Contents
Advertisement
Quick Links
Instruction Manual
取扱説明書
■ 組立前に必ずこの説明書を最後まで、 よ く お読みにな り、 正し く お使
い く だ さい。 特に、 「 1. 組立を始める前に必ずお読み く だ さい」 は、 組
立前及び飛行前に必ずお読み く だ さ い。
■ この説明書は、 大切にお手元に保管 して く だ さ い。
※ 製品改良のため、 予告な く 仕様を変更する場合があ り ます。
■ Before assembly, make sure to completely read this
instruction manual. In particular, make sure to read the
"1. Read before assembly" section before assembly and
operating the unit.
■ Keep this instruction manual in a handy, safe place.
※ In order to make improvements to this product, specifications
may be altered without prior notice.
別売品 Sold separately
■ メ イ ンブレー ド : 680-760mm
■ テールブレー ド : 90-105mm
■ バッテリ ー : リ チウムポリマーバッテリ ー 5 cell (18.5V)
又は6 cell (22.2V)×2パッ ク (4800〜5500mAh推奨)
搭載可能サイ ズ (幅60mm、 高さ50mm、 長さ200mm)
■ モーター : ブラシレスモーター ø6シ ャ フ ト KV450〜630
■ ESC (アンプ) : 10 cell又は12 cell対応 120A以上推奨
■ プロポセッ ト : 120°スワ ッ シュモー ド機能の付いた送信機。
3サーボ+ラダーサーボ ・ 3軸 (エルロン ・ エレベーター ・ ピッ チ) ジャイ ロ
■ Main blade: 680-760mm
■ Tail blade: 90-105mm
■ Battery: Lithium polymer battery 5 cell (18.5V) or 6 cell (22.2V)×2 packs
(4800〜5500mAh recommended)
Mountable size (Width 60 mm, height 50 mm, length 200 mm)
■ Motor: Brussless motor ø6 shaft KV450-630
■ ESC (amp): 10 cell or 12 cell, 120 A or higher recommended
■ Transmitter set: A transmitter with 120° swash mode function.
3 servos + rudder servo and 3 axis (aileron, elevator, pitch) gyro
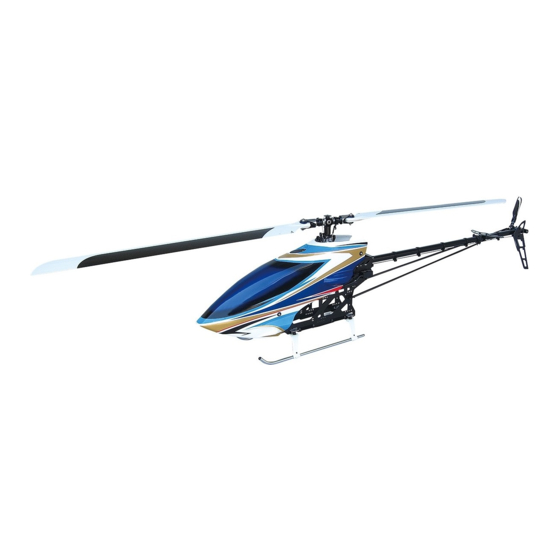
■ 主要諸元
● 全備重量 (参考) : 約5,600g
(使用するバッ テ リ ー ・ ESC ・ ブレー ド等によ り異な り ます。 )
■ SPEC
● Overall weight (reference): Approx. 5,600g
(Varies depending on the type of battery, ESC,
blade or other parts used.)
200mm
417mm
※0414-538 WCカーボン対称メ イ ンブレー ド L=720使用時
※With 0414-538 WC carbon symmetric main blade L=720
MADE IN JAPAN
1,490mm
Ⓒ 2020
No.10H61
Advertisement
Table of Contents

Related Manuals for Hirobo SST-EAGLE4EXEP SSL-III


Summary of Contents for Hirobo SST-EAGLE4EXEP SSL-III
- Page 1 Instruction Manual 取扱説明書 ■ 組立前に必ずこの説明書を最後まで、 よ く お読みにな り、 正し く お使 ■ 主要諸元 ● 全備重量 (参考) : 約5,600g い く だ さい。 特に、 「 1. 組立を始める前に必ずお読み く だ さい」 は、 組 (使用するバッ テ リ ー ・ ESC ・ ブレー ド等によ り異な り ます。 ) 立前及び飛行前に必ずお読み...
-
Page 2: Table Of Contents
お守りください。 precautions before assembly. このたびは、 ヒロボー製品をお買上げいただき、 ありがとうございます。 Thank you very much for purchasing a Hirobo product. In order to 安全にお使いいただくために、 飛行前にこの取扱説明書を最後までよ be able to use this product safely, please read this manual before flying the helicopter. Please fly the helicopter safely observing くお読みください。... - Page 3 ◆ To reduce the risk of accidents and injuries, do not use parts other 9. モーターを回さないで、 各部の操作方法を練習して ください。 than those shown in this instruction manual or in Hirobo catalogs. ◆ モーターを回す前に、 各部の操作方法を練習して ください。 9. With the motor off, practice how to operate each part.
- Page 4 3. 修理は、 お買上げの販売店、 または直接弊社までお申し付けください。 3. Inquire about repairs at the store from where you purchased the product or ◆ 修理の知識のない方や専用工具を持っていない方が修理をすると、 at the engineering services section of Hirobo’s Sales Department. 十分な性能を発揮しないだけでなく、 事故や怪我の原因となります。 ◆ Individuals lacking proper knowledge or tools necessary for repairs ◆...
- Page 5 無線操縦ヘリコプターを安全に For safe handling of the radio controlled お取扱いいただくために helicopter 先に、 無線操縦模型として共通の注意事項を述べましたが、 ヘリコプター In addition to the standard precautions previously mentioned regarding の場合、 さらに次に述べる注意事項を守って ください。 radio controlled models, please observe also the following precautionary items which are specific to helicopters. 警告...
- Page 6 警告 WARNING フライ ト中の安全確認 In-flight safety check 1. 飛行するときは周辺に当たるものや、 巻き込まれそうなものがないか確 1. Check that there are no objects in the surrounding area that may get 認して ください。 entangled or struck by the unit during flight. 2. 周囲に同じ周波数の使用者がいないことを確認して、 送信機のスロッ ト 2. Check that there are no other operators in the surrounding area using the ルスティ...
- Page 7 電動模型の安全について For the safe operation of electric models 警告 WARNING ご使用の前に Before using the unit 送信機、 乾電池、 バッテリー、 充電器、 機体等を幼児や子供の手の届く Never leave equipment such as the transmitter, dry battery, battery, charger or flying unit in a location that can be accessed by the inquisitive hands of infants ところに放置しないでください。...
- Page 8 この説明書の見方 How to use this instruction manual 組立前の注意 Pre-assembly precautions 1. 組立る前に説明書を良く読んで、 おおよその構造及び組立手順を理解し 1. Before assembly, read the instruction manual thoroughly and familiarize てから組立に入って ください。 正しい組立を行わないと、 本来の性能を yourself with the unit’s structure and assembly procedures. Failure to 発揮できなく なるばかりでなく、 大変危険です。 assemble the unit properly may not only result in impaired performance 2.
-
Page 9: ネジの種類とサイズの見方
ネジの種類とサイズの見方 How to read part types and sizes 本説明書の文中に記載している記号は、 次の約束になっています。 The symbols shown in this instruction manual are shown as below: ● 単位はミ リ メー トルです。 ● The unit of measurement is the millimeter. ナベ頭ビス セットスクリュー ø5ボール Pan-head screw Set screw ø5 ball 12mm ø5ボール... -
Page 10: キッ ト以外に必要なもの
フライ トするためにキッ ト以外に必要なもの Items necessary for flying this model not (別売) included in this kit (Sold separately) 当機を楽しむためには、 以下のものが必要です。 (別売) The following items are necessary in order to use the unit. (sold separately) ¥ 税抜価格 スワッシュモード対応プロポセット ピ ッ チチャ ンネル SWM3サーボ... - Page 11 あると便利な周辺用具 Useful tools ¥税抜価格 ブレードサポート ロッドエンドトリマー RCメカクッションパッド RCメカクッションバンド Blade support RC mechanical cushion pad Rod end trimmer RC mechanical cushion band 2513-039 ¥500 2513-134 (キイロ/Yellow) ¥1,000 2513-075 ¥1,200 2513-098 ¥800 シリコンスプレー スキッドゴムφ10 面ファスナー 25X250 キャップ付きテーパーリーマー Skid rubber φ10 Taper reamer with cap Silicon splay Hook-and-Loop fastener 25X250 2513-079 ¥880...
-
Page 12: 組立編
2. 組立編 Assembly サーボの組立 ピッチサーボ Servo assembly エルロンサーボ Pitch servo Aileron servo ELS17サーボホーンL22 EX ø5ボール台付 ELS17 servo horn L22 EX ø5 ball with stand M2X8CS ........3 サーボに付属のネジ Screw included with servo M2.6X12CS ......8 M2X8CS ELS17サーボホーンL22 EX ø5ボール台付 ..... 3 サーボに付属のネジ... - Page 13 カウンターギヤ部の組立 M4X4SS Counter gear assembly ø15ベアリングホルダーW38を取付 けた時に、 上下にアソビが無い様に テールプーリー17T (3GT D6) M4X4SS ........2 締付けてく ださい。 Tail pulley 17T (3GT D6) Tighten screw so there is no up/ down play when ø15 bearing M3X5SS ........2 holder W38 is assembled. カウンターギヤシャフ...
- Page 14 メ インフレームの組立 Main frame assembly ELS17フロントバッテリープレート使用の場合 If using the ELS17 front battery plate M3X8CS ......... 22 ※バッテリーは、 キャビン側、 テール側から取り付け可能です。 バッテリー挿入方向を選択し、 クロスメンバーM3×70を組み立てます。 バッテリー取り付け方向によっ てクロスメンバーM3×70の取り付け位置 M3X6CS ........4 が異なりますので注意して ください。 * The battery can be attached from either the cabin side or tail side. M3X6TS1 ........
- Page 15 メ インフレームの組立 Main frame assembly ELS17リヤバッテリープレート使用の場合 If using the ELS17 rear battery plate M3X8CS ......... 22 ※バッテリーは、 キャビン側、 スキッ ドフッ ト下側から取り付け可能です。 バッテリー挿入方向を選択し、 クロスメンバーM3×70を組み立てます。 バッテリー取り付け方向によってクロスメンバーM3×70の取り付け位 M3X6CS ........4 置が異なりますので注意して ください。 * The battery can be attached from either the cabin side or skid foot underside. キャビン側...
- Page 16 サーボフレーム・メ インフレームの組立 Servo frame and main frame assembly カラー3X8X3 Collar 3X8X3 クロスメンバーM3X38 カラー3X8X7 Cross member M3X38 Collar 3X8X7 ELS17ジャイロマウン ト EX-EP キャビンクロスメンバー M3X20 M3X25CS ....... 12 ELS17 gyro mount EX-EP cabin cross member M3X20 M2.6X6PH皿 M2.6X6 disc screw M3X18CS ......... 2 M3X8CS カラー3X8X14 M3X18CS...
- Page 17 ランディ ングギヤの取付 Landing gear installation M3 Uナッ ト M3 U nut M3 Uナッ ト M3 U nut M3X10CS ......... 4 M2.6X10CS ......4 M2.6ナイロンナッ ト ....4 M2.6 nylon nut M3 Uナッ ト ....... 4 M3 U nut FW ø3Xø9X1T ......4 フローティ...
- Page 18 モーターの組立 Motor assembly モーター (別売) Motor (sold separately) ギヤ比 Gear ratio ギヤ比 メインギア ピニオンギヤ M4X8ボタンボルト ....4 Gear ratio Main gear Pinion gear M4X8 button bolt 1 : 12.30 123T 1 : 11.18 M2X4トラスPH ......2 M2X4 truss PH ピニオンギヤ11T Pinion gear 11T M4X4SS ........
- Page 19 メ インギヤの取付 メインマス ト Main gear installation Main mast 175mm 182.5mm 175mmの穴を使用して ください。 M4X10CS ......... 2 Use the hole at 175 mm. カラー3X8X14 ......2 Collar 3X8X14 ELS17カラー2.6X3.6X5F ELS20 ø12メインマス ト M3X25CS ......... 6 ELS17 collar 2.6X3.6X5F ELS17クロスメンバー P=175 ブロックW14 モーターAssy ELS20 ø12 main mast ELS17 cross member...
- Page 20 ウォッシュアウ トの組立 Washout assembly ※割りのある方に使用 注 意 Caution *Apply the bolt on the slit side of the radius block. M3X22CS ウ ォ ッ シュアウ ト コン トロールアーム M3X22CS ......... 1 の向きに注意してく ださい。 Note washout control arm orientation. M3X15CS ......... 1 ELS17ラジアスブロック...
- Page 21 ヨーク / ブレードホルダー部の組立 Yoke and blade holder assembly 警 告 Warning 警 告 Warning スピン ドルのネジき り部に必ずネジロック剤 (高強度タイプ) を塗布し、 ボタンボル ト 飛行前にはM5X10ボタンボル トが緩んでいないかを点検してく M5X10を40〜45kg•f/cmの締め付け トルクでし っかり と締め付けてく ださい。 ださい。 ネジロッ ク剤を塗布しなかったり、 ボル トがし っかり と締めつけ られていなかった場合、 また、 M5X10ボタンボル トは定期的に交換してく ださい。 ボル...
- Page 22 ローターヘッ ドの取付 Rotor head installation ELS17 SSLⅢ ローターヘッ ドASSY M3X50CS ......... 2 M4X8ボタンボルト ELS17 SSLⅢ rotor head assy M4X8 button bolt M2.6X10CS M3X8CS ........8 M4X8ボタンボルト M2.6X10CS ......2 M4X8 button bolt M2.6X10CS M4X8ボタンボルト ....2 M4X8 button bolt M4X8ボタンボルト M4X8 button bolt M2.6X10CS FW ø2.6Xø7.5X0.5T ....
- Page 23 テールケース部の組立 Tail case assembly 注 意 Caution M3X8CS ........5 タイ ミ ングベル トは、 折り曲げたり、 キズをつけた M3X8CS り しないでく ださい。 破損の原因になり ます。 FW ø2.6Xø7.5X0.5T M3X5CS ........3 To reduce the risk of damage, do not ELS17テールベアリングケー スA bend or scratch the timing belt. ELS17 tail bearing case A Brg.
- Page 24 テールピッチプレートの組立 Tail pitch plate assembly 工場組立済 ミゾ付平行ピンø1.5X8 Pre-assembled Grooved parallel pin ø1.5X8 テールリンク Tail link Eリング1.2mm E-ring 1.2 mm ELS20テールピッチプレー トF テールピッチプレー トボス ELS20 tail pitch plate F Tail pitch plate boss カラー7X8X4 Collar 7X8X4 スライ ドシャフ ト Slide shaft Brg.
- Page 25 テールブームパイプ部の取付 Tail boom pipe installation M3X8CS ........4 M2.6X6CS ........ 1 FW ø3Xø9X1T ......2 M2.6X6CS FW ø3Xø9X1 EX尾翼バン ド EX tail fin band M3X8CS FW ø3Xø9X1T M3X8CS 八角テールブームパイプ カーボン L=895 Octagonal tail boom pipe Carbon L=895 テールブームブレース部の組立 Tail boom brace assembly 90度向きを変えて組み立てます。...
- Page 26 テールブームの取付 Tail boom installation M2.6X8TS-1 ......5 8角テールブームパイプ 注 意 Caution Octagonal tail boom pipe 8角テールブームパイプが入り にく いと きは、 マイナス ドライバー等で隙間を少し広げて入れて下さい。 If it is difficult to insert the octagonal tail ラダーコン トロールガイ ド boom, use a slotted screwdriver etc to wide Rudder control guide the gap slightly, and then insert it.
- Page 27 尾翼の取付 サーボプレー ト Tail fin installation Servo plate M2.6X15CS ラダーサーボ ラダーサーボの取付 Rudder servo Rudder servo installation M2.6X15CS ......4 サーボプレー ト ......2 M3X32CS ......... 2 Servo plate M3X25CS ......... 2 M3X32CS M3X18CS ......... 4 サーボマウン ト Servo mount 注 意 Caution FW ø2.6Xø7.5X0.5T FW ø2.6Xø7.5X0.5T ....
- Page 28 リアバッテリープレートの取付 Rear battery plate installation スプリング M3X3SS Spring 注 意 Caution M3X3SS ........2 M3X3SSはスライ ドラッチピンのDカッ ト部に合わせて スライ ドラッチレバー 締付けてく ださい。 Slide latch lever Adjust the slide latch pin so that M3X3SS is スプリング ......... 1 tightened on the D-cut part of the pin. Spring スライ...
- Page 29 フロントバッテリープレートの取付 Front battery plate installation M2.6X6皿ネジ M2.6X6 disc screw M2X6皿頭小ネジ ..... 4 M2X6 disc head small screw M2.6X6皿ネジ ......4 M2X6皿頭小ネジ M2.6X6 disc screw M2X6 disc head small screw M2X10頭小ネジ ....... 4 M2X10 small head screw ELS17バッテリアタッチメン ト フック ELS17 battery attachment hook ELS17フロン...
- Page 30 ローターヘッ ドのリンケージ Rotor head linkage M2ロッ ドエン ド ....... 10 M2 rod end エレベーター/スワッシロッ ド Elevator/swash rod ピッチロッ ド Pitch rod エルロン/スワッシュロッ ド Aaileron/swash rod ピッチロッ ド Pitch rod ピッチ/スワッシュロッ ド Pitch/swash rod メインマス ト <参考> メインマス トの長さを182.5mmで使用の場合、 ピッチロッ ド Main mast の長さを変えて...
- Page 31 スイ ッチプレートの取付 Switch plate installation M3X6ボタンボルト ....2 M3X6 button bolt ※この穴を使います。 FW ø2.6Xø7.5X0.5T ....2 *Use this hole. FW ø2.6Xø7.5X0.5T ※好みに応じて、 スイ ッチプレー トの 位置を変更できます。 * The switch plate position can be スイ ッチプレー ト changed if you wish. Switch plate M3X6ボタンボルト...
- Page 32 ラダーのリンケージ Rudder linkage M2X8CS ........1 下図のようにラダーコントロールガイ ドの位置をラダー コン トロールロッ ドにそってずらしながら合わせます。 この穴を 使用する EX ø5ボール台付 ..... 1 Position the rudder control guide by sliding it along Use this hole. the rudder control rod as shown below. EX ø5 ball with stand M2ロッ...
- Page 33 メ インブレードの取付 Main blade installation メインブレー ド (別売) Main blade (sold separately) ø5ドラッグボルト ø5 drag bolt ø5ドラッグボルト ...... 2 ø5 drag bolt M4ナイロンナッ ト ..... 2 M4 nylon nut SSZブレー ドスペーサー3T SSZ blade spacer 3T ブレードの厚みによって、 ブレードスペーサー の厚みを変えて下さい。 Change the blade spacer thickness to suit the blade thickness.
- Page 34 ピッチ / スロッ トルの設定 Pitch and Throttle setting ■ピッチの設定 ■Pitch setting ① 送信機のピッチカーブ機能にデータが入力されていないことを確認 ① Make sure there is no data in the transmitter’s pitch curve function. して ください。 もし入力されている場合はデータを消去して ください。 If there is any data, delete it. (詳しくは送信機の説明書をご覧ください。 ) (Refer to the transmitter instruction manual for details.) ②...
- Page 35 キャビンの取付 Cabin installation ■ キャビンの加工 Cutting of the cabin 穴あけ 10mm Drill 10mm hole この穴位置は、あくまでも目安です。始めに小さめの穴 を開け、キャビン取付用クロスメンバーとの位置関係を 確かめながら、徐々に穴を拡げてください。 In order to install the cabin correctly, make a small hole firstly and widen it seeing the position of the cross member. M3X6CS ........4 FW ø2.6Xø7.5X0.5T ....
- Page 36 ESC (アンプ)とバッテリーの接続について ESC (amp) and battery connection 警 告 Warnning ESC (アンプ) 及びバッテリーは市販のコネクタ等を半田付けしてから下記の 図を参考に配線して ください。 思いがけない事故を防ぐために、 バッテ リ ーとESC After soldering the commercially available connector, etc., for the ESC (amp) (アンプ) はフライ トする直前に接続し、 フライ トが and battery, connect the cables referring to the diagram below. 終わった...
- Page 37 ■ピッチカーブの設定 ■Pitch curve setting (このデーターはコンピュータプロポを使用したものです。 ) (This data originated from the use of a programmable transmitter.) ※ESC (アンプ) 、 機体、 電池等によ り変化します。 * It may vary depending on the ESC (amp), main unit and battery. 一般的な目安です。 General guidelines. コンディション ホバリング オートローテーション...
- Page 38 MEMO...
-
Page 39: 補修パーツについて
郡 市・ ご住所 府・県 区 TEL ( ) F AX ( ) コードNo 品名 単価 数量 金額 − − − − − ①パーツ代金の合計 ②送料 (代引手数料込) ご注文はFAXにてお願いします。 合計額 (①+②) ヒロボー株式会社 (パーツ係) + 〒726-0006 広島県府中市桜が丘三丁目3番地1 ③消費税 (合計額×税率) FAX:(0847)47-6108 注文TEL:0847-44-9088 = https://www.hirobo.jp/ お支払金額=合計額 (①+②) +③... -
Page 40: パーツリス ト
2531-002 0307-089 2531-001 2539-017 2506-044 2500-090 0307-062 2539-029 0414-462 0414-520 2500-090 2506-044 0412-296(OP) 2539-029 2532-051 0307-106 0414-459 2539-017 2532-036 0307-056 2532-007 2521-094 2500-073 0307-055 2532-015 2507-001 2531-006 0414-467 2507-001 2509-009 0307-058 2532-055 2500-044 2529-003 2506-035 2524-001 0414-523 2521-074 0414-524 2530-004 2500-091 2522-063 2522-005 (... - Page 41 コー ド No. 品名 入数 税抜価格 ( 円 ) 備考 Code No. Part Q'ty Price (Yen) Remarks ELS17ウオッシュコントロ−ルアーム 0307-055 5,000 ELS17 wash control arm ELS17ラジアスブロック 0307-056 4,000 ELS17 radius block ELS17ブレードホルダー 0307-058 8,600 ELS17 blade holder ELS17ピッチアーム 0307-059 3,700 ELS17 pitch arm ELS17 SSLⅢローターヘッドASSY 0307-060 70,000...
- Page 42 0307-039 2500-122 0307-095 2532-030 2521-148 0307-096 2525-007 2530-004 2532-031 2525-007 2530-004 2521-152 2506-003 2532-031 2532-002 2532-030 0307-051 2530-004 0307-097 0307-061 2532-030 別売 Sold separately 0307-111 0307-098 ( 別売) (Sold separately) 0307-044 0307-050 2531-003 2538-012 2531-003 2506-044 2506-059 2532-008 2532-002 0307-053 0307-043 2532-021 2532-034...
- Page 43 コー ド No. 品名 入数 税抜価格 ( 円 ) 備考 Code No. Part Q'ty Price (Yen) Remarks ELS17 ø24 ベアリングホルダー 0307-039 3,000 ELS17 ø24 bearing holder ELS17 ø24 ベアリングホルダー W38 0307-040 4,200 ELS17 ø24 bearing holder W38 ELS17 モーターマウント 0307-043 9,200 ELS17 motor mount ELS17 ピニオンギヤ...
- Page 44 0307-102 0307-085 0307-018 2521-069 2500-045 2521-129 0307-101 2532-002 2506-038 0414-572 2506-044 2506-044 2532-041 2532-002 0307-037(25T) 2531-003 2506-044 0307-099(24T)(別売) 0307-027 0307-101 (Sold Separetely) 2521-149 2521-129 2521-069 2511-004 2538-012 2538-012 0307-018 0307-032 2531-002 2506-038 2532-002 2511-036 2500-045 0307-085 0307-082 0307-102 2532-002 2532-008 2532-002 2506-044 2532-002...
- Page 45 コー ド No. 品名 入数 税抜価格 ( 円 ) 備考 Code No. Part Q'ty Price (Yen) Remarks EX-EP キャビンクロスメンバー M3X20 0307-018 1,000 EX-EP cabin cross member M3X20 ELS14 カウンターギヤシャフト D6 0307-027 5,000 ELS14 counter gear shaft D6 ELS17 ジャイロマウント 0307-032 3,000 ELS17 gyro mount ELS17 フロントバッテリープレート...
- Page 46 2525-007 0307-078 2532-049 2525-007 0307-078 2532-028 0307-077 2532-028 2525-007 0412-179 2532-028 0307-078 2525-007 2532-028 0307-079 0308-016 2532-030 2532-030 2522-062 2522-004 ( 別売) 2532-030 2532-030 (Sold Separetely) 2524-001 2522-063 2522-005 ( 別売) (Sold Separetely) 0412-179 2522-062 0412-179 2522-004 ( 別売) (Sold Separetely) 2532-033 2532-033 0307-076(アルミ用/for aluminum)
- Page 47 コー ド No. 品名 入数 税抜価格 ( 円 ) 備考 Code No. Part Q'ty Price (Yen) Remarks ELS17 ガバナーセンサーステー 0307-034 1,000 ELS17 governor sensor stay ELS17 ラジアスステー 0307-063 6,000 ELS17 radius stay ELS17 テールブームホルダー W38 2 セット必要 0307-076 2,600 ELS17 tail boom holder W38 2 set is necessary.
- Page 48 0307-113 2506-005 2500-073 0412-157 2539-015 0307-109 2500-073 0414-580 2509-025 2506-005 0307-108 0307-104 2532-039 2507-005 2506-017 2500-120 2525-006 0414-548 2532-031 2521-146 2532-002 2500-120 2506-044 0414-549 2532-039 0307-069 2532-001 2511-002 2506-004 2504-032 0307-090 2506-038 0414-572 0307-107 2500-045 2521-150 0307-064 2506-032 2506-038 2500-082 2505-006 2500-045 0307-065...
- Page 49 コー ド No. 品名 入数 税抜価格 ( 円 ) 備考 Code No. Part Q'ty Price (Yen) Remarks テールピッチレバーカラー 0412-157 Tail pitch lever collar ラダーコントロールガイド 1式 0414-137 Rudder control guide 1 set ELS17 テールベアリングケース A 0307-064 3,000 ELS17 tail bearing case A ELS17 テールベアリングケース...
- Page 50 0412-199 2506-044 2532-001 0307-110 2513-078 ( 別売) (Sold Separetely) 0307-086 2532-053 0307-035 2532-002 2506-044 2505-006 2506-010 0404-722 2506-010 2532-008 2506-044 2532-002 2532-038 2505-006 2521-069 0414-328 0414-150 0307-105 0414-575 2505-006 2532-030 0307-075 ( 別売) (Sold Separetely) 0404-796 2506-044 2532-038 2505-006 2521-069 2532-030 0404-796 2506-044...
- Page 51 Cap screw M3X25 キャップスクリュー M2.6X8 2532-030 Cap screw M2.6X8 キャップスクリュー M3X18 2532-038 Cap screw M3X18 キャップスクリュー M3X32 2532-053 Cap screw M3X32 【お知らせ】 URL https://www.hirobo.com/ 2020年3月にオフ ィシャルオンラインショップをオープンいたしました。 お支払い方法が、 銀行振り込み、 クレジッ ト決済、 コンビニ決済から選べるようになり、 お買い求めやすく なりました。 電動機、 エンジン機にかかわらず、 キッ ト、 スペアパーツ、 OPパーツを揃えています。 商品のご購入はもちろん、 商品詳細確認にもご利用ください。...
- Page 52 3-3-1 SAKURAGAOKA, FUCHU-SHI, 1 〒726-0006 広島県府中市桜が丘三丁目 番地 HIROSHIMA-PREF., JAPAN 〒726-0006 TEL : (0847) 44-9088㈹ FAX : 47-6108 TEL : 81 ・ 847 ・ 44-9088 FAX : 81 ・ 847 ・ 6108 注 意 Caution ① 本書の内容の一部または全部を無断で転載することは禁止されています。 ② 本書の内容については、将来予告なしに変更することがあります。 ③ 本書の内容について万全を期しておりますが、万一ご不審な点や誤り、記載もれなどお気付きのこと がありましたら、ご一報くださいます...
Need help?
Do you have a question about the SST-EAGLE4EXEP SSL-III and is the answer not in the manual?
Questions and answers