Advertisement
Quick Links
Advertisement

Summary of Contents for Creality 3dpRINTmILL
- Page 1 V2.0...
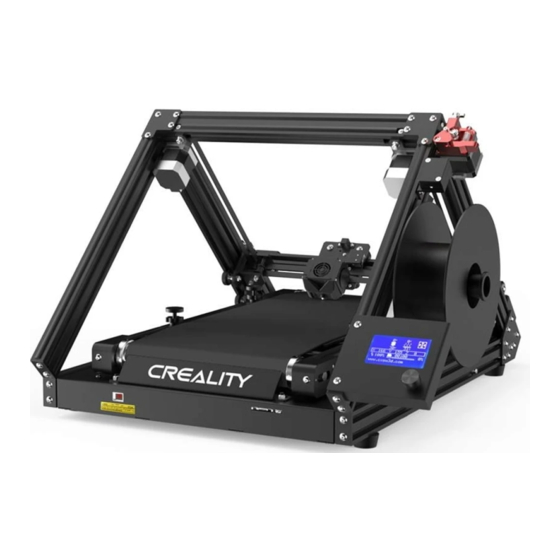
- Page 5 Introduction 设备简介 X motor Nozzle kit Printing platform Bed leveling nut X电机 喷头套件 打印平台 调平螺母 Belt tensioning screw Manual power switch X axis limit switch Extruder 皮带张紧螺丝 手拨电源开关 X轴限位开关 挤出机 Material rack and material tube Knob screen Y motor Knob Y电机...
- Page 6 Basic Parameters 基本参数 Model | 型号 3DPrintMill Print size | 成型尺寸 无限长*200*170mm (长*宽*高) | Infinite length*200*170mm (length*width*height) Molding technology | 成型技术 Number of nozzle | 喷头数量 Layer thickness | 打印层厚 0.1mm-0.4mm Nozzle diameter | 喷嘴直径 Standard | 标配 0.4mm XY axis precision | 精度...
-
Page 7: Parts List
Parts List 零部件清单 Filament 耗材 Spool holder 料架 Profile bracket 1 x 1 Profile bracket 2 x 1 X/Y axis belt assembly x 1 Bottom belt assembly x 1 Display kit x 1 型材支架1 型材支架2 X/Y轴皮带组件 底部皮带组件 显示屏组件 Accessory tool list 配件工具清单... - Page 8 Install the Profile Support Frame 安装型材支撑架 Bottom belt assembly x 1 底部皮带组件 Profile bracket 1 x 1 型材支架1 Profile bracket 2 x 1 型材支架2 Step: Install the profile support 1 and profile support 2 to the bottom of machine with four hexagon flat head screws M5x12 (As shown in the figure above).
- Page 9 Install X/Y Axis Belt Assembly 安装X/Y轴皮带组件 X/Y axis belt assembly X/Y轴皮带组件 Install with M5 * 45 socket head cap screws with spring washer. 用 M5*45 内六角圆柱头弹垫组合螺钉安装。 Hexagon socket flat round head screw M5X18 内六角平圆头螺钉M5X18 Hexagon socket head spring washer combination screw M5X12 x 2 内六角圆柱头弹垫组合螺钉M5X12 Hexagon socket head spring washer combination screw M5X45 x2...
- Page 10 Install the Spool Holder 安装料架 Spool holder料架 M5T nuts M5 T型螺母 Hexagon socket flat round head screw M5X8 x 2 内六角平圆头螺钉M5X8...
-
Page 11: Install The Display
Install the Display 安装显示屏 M5T nuts M5 T型螺母 Hexagon socket flat round head screw M5X8 x 2 内六角平圆头螺钉M5X8 Step: Lock the display assembly with two M5X8 flat head screws and two M5 T-nuts, as shown in the figure above; 步骤: 用2颗M5x8的平圆头螺丝跟2颗M5 T型螺母将显示屏组件锁住, 如上图示;... -
Page 12: Cable Connection
Cable Connection 设备接线 Insert the Teflon tube into the pneumatic connector (also insert the blue wire clamp) 将铁氟龙管插入气动接头 (同时插入蓝 色线夹) Connect the Y-axis limit line. Power cord x 1 连接Y轴限位线。 After the display is installed, please 电源线 connect the display cable. Connect the broken detection line 显示屏安装完成后,请将显示屏线连接好。... - Page 13 Leveling 调平 1.First move the X axis to the contact part between the nozzle and the belt (slightly press the nozzle onto the belt ) . 2.Push the two limit switches against the X sliding block to lock the limit; 3. Press back on the screen to get the printer back to the origin; adjust the Y axis end-stop adjusting screw according to the position of the nozzle relative to the belt after back to the origin in order to make sure the nozzle contacting with the belt rightly;...
- Page 17 When the current temperature reaches the target temperature, press and hold the spring of the extruder and insert the consumables into the charging detection hole one by one, then insert the consumables into the small hole of the extruder until the nozzle position. 当前温度达到目标温度时,按住挤出机弹簧,将耗材依次插入装料检测孔,再将耗材插入挤出机小孔直...
- Page 18 3. Select language→close→setting→add corresponding model→printer setting→close→customize→ confi guration→number of prints to complete the setting. CrealityBelt CrealityBelt 3.依次选择语言→关闭→设置→新增对应机型→打印机设置→关闭→自定义→Confi guration→打印个数, 完成设置。...
- Page 19 4. Open the file in turn → select the file. 依次打开文件→选择文件。 6.Insert the storage card→ print from card→select the file to be printed. 插入存储卡→从存储卡上打印→选择要 打印的文件。 5.Generate G-code, and save the gcode file to storage card. 生成G代码→保存到存储卡。 Notes: For details on the software instructions, please refer File names must be Latin letters or numbers, not Chinese to the slicing software manual in the storage card! characters or other special symbols.
- Page 20 X-axis motor port Y-axis motor port Z-axis motor port E-axis motor port Storage card slot X轴电机接口 Y轴电机接口 Z轴电机接口 E轴电机接口 存储卡卡槽 Micro USB port Micro USB接口 Nozzle fan 喷头风扇 12864 screen Motherboard fan 12864屏幕 主板风扇 Y axis limit Y轴限位 Power input Hot bed Heating pipe Controllable...
-
Page 21: Troubleshooting
Trouble-Shooting Workflow Fault diagnosis Fault cause Fault handling Result feedback 1 . Wipe Storage-card Storage-card 2. Format Storage-card Start 3. Replace Storage-card Play by memory Change the file name to English and File naming card Seal number format 1 . Move model position and slice again Other documents are Display error File identifica-... - Page 22 工作流程 故障诊断 故障原因 故障处理 结果反馈 1. 擦拭存储卡 否 存储卡 2.格式化存储卡 开始 3.更换存储卡 由存储卡打 否 文件名 1 . 文件名修改为英文和数字格式 印 1 . 移动模型位置并重新切片 其他文件是否 是/否 否 文件是否 是 是 是否乱码 是 切片 2.使用修复软件修复模型 识别 打印正常 是 1 . 检查电机、 线路 回零 轴电机...
- Page 24 11F & Room 1201, Block 3, JinChengYuan, Tongsheng Community, Dalang, Longhua District, Shenzhen, China, 518109 Official Website: www.creality.com Tel: +86 755-8523 4565 E-mail: info@creality.com cs@creality.com...


Need help?
Do you have a question about the 3dpRINTmILL and is the answer not in the manual?
Questions and answers