Advertisement
Quick Links
Advertisement

Related Manuals for Creality 3D Print Mill


Summary of Contents for Creality 3D Print Mill
- Page 1 3 D 列印 機使 用說 明書 V1.1...
- Page 3 目錄 使用須知 組裝 3D 列印機 親愛的創想三維用戶: 感謝您選擇、使用創想三維的產品。為了您使用方便,請您在使用之前仔細閱讀 說明書,並嚴格按照說明書的指示進行操作。 創想三維團隊隨時準備為您提供優質的服務。在使用過程中無論遇到什麼問題, 請按照說明書結尾所提供的電話、信箱與我們進行聯繫。 使用 3D 列印機 為了您能更好的體驗我們的產品,您還可以從以下方式獲取設備操作知識: 您可以在記憶卡內找到更多使用說明與影片。 創想三維官網: www.cxsw3d.com 您可以登錄創想三維官網找尋相關軟硬 上料 體、聯繫方式、設備操作、設備保養等訊息。 開始列印...
- Page 4 使用須知 請勿嘗試任何使用說明中沒有描述的方法來使用機器,避免造成意外的人身傷害和財產損失。 請勿將機器放置在易燃易爆物品或高熱源附近,請將機器放置在通風、陰涼、少灰塵的環境內。 請勿將機器放置在震動較大或者其他不穩定的環境內,機器晃動會影響列印品質。 建議使用原廠推薦耗材,以免造成擠出頭堵塞與機器損壞。 請勿在安裝過程中使用其他產品電源線代替,請使用機器附帶的電源線,電源插頭需接插在帶有地線的三孔插座。 請勿在列印機工作時接觸噴嘴以及熱床,以防止出現高溫燙傷,造成人身傷害。 請勿在操作機器時佩戴手套或纏繞物,以防可動部件對人身造成捲入擠壓和切割傷害。 在列印完畢後即時利用噴嘴的餘溫借助工具將噴頭上的耗材清理乾淨,清理時請勿直接用手觸摸噴頭,以防出現燙傷。 常做產品維護時,定期在斷電的情況下,用乾布對列印機做機身清潔,拭去灰塵和沾黏的列印材料、軌道上的異物。 年齡在10歲以下兒童,請勿在沒有人員監督的情況下使用機器,以免造成人身傷害。 本機沒有安全保護機制,請勿在開機狀態下手動快速移動噴頭和列印平台機構,否則設備會自動斷電關機保護。 使用者應遵守設備所在地及相應國家及地區法律、法規,愅守職業道德,嚴禁使用我司產品列印有違背該所在地及國家法律禁止的任何產品或物件。...
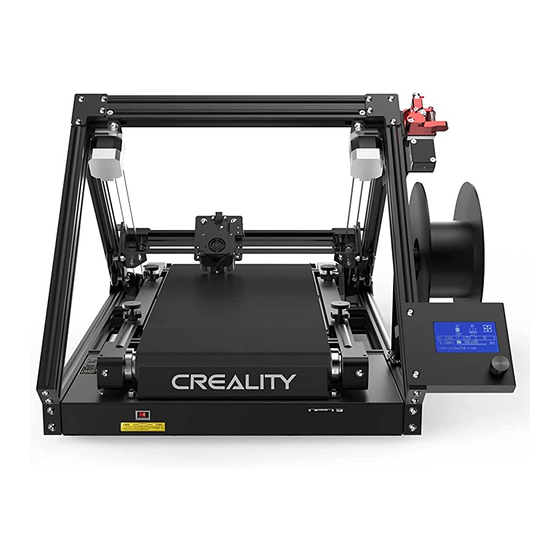
- Page 5 Introduction 設 備 簡 介 X motor Nozzle kit Printing platform Bed leveling nut X 電機 噴頭套件 列 印 平 台 調 平 螺 母 Belt tensioning screw Manual power switch X axis limit switch Extruder 皮帶鬆 緊螺 絲 手撥電源開關 X 軸...
- Page 6 設備 參 數 Basic Parameters 基 本 参 數 Model | 型號 3D Print Mill Print size | 成型尺寸 無限長*200*170mm(長*寬*高)| Infinite length*200*170mm (length*width*height) Molding technology | 成型技術 Number of nozzle | 噴頭數量 Layer thickness | 列印層厚 0.1mm - 0.4mm Nozzle diameter | 噴嘴直徑...
-
Page 7: Parts List
Parts List 零件清 單 � � Spool holder x � Filament x � 料 架 耗 材 X/Y axis belt assembly x � Bottom belt assembly x � Profile bracket � x � Profile bracket � x � Display kit x � �... - Page 8 Install the profile bracket 安裝型材 支 撐 架 � � Bottom belt assembly x � � 底部皮帶組件 Profile bracket � x � � 型材支架 1 �� � Profile bracket � x � � 型材支架 2 �� Step: Install the profile support � and profile support � to the bottom of machine with four hexagon flat head screws M�x��...
- Page 9 Install X/Y Axis Belt Assembly 安裝 X/Y 軸 皮 帶 組件 �� �� �� � �� X/Y axis belt assembly x � � X/Y 軸皮 帶組 件 Install with M� * �� socket head cap screws �� with spring washer. 用...
- Page 10 Install the Spool Holder 安裝料架 � Spool holder x � 料架 � �� M�T nuts x � M 5 T 型螺母 �� �� Hexagon socket flat round �� head screw M�X� x � 內六角平圓頭螺釘 M5X8...
-
Page 11: Install The Display
Install the Display 安 装 螢 幕 �� M�T nuts x � M5 T 型螺母 �� �� Hexagon socket flat round �� head screw M�X� x � �� 內 六角平圓頭螺釘M5X8 �� Step: Lock the display assembly with two M�X� flat head screws and two M� T-nuts, as shown in the figure above. 步驟:用... -
Page 12: Cable Connection
Cable Connection 設備接線 Insert the Teflon tube into the pneumatic connector (also insert the blue wire clamp) 將鐵氟龍管插入氣動接頭 (同時插入藍色線夾) Connect the Y-axis limit line. �� 連接Y軸限位線。 After the display is installed, please 電源線 connect the display cable. Connect the broken detection line as shown in Figure A . - Page 13 Leveling 調 平 �. First move the X axis to the contact part between the nozzle and the belt (slightly press the nozzle onto the belt ) . �. Push the two limit switches against the X sliding block to lock the limit;...
- Page 14 預熱 注意:UI 示意僅供參考,實際以機器介面為主...
- Page 15 預 熱 注意:UI 示意僅供參考,實際以機器介面為主...
- Page 16 在 您 等 待 溫 度上 升 時 , 把耗 材 掛 在 料 架上 為了順利完成列印,耗材的末端位置應如圖所示。...
- Page 17 裝 料 When the current temperature reaches the target temperature, press and hold the spring of the extruder and insert the consumables into the charging detection hole one by one, then insert the consumables into the small hole of the extruder until the nozzle position. 當前溫度達到目標溫度時,按住擠出機彈簧,將耗材依次插入裝料檢測孔,再將耗材插入擠出機小孔直至噴嘴位置。...
- Page 18 開始列印 �. Select language→close→setting→add corresponding model→printer setting→close→customize→ configuration→number of prints to complete the setting. CrealityBelt CrealityBelt 安裝軟體 打開軟體 3. 依次選擇語言→關閉→設置→新增對應機型→列印機設置→關閉→自定義→Configuration→列印個數→完成設置。...
- Page 19 開始列印 �. Open the file in turn → select the file. 依次打開文件→選擇文件。 �. Insert the memory card → press the knob → select from the menu → the file to be printed 插入記憶卡→按下旋鈕→選擇菜單 →要列印的文件。 生成 G-code→保存 文件名需為英文或數字,不能為中文或其他特殊符號。 溫馨提醒:軟體使用相關說明,請參考記憶卡內切片軟體使用手冊。...
- Page 20 電 路接線 Memory card slot X-axis motor port Y-axis motor port Z-axis motor port E-axis motor port 記 憶 卡 卡 槽 X 軸電機接口 Y 軸電 機接 口 Z 軸 電 機 接 口 E 軸 電 機 接 口 Micro USB port Micro USB 接...
- Page 22 故障檢修 工作流程 故障診斷 故障原因 故障處理 處理方式 1. 清潔 USB/記憶卡 否 USB/記憶卡 2. 格式化 USB/記憶卡 開始 3. 更換 USB/記憶卡 從記憶卡列印 文件名修改為英文和數字格式 否 文件名 其他文件 1. 移動模型位置並重新切片 是/否 切片 否 文件是否列印 是 是否有亂碼 是 是否 是 2. 使用修復軟體修復模型 列印正常 是 1. 重接電路 歸零...
- Page 24 因每款機型不同,實物與圖可能有所差異,請以實物為準。最終解釋歸深圳市創想三維科技有限公司所有。 11F & Room 1201, Block 3, JinChengYuan, Tongsheng Community, Dalang, Longhua District, Shenzhen, China, 518109 Official Website: www.creality.com Tel: +86 755-8523 4565 E-mail: info@creality.com cs@creality.com...
Need help?
Do you have a question about the 3D Print Mill and is the answer not in the manual?
Questions and answers