
Subscribe to Our Youtube Channel
Related Manuals for RADEMACHER 9499


Summary of Contents for RADEMACHER 9499
- Page 1 DuoFern Sun/Wind Sensor Instruction manual Item no. 3200 44 64 Type: 9499 VBD 697-2 (06.21)
-
Page 2: Table Of Contents
Contents This manual................4 How to use this manual ..............4 Hazard symbols ...............4 Symbols and depictions used............5 Safety instructions ..............6 Intended use ..................7 Included in delivery ..............8 General view ................9 Operating buttons ................10 Display and its symbols..............11 Product description ............. 12 Technical specifications ............ - Page 3 Contents 14. Reset (factory settings) ............36 15. Cleaning and care ..............37 16. Simplified EU declaration of conformity ......38...
-
Page 4: This Manual
1. This manual..describes how to install and commission the DuoFern Sun/Wind Sensor. 1.1 How to use this manual ◆ Before you begin, please read this manual through completely and follow all the safety instructions. ◆ This manual is part of the product. Please store it in an easily accessi- ble place. -
Page 5: Symbols And Depictions Used
2.1 Symbols and depictions used Depiction Description Procedures Itemisation ◆ or a) List Useful information Please read the respective manual... -
Page 6: Safety Instructions
3. Safety instructions The use of defective devices can lead to personal injury and dam- age to property. ◆ Never use defective or damaged devices. ◆ Check the DuoFern Sun/Wind Sensor is intact. Consult our service department in the event that you discover damage. ◆... -
Page 7: Intended Use
3.1 Intended use Only use the DuoFern Sun/Wind Sensor to log on and control DuoFern devices. Operating conditions ◆ The DuoFern Sun/Wind Sensor must be installed at a minimum height of 2 metres. Radio systems that transmit on the same frequency can cause interference. -
Page 8: Included In Delivery
(5 x 30 mm) Wall plugs (8 mm) DuoFern Sun/Wind Sensor Instruction manual Item no. 3200 44 64 Type: 9499 VBD 697-2 (06.21) DuoFern Sun/Wind Sensor Installation and operating manual Check the contents of the packaging to make sure that they are com-... -
Page 9: General View
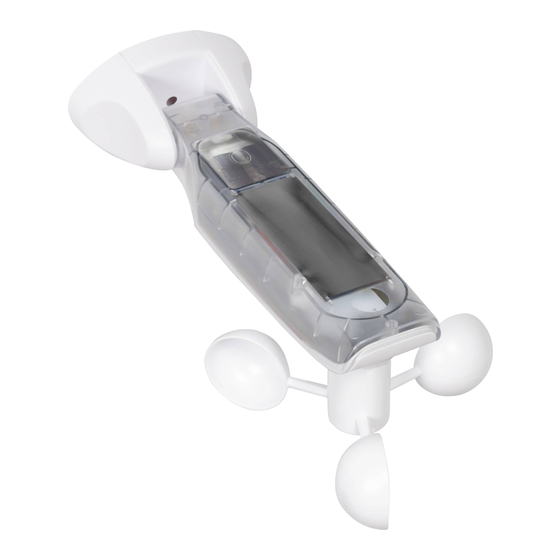
5. General view Wind propeller Display Sensor housing Operating buttons Light sensor Type plate Solar cell Wall bracket... -
Page 10: Operating Buttons
5.1 Operating buttons Pressing any button switches on the display, see page 11. Then you can execute the following functions and setting. Function Button In normal mode In the menu Open the menu Cancel, back - - - Confirm the setting, next UP * Increase the current value DOWN *... -
Page 11: Display And Its Symbols
5.2 Display and its symbols Sun / Wind Service functions, e.g. change of rotation direction Current weather data / menus or setting parameters Radio Battery status klux Light intensity in klux km/h Wind velocity (km/h) Pressing any button switches on the display. The current weather data (wind velocity and light intensity) is displayed alternately. -
Page 12: Product Description
6. Product description The DuoFern Sun/Wind Sensor can be used to control DuoFern sun shading and wind protection devices depending on the weather, e.g. awnings, roller shutters, Venetian blinds, external Venetian blinds, etc. The DuoFern Sun/Wind Sensor measures the brightness and wind velocity in real time. -
Page 13: Technical Specifications
7. Technical specifications Measuring ranges Sun sensor: 1 klux to 99 klux / off > Sun detected after: 10 minutes > Shade detected after: 20 minutes Wind sensor: 10 km/h to 99 km/h / off General information Battery power reserve: 24 hours Permissible ambient -10 °C to 60 °C... -
Page 14: Installation
8. Installation The DuoFern Sun/Wind Sensor can be installed on a smooth wall or surface. Installation requirements to ensure correct functionality: ◆ Install the DuoFern Sun/Wind Sensor in such a way that the sun and wind values can be measured easily. ◆... -
Page 15: Installation Sequence
8.1 Installation sequence Remove the protective caps from the wall bracket. Loosen the fulcrum screw slightly and push down on the sensor housing. Mark the drill holes and drill the 8 mm holes with an 8 mm drill bit. Install the DuoFern Sun/Wind Sensor with the wall plugs and screws provided. -
Page 16: Menu Overview
9. Menu overview Main menu Menu Page Sun function ................17 Wind function ................ 19 Service functions ..............22 Sun / wind test functions ..........23 Rotation direction test / change of rotation direction ..26 Checking the battery status ........... 27 Software version ............ -
Page 17: Menu 1 - Configuring The Sun Function
10. Menu 1 - Configuring the sun function Sun function After After 10 minutes 20 minutes The awning extends or the shutter The awning retracts or the shutter closes completely. opens. The sun function can only be used for sun shading actu- ators. - Page 18 10. Menu 1 - Configuring the sun function Configuring or accepting the set limit If the display is off, turn it on by pressing any button. Select menu 1. > Open the menu. Configure the set limit. Setting range: 1 to 99 klux >...
-
Page 19: Menu 2 - Configuring The Wind Function
11. Menu 2 - Configuring the wind function Wind function After 2 seconds The awning retracts and is blocked. After 15 minutes The block is lifted as soon as the If the sun function is active, the value drops below the set limit for awning extends again when the 15 minutes. - Page 20 11. Menu 2 - Configuring the wind function Configuring or accepting the set limit If the display is off, turn it on by pressing any button. Select menu 2. > Open the menu. Configure the set limit. Setting range: 10 to 99 km/h >...
- Page 21 11. Menu 2 - Configuring the wind function Wind velocity in various units Wind strength Description km/h (Beaufort) Calm < 0.3 < 1.1 Almost calm 0.3 - 1.5 1.1 - 5.4 Very light wind 1.6 - 3.3 5.5 - 11.9 Light wind 3.4 - 5.4 12.0 - 19.4...
-
Page 22: Menu 8 - Service Functions
12. Menu 8 - Service functions The following service functions are available: ◆ Menu 8.1 Sun and wind test functions ◆ Menu 8.2 Rotation direction test and change of rotation direction ◆ Menu 8.3 Display the battery status ◆ Menu 8.0 Software version The test functions are used to check the connection and the settings of the controlled device. -
Page 23: Menu 8.1 - Sun Test Function
12.1 Menu 8.1 - Sun test function Retract all logged-on awnings or shutters completely (e.g. with a remote control). If the display is off, turn it on by pressing any button. Open menu 8 and select > menu 8.1. > Open menu 8.1. -
Page 24: Service Functions
12.1 Menu 8.1 - Sun test function 15 seconds As soon as the torch is switched off, all awnings retract and/or the shutters open after 15 seconds. exit the test mode and return to menu 8 "Service functions". If the sun function does not work as intended, you can find more information on page 29. -
Page 25: Menu 8.1 - Wind Test Function
12.2 Menu 8.1 - Wind test function Extend all logged-on awnings or shutters slightly (e.g. with a remote control). If the display is off, turn it on by pressing any button. Open menu 8 and select > menu 8.1. > Open menu 8.1. -
Page 26: Menu 8.2 - Rotation Direction Test / Change Of Rotation Direction
12.3 Menu 8.2 - Rotation direction test / change of rotation direction If the display is off, turn it on by pressing any button. Open menu 8 and select > menu 8.2. > Open menu 8.2. The number of the select- ed tubular motor or actuator flashes on the display. -
Page 27: Menu 8.3 - Checking The Battery Status
12.4 Menu 8.3 - Checking the battery status If the display is off, turn it on by pressing any button. Open menu 8 and select > menu 8.3. > Open menu 8.3. The current charge of the battery is shown in %. -
Page 28: Menu 8.0 - Viewing The Software Version
12.5 Menu 8.0 - Viewing the software version If the display is off, turn it on by pressing any button. Open menu 8 and select > menu 8.0. > Open menu 8.0. The current software version is displayed (example). return to menu 8 "Service functions". -
Page 29: Menu 9 - Logging Duofern Devices On/Off
You can log a maximum of 3 DuoFern devices on to the DuoFern Sun/ Wind Sensor. Further information about logging on can be obtained from our website www.rademacher.de Conditions of use for the sun function In order for the sun function of the DuoFern Sun/Wind Sensor to work,... -
Page 30: Logging On Devices
13.1 Logging on devices If the display is off, turn it on by pressing any button. Select menu 9. > Open menu 9. The number of logged-on DuoFern devices is dis- played. Switch the desired DuoFern device to log-on mode. Start the log-on process on the DuoFern Sun/ Wind Sensor. - Page 31 13.1 Logging on devices After successfully logging on, the DuoFern Sun/Wind Sensor configures the following settings on the newly logged-on device, see next page: ◆ Automatic wind function is activated ◆ Wind movement direction UP/Retract ◆ Automatic sun function is activated ◆...
-
Page 32: Logging Off Devices
13.2 Logging off devices If the display is off, turn it on by pressing any button. Select menu 9. > Open menu 9. The number of logged-on DuoFern devices is dis- played. Switch the desired DuoFern device to log-off mode. Start the log-off process on the DuoFern Sun/ Wind Sensor. -
Page 33: Logging Duofern Devices On/Off
13.2 Logging off devices Behaviour in the event of a failed log-off In the event of an error, the message "Err" appears and the log-on process is terminated. Error causes: An attempt was made to log off a device that is not logged on. -
Page 34: Clear-Up
13.3 Clear-up This function enables you to log off all DuoFern devices that are no longer available by radio from the DuoFern Sun/Wind Sensor. If the display is off, turn it on by pressing any button. Select menu 9. > Open menu 9. -
Page 35: Deleting All Duofern Devices
13.4 Deleting all DuoFern devices If the display is off, turn it on by pressing any button. Select menu 9. > Open menu 9. The number of logged-on DuoFern devices is dis- 'played. 4 seconds Press and hold the button for 4 seconds. All logged-on devices are deleted. - Page 36 14. Reset (factory settings) This function can be used to completely reset the DuoFern Sun/Wind Sensor to the factory settings. All previous settings and logged-on DuoFern devices are deleted. Press any button to turn on the display. 4 sec. Press and hold all 4 buttons simultaneously. M M M Then all data is reset to the factory settings: Set limits:...
- Page 37 15. Cleaning and care The function of the DuoFern Sun/Wind Sensor can be affected by envi- ronmental influences: ◆ For example, dust or bird droppings on the top of the housing can impair the solar cell and obscure the light sensor. ◆...
- Page 38 16. Simplified EU declaration of conformity RADEMACHER Geräte-Elektronik GmbH hereby declares that the DuoFern Sun/Wind Sensor complies with the Directive 2014/53/EU (Radio Equipment Directive). The full text of the EU declaration of conformity is available at the following website: www.rademacher.de/ce...
- Page 40 RADEMACHER Geräte-Elektronik GmbH service.en@rademacher.de Buschkamp 7 46414 Rhede (Germany) Tel.: +49 2872 933 175...
Need help?
Do you have a question about the 9499 and is the answer not in the manual?
Questions and answers