Regency Fireplace Products City Series Owners & Installation Manual
Hide thumbs
Also See for City Series:
- Owners & installation manual (124 pages) ,
- Owners and installation manual (108 pages) ,
- Manual (33 pages)
Table of Contents
Advertisement
Quick Links
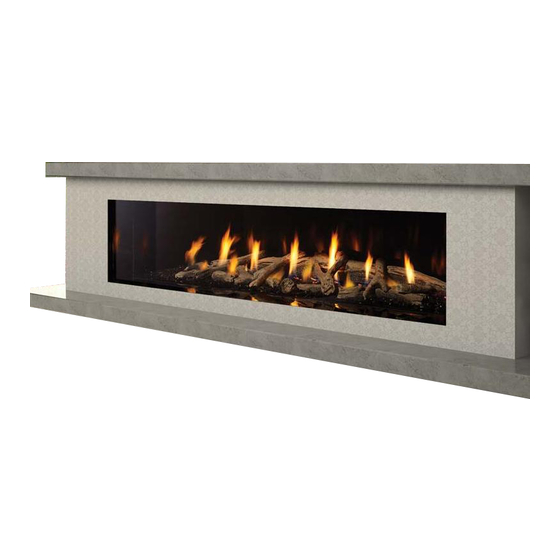
CST60E DIRECT VENT
STYLE
See-Thru
WARNING
FIRE OR EXPLOSION HAZARD
Failure to follow safety warnings exactly could result in serious
injury, death, or property damage.
- Do not store or use gasoline or other flammable vapors and liquids in the vicinity of this or any
other appliance.
- WHAT TO DO IF YOU SMELL GAS
•
Do not try to light any appliance.
• Do not touch any electrical switch: do not use any phone in your building.
Leave the building immediately.
• Immediately call your gas supplier from a neighbour's phone. Follow the gas supplier's
instructions.
• If you cannot reach your gas supplier, call the fire department.
- Installation and service must be performed by a qualified installer, service agency or the gas supplier.
Tested by:
Certified to/Certifié pour:
920-348
FPI FIREPLACE PRODUCTS INTERNATIONAL LTD. 6988 Venture St., Delta, BC Canada, V4G 1H4
City Series ®
MODEL
CST60E-NG / CST60E-LP
CSA 2.17-2017
ANSI Z21.88-2019
CSA 2.33-2019
Installer: Please complete the details on the back cover and leave this manual
with the homeowner.
Homeowner: Please keep these instructions for future reference.
Owners &
Installation Manual
www.regency-fire.com
09.14.21
Advertisement
Table of Contents

Related Manuals for Regency Fireplace Products City Series


Summary of Contents for Regency Fireplace Products City Series
- Page 1 City Series ® Owners & CST60E DIRECT VENT Installation Manual STYLE MODEL www.regency-fire.com See-Thru CST60E-NG / CST60E-LP WARNING FIRE OR EXPLOSION HAZARD Failure to follow safety warnings exactly could result in serious injury, death, or property damage. - Do not store or use gasoline or other flammable vapors and liquids in the vicinity of this or any other appliance.
- Page 2 The CST60E City Series have been approved by Intertek for both safety and efficiency. As it also bears our own mark, it promises to provide you with economy, comfort and security for many trouble free years to follow.
- Page 3 This appliance can only be used with the type of gas indicated on the rating plate. It is not convertible for use with other gases, unless a certified kit is used. Ensure that structural members are not cut or weakened during installation. City Series CST60E | 3...
- Page 4 After it has been determined that each appliance connected to the venting system properly vents when tested as outlined above, return doors, windows, exhaust fans, fireplace damper and any other gas-fired burning appliance to the previous conditions of use. 4 | City Series CST60E...
-
Page 5: Table Of Contents
Venting Arrangement for Vertical Terminations - 5" x 8" Flame Pattern .................. 114 (127 mm x 203 mm) Rigid and Flex Pipe ........54 Aeration Adjustment ................ 115 Vertical Terminations - 5" x 8" (127 mm x 203 mm) Rigid Pipe ..55 City Series CST60E | 5... - Page 6 Individual Glass Gasket Parts for Item # 25 ........121 Upper Glass Clamps ............... 122 Lower Glass Clamps ............... 122 Power Vent-End of Line (Part # 946-535) ........123 Power Vent - Inline (Part # 666-945) ..........124 Warranty ..................126 6 | City Series CST60E...
-
Page 7: Copy Of Safety Decal
Part No. 946-753 HeatWave Kit may be used. Le système HeatWave (pièce n 946-753) peut être utilisé. Part No. 946-535 Power Vent Horizontal Termination City Series may be used. La pièce n 946-535 Horizontal Power Vent Termination City Series peut être utilisée. - Page 8 (e) A copy of all installation instructions for all Product Approved side wall horizontally vented gas fueled equipm ent, all venting instructions, all parts lists for venting instructions, and/or all venting design instructions shall remain with the appliance or equipment at the completion of the installation. 8 | City Series CST60E...
-
Page 9: Important Message
OUT OF TRAFFIC AND AWAY FROM THE BARRIER MUST BE REPLACED FURNITURE AND DRAPERIES. WITH THE MANUFACTURER'S BARRIER FOR THIS APPLIANCE. WARNING: FAILURE TO INSTALL THIS APPLIANCE CORRECTLY WILL VOID YOUR WARRANTY AND MAY CAUSE A HOUSE FIRE. City Series CST60E | 9... -
Page 10: First Fire
When on, the pilot flame may make a whispering sound. DO NOT BURN THE UNIT WITHOUT THE GLASS IN PLACE. Gas Control Valve As the gas control valve turns ON and OFF, a dull clicking sound may be audible. This is normal. | City Series CST60E... -
Page 11: Lighting Procedure
• Power vent models do not have a continuous pilot option. a) Turn the system off by pressing the ON/OFF button on the remote . b) Wait 5 minutes, then repeat the process from step 2. City Series CST60E | 11... -
Page 12: Copy Of The Lighting Plate Instructions
DO NOT REMOVE THIS INSTRUCTION PLATE NE PAS ENLEVER CETTE ÉTIQUETTE D’INSTRUCTIONS 919-649b Part #: 919-649b | City Series CST60E Colours: Black on Grey, except for parts indicated as being Red. Punch out .25" hole top right corner where indicated. -
Page 13: Proflame Ii Remote Control Operating Instructions
REMOTE CONTROL Supply voltage 4.5V (three 1.5V AAA batteries) Ambient temperature ratings 0 - 50 C (32 - 122 Typical operative distance 12 m (39 ft) in free air Radio frequency 315 MHZ (FCC version) City Series CST60E | 13... - Page 14 LCD display will only show the room temperature (fig. 6). At the same time the IFC will turn off the appliance. A single “beep” from the IFC confirms reception of the command. Figure 9 Figure 10 | City Series CST60E...
- Page 15 (fig. 14). A single “beep” confirms reception of the command. ing the DOWN ARROW key will turn the secondary burner off. A single “beep” confirms the reception of the command. Figure 17 Figure 18 Figure 13 Figure 14 City Series CST60E | 15...
- Page 16 2. Press and hold the ON/OFF and MODE buttons simultatneously. manual. For information on light bulb replacement, refer to the 3. Reinstall the battery removed in step 1 while holding both buttons, "Maintenance" section. then release the MODE button only. | City Series CST60E...
-
Page 17: Maintenance Instructions
Continuous condensation can cause corrosion of caps, pipes, and fittings. It may be caused by having excessive lateral runs, too many elbows, and exterior portions of the system exposed to cold weather. City Series CST60E | 17... -
Page 18: Installer's Information
• All pictures/diagrams shown throughout this manual are for illustration purposes only. Actual product may vary due to enhancements. • Dimensions will appear as (inches)" / (metric) mm throughout this manual. The inches are rounded to the nearest 1/16" when converted. | City Series CST60E... -
Page 19: Gas Connection - Bottom Of Unit
(Metal box supplied for all 120 volt connections.) Side A Side B Side B Side A Side A Side B 1-1/2" (38 mm) 1" (25 mm) 4-3/4" (121 mm) 1/2" (13 mm) 3-3/4" (95 mm) 2-1/2" (64 mm) City Series CST60E | 19... -
Page 20: General Safety Information
Barrier (Outer) Safety Glass b. Firebox (inner) glass c. Log Set d. Fireglass e. Ceramic stones or other approved media f. Painted, enamel, or glass panels (panels required) g. HeatWave Kit h. HeatWave Kit Adaptor | City Series CST60E... -
Page 21: Locating Your Gas Fireplace
• See section "Exterior Vent Termination Locations." B. CST60E - SEE-THRU Glass Glass 36" min. (914 mm) 36" min. (914 mm) 36" min. (914 mm) walkway 36" min. (914 mm) walkway City Series CST60E | 21... -
Page 22: Unit Assembly Prior To Installation
Leveling legs Flanges supplied tool--found in the manual package) if required. Leveling Legs There are two levelling legs on each side that can be adjusted with the tool Leveling legs found in the manual package. Levelling Legs | City Series CST60E... - Page 23 3. Push the access panel toward the inside of the unit and lift up from the bottom to release the bottom tabs. When clear, lift out of unit. 4. Reverse steps to reinstall access panel. City Series CST60E | 23...
-
Page 24: Installation - General
Minimum 120 sq. in. opening (flush) Stud Stud In the example above, the ceiling does not meet the requirement as it is higher than the specified minimum. Top of chase enclosure is sealed off to meet the 0-2'' (51mm) requirement. | City Series CST60E... -
Page 25: Clearances - Flush Installation
• The top, back, and sides of the fireplace are defined by standoffs. The metal ends of the standoffs may NOT be recessed into combustible construction. Ceiling Sprinkler Chase grill Side view City Series CST60E | 25... -
Page 26: Flush Installation Examples (Ventilation Openings)
120 sq. in. min. 4" (102 mm) min. 10" (254 mm) min. 1-1/2" (38 mm) min. Option 2 - Front/Side Shown with ventilation openings on side and front to meet the minimum requirement of 120 sq. in. | City Series CST60E... - Page 27 2" (51 mm) max. 120 sq. in. min. 4" (102 mm) min. 10" (254 mm) min. Option 4 - One Side Shown with ventilation opening on one side to meet the minimum requirement of 120 sq. in. City Series CST60E | 27...
- Page 28 Shown with ventilation opening at top of enclosure to meet the minimum requirement of 120 sq. A minimum gap of 1-3/4" (44 mm) between the top of the enclosure and the ceiling is required with this type of ventilation opening, to equal the minimum requirement of 120 sq. in. | City Series CST60E...
-
Page 29: Clearances - Bench Installation
• The top, back, and sides of the fireplace are defined by standoffs. The metal ends of the standoff may NOT be recessed into combustible construction. Ceiling Sprinkler Chase grill Side view City Series CST60E | 29... - Page 30 90 sq. in. front and back 1-1/2" (38 mm) min. Option 2 - Front and Back Shown with ventilation openings on the front and back of the enclosure to meet the minimum requirement of 180 sq. in. | City Series CST60E...
- Page 31 1-1/2" (38 mm) min. 3" (77 mm) min. Option 4 - Top and Front Shown with ventilation opening on top and front (90 sq. in. each) to meet the minimum requirement of 180 sq. in. City Series CST60E | 31...
- Page 32 Shown with ventilation opening on the front with a chimney chase to meet the minimum requirement of 180 sq. in. • The chimney chase must be sealed with a firestop to prevent heat from escaping into the chimney chase enclosure. All heat must exit through the ventilation openings. | City Series CST60E...
-
Page 33: Mantel Clearances
8 10 12 14 12" (305 mm) maximum 9" (229 mm) 5-1/4" (133 mm) maximum 18-1/16" (459 mm) 10-1/4" (260 mm) - from base of unit to bottom of fireplace 1/2" Drywall, wood, wood panel, etc. City Series CST60E | 33... -
Page 34: Mantel Leg Clearances
• One side shown. Clearances are the same Mantel Leg 7" (179 mm) on the other side. Allowable mantel leg projection 5" (127 mm) 12" (305 mm) 60-5/16" (1532 mm) - measured from side lip finishing 9" (229 mm) 10-1/4" (260 mm) | City Series CST60E... -
Page 35: Framing Dimensions
• A combined minimum of 180 square inches of open area for the bench installation and 120 square inches for the flush installation is required for the convection air outlet to cool the enclosure. Ensure clearances for convection air outlets are met. • See clearances in this manual for different ways to achieve this. City Series CST60E | 35... -
Page 36: Chase Vent Installation (White Front) (Part # 686-991)
Opening for vent: 3-1/4" (83 mm) - 3-1/2" (89 mm) Ceiling Ceiling Stud Max 2” (51 mm) Top of chase enclosure Max 2” (51 mm) 60” (1524 mm) Chase Vent 60” (1524 mm) Chase Vent Stud Stud Finishing material Finishing material | City Series CV60E | City Series CST60E... -
Page 37: Wall Board/Drywall Installation
Side B Side A NO SCREWS NO SCREWS SCREWS SCREWS SCREWS 4-1/2" (114 mm) 7-1/2" (191 mm) 7-1/8" (181 mm) 9-5/16" (237 mm) 1-1/8" (29 mm) 6-3/8" (162 mm) 12-1/8" (308 mm) 4-1/2" (114 mm) City Series CST60E | 37... -
Page 38: Framing And Finishing Inset Installations
(with smaller glass) have no limit on how far the combustible material extends from the appliance. Ensure that no material encroaches anywhere in the area of the glass as defined by the finishing lip surrounding the appliance. | City Series CST60E... - Page 39 Min. 23-3/8" (594 mm) with 2 x 6 diemnsion C Maximum 5-1/4" (133 mm) Bottom of fireplace opening - combustible hearth shown. • A recess may be used on both sides if the clearance require- ments shown above are adhered to. City Series CST60E | 39...
- Page 40 • The TV mounting bracket cannot be secured directly to the appliance-it must be secured to the framing. The TV depicted in the image above may require a higher placing, depending on the style of the TV and the mounting bracket used. | City Series CST60E...
-
Page 41: Finishing
Firebox Glass will not be Screwdriver and remove bottom and - Finish up to trim on all 4 sides possible side trim pieces - Bottom edge should be ush with top surface of Inner Liner Panel Recess Install Example City Series CST60E | 41... -
Page 42: Wall Mount On / Off Switch And Battery Holder Installation
11. Using the two (2) screws provided, secure the cover plate to the battery holder. 12. For coding instructions, see full details in this manual. Proflame Battery Holder REMOTE Item Part No. Description Slider Switch 910-576 Wall Plate 911-187 Battery Holder J-Box 910-369 Low Voltage Junction Box | City Series CST60E... -
Page 43: Lp Conversion Instructions
Pilot hood 11. Lift off the trim cover on the right side of the burner. Also, remove the burner surround by sliding it to the left and lifting it off. Trim cover Burner Surround 07.14.21 920-406 City Series CST60E | 43... - Page 44 Manifold Pressure - High 10.5" WC (2.62 kpa) Manifold Pressure - Low 2.9" WC (0.72 kpa) Orifice Size #50 DMS Maximum Input 36,000 Btu/h (10.54 kW) Minimum Input 19,500 Btu/h (5.71 kW) Altitude 0-4500 ft (0-1372m) Installer Notice: These instructions must be left with the appliance 920-406 07.14.21 | City Series CST60E DETAIL A SCALE 1 : 4...
-
Page 45: Ng System Data
(or as per local codes) for the unit, disconnect the hose, and tighten the ease of servicing this appliance. screw (clockwise) with a 1/8" flat screwdriver. • Screw should be snug, but do not over tighten. City Series CST60E | 45... -
Page 46: Exterior Vent Termination Locations
* Clearance in accordance with local installation codes and the requirements of the gas supplier a 3 feet (91cm) within a height of 15 feet (4.5m) above the meter / regulator assembly b 3 feet (91cm) above - if within 10 feet (3m) horizontally | City Series CST60E... -
Page 47: Installation-Non Power Vent
Offset Support 58DVA-ES 5DT-OS TM-5OS Wall Thimble-Black 58DVA-WT 5DT-WT 5DWT VDV-WPT05 Wall Thimble Support/Ceiling Support 58DVA-DC Firestop Spacer 58DVA-FS 5DT-FS 5DFS TM-5LS VDV-FS05 Trim Plate-Black 58DAV-WFS 5DT-TP 5DCP TM-5TP VDV-WTC05 * Not available from Regency City Series CST60E | 47... - Page 48 1 foot of run towards the termination. 36" (914mm) 29-13/16" (757mm) 39-7/16" (1002mm) Never allow the vent to run downward - this could cause high temperatures and may present a possible fire hazard. 48" (1219mm) 38-1/4" (972mm) 47-7/8" (1216mm) | City Series CST60E...
-
Page 49: Vent Restrictor Position
Fully open 1" Factory Set 2 " 4 " Set 5 Set 1 3/4" 3-1/2" 8 " Set 2 3-1/8" 8 " Cross section showing the ceiling of the firebox from the inside Set 3 2-3/8" City Series CST60E | 49... -
Page 50: Venting Introduction
Horizontal vent must be supported every 3 feet. • Firestops are required at each floor level and whenever passing through a wall. • A vent guard should be used whenever the termination is lower than the specified minimum or as per local codes. | City Series CST60E... -
Page 51: Horizontal Terminations - Flex Vent 5" X 8" (127 Mm X 203 Mm)
• Flex system can only be used up to a maximum continuous vent length of 10 feet. If longer runs are required, rigid pipe must be used. Vent Guard - if required* (Part #946-506/P) City Series CST60E | 51... -
Page 52: Horizontal Terminations - Rigid Pipe 5" X 8" (127 Mm X 203 Mm)
Products Ameri Vent Direct Vent, Security Secure Vent , ICC Excel, Selkirk Direct-Temp. AstroCap is a proprietary trademark of FPI Fireplace ® Products International Ltd. Dura-Vent® and Direct Vent are registered and/or proprietary trademarks of Simpson Dura-Vent Co. Inc. | City Series CST60E... - Page 53 7' (2.1 m) required between all 90 elbows. 6' (1.8 m) 5' (1.5 m) 11' (3.4 m) 8' (2.4 m) 7' (2.1 m) 6'(1.8 m) 12' (3.7 m) 9' (2.7 m) Restrictor Set 0 - Factory Setting City Series CST60E | 53...
-
Page 54: Venting Arrangement For Vertical Terminations - 5" X 8" (127 Mm X 203 Mm) Rigid And Flex Pipe
If no offsets are used, the maximum run is Vent restrictor on per the chart on this page. Set 4: 1" (25 mm) open Set 1: 3-1/2" (89 mm) open Min. length of pipe between elbows: 12" (305 mm) | City Series CST60E... -
Page 55: Vertical Terminations - 5" X 8" (127 Mm X 203 Mm) Rigid Pipe
Products Ameri Vent Direct Vent, Security Secure Vent , ICC Excel, Selkirk Direct-Temp. AstroCap is a proprietary trademark of FPI Fireplace ® Products International Ltd. Dura-Vent® and Direct Vent are registered and/or proprietary trademarks of Simpson Dura-Vent Co. Inc. City Series CST60E | 55... -
Page 56: Vertical Terminations - 5" X 8" - Rigid Or Flex Pipe
30 feet (9.1 m) with min. of 10 feet (3 m) total vertical pipe and max. 8 feet (2.4 m) total horizontal pipe. • A minimum of 1 ft. (610 mm) is required between all elbows. | City Series CST60E... -
Page 57: Vertical Terminations - Vertical Flex Vent Kit (Part #946-772)
The ceiling firestop/firestop spacer may be cut down to size if this shield is too high for the application. 11" Ceiling firestop Diagram 2 920-385 Page 1 03.23.21 City Series CST60E | 57... - Page 58 Note: Any closets or storage spaces which the vent passes through must be enclosed. Diagram 3a Diagram 3a Diagram 3a 920-328 09.18.20 City Series ACB60E | 61 920-328 09.18.20 City Series ACB60E | 61 | City Series CST60E 920-385 Page 2...
-
Page 59: Vertical Flue Extension Kit (Part # 946-769)
(0.91 m) to avoid excessive stress and sagging of the vent pipe. Wall straps are provided (3 in total) for this purpose. All round/plumbers strapping may also be used if further supports are required. City Series CST60E | 59 919-696 06.11.18... -
Page 60: Ceiling Firestop / Firestop Spacer (Part # 946-770)
6.1m 920-328 920-337 10.05.20 10.05.20 CEILING FIRESTOP/FIRESTOP SPACER | City Series ACB60E ( PART # 946-757) CEILING FIRESTOP/FIRESTOP SPACER | City Series ACB60E Used in conjunction with the 946-755 Vertical flex kit and 946-756 kit Vertical ( PART # 946-757) flex extension kit/Horizontal power vent kit. -
Page 61: Wiring Diagram - Non Power Vent
Spark Electrode Diagnostic Interface 911-111 Flame Sensor Electrode Combustion Blower 911-311 PFII IFC Board Lamp Green to Ground User Interface 911-344 Power Harness w/Aux Comfort Fan Connector Split Flow 911-253- Main Line Motor 911-272 Variable Lights City Series CST60E | 61... -
Page 62: Wiring The Unit (120 Volt Power Supply)
2. Loosen 2 screws in locations shown below. DETAIL A SCALE 1 : 6 Side A 3. Slide electrical box plate towards the back of the unit and then out. DETAIL B SCALE 1 : 4 Side A | City Series CST60E... - Page 63 NOTE: The receptacle and receptacle cover may be located in the manual pack and may need to be installed. 6. Feed any excess wiring into the wall and reinstall the plate onto the wall of the unit. 7. Reinstall electrical box and plate onto screws. 8. Tighten screws to secure. City Series CST60E | 63...
-
Page 64: Installation-Power Vent
This unit may be terminated vertically or horizontally. See the following pages for various vent configurations using rigid or flex & vertical or horizontal termina- tions. The instructions contained in this manual must be read carefully prior to installation. | City Series CST60E... -
Page 65: 4"X 6-5/8" (102 Mmx 168 Mm) Rigid Pipe Cross Reference Chart
4D90A Adaptor* 4D90L VDV-UAA04 Ceiling Support 4DT-CS 4DSP 4DFSP SV4SD TM4-RDS VDV-SCR04 Cathedral Support Box 46DVA-CS 4DT-CSS 4DRSB 4DRS SV4CSB TM4-SDS VDV-CSS04 Wall Support/Band 46DVA-WS 4DT-WS/B 4DWS 4DWS SV4BM TM-SWS VDV-WS04 *Not available at Regency City Series CST60E | 65... - Page 66 20-3/4” (527mm) Metal-Fab Sure Seal: www.mtlfab.com 24” (610mm) 20-5/8” (524mm) 29-1/8” (740mm) Security Secure Vent: www.securitychimneys.com 36” (914mm) 29” (737mm) 37-1/2” (953mm) Industrial Chimney Company: www.icc-rsf.com 48” (1219mm) 37-7/16” (951mm) 45-15/16” (1167mm) Olympia Ventic DV: www.olympiachimney.com | City Series CST60E...
-
Page 67: Horizontal Terminations - Inline Horizontal Vent Chart
Vent Restrictor Position No vent restrictor required. Vent Restrictor Position No vent restrictor required. Set 0 Fully open Factory Set Set 0 Fully open 3 1 8 " Factory Set 920-210b 09.22.20 3 1 8 " City Series CST60E | 67 3"... -
Page 68: Horizontal Terminations - End Of Line Horizontal Vent Chart
• • Minimum 4' (1.2 m) from the unit prior to terminating. Minimum 4' (1.2 m) from the unit prior to terminating. Vent Restrictor Position No vent restrictor required. Set 0 Fully open Factory Set 3 1 8 " | City Series CST60E... -
Page 69: Horizontal Terminations - Inline Power Vent - 4" X 6-5/8" Flex Vent
Sold separately Minimum 1 ft (0.3 m) prior to a termination cap. Minimum 6 ft (1.8 m) rise from top of unit if there is a 946-506/P Vent Guard Sold separately negative run. 920-210b 09.22.20 City Series CST60E | 69... -
Page 70: Horizontal Terminations - Inline Power Vent - 4" X 6-5/8" Rigid Pipe
Sold separately 666-945 Power Vent Kit Sold separately 946-206 Vinyl Siding Standoff Sold separately 946-523/P Astro Cap Termination Sold separately Wall Thimble Sold separately 946-506/P Vent Guard Sold separately NOTE: Slip section is mandatory. 920-210b 09.22.20 | City Series CST60E... -
Page 71: Horizontal Terminations - End Of Line Power Vent - Rigid Pipe 4" X 6-5/8" (102 Mm X 168 Mm)
Vent Trim, Fan, and Terminal 911-250/P 45'-5 Wire BX Cable or Sold separately 911-251/P 90' 5-Wire BX Cable Sold separately Amount required 4" x 6-5/8" Rigid Pipe Sold separately for install NOTE: *Slip section is mandatory. City Series CST60E | 71... -
Page 72: Power Vent Installation - End Of Line Power Vent - Flex Pipe
Included w/Power Vent kit Power Vent Frame Included w/Power Vent kit 911-250/P 45' 5-Wire BX Cable or Sold separately 911-251/P 90' 5-Wire BX Cable Sold separately 946-535 Power Vent Kit Sold separately Power vent trim Power vent frame | City Series CST60E... -
Page 73: Horizontal Termination - 4" X 6-5/8" (102 Mm X 168 Mm) Venting (Rigid Vent Systems)
3 supplied screws (drilling pilot holes will make this easier). 4. Level the fireplace and fasten it to the framing using nails or screws through the top and side nailing strips. Diagram 2 Diagram 4 Diagram 1 City Series CST60E | 73... -
Page 74: Venting Arrangement For Vertical Terminations-Inline Power Vent
(Note: two 90 elbows shown.) .22 m) from to inline PV Min. 2' (0,61 m) from inline PV to termination cap Min. 4' (1.22 m) from top of unit to inline PV 920-210b 09.22.20 | City Series CST60E... -
Page 75: Vertical Inline Power Vent Terminations - Rigid Pipe
Venting, ICC Excel Direct, Olympia Ventis DV, and Security Secure Vent systems. Use of these systems with the Rigid Pipe adaptor is deemed acceptable and does not affect the Intertek WHI listing of components. 920-210b 09.22.20 City Series CST60E | 75... -
Page 76: Vertical Terminations - Rigid Pipe 4" X 6-5/8" (102 Mm X 168 Mm)
8' Min. Please note min. 1 foot between 90 6' Min. 7' Max 9' Min. elbows is required. 7' Min. 8' Max 10' Min. Lengths do not include elbow indicated Restrictor Set 0 - Factory Setting | City Series CST60E... -
Page 77: Vertical Terminations - Flex Pipe
911-250/P 45' (13.7 m) 5-wire BX cable (sold separately). 911-251/P 90' (27.4 m) 5-wire BX cable (sold separately). Must also purchase one of the flashings listed below: 46DVA-F12 Flashing 7/12 - 12/12 46DVA-F6 Flashing 0/12 - 6/12 46DVA-FF Flat roof flashing City Series CST60E | 77 920-210b 09.22.20... -
Page 78: Inline Power Vent Dimensions
10" (254 mm) 4-1/2" (114 mm) 14-1/4" (362 mm) 11" (279 mm) 12-1/4" (312 mm) 4-3/8" (111 mm) 5-7/8" (149 mm) 14-1/4" (362 mm) 11-11/16" (297 mm) 4-7/16" (113 mm) 15-5/8" (397 mm) 6-7/16" (163 mm) | City Series CST60E... -
Page 79: Gas Power Vent Installation - Framing- Inline Power Vent Terminations
Termination End 16" (406 mm) Appliance End Directional Arrows 10" (254 mm) Vent at appliance end Pressure switch orientation if inline power vent is oriented horizontally (see Diagram 2) City Series CST60E | 79 920-210b 09.22.20... -
Page 80: Power Vent Terminal Installation-Inline Power Vent Terminations
Remove the 2 screws connecting the pressure switch mount to the mounting bracket. Turn the mounting bracket 90 degrees, line up the holes and screw the bracket back onto the mount. Fan (Part # 911-305) | City Series CST60E 920-210b 09.22.20... -
Page 81: Gas Power Vent Installation Clearance Requirements Inline Power Vent Terminations
Diagram 1 Diagram 2 16 in 16 in (406 mm) (406 mm) Diagram 4 Diagram 3 Diagram 4 Diagram 3 12" (305 mm) 2" (51 mm) 3" (78 mm) 16" (406 mm) 920-210b 09.22.20 920-210b 09.22.20 City Series CST60E | 81... -
Page 82: Horizontal Termination-End Of Line Power Vent - 4" X 6-5/8" (102 Mm X 168 Mm) Rigid Venting
3 supplied screws (drilling pilot holes will make this easier). 4. Level the fireplace and fasten it to the framing using nails or screws through the top and side nailing strips. Diagram 1 | City Series CST60E... -
Page 83: Horizontal Termination-End Of Line Power Vent - 4" X 6-5/8" (102 Mm X 168 Mm) Flex Venting
4. Apply Mill-Pac to the outer flex pipe and slip it over the outer flue collar of the vent terminal by at least 1-3/8"(35mm). Fasten with the three screws. City Series CST60E | 83... -
Page 84: Vertical Inline Power Vent Terminations - Rigid Pipe
3 ft (0.9 m) to avoid excessive stress on the elbows and possible separation. Wall straps are available for this purpose (Diagram 2). Ruban de plombier relié à Diagram 3 l’attache murale Attache murale walstrpf.eps | City Series CST60E Coudes de 45 french... -
Page 85: Vertical Inline Power Vent Terminations - Flex Pipe (Part # 946-755)
17. Use Mill-Pac to secure the inner flex pipe to the pipe adaptor. Slide the inner pipe over the flex-to-rigid adaptor and secure with three screws. 18. Repeat Step 17 to secure outer flex. Ceiling firestop Diagram 2 City Series CST60E | 85... -
Page 86: Vertical Inline Power Vent Terminations - Flex Pipe
Flashing • Any closets or storage spaces that the vent passes through must be enclosed. Roof Support Ceiling Firestop Enclosure Ceiling Firestop Elbow Support Flex Pipe Support to prevent sagging Inline Power Vent Terminal Diagram 3a | City Series CST60E... -
Page 87: Vertical Flue Extension Kit - Horizontal Power Vent Kit
• If an offset is necessary in the attic or floor joists it is important to sup- port the vent pipe every 3 feet to avoid excessive stress and sagging of the vent pipe. Wall straps are provided (3 in total) for this purpose. • Round/plumbers strapping may be used if further supports are required. 919-696 06.11.18 City Series CST60E | 87... -
Page 88: Top Vent Reducer Installation - 5" X 8" (127 Mm X 203 Mm) To 4" X 6-5/8" (102 Mm X 168 Mm) (Part # 946-758)
3. Follow installation instructions for the Flex venting kit. CEILING FIRESTOP/FIRESTOP SPACER ( PART # 946-757) | City Series CST60E Used in conjunction with the 946-755 Vertical Flex Kit and the 946-756 Verti- cal Flex Extension Kit/Horizontal Power Vent Kit. -
Page 89: Gas Power Vent Install - Wiring The Inline Power Vent To The Unit
Pressure switch must always be oriented vertically inside the inline inside the inline power vent. power vent. Install the second zip tie loosely on the bracket behind the pressure switch. Run the motor wires through the zip tie. 920-210b 09.22.20 City Series CST60E | 89... -
Page 90: Horizontal Venting With Two 90 O Elbows
Seal behind flange with silicone-- trim. screw against Plywood siding. Wipe mm) of exposed wires. any excess silicone off outer flange after flange is screwed down. 5. Feed the BX cable through the strain relief installed in step 3. | City Series CST60E... -
Page 91: Gas Power Vent Installation-Wiring-End Of Line Power Vent
14. Install the second grommet onto the wires and secure them into a to service the power vent cap. See maintenance section of manual bracket located on the side of the power vent box. to see how servicing is completed internally. Grommet in bracket City Series CST60E | 91... -
Page 92: Gas Power Vent Installation--Wiring The Power Vent To The Unit
3. Locate the white and black power cables. Cut the connectors off and strip the wires. 6. Join Powervent and BX cable wires together by firstly splicing 1" off wires-- join black to black, white to white (Diagram 6). Diagram 6 | City Series CST60E 920-399 06.14.21... - Page 93 11. Once wiring is complete, plug unit into power located on the right side of unit, next to junction box (Diagram 10). Reinstall gasket pad removed in Step 7, access panel removed in Step 2, and exterior panels removed in Step 1. Diagram 10 City Series CST60E | 93 920-399 06.14.21...
-
Page 94: Wiring Diagram-Power Vent Application
Copper Line to Ground 911-344 Power Harness w/Aux 911-314 PV Switch Connector Load 911-253-ASM Main Line 946-535/666- Power Vent Diagnostic Interface Combustion Blower 911-305/P Fan Motor Lamp (Inline) User Interface 911-244/P Comfort Fan (End of Line) | City Series CST60E... -
Page 95: Installation-Panels, Barriers, Faceplates
Clamps in closed position Clamps in open position, rail pulled times when handling the firebox glass. forward Clamps in open position, rail pulled Clamps in closed position City Series CBV0E | 19 forward City Series CST60E | 95... - Page 96 IMPORTANT: Remove glass panel completely when installing or removing panels, logs, media, etc. to avoid causing any damage to the glass. Levers to lower firebox glass | City Series CST60E...
-
Page 97: Glass Barrier Installation
6. Ensure that hooks are sitting over their pins and that the glass is sitting level and centered in the opening. 7. Remove the vacuum clamps and corner protectors. 8. To remove the glass, see the owner's manual. Glass barrier removal video City Series CST60E | 97... -
Page 98: Glass Barrier Adjustment
If glass isn’t hanging straight, use a phillips screwdriver to adjust the angle. Clockwise = angles barrier out toward you Counter clockwise = angles barrier in towards the unit. Slide the screwdriver straight up at the two indicator slots. | City Series CST60E... -
Page 99: Inner Black Steel/Enamel Panel Installation (Part #450-907/450-908)
#4 x 2 17-11/16" (449 mm) x 11-3/16" (284 mm) #5 x 4 17-7/8" (454 mm) x 5" (127 mm) 2. Install 2 screws loosely on both sides. 920-401 07.22.21 City Series CST60E | 99 DETAIL A SCALE 1 : 8... - Page 100 SCALE 1 : 8 DETAIL F SCALE 1 : 8 9. Clean the outer panels with a cloth before installing the safety outer barrier glass. To install the safety glass, see this manual for instructions. 100 | City Series CST60E 920-401 07.22.21...
-
Page 101: Inner Black Glass Panel Installation
8. Clean the panels with a cloth. Add the desired media or logs before installing the firebox inner glass. To install the firebox glass, see this DETAIL D SCALE 1 : 4 manual for instructions. 920-404 07.21.21 City Series CST60E | 101... - Page 102 12. Clean the outer panels with a cloth before installing the safety a glass stopper, proceed to the next step. outer barrier glass. To install the safety glass, see this manual for instructions. DETAIL F SCALE 1 : 2 920-404 07.21.21 102 | City Series CST60E...
-
Page 103: Clean Trim Faceplate Installation
2. Prior to installing outer liner panels and barrier glass, remove finishing 5. Affix clean trim faceplate with self-tapping scews included in the box. trim plates from right and left sides. 3. Insert clean trim faceplate into fireplace opening. City Series CST60E | 103 920-223 04.17.20... -
Page 104: Installation-Media
* Media not supplied with unit - must be purchased separately. Media should only cover up to a maximum of 50% of the burner surround. Adriron Embers + Fireglass Black Coal Crushed Glass + Fireglass Lava Embers + Fireglass 104 | City Series CST60E... - Page 105 Firebeads + Fireglass Crushed Glass Iceburg Chips + Fireglass Spa Stones + Fireglass River Stones and Fireglass Volcanic, Ivory/Tan Basalt, + Natural Stones + Fireglass City Series CST60E | 105...
-
Page 106: Optional Driftwood Log Set Installation
CITY SERIES 60 Optional Driftwood Log Set Installation CITY SERIES 60 - LOG INSTALLATION Read the instructions below carefully and refer to the images. If the logs are broken, do not use them in the unit until they are re- placed. - Page 107 6. Locate the hole on the burner surround, on the left side of the pilot. Insert the pin underneath Log 1 into the hole on the burner surround. 7. Lay the log on the firebox. Ensure the bottom left end of the log is 3/4" away from the edge of the firebox. City Series CST60E | 107 920-393...
- Page 108 9. Insert the pin of Log 2 into the hole. Lay the log on the firebox, then measure the edge of the log to the side as shown below. 10. Connect the hole underneath Log 3 to the pin on Log 1. Rest Log 3 on the landing on Log 1. 108 | City Series CST60E 07.14.21...
- Page 109 11. Connect the hole underneath Log 4 to the pin on Log 2. Rest Log 4 on the landing on Log 2. 12. Connect the hole underneath Log 5 to the pin on Log 2. Rest Log 5 on the landing on Log 2. 920-393 07.14.21 City Series CST60E | 109...
- Page 110 13. Place Log 6 on top of Log 3, ensuring the pin on Log 3 is aligned with the hole on Log 6, and that Log 6 rests on the landing on Log 3. 14. Place Log 7 on top of Log 4, ensuring the pin on Log 4 is aligned with the hole on Log 7. 07.14.21 920-393 110 | City Series CST60E...
- Page 111 CITY SERIES 60 installation-media 15. Install Log 8 between Log 3 and Log 4, as shown below. 16. Install Log 9 on top of the pilot as shown below. 920-393 07.14.21 City Series CST60E | 111...
- Page 112 CITY SERIES 60 installation-media 17. Install Log 11 beside Log 6. 18. Install Log 10 at the right end of the unit, as shown below. 07.14.21 920-393 112 | City Series CST60E...
- Page 113 19. Install the 3.5 lb box of black charcoal glass (optional) or 1lb box of Andriron embers (optional) around the burner. You can add a maximum of 30 pieces of Andriron embers on top of the burner. Make sure the burner surround is only 50% covered. Correct Coal Placement Final Placement City Series CST60E | 113 920-393 07.14.21...
-
Page 114: Maintenance
1 flowing around the flame sensor and 1 carbon buildup and will alter the unit's flowing across the burner (it does not have to be performance, which is not covered under touching the burner). warranty. 114 | City Series CST60E... -
Page 115: Aeration Adjustment
Pushing lever in opens the air shutter. • Pulling the lever outward closes the air shutter. aeration handle • The aeration handle is located near the right side of the gas valve access door, attached by a magnet. City Series CST60E | 115... -
Page 116: Bulb Replacement
Regency part# 911-208 Oven lamp assembly G9 120V/25W Regency part# 911-072 Replacement bulb G9 120 Volt/25 watt Light gasket Light glass Light cover Inner light cover reassembly order Inner light covers shown from below 116 | City Series CST60E... -
Page 117: Valve Replacement
Burner screw locations 8. Remove 13 screws in locations shown below. 11. Reverse Steps 10-1 to complete. 11. Reverse Steps 10-1 to complete. 11. Reverse steps 10-1 to complete. DETAIL A SCALE 1 : 4 City Series CST60E | 117... -
Page 118: Gas Maintenance - Recommended Annual Routine
• Flame sensor (electronic ignition models) • Batteries (remote handheld, remote receiver, volt models) • Flame electrode DC sparker, change as needed) • Burner orifice • Burner media (change as needed) • Thermocouple (millivolt models) • Air shutter setting • Thermopile (millivolt models) • Wiring Gas Leak Tests • Check main gas line connection to valve • Check shut off valve connections • Check connection at gas valve outlet • Check connection at main burner orifice • Check pilot fuel line at valve and at pilot assembly 920-324 09.14.20 118 | City Series CST60E... -
Page 119: Parts Lists
Main Assembly City Series CST60E | 119... - Page 120 Bracket Dormont Orifice Mount 10-BZ001-19.5 936-155 Gasket Tadpole Tape 911-182 IFC Digital Fireplace Control Fuse 3.15 amp Fast Acting 936-222 Gasket Tape 1" Wide Graphite 911-187 Battery Holder W/Switch 584.103 936-243 Gasket 7/8" Window Adhesive 120 | City Series CST60E...
-
Page 121: Accessories
Firebeads Caramel Luster 5 lb Pkg 686-969 Conversion - LP 946-710 Stones -Slate/Grey Basalt Natural 15 lbs 686-930/P Log Set 60 City Series (Driftwood) 946-711 Stones - Ivory/Tan Basalt Natural 15 lbs 686-991 Chase Vent Front White CST60E 180 sq. in. 902-156... -
Page 122: Upper Glass Clamps
Upper/Lower Glass Clamps Right 666-039 Upper/Lower Glass Clamps Left Lower Glass Clamps DETAIL A SCALE 1 : 8 Item Part Description 666-038 Upper/Lower Glass Clamps Right 666-039 Upper/Lower Glass Clamps Left 666-534 Firebox Glass Support 122 | City Series CST60E... -
Page 123: Power Vent-End Of Line (Part # 946-535)
UNITS IN INCHES ANGULAR = E.C.N.: DATE: SIGN: THIS DRAWING IS THE PROPERTY OF FPI LTD., IT MAY NOT BE COPIED IN WHOLE OR IN PART, OR DISCLOSED TO A THIRD PARTY WITHOUT OUR PRIOR WRITTEN CONSENT. City Series CST60E | 123... -
Page 124: Power Vent - Inline (Part # 666-945)
ANGULAR = 1 E.C.N.: SIGN: DATE: THIS DRAWING IS THE PROPERTY OF FPI LTD., IT MAY NOT BE COPIED IN WHOLE OR IN PART, OR DISCLOSED TO A THIRD PARTY WITHOUT OUR PRIOR WRITTEN CONSENT. 124 | City Series CST60E... - Page 125 City Series CST60E | 125...
-
Page 126: Warranty
FPI is not responsible for results or costs of workmanship of unauthorized FPI dealers or agents in the negligence of their service work. 126 | City Series CST60E Revision Date: February 2019... - Page 127 Freight damages for products or parts are not covered under the terms of the warranty. Products made or provided by other manufacturers and used in conjunction with the FPI appliance without prior authorization from FPI may void this warranty. City Series CST60E | 127 Revision Date: February 2019 Regency Gas Products Warranty...
- Page 128 To provide the best support for your product, we request that you complete a product registration form at http://www.regency-fire.com/Customer-Care/Warranty-Registration.aspx within ninety (90) days of purchase. 128 | City Series CST60E Revision Date: February 2019 Regency Gas Products Warranty...
- Page 129 For fireplace care and tips and answers to most common questions please visit our Customer Care section on our Web Site. Please feel free to contact your selling dealer if you have any questions about your Regency product. City Series CST60E | 129...
- Page 130 130 | City Series CST60E...
- Page 132 Dealer Name & Address: _______________________________________________ ___________________________________________________________________ Installer: ____________________________________________________________ Phone #: ___________________________________________________________ Date Installed: _______________________________________________________ Serial #: ____________________________________________________________ Printed in Canada Regency and City Series are trademarks of FPI Fireplace Products International Ltd. © Copyright 2021, FPI Fireplace Products International Ltd. All rights reserved.
Need help?
Do you have a question about the City Series and is the answer not in the manual?
Questions and answers