Table of Contents
Advertisement
Quick Links
TSW-770/1070-MSMK-ANG
Multisurface Mount Kit for TSW-770 and TSW-1070 Series, Angled
The
TSW-770/1070-MSMK-ANG
versatile mounting solution for a TSW-770, TSS-770, TSW-1070, or
TSS-1070
touch screen. Using the kit, the touch screen can be mounted
directly to glass, granite, marble, wood paneling, plaster, smooth
masonry, or virtually any other flat surface. The touch screen can also be
mounted into a wall or supported electrical boxes. When installed, the
touch screen is angled upwards at a 20° tilt.
In the Box
1
TSW-770/1070-MSMK-ANG, Multisurface Mount Kit
Additional Items
2
Screw, 6-32 x 3/8 in., Phillips (2013475)
4
Screw, 6-32 x 1/2 in., Phillips (2007240)
2
Screw, 6-32 x 3/4 in., Phillips (2033247)
4
Screw, 6-32 x 1 in., Phillips (2007251)
4
Screw, M3 x 25 mm, Phillips (2049589)
2
Screw, M3.5 x 25 mm, Phillips (2049591)
4
Washer, #6 (2007663)
TSW-770/1070-MSMK-ANG-B-S Only
1
Bracket, Angled, Black (2056875)
1
Faceplate, Front, Black (2056894)
1
Faceplate, Rear, Black (2056896)
1
Adhesive, Foam, Black (2056892)
1
Label, Polycarbonate, Black (4532843)
multisurface mount kit provides a
TSW-770/1070-MSMK-ANG-W-S Only
1
Bracket, Angled, White (2056770)
1
Faceplate, Front, White (2056893)
1
Faceplate, Rear, White (2056895)
1
Adhesive, Foam, White (2056891)
1
Label, Polycarbonate, White (4532842)
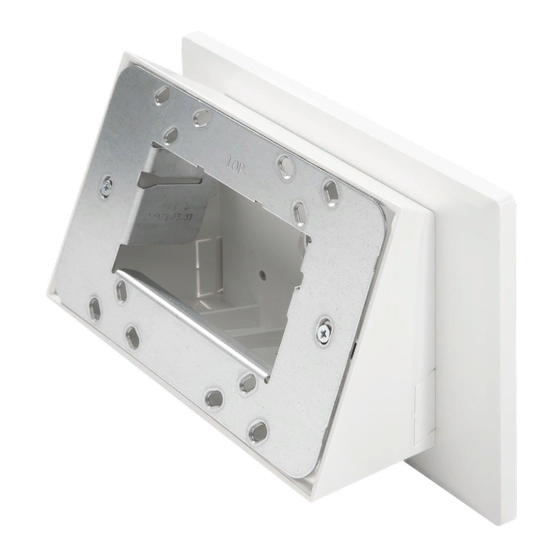
Install the MSMK
The TSW-770/1070-MSMK-ANG can be installed over an electrical box,
into drywall, or onto a flat, smooth surface. Procedures for each
installation are provided in the sections that follow.
Electrical Box Mounting
NOTE:
For U.S.-style installations, use a #2 Phillips screwdriver. For
European and U.K.-style installations, use a #1 Phillips screwdriver or
equivalent.
1. Route all necessary cables through the rear of the electrical box.
2. Attach the rear faceplate to the wall:
NOTE: Ensure that the rear faceplate is oriented so that the
"TOP" machined text is facing upward prior to installation. Also
ensure that the faceplate is level after installation.
For U.S.-style installations, use the four provided 6-32 x 1 in.
l
screws to install the rear faceplate over a 1-gang (horizontally
mounted), 2-gang, or 3-gang U.S. electrical box (as shown in
the illustration on the next page).
Quick Start
1
Advertisement
Table of Contents

Related Manuals for Crestron TSW-770-MSMK-ANG


Summary of Contents for Crestron TSW-770-MSMK-ANG
- Page 1 Quick Start TSW-770/1070-MSMK-ANG Multisurface Mount Kit for TSW-770 and TSW-1070 Series, Angled TSW-770/1070-MSMK-ANG multisurface mount kit provides a TSW-770/1070-MSMK-ANG-W-S Only versatile mounting solution for a TSW-770, TSS-770, TSW-1070, or Bracket, Angled, White (2056770) TSS-1070 touch screen. Using the kit, the touch screen can be mounted Faceplate, Front, White (2056893) directly to glass, granite, marble, wood paneling, plaster, smooth Faceplate, Rear, White (2056895)
- Page 2 Quick Start TSW-770/1070-MSMK-ANG Multisurface Mount Kit for TSW-770 and TSW-1070 Series, Angled For European-style installations, use the four provided M3 x 25 mm screws to install the rear faceplate over a 2-gang European electrical box. For U.K.-style installations, use the two provided M3.5 x 25 mm screws to install the rear faceplate over a 2-gang U.K.
- Page 3 Quick Start TSW-770/1070-MSMK-ANG Multisurface Mount Kit for TSW-770 and TSW-1070 Series, Angled 4. Attach the angled bracket to the front faceplate using the four provided 6-32 x 1/2 in. screws. 6. Route all cables out of the center openings in the faceplates and brackets and connect them to the rear of the touch screen. 7.
- Page 4 Quick Start TSW-770/1070-MSMK-ANG Multisurface Mount Kit for TSW-770 and TSW-1070 Series, Angled Drywall Mounting Surface Mounting The following is required for this installation: a level, a roll of masking 1. Create a cutout in the drywall where the touch screen will be installed tape, a Phillips screwdriver, and a surface cleaning product that does not for routing cables.
- Page 5 2. Remove the protective covering from the front of the adhesive pad. 3. Hold the angled bracket at a 45-degree angle to the adhesive pad, NOTE: To ensure the raceway fits into the knockout, Crestron and then align the lower edge of the bracket with the lower edge of recommends using raceway with the following the pad.
- Page 6 Quick Start TSW-770/1070-MSMK-ANG Multisurface Mount Kit for TSW-770 and TSW-1070 Series, Angled Attach the Plastic Cap (Optional) 2. Attach the TSW-770/1070 mounting bracket (provided with the touch screen) to the angled bracket using the two provided 6-32 x 3/8 in. screws. Ensure the bracket is level after installation. To provide a finished appearance for installations on glass or other transparent surfaces, install the included molded plastic cap on the NOTE: If installing a TSW-770-LB or TSW-1070-LB light bar as...
- Page 7 Crestron disclaims any proprietary interest in the marks and names of others. Crestron is not responsible for errors in typography or photography.
Need help?
Do you have a question about the TSW-770-MSMK-ANG and is the answer not in the manual?
Questions and answers