Minebea Intec Puro Operating Instructions Manual
Hide thumbs
Also See for Puro:
- Operating instructions manual (61 pages) ,
- Operating instructions manual (16 pages) ,
- Operating instructions manual (69 pages)

Subscribe to Our Youtube Channel
Related Manuals for Minebea Intec Puro


Summary of Contents for Minebea Intec Puro
- Page 1 PRESENTED BY JPBOWLIN.COM 817.332.8116 J.P. Bowlin is a quality-driven Calibration Company that has provided calibration, repair and sales of all types of weighing and measurement products since 1931.
- Page 2 Operating Instructions Weight indicator Puro® 98628-000-62 Edition 1.0.1 6/22/2020 Minebea Intec Bovenden GmbH & Co. KG, Leinetal 2, 37120 Bovenden, Germany Phone: +49.551.309.83.0 Fax: +49.551.309.83.190...
- Page 3 Any information in this document is subject to change without notice and does not represent a commitment on the part of Minebea Intec unless legally prescribed. This product should only be operated/installed by trained and qualified personnel. In correspondence concerning this product, the type, name, and release number/serial number as well as all license numbers relating to the product have to be cited.
-
Page 4: Table Of Contents
Weight indicator Puro® Table of contents Table of contents Introduction............................3 Read the manual................................. 3 This is what operating instructions look like ......................3 This is what lists look like............................3 This is what menu items and softkeys look like..................... 3 This is what the safety instructions look like...................... - Page 5 Weight indicator Puro® Table of contents Application programs ...............................15 5.2.1 Weighing application .............................15 5.2.2 Counting application ............................17 5.2.3 Checking application .............................20 5.2.4 Totalizing application and statistics mode ....................28 Menu................................... 32 5.3.1 Accessing the menu............................33 5.3.2 Menu navigation ............................34 Calibration and adjustment ............................ 41 5.4.1...
-
Page 6: Introduction
1 Introduction Weight indicator Puro® Introduction Read the manual Please read this manual carefully and completely before using the product. This manual is part of the product. Keep it in a safe and easily accessible location. This is what operating instructions look like 1. - Page 7 Weight indicator Puro® 1 Introduction NOTICE Warning of damage to property and/or the environment. NOTICE indicates that damage to property and/or the environment may occur if appropriate safety measures are not observed. Take the corresponding safety precautions. Note: User tips, useful information, and notes.
-
Page 8: Safety Instructions
If there are grounds for rejection of the goods, a claim must be filed with the carrier immediately. A Minebea Intec sales or service organization must also be notified. Visit our website http://www.puroscales.com or contact your dealer. -
Page 9: Failure And Excessive Stresses
Weight indicator Puro® 2 Safety instructions Failure and excessive stresses If the device or the power cord display visible damage: Disconnect the power supply and secure the device to prevent it being used further. Do not unnecessarily subject the device to extreme temperatures, corrosive chemical vapors, moisture, shocks, and vibrations. -
Page 10: Device Installation
3 Device installation Weight indicator Puro® Device installation Mechanical preparation 3.1.1 Ambient conditions Only use within buildings. Operating temperature: -10°C to +40°C Storage temperature: -20°C to +50°C Relative humidity: 20% to 85%, non-condensing Altitude: up to 3,575 m 3.1.2 Installation location Place the device on a stable, flat surface. -
Page 11: Connections
Weight indicator Puro® 3 Device installation Connections Pos. Description Accessories DC IN USB-C Printer port LC (load cell) 3.2.1 Electrical supply The scale is supplied using a power supply unit, unless a battery supply is required. Connect the USB-C male plug connector with the USB-C female plug connector on the underside of the device, then connect the power supply unit to the wall socket. -
Page 12: Connecting The Platform
If the rechargeable battery is replaced with a battery of the wrong type, or if it is not connected correctly, then there is a danger of explosion. The battery may only be replaced with the same type by an authorized Puro® service dealer. -
Page 13: Connecting A Printer
Weight indicator Puro® 3 Device installation DGND Ground Signal- Signal+ Sense- Supply voltage- Supply voltage+ Sense+ 9. Tighten the screw connection. 10. Reassemble the housing, tighten the screws, and apply the rubber plugs. 3.2.3 Connecting a printer A printer can be connected via the printer port on the side of the indicator. -
Page 14: Device Description
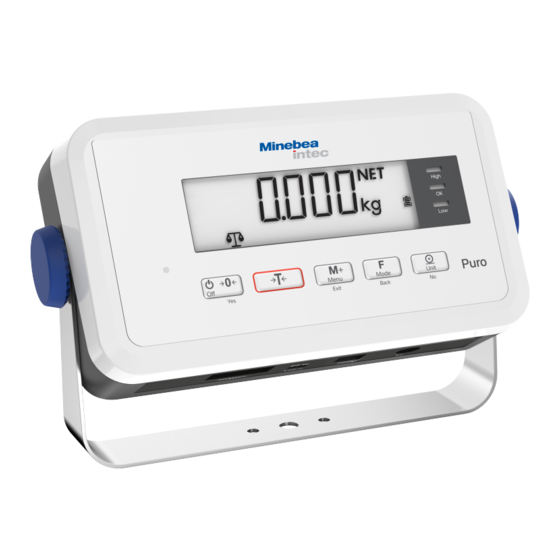
4 Device description Weight indicator Puro® 4 Device description Display and operating elements 4.1.1 Overview Control panel (front) with LCD display. Description Display elements, see Chapter 4.1.2. Operating elements, see Chapter 4.1.3. 4.1.2 Display elements LCD display 10 11 Item Description... -
Page 15: Operating Elements
Weight indicator Puro® 4 Device description Item Description Item Description Totalizing application active Tare active, tare value is displayed Scale tares automatically Item (value in items) LED displays The battery status LED (1) Illuminates red while the battery is being charged Illuminates green if the battery is fully charged. - Page 16 4 Device description Weight indicator Puro® Unit Menu Mode (Brief press) < 1 se- Switch on the Set tare Totalizing Call up applica- Send the current cond scale (if the Display weight tions value to the selected scale is swit-...
-
Page 17: Operating
Weight indicator Puro® 5 Operating Operating Basic functions 5.1.1 Switching on the device Press the key. Whenever it is switched on, the device performs a self-test. This will display all display segments for a few seconds. All indicator LEDs illuminate. -
Page 18: Application Programs
5 Operating Weight indicator Puro® [WEIGHT] Weighing [COUNT] Counting [CHECK] Checking Selectable applications (selec- Check Weighing tion in the menu, see Chap- Check Counting ter 5.3.2.1): The Totalizing, Automatic Tare, and Automatic Printing applications can be activated in the menu. - Page 19 Weight indicator Puro® 5 Operating 5.2.1.1 Set tare Place the empty container on the load plate. The tare weight of the container is displayed: Press the (Tare) key to save the tare weight. [0.000 kg] and [NET] (net value) is displayed: The scale has been tared.
-
Page 20: Counting Application
5 Operating Weight indicator Puro® Note: Weight units must be activated in the menu in order to be able to be called up via (unit) key. See Chapter 5.3.2.3. Unit 5.2.1.3 Stable weight value A stable weight value is displayed with the unit symbols (e.g. [kg]). - Page 21 Weight indicator Puro® 5 Operating Example: Use a known number of parts (reference quantity) to determine an unknown number of parts. If counting needs to be carried out into a container, tare the container. To select the Counting application, press the...
- Page 22 5 Operating Weight indicator Puro® 8. Place the sample (parts to be counted) on the load plate. The number of parts applied ([pcs]) is displayed. The warning symbol indicates that the displayed value is not a weight value. 9. To count parts that are removed from a container, after initializing the sample weight, place the container with the items to be counted on the scale and press the (Tare) key.
-
Page 23: Checking Application
Weight indicator Puro® 5 Operating Note: If a reference sample weight is already saved, [CLR.PW] (delete reference sample weight) will be displayed. In order to use the saved reference sample weight, press the (No) key. Unit In order to delete the saved reference sample weight and replace it with a new sample weight, press the (Yes) key. - Page 24 5 Operating Weight indicator Puro® Check against Using the Check Against Zero application, it is possible to check the zero sample as a difference from the reference weight. In this case the lower limit must be a negative value and the upper li- mit must be a positive value or zero.
- Page 25 Weight indicator Puro® 5 Operating 4. Press the (Yes) key to change the value for the lower limit. The value for the lower limit is displayed using flashing digits in the display: [000.000] (in this example 0.000 kg). 5. Press the (No) key to change the value.
- Page 26 5 Operating Weight indicator Puro® 9. Place the container on the load plate (in this example: 0.527 kg). 10. To tare the container, press the (Tare) key until [0 kg] and [NET] are displayed. 11. Place the sample in the container.
- Page 27 Weight indicator Puro® 5 Operating Note: If [LIM.ERR] (limit value error) is briefly displayed followed by [CLR.LIM] (delete limit value), then invalid limit values have been defined. Repeat the setup process. 5.2.3.2 Check Counting application Note: The application must be previously activated in the menu. See Chapter 5.3.2.1.
- Page 28 5 Operating Weight indicator Puro® 4. Press the desired reference quantity by briefly pressing the (decrease in Mode increments) key or the (No) (increase in increments) key in order to switch Unit between the selection options [10, 20, 50, 100, 200].
- Page 29 Weight indicator Puro® 5 Operating 8. Press the (Yes) key to enter the lower limit. The saved lower limit is displayed using flashing digits in the display: [000000] (in this example 0 items). 9. Press the (No) key to change the value.
- Page 30 5 Operating Weight indicator Puro® 13. Press the (Yes) key to confirm the value for the upper limit. The scale can now be used for the Check Counting application within the specified limit values. If the limit values defined are invalid, [LIM.ERR] (limit value error) is displayed briefly, followed by [CLR.LIM] (delete limit value).
-
Page 31: Totalizing Application And Statistics Mode
Weight indicator Puro® 5 Operating The LEDs indicate whether the sample is within the limit values. Sample < lower limit value Yellow LED illuminates. Sample is within the tolerance limits Green LED illuminates. Sample > upper limit value Red LED illuminates. - Page 32 5 Operating Weight indicator Puro® Release the key. The first menu item [APPLIC] (application) is shown in the display. 2. Press the (No) key in order to access the next menu item, or press the Unit Mode to access the previous menu item.
- Page 33 Weight indicator Puro® 5 Operating 2. Press the key to add the weight to the totalized data (manual mode). Menu The weight value is automatically added to the totalized data as soon as the measured value is stable (automatic mode).
- Page 34 5 Operating Weight indicator Puro® Requirement: In order to display saved statistics, there must not be a load on the scale. Empty the load plate. 2. Press the key in order to display the saved totalized data. Menu The statistics information is displayed in the display in the following order: Number of weighings carried out (N = 7): Totalized value (total = 5.225 kg)
-
Page 35: Menu
Weight indicator Puro® 5 Operating Deleting the totalizing memory: 3. Press and hold the key while there is no load on the load plate and the totalized data are displayed. The message [CLR.TOT] is displayed. 4. To confirm the message, press the (Yes) key;... -
Page 36: Accessing The Menu
5 Operating Weight indicator Puro® Note: If appropriate interface options are installed, additional sub-menus may be available. Information on this can be found in the manual for the interface used. 5.3.1 Accessing the menu Press and hold the key until [M.E.N.U] is displayed. -
Page 37: Menu Navigation
Weight indicator Puro® 5 Operating 5. When [END] is displayed, press the (Yes) key in order to return to the options from the sub-menu. 6. Press the (No) key to return to the first item in the current menu. Unit 7. - Page 38 5 Operating Weight indicator Puro® — RESET Factory settings — NO not reset* — YES activated — END Exit menu level 5.3.2.2 [METRO] menu selection The functions of the displays and scales can be adjusted in this menu. Factory settings are marked with "*"...
- Page 39 Weight indicator Puro® 5 Operating — lb Pound — OFF deactivated — ON activated* — oz Ounce — OFF deactivated — ON activated* — lb:oz Pound:ounce — OFF deactivated* — ON activated — RESET Factory settings — NO not reset* —...
- Page 40 5 Operating Weight indicator Puro® — ON activated — AUTO Switches on when a key is pressed or the displayed weight changes* — COM.EQU Communication module — OFF deactivated* — BLUE.TH Bluetooth activated (if the Bluetooth module is installed) — WIFI WiFi activated (if the WiFi module is installed) —...
- Page 41 Weight indicator Puro® 5 Operating — ON activated — INFO Info on reference (CkWt, CkCount, Count) — OFF deactivated* — ON activated — TOTAL Totalizing memory/statistics data — OFF deactivated* — RESULT Totalizing memory is printed — ALL Totalizing memory/statistics data are printed —...
- Page 42 5 Operating Weight indicator Puro® — OFF deactivated* — MAN.OUT Manual output — MAN.STA Manual output, if data are stable — INT.OUT Interval output — AUT.OUT Automatic output — AUT.STA Automatic output, if data are stable — INTERV Specify output interval (if INT.OUT is selected) —...
- Page 43 Weight indicator Puro® 5 Operating CAL.ADJ — CAL Initiates a two-point calibration (zero and max. load) — LIN Initiates a linearization (zero, half weighing range and max. load) — GEO The adjustment of the calibration based on the current location is carried out using the geographic adjustment factor (GEO).
-
Page 44: Calibration And Adjustment
5 Operating Weight indicator Puro® — ON Locked — S.CAL.AD Calibration/adjustment menu — OFF Unlock* — ON Locked — RESET Restore factory setting of the current menu — OFF Unlock* — ON Locked — END Exit menu level Calibration and adjustment The scale can be calibrated and adjusted in this menu. - Page 45 Weight indicator Puro® 5 Operating Selection of the procedure for the configuration of the A/D converter: 2. Press the key four times in order to select the [ADC.CON] menu item (A/D Mode converter configuration). 3. Confirm the [ADC.CON] (A/D converter configuration) menu item using the (Yes) key.
- Page 46 5 Operating Weight indicator Puro® 8. Confirm the setting with the (Yes) key. Selection of the calibration weight: 9. Confirm the [CAL.WGT] (calibration weight) sub-menu with the (Yes) key. The current setting is displayed (flashing). 10. Confirm the current setting with the...
-
Page 47: Cal] Calibration
Weight indicator Puro® 5 Operating 15. Confirm the current setting with the (Yes) key or press the key in order to Unit make a new setting. If the value needs to be changed, the first figure on the left-hand side starts flashing. - Page 48 5 Operating Weight indicator Puro® Release the key. The first menu item [APPLIC] (application) is displayed. 2. Press the key in order to go to the next menu item, or press the key to go Unit Mode to the previous menu item.
- Page 49 Weight indicator Puro® 5 Operating The value of the calibration weight (selection in the ADC configuration) is shown in the display; all digits ([001500.0]) flash (in this example 1,500 kg) 8. To change the value of the calibration weight, press the...
-
Page 50: Lin] Linearization
5 Operating Weight indicator Puro® [--C--] is displayed while the calibration weight is being saved. In the event of an error during the calibration process, [CALE] (calibration error) is displayed and the process is canceled. 14. Remove the weight. The scale is ready for operation. - Page 51 Weight indicator Puro® 5 Operating 3. Repeat until [CAL.ADJ] is shown in the display. 4. Press the (Yes) key to access the sub-menu item. 5. Select until [LIN] is shown in the display. 6. Press the (Yes) key to start the linearization.
- Page 52 5 Operating Weight indicator Puro® 10. Press the (Yes) key to start the linearization at 50% of the calibration weight . [--C--] is displayed while the value is being saved. In the display, the value of the 2 linearization weight at 100% of the calibration weight is displayed with flashing digits [00150.0] (in this example 150 kg).
-
Page 53: Geo] Geographic Data (Calibration Location)
Weight indicator Puro® 5 Operating 13. Remove the weight. The scale is ready for operation. 5.4.4 [GEO] geographic data (calibration location) The adjustment of the calibration based on the current location is carried out using the geographic adjustment factor [GEO]. (Settings from 0 … 31 are available.) The table under 5.4.5... -
Page 54: Geo Code Table
5 Operating Weight indicator Puro® 7. Press the (Yes) key to start the GEO selection. The GEO value [12] set by default flashes in the display. 8. If the value needs to be changed, select a value between 0 … 31 and press the... - Page 55 Weight indicator Puro® 5 Operating Altitude in meters 1,300 1,625 1,950 2,275 2,600 2,925 3,250 1,300 1,625 1,950 2,275 2,600 2,925 3,250 3,575 Altitude in feet 1,016 2,130 3,200 4,260 5,330 6,400 7,460 8,530 9,600 10,660 1,060 2,130 3,200 4,260 5,330 6,400 7,460 8,530 9,600 10,660 11,730...
-
Page 56: Sbi Interface
5 Operating Weight indicator Puro® Altitude in meters 1,300 1,625 1,950 2,275 2,600 2,925 3,250 1,300 1,625 1,950 2,275 2,600 2,925 3,250 3,575 Altitude in feet 1,016 2,130 3,200 4,260 5,330 6,400 7,460 8,530 9,600 10,660 1,060 2,130 3,200 4,260 5,330 6,400 7,460 8,530 9,600 10,660 11,730... - Page 57 Weight indicator Puro® 5 Operating Algebraic sign Possible characters: "+", "–", " " Weight value Possible characters: "0"..."9", ". ", " " Unit Possible characters: "a"..."z", "A"..."Z", " " Carriage return ASCII 0x0D Line feed ASCII 0x0A This format is also used for automatically generated telegrams, which are released according to the menu settings: [INT.OUT], [AUT.OUT], [AUT.STA] (see above).
- Page 58 5 Operating Weight indicator Puro® The command cannot be performed because a parameter is currently blocked. Minebea Intec EN-55...
-
Page 59: Maintenance/Repairs/Cleaning
Defective or damaged cables or screw connections must be replaced as a complete unit. WARNING Improper repairs can pose considerable risks to the user. Only have repairs carried out by Minebea Intec qualified dealers using original spare parts. Cleaning 6.2.1 Instructions for cleaning The device must be cleaned of contaminants on a regular basis. -
Page 60: Waste Disposal Policy
7 Waste disposal policy Weight indicator Puro® Waste disposal policy If the packaging is no longer required, please take it to your local waste disposal facility and/or a reputable disposal company or collection point. The packaging largely consists of environmentally friendly materials, which are suitable for recycling. -
Page 61: Error Correction
Weight indicator Puro® 8 Error correction Error correction The table lists frequent problems, as well as possible causes and corrective measures. If the problem persists, inform Minebea Intec or an authorized dealer. Symptom Possible cause Corrective measure Switching on not... -
Page 62: Service Information
8 Error correction Weight indicator Puro® Service information Contact the authorized service partners if a problem cannot be rectified with the aid of the troubleshooting information or is not described there. Our website http://www.puroscales.com provides information about your closest service partner. -
Page 63: Technical Data
Weight indicator Puro® 9 Technical data Technical data Specification Model number EF - IN 4P (plastic) Max. load of the scale 5 to 20,000 lb or kg Display resolution Max. 1:30,000 Weight units kg, g, lb, oz, lb:oz Applications Weighing, Counting, Check Weighing, Check Counting,... -
Page 64: Accessories
USB charging device YP-PS1 Weighing hooks YP-H1 Stand, table, stainless steel, height 300 mm YP-CBS1 Stand, table, stainless steel, height 600 mm YP-CBS2 Stand, ground, stainless steel, height 1,000 mm YP-CFS1 Adapter (stand) for Puro indicator YP-CH1 Dimensions EF-IN4P Minebea Intec EN-61... - Page 65 Weight indicator Puro® 9 Technical data All dimensions in mm / inch All dimensions in mm / inch All dimensions in mm / inch EN-62 Minebea Intec...
- Page 66 9 Technical data Weight indicator Puro® All dimensions in mm / inch Minebea Intec EN-63...
-
Page 67: 10 Appendix
Weight indicator Puro® 10 Appendix 10 Appendix 10.1 Printouts Printouts can be created by pressing the key or using the control command "P". The Unit settings for printouts can be changed in the menu (see Chapter 5.3.2.5). Example printouts: Printout for the Weighing application... -
Page 68: 10.2 Fcc Notice
10 Appendix Weight indicator Puro® 10.2 FCC notice Note: This device has been tested and found to comply with the limits for digital devices of class B as per part 15 of the FCC regulations. These limits were created in order to ensure appropriate protection against interference when operating in residential areas. - Page 69 Published by Minebea Intec Bovenden GmbH & Co. KG | Leinetal 2 | 37120 Bovenden, Germany Phone: +49.551.309.83.0 | Email: info@minebea-intec.com www.minebea-intec.com...
Need help?
Do you have a question about the Puro and is the answer not in the manual?
Questions and answers