Table of Contents
Advertisement
Available languages
Available languages
Quick Links
MODELO
CKSTPCEC8801
MODELO
CKSTPCEC6801
MODEL
MODEL
Manual de Instrucciones
MULTI-OLLA EXPRESS OSTER® XL
LEA TODAS LAS INSTRUCCIONES ANTES DE USAR ESTE APARATO
Instruction Manual
OSTER® XL EXPRESS MULTI-COOKER
READ ALL INSTRUCTIONS BEFORE USING THIS APPLIANCE
CKSTPCEC8801_18SEM2 (LA).indd 1
12/13/18 09:11
Advertisement
Table of Contents

Related Manuals for Oster XL


Summary of Contents for Oster XL
- Page 1 MODELO CKSTPCEC8801 MODELO CKSTPCEC6801 MODEL MODEL Manual de Instrucciones MULTI-OLLA EXPRESS OSTER® XL LEA TODAS LAS INSTRUCCIONES ANTES DE USAR ESTE APARATO Instruction Manual OSTER® XL EXPRESS MULTI-COOKER READ ALL INSTRUCTIONS BEFORE USING THIS APPLIANCE CKSTPCEC8801_18SEM2 (LA).indd 1 12/13/18 09:11...
-
Page 2: Medidas De Protección Importantes
MEDIDAS DE PROTECCIÓN IMPORTANTES AVISO DE SEGURIDAD IMPORTANTE: Cuando libere la presión de la unidad, asegúrese de usar un guante de horno y un utensilio de cocina para abrir gradualmente la válvula y liberar la presión. Tenga cuidado con el vapor que sale. No sumerja JAMÁS la base térmica, el cable de alimentación o el enchufe en agua o cualquier otro líquido. - Page 3 14. Después de cocinar a presión, no abra la Olla Multiuso hasta que la unidad se haya enfriado, se haya liberado toda la presión interna y la Válvula Flotante se haya asentado por completo. Si la tapa es difícil de quitar, esto indica que la olla todavía está...
-
Page 4: Instrucciones Del Cable Eléctrico
CO NS ERV E ESTA S IN S TRU C CI ON ES SÓLO PARA USO DOMÉSTICO INSTRUCCIONES DEL CABLE ELÉCTRICO: Se proporciona un cable eléctrico corto para reducir el riesgo de que los niños lo agarren, se enreden o se tropiecen con un cable más largo. PRECAUCIONES: 1. -
Page 5: Desc Ri Pc I Ón Del A Rtefac To
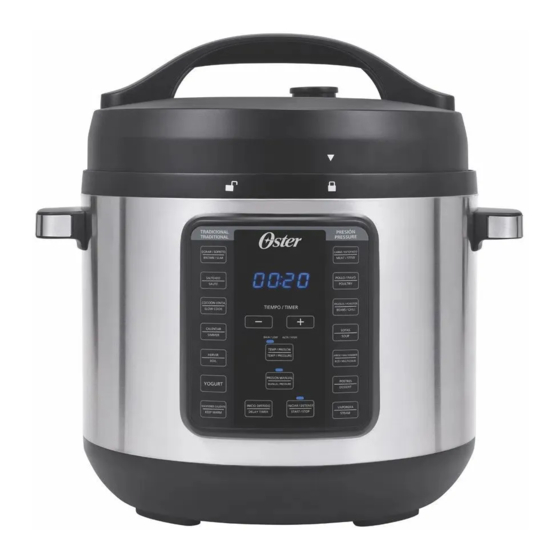
DESC RI PC I ÓN DEL A RTEFAC TO Cable Eléctrico Panel de Control Válvula Flotante Clavija de Bloqueo de la Tapa Válvula de Liberación de Vapor Manija de la Tapa Colector de Condensación Tapa Puerto del Cable Eléctrico Olla de Cocción Base de Calentamiento CKSTPCEC8801_18SEM2 (LA).indd 4 12/13/18 09:11... -
Page 6: Panel De Control
COMPONENTES DE SU OLLA DE COCCIÓN EXPRESS MULTIUSO OSTER ® PARTE INFERIOR DE LA TAPA PANEL DE CONTROL Anillo de Fijación de la Junta Pantalla de Visualización Cubierta de la Válvula de Liberación Botones de Selección de Tiempo de Vapor Junta de Sellado Válvula Flotante... - Page 7 CÓMO USAR SU OLLA DE COCCIÓN MULTIUSO OSTER® XL PRIMEROS PASOS: Retire todo el embalaje, el papel y el cartón (también el que pueda encontrarse entre la olla de cocción y la base de calentamiento). Lea el manual de instrucciones y guárdelo.
- Page 8 2. Asegúrese de que la Tapa esté completamente bloqueada y el esté alineado con . 3. La presión no se generará si la Válvula de Liberación de Vapor no se ha cambiado a la posición de Sellado. 4. El exceso de llenado puede causar el riesgo de obstrucción de las válvulas y el desarrollo de una presión excesiva.
-
Page 9: Primeros Pasos
PRIMEROS PASOS (NOTA: La Olla de Cocción Multiuso emite un sonido cada vez que se presiona un botón.) 1. Agregue los ingredientes deseados en la Olla de Cocción. Coloque la Tapa encima de la Olla Multiuso y alinee . Para bloquear, gire hacia la izquierda, alinee con . - Page 10 USANDO LA CONFIGURACIÓN MANUAL MIENTRAS SE COCINA A PRESIÓN Si está preparando una receta de cocción a presión que requiere un ajuste manual, o si simplemente desea cocinar a presión usando su propio ajuste de presión y tiempo de cocción, entonces seleccione PRESIÓN MANUAL y ajuste la presión y el tiempo de cocción tal y como lo desee.
-
Page 11: Cocción A Presión
MARCAS DE LA OLLA DE COCCIÓN EXTRAÍBLE Dentro de la Olla de Cocción extraíble se encuentran unas marcas para guiar el nivel de llenado de la Olla de Cocción. La palabra MAX indica la línea de llenado máxima. Las marcas 1/3, 1/2 y 2/3 son guías prácticas para usar en sus recetas. - Page 12 7. La Olla Multiuso necesita ganar presión antes de que comience a cocinar a presión. Cuando la Olla Multiuso esté ganando presión, la palabra “CALENTAR” aparecerá en la Pantalla y el tiempo no contará hacia atrás. La cantidad de tiempo que toma la Olla Multiuso para generar presión varía según la humedad y la temperatura del agua, pero el tiempo de presurización promedio es de 13-15 minutos.
- Page 13 LIBERACIÓN DE LA PRESIÓN AL FINALIZAR LA COCCIÓN A. Método de Liberación de Presión Natural: Después de completar el ciclo de cocción, deje que la Olla Multiuso libere la presión de forma natural a través de la Válvula Flotante. La unidad se enfriará gradualmente por sí sola. Espere al menos 10 minutos después de que la cocción se haya completado, y luego, utilizando un utensilio de cocina, mueva la lengüeta de la Válvula de Liberación de Vapor a la posición de “Liberar”...
-
Page 14: Cocción Lenta
USANDO LA TAPA Y VÁLVULA DE LIBERACIÓN DE VAPOR COCCIÓN A POSICIÓN DE LA VÁLVULA DE FUNCIÓN TAPA REQUERIDA PRESIÓN LIBERACIÓN DE VAPOR PRESIÓN MANUAL Sí Sí Sellada CARNES/ESTOFADOS Sí Sí Sellada FRIJOLES/CHILE Sí Sí Sellada ARROZ/GRANOS Sí Sí Sellada YOGUR Sí... - Page 15 UTILIZANDO LA FUNCIÓN DE COCCIÓN LENTA La función de COCCIÓN LENTA no utiliza presión durante el proceso de cocción, pero se puede acumular algo de presión dentro de la unidad durante la cocción. Cuando use esta función, asegúrese de que la Válvula de Liberación de Vapor esté en la posición de “Liberar”.
-
Page 16: Guía De Cocción
GUÍA DE COCCIÓN Función de Configuración Ajustes de Ajustes de Rango de Tiempo Cocción Predeterminada Presión Temperatura de Cocción PRESIÓN Alta presión / 30 minutos Bajo-Alto 1 minuto - 4 horas MANUAL COCCIÓN 30 minutos - 20 Alta temperatura / 4 horas Bajo-Alto LENTA horas... - Page 17 UTILIZANDO LA FUNCIÓN DE VAPOR Coloque la Olla de Cocción dentro de la Base de Calentamiento. Enchufe la Olla Multiuso en un tomacorriente. La Olla Multiuso emitirá un pitido y la Pantalla se iluminará con cuatro guiones (- - - -). 1.
- Page 18 TABLA DE VAPOR Alimento Cantidad Cantidad Pre-preparación Tiempo de de Agua Cocción Verduras Espárragos ½ Kilo 2 tazas Entero/cortado 4 – 5 minutos Brócoli 1 manojo 2 tazas Floretes de 51 mm 2 – 3 minutos Zanahorias bebés ½ Kilo 2 tazas Peladas y cortadas 2 –...
- Page 19 UTILIZANDO LAS FUNCIONES DE DORAR/SELLAR Y SALTEAR Coloque la Olla de Cocción dentro de la Base de Calentamiento. Enchufe la Olla Multiuso en un tomacorriente. La Olla Multiuso emitirá un pitido y la pantalla se iluminará con cuatro guiones (- - - -). 1.
- Page 20 8. Una vez que haya realizado los ajustes deseados, de haberlos, presione COMENZAR/DETENER. 9. La Olla Multiuso necesita generar presión antes de que comience la cocción a presión. Cuando la Olla Multiuso está generando presión, la palabra “CALENTAR” aparecerá en la Pantalla y el tiempo no contará hacia atrás. Cuando se alcanza la presión, la palabra “CALENTAR”...
-
Page 21: Mantenimiento Y Limpieza
UTILIZANDO LAS FUNCIONES DE HERVIR Y HERVIR A FUEGO LENTO Coloque la Olla Multiuso sobre una superficie plana y nivelada. No use la Tapa con la función HERVIR. Coloque la olla de cocina dentro de la base de calentamiento. Enchufe la Olla Multiuso en un tomacorriente. - Page 22 Tapa antes de usarla. Coloque la Tapa hacia arriba al guardarla, ya que esto también extenderá la vida útil de la Junta. La Junta de Sellado puede necesitar ser reemplazada cada 1 - 2 años dependiendo del uso regular. Póngase en contacto con el servicio al cliente de Oster o visite www.oster.com. ®...
- Page 23 PARTE INFERIOR DE LA TAPA Válvula Flotante Cubierta de la Válvula de liberación de Vapor Figura 8 Válvula Flotante Presione suavemente la válvula hacia arriba y hacia abajo 2-3 veces y asegúrese de que esté libre de residuos antes de comenzar a usar la Olla Multiuso. Clavija de Bloqueo de la Tapa Presione suavemente el pasador y asegúrese de que esté...
-
Page 24: Solución De Problemas
SOLUCIÓN DE PROBLEMAS Tema (Asunto) Pregunta Solución Potencia Mi Olla Multiuso no está Asegúrese de que el tomacorriente esté funcionando encendiendo correctamente. Verifique que la Olla Multiuso esté enchufada. Llame a Servicio al Cliente (Detalle en la tarjeta de garantía adjunta en el producto. - Page 25 CÓDIGOS DE NOTIFICACIÓN Notificación Solución La luz de Asegúrese de que la Tapa esté cerrada por completo y en la posición BLOQUEADO , “TAPA alineando con . CERRADA” está parpadeando Aparece en La Olla Multiuso detendrá el ciclo de cocción. Desconecte su Olla Multiuso y contacte al pantalla “E1”...
-
Page 26: Consejos Y Sugerencias
1. Consulte el manual del usuario de la Olla de Cocción Express Multiuso Oster ® cuando use su Olla Multiuso. -
Page 27: Important Safeguards
IM PORTAN T SA FEG UA RDS IMPORTANT SAFETY NOTICE: When releasing pressure from the unit, ensure an oven glove is worn and a kitchen utensil is used to gradually open the valve and release pressure. Beware of escaping steam. NEVER immerse the heating base, power cord or plug into water or any other liquid. -
Page 28: Power Cord Instructions
20. Always plug Power Cord fully into Multi-Cooker first, then plug cord into the wall outlet. 21. Unplug from outlet when not in use, before putting on or taking off parts and before cleaning. Allow to cool before putting on or taking off parts, and before cleaning. To disconnect, ensure that the Multi-Cooker is OFF, then unplug Power Cord from outlet. - Page 29 2. During initial use of this appliance, some slight smoke and/or odor may be detected. This is normal with many heating appliances and will not recur after a few uses. 3. Please use caution when placing your Cooking Pot on a ceramic or smooth glass cook top stove, countertop, table or other surface.
-
Page 30: Control Panel
OST ER ® E XP RE SS C RO CK X L C OMP ON E NT S CONTROL PANEL UNDERSIDE OF LID Display Screen Gasket Fixing Ring Time Selection Buttons Steam Release Valve Cover Sealing Gasket Bobber Valve Plastic Spoon Steaming Rack Optional Glass Lid Accessory Pressure Release Valve... - Page 31 HOW TO USE YOUR EXPRESS CROCK MULTI-COOKER Getting started: Remove all packaging, paper, and cardboard (including any located between the Cooking Pot and Heating Base). Read and save the literature and be sure to read the service and warranty information. Assembly: •...
-
Page 32: Getting Started
5. The gasket and the valves can be removed for cleaning. (See page 18). 6. Once the pressure increases, the Lid should not be opened. Safety sensors ensure the pressure remains within the set range. Never force the Lid open. 7. -
Page 33: How To Use The Time Delay
Note: For pressure cooking functions, 13-15 minutes is the approximate average preheat time. If food content is larger or very cold, preheat time may take slightly longer. 9. This Multi-Cooker allows you to delay the start of your cooking so that cooking finishes when you need it. -
Page 34: Pressure Cooking
Example: It’s 4pm and you want to have a soup cooked and ready in 2 hours’ time for dinner at 6pm. You want to set the machine now so you are free to do other things. The pre-set function (if unchanged) will cook for 30 minutes at HIGH pressure. Time to gain pressure varies according to humidity and water temperature, but let’s assume it takes 15 minutes to gain pressure. - Page 35 USING THE PRESSURE COOKING FUNCTIONS Place the Multi-Cooker on a flat, level surface. Place Cooking Pot inside Heating Base. Plug the Multi-Cooker into a wall outlet. The Multi-Cooker will beep, and the Display Screen will illuminate with four dashes (- - - -). 1.
- Page 36 BOBBER VALVE When Bobber Valve is in the “UP” position, DO NOT attempt to open the Lid, as the Multi- Cooker is still under pressure. When the Bobber Valve is in the “DOWN” position, the pressure has released. (See figure 4) “UP”...
- Page 37 Valve REMOVE Pressure Release Valve Valve OPEN (“Release”) Valve CLOSED (“Seal”) Figure 5 USING THE LID AND STEAM RELEASE VALVE PRESSURE STEAM RELEASE VALVE FUNCTION LID REQUIRED COOK POSITION MANUAL PRESSURE Seal MEAT/STEW Seal BEANS/CHILI Seal RICE/GRAINS Seal YOGURT Yes (in some steps) Release POULTRY Seal...
-
Page 38: Slow Cooking
USING THE GLASS LID The optional Glass Lid accessory can be used instead of the standard Express Crock Lid on all non-pressure cooking functions such as SLOW COOK, BROWN/SEAR, SAUTÉ, BOIL, SIMMER, YOGURT, and KEEP WARM. SLOW COOKING LOW Setting: This is suitable for simmering and slow cooking. Recommended cooking time in LOW is for 8 or more hours. -
Page 39: Cooking Guide
COOKING GUIDE Cooking Pressure Temperature Default Setting Cook Time Range Function Adjustments Adjustments Manual High Pressure / 30 minutes Low-High 1 minute - 4 hours Pressure 30 minutes – 20 SLOW COOK High temp / 4 hours Low-High hours STEAM High pressure / 10 minutes Low-High 1 minute –... -
Page 40: Steaming Chart
4. Using the finger tab, flick the Steam Release Valve to the “Seal” position. 5. Press the STEAM button and adjust the time and pressure as needed. Note: See the Cooking Guide on page 13 to find the possible time and pressure adjustments. -
Page 41: Rice Cooking
SEARING AND SAUTÉING The settings BROWN/SEAR and SAUTÉ do not cook under pressure. They work similarly to standard cooking, requiring dry heat, and therefore does not need the Lid. Place the Multi-Cooker on a flat, level surface. Do not use the Lid with this function. BROWN/SEAR The BROWN/SEAR function is designed to brown (sear) meats for casseroles and soups. - Page 42 5. Place the Lid on and lock by rotating counterclockwise to the LOCKED position. 6. Using the finger tab, flick the Steam Release Valve to the “Seal” position. 7. Press the RICE/GRAINS button and adjust the time and pressure as needed. Note: See the Cooking Guide on page 13 to find the possible time and pressure adjustments.
-
Page 43: To Change A Setting
USING THE BOIL AND SIMMER FUNCTIONS Place the Multi-Cooker on a flat, level surface. Do not use the Lid with the BOIL function. Place Cooking Pot inside Heating Base. Plug the Multi-Cooker into a wall outlet. The Multi-Cooker will beep, and the Display Screen will illuminate with four dashes (- - - -). 1. - Page 44 Gasket in Lid before use. Leave the Lid upturned for storage, as this will also extend the life of the gasket. Sealing Gasket may need to be replaced every 1 – 2 years depending on regular use. Contact Oster customer service or visit www.oster.com to order ® replacement parts.
-
Page 45: Troubleshooting
Lid Lock Pin Gently press the pin and ensure it is clear from debris before you begin using the Multi-Cooker. Note: 1. Condensation may collect inside the Heating Base under the removable Cooking Pot. This is normal. Allow to cool, and then dry using kitchen cloth. 2. - Page 46 NOTIFICATION CODES Notification Solution “CLOSE LID” Ensure that the Lid is closed completely and in the LOCKED position, aligning with blinking light Display “E1” The Multi-Cooker will stop the cooking cycle. Unplug Multi-Cooker and contact customer service center at 1-800-323-9519. Display “E2”...
-
Page 47: Hints And Tips
HINTS AND TIPS Hints and Tips to get the best use of your Oster Express Crock Multi-Cooker: Go ® to the Oster website at www.oster.com for additional recipes, hints, tips and much more. ® With your Express Crock you can create a large variety of delicious meals, snacks and desserts. - Page 48 XXX where X is any number between 0 and 9 or any letter between A and Z. La siguiente información es para México solamente. The following information is intended for Mexico only. MULTI-OLLA EXPRESS OSTER ® MODELOS: CKSTPCEC8801, CKSTPCEC8801-013 LA SIGUIENTE INFORMACIÓN ES PARA MÉXICO: IMPORTADOR: NEWELL BRANDS DE MÉXICO S.A.
Need help?
Do you have a question about the XL and is the answer not in the manual?
Questions and answers