Table of Contents
Advertisement
Quick Links
Advertisement
Table of Contents

Subscribe to Our Youtube Channel
Related Manuals for Yaesu FTM-6000R


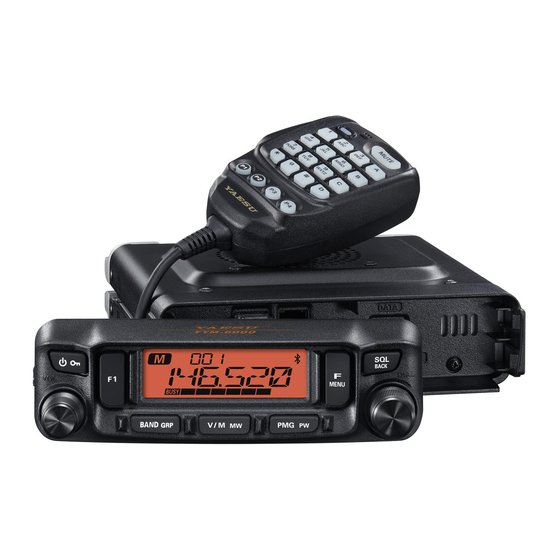
Summary of Contents for Yaesu FTM-6000R
- Page 1 144/430MHz DUAL BAND FM TRANSCEIVER Operating Manual...
-
Page 2: Table Of Contents
Restoring to Defaults (All Reset) ....38 Supplied Accessories and Options ....7 Specifications ..........39 Supplied Accessories ........7 YAESU LIMITED WARRANTY ...... 41 Available Options........... 7 Name and function of each component ..8 Panel (front) ........... 8 Panel (Rear, Left and right side).... -
Page 3: Introduction
3W Audio Power Speaker m Heavy Duty-Heat Sink with FACC (Funnel Air-Convection Conductor) Thank you for purchasing the FTM-6000R/E Transceiver. We urge you to read this man- ual in its entirety, and also the Advance Manual (available for download on the Yaesu website), to gain a full understanding of the amazing capability of the exciting new FTM- 6000R/E Transceiver. -
Page 4: Basic Operation
Basic Operation Turning the Transceiver ON 1. Press and hold the Power (Lock) switch to turn the transceiver ON. z Turning the transceiver OFF Press and hold the Power (Lock) switch again to turn the transceiver OFF. Adjusting the volume 1. -
Page 5: Tuning To A Frequency
Tuning to a Frequency z DIAL knob Rotating the DIAL knob changes the frequency in the optimal frequency step for the current frequency band. Change frequency in 1MHz steps Press the DIAL knob, and then rotate the DIAL knob. Change frequency in 5MHz steps Press and hold the DIAL knob, and then rotate the DIAL knob. -
Page 6: E 2 O-Iii (Easy To Operate-Iii) Provides The
O-III (Easy to Operate-III) Provides the Choice of 3 Operating Modes to assign Functions & Settings “[F1] key” assigns the most frequently used function. “Function list” assigns frequently used functions. “Menu list” to make all settings. [F1] key From the list, the function with the highest Press and hold: Assign to [F1] key priority can be registered to the [F1] key, Press briefly: Recall and execute... -
Page 7: Mag (Memory Auto Grouping) Function
MAG (Memory Auto Grouping) function Memory channels can be easily grouped and recalled by band. Each time the [BAND grp] key is pressed while operating in memory mode, the bands are switched in the order illustrated below. Only the memory Press in memory mode to switch bands channels in that frequency band can be au- tomatically grouped and recalled. - Page 8 Menu List The items in the gray are pre-registered in the “Function list”, Press the [F menu] key to call the “Function list”. Enables/Disables the Automatic Power Off Reverses the transmit and receive frequen- 01 APO 19 RPT.REV feature. cies while working through a repeater. 02 AR MOD Select the ARTS Beep mode.
-
Page 9: Supplied Accessories And Options
Supplied Accessories and Options Supplied Accessories • DTMF microphone SSM-85D • DC power cable (with fuse attached) • Control cable • Control cable 10ft (3m) • Bracket for main body • Bracket for the controller • USB Cable • Spare fuse (15A) •... -
Page 10: Name And Function Of Each Component
Name and function of each component Panel (front) VOL knob Rotate the VOL Knob to adjust the audio volume level. POWER ( ) Switch Press and hold this button to switch the power ON or OFF. When the power is ON, press this button briefly to engage, or release the key lock. [F1] key The [F1] key is user programmable, allowing quick access to the Function or Menu item that is most often used. - Page 11 [F menu] key Press briefly Press the [F menu] key to display the function list screen. Rotate the DIAL knob to select an item and perform the functions and make settings. In the factory default setting, the items in gray of the table below are registered to the function list. The regis- tration can be canceled at any time.
- Page 12 [SQL back] key • Press the [SQL back] key, then rotate the DIAL knob to adjust the squelch level. The squelch level may be adjusted to mute the background noise when no signal is present. • Press the [SQL back] key to return to the previous screen. •...
-
Page 13: Panel (Rear, Left And Right Side)
Panel (Rear, Left and right side) DATA jack Please refer to YAESU website for When updating the panel firmware, connect firmware updates. to the PC with the supplied USB cable. CONTROL jack Press to release the Plug the control cable into this jack to control panel from the connect with the main body. -
Page 14: Microphone (Ssm-85D)
Microphone (SSM-85D) Speak into the microphone during transmission. TX LED Lights red while pressing PTT switch. Press and hold the PTT switch to transmit, and release it to receive. Press this button to move the frequency or memory channel lower by one step, press and hold it to start scanning. -
Page 15: Safety Precautions ( Be Sure To Read )
Be sure to read these important precautions, and use this product safely. Yaesu is not liable for any failures or problems caused by the use or misuse of this product by the pur- chaser or any third party. Also, Yaesu is not liable for damages caused through the use of this product by the purchaser or any third party, except in cases where ordered to pay damages under the laws. - Page 16 Never cut off the fuse holder of the DC power cord. Do not pull the cable when plugging and unplug- This may cause short-circuiting and result in ignition ging the power cord and connection cables. and fire. Please hold the plug or connector when unplugging. If not, this may result in fire, electric shock and equip- Do not use fuses other than those specified.
-
Page 17: Installing The Radio
Installing the Radio About the antenna The antenna is an extremely important part for both transmitting and receiving. The an- tenna type and its inherent characteristics determine whether the performance of the transceiver can be fully realized. As such, please note the following: m Use an antenna that is suitable for the installation conditions and application objec- tive. -
Page 18: Installing The Transceiver
Installing the transceiver Install the main body and the front panel using the supplied brackets. • The bracket can be formed by hand to match the location where the front panel is installed. • Be careful not to cause an injury when bending the bracket. 1. -
Page 19: Repeater Operation
• Menu list [25 SQL.COD]: CTCSS Tone frequency z Tone Calling (1750 Hz) If the transceiver is FTM-6000R/E (European/Asian versions), press and hold in the [P4] key on the microphone (in factory default setting) to generate a 1750 Hz burst tone to access the European repeater. -
Page 20: Using The Memory
Using the Memory The FTM-6000R/E incorporates a large number of memory channels that can register the operating frequency, communication mode, and other operational information. • 999 Memory Channels • 1 Home Channel • 50 pairs PMS Memory Channels The operating frequency and other operational information can be registered to each regular memory channel, home channel, or PMS memory channel: •... -
Page 21: Recall Memory
Recall memory 1. Press the [V/M mw] key. • The last used memory channel is recalled. • “ ” icon and a memory number will appear on the display. 2. Rotate the DIAL knob to select the memory channel to recall. -
Page 22: Recall Only Memories In The Same Frequency Band (Band) Using The Memory Auto Grouping (Mag) Function
Recall only memories in the same frequency band (Band) using the memory auto grouping (MAG) function With the memory auto grouping (MAG) function, only memory channels in the same fre- quency band (Band) can be called. In the memory mode, each time the [BAND grp] key is pressed, only memory channels of the specified frequency band are automatically recalled as a group, as shown be- low:... -
Page 23: Pmg (Primary Memory Group)
PMG (Primary Memory Group) If an often-contacted group of friends frequency is registered in a PMG (Primary Memory Group), that frequency can be recalled immediately by pressing the [PMG pw] key. Register the frequency with PMG 1. Tune to the frequency or the memory channel to be registered in PMG. 2. -
Page 24: To Append An Alpha-Numeric "Tag" To A Memory
To Append an Alpha-numeric “Tag” to a Memory Memory name tags, such as a call sign may be assigned to the memory channels and home channels. Input a memory tag using up to 6 characters. Alphabetic characters, Numbers and Symbols may be entered to the memory name tag. 1. -
Page 25: Clearing Memories
Clearing Memories 1. Select the memory channel from which the data is to be cleared, then press and hold the [V/M mw] key. 2. Rotate the DIAL knob to select [DELETE], then press the DIAL knob. 3. Press and hold the [V/M mw] key. Confirmation screen “OK?”... -
Page 26: Recalling The Home Channel
Recalling the Home Channel z Recall with [F1] key In the factory default setting, “HOME” (calls the home channel) is registered to the [F1] key. 1. Press the [F1] key. “HM” and the home channel frequency appear on the LCD. 2. -
Page 27: Changing The Home Channel Frequency
z Recall with Microphone With the factory default setting, “HOME” (calls the home channel) is registered to the [P2] key of the Microphone. 1. Press the [P2]* key on the microphone. * This is the factory setting. This function can also be assigned to the [P1] - [P4] key (see page 12). -
Page 28: Scanning Function
PMS Programmable Memory channels. 50 sets of PMS memory channels (L01/U01 to L50/U50) are available. For additional details on the Programmable Memory Scan (PMS), refer to the Advanced Manual which may be downloaded from the Yaesu website. -
Page 29: Setting The Receive Operation When Scanning Stops
Setting the Receive Operation When Scanning Stops 1. Press and hold the [F menu] key. 2. Rotate the DIAL knob to select [23 SCN.TYP], then press the DIAL knob. “SCN.RSM” is displayed. 3. Press the DIAL knob again. 4. Rotate the DIAL knob to select the hold time after the scan is paused: •... -
Page 30: Convenience Features
Convenience Features ® Bluetooth Operation (Requires optional BU-4) T h e F T M - 6 0 0 0 R / E c a n b e e q u i p p e d w i t h t h e B l u e t o o t h f u n c t i o n b y i n - ®... - Page 31 DIAL knob. The LED of SSM-BT10 blinks blue. The pairing is completed. 10. Press the PTT switch to return to the normal operation. headset, the “ ” icon lights up on the FTM-6000R/E While connected to a Bluetooth ®...
- Page 32 DIAL knob. 3. Rotate the DIAL knob to select [BLT.LST] then press the DIAL knob. 4. If the “ ” icon lights up on the FTM-6000R/E screen, press the DIAL knob. The “ ” icon flashes on the FTM-6000R/E screen and the Bluetooth headset disconnects.
- Page 33 4. Rotate the DIAL knob to select the Bluetooth headset ® to be deleted. 5. If the “ ” icon lights up on the FTM-6000R/E screen, press the DIAL knob. The “ ” icon flashes on the FTM-6000R/E screen and the Bluetooth headset dis- ®...
- Page 34 Bluetooth battery save function ® Turning on the Bluetooth Battery Saver feature extends the battery life of the standby ® Bluetooth headset. ® 1. Press and hold the [F menu] key. 2. Rotate the DIAL knob to select [35 BLT], then press the DIAL knob.
-
Page 35: Changing The Frequency Step
Changing the Frequency Step The DIAL knob rotation frequency step may be changed. Normally, use the factory de- fault setting of “AUTO”. 1. Press and hold the [F menu] key. 2. Rotate the DIAL knob to select [27 STEP], then press the DIAL knob. -
Page 36: Tone Squelch Feature
For additional details on the following Functions, refer to the Advanced Manual which may be downloaded from the Yaesu website. Tone squelch feature The tone squelch opens the speaker audio only when a signal containing the specified CTCSS tone is received. By matching the tone frequency with the partner station in ad- vance, a quiet standby is possible. -
Page 37: Using Menu List
Using Menu List The Menu list Mode permits configuring the various functions to accommodate individual operating needs and preferences. Menu List Operation 1. Press and hold the [F menu] key. The Menu list will be displayed. 2. Rotate the DIAL knob to select the desired item in the Menu list, then press the DIAL knob. -
Page 38: Tables Of Menu List Operations
Tables of Menu list Operations Note: For details, refer to the Advanced Manual (download from the Yaesu website). Number / Selectable options Description Menu Item (Options in bold are the default settings) Enables/Disables the Automatic Power 01: APO OFF / 0.5H 1.0H / 1.5H / 2.0H to 12.0H Off feature. - Page 39 Number / Selectable options Description Menu Item (Options in bold are the default settings) Reverses the transmit and receive 19: RPT.REV* frequencies while working through a re- peater. SIMP / -SFT / +SFT 20: RPT.SET* Set the Repeater Shift direction. 21: RPT.OTR Activate/Deactivate the Automatic Re- RPT.ARS...
-
Page 40: Restoring To Defaults (All Reset)
Restoring to Defaults (All Reset) Caution When the All Reset function is performed, all data registered in the memory will be deleted. Be sure to keep a separate record of the information registered to the memory channels. To restore all transceiver settings and memory content to the factory defaults. The all reset can be canceled by pressing the PTT switch during the operation. -
Page 41: Specifications
Specifications z General Frequency Range : TX 144 - 148MHz or 144 - 146MHz 430 - 450MHz or 430 - 440MHz (Depends on the transceiver version) : RX 108 - 137MHz (AIR Band) 137 - 174MHz (144MHz HAM / VHF Band) 174 - 400MHz (GEN) 400 - 480MHz (430MHz HAM / UHF Band) 480 - 999.99MHz (GEN) (USA Cellular Blocked) - Page 42 The Bluetooth wordmark and logo are registered trademarks owned by Bluetooth SIG, Inc. and are ® used under license by Yaesu Musen Co., Ltd. About internal spurious signals The internal oscillator frequency relationship below may cause some effect on the receiver mixer and IF circuits.
-
Page 43: Yaesu Limited Warranty
Limited Warranty is valid only in the country/region where this product was originally purchased. On-line Warranty Registration: Thank you for buying YAESU products! We are confident your new radio will serve your needs for many years! Please register your product at www.yaesu.com - Owner’s Corner... - Page 44 YAESU dealer/distributor from whom the product was originally purchased. 2. Include proof of original purchase from an authorized YAESU dealer/distributor, and ship the product, freight prepaid, to the address provided by the YAESU Service Center in your country/ region.
- Page 45 Note...
- Page 46 Changes or modifications to this device that are not expressly approved by YAESU MUSEN could void the user’s authorization to operate this device. This device complies with part 15 of the FCC Rules. Operation is subject to the following two conditions: ( 1 ) This device may not cause harmful interference, and ( 2 ) this device must accept any interference including received, interference that may cause undesired operation.
- Page 47 Telephone: (714) 827-7600 EU Declaration of Conformity We, Yaesu Musen Co. Ltd of Tokyo, Japan, hereby declare that this radio equipment FTM-6000E is in full compliance with EU Radio Equipment Directive 2014/53/EU. The full text of the Declaration of Conformity for this product is available to view at http://www.yaesu.com/jp/red ATTENTION –...
- Page 48 Copyright 2021 YAESU MUSEN CO., LTD. All rights reserved. No portion of this manual may be reproduced without the permission of YAESU MUSEN CO., LTD. YAESU MUSEN CO., LTD. Tennozu Parkside Building 2-5-8 Higashi-Shinagawa, Shinagawa-ku, Tokyo 140-0002 Japan YAESU USA...
Need help?
Do you have a question about the FTM-6000R and is the answer not in the manual?
Questions and answers