Advertisement
Table of Contents
- 1 Table of Contents
- 2 Using this Manual
- 3 General Information
- 4 Warnings and Safety
- 5 Specifications
- 6 Assembly Instruction
- 7 Battery Charging (Lock & Removal)
- 8 Quick Start Guide
- 9 Operation
- 10 Maintenance
- 11 Troubleshooting
- 12 Limited Warranty
- 13 Link to Assembly Video and Online Resources
- Download this manual
User Manual
LEVEL Electric Bicycle
(TROTTLE AFTER PEDAL)
Thank you for purchasing the Aventon LEVEL Ebike.
We take pride in bringing you a quality product that will o er years of
enjoyment. Please read and understand this manual fully before
assembling and riding your bike. If you have questions after reading this
manual, please refer to the Aventon SupportoHelp Center, contact us by
email, and/or give us a phone call.
We are here to help!
Aventon Help Center: https://www.aventon.com/pages/support
Email: info@aventon.com
Phone: 1-866-300-3311
Advertisement
Table of Contents

Related Manuals for aventon LEVEL


Summary of Contents for aventon LEVEL
- Page 1 Please read and understand this manual fully before assembling and riding your bike. If you have questions after reading this manual, please refer to the Aventon SupportoHelp Center, contact us by email, and/or give us a phone call. We are here to help! Aventon Help Center: https://www.aventon.com/pages/support...
-
Page 2: Table Of Contents
USING THIS MANUAL GENERAL INFORMATION WARNINGS AND SAFETY SPECIFICATIONS ASSEMBLY INSTRUCTION BATTERY CHARGING (LOCK & REMOVAL) QUICK START GUIDE OPERATION MAINTENANCE TROUBLESHOOTING LIMITED WARRANTY LINK TO ASSEMBLY VIDEO AND ONLINE RESOURCES... -
Page 3: Using This Manual
Aventon recommends having a certified, reputable bike mechanic to check your work. NOTICE: If you do not have the experience, skill, and tools to complete assembly and fit, Aventon highly recommends having a certified, reputable bike mechanic complete these procedures as well as any future adjustments or tuning. - Page 4 Aventon. Do not attempt to true wheels or tighten spokes unless you have adequate knowledge, tools, and experience. Ensure the tires and inner tubes are in good working condition without any visual damage and have the correct amount of air pressure.
-
Page 5: Warnings And Safety
Be careful at intersections and when preparing to pass other vehicles or cyclists. Familiarize yourself with all the features and operations of the bike by Aventon Bikes. Practice and become proficient at shifting gears, applying the brakes, using the pedal assist system, and using the throttle in a controlled setting before riding in riskier conditions. - Page 6 Always use the lowest assist level until you are comfortable with the bike and feel confident in controlling the power.
- Page 7 A Note for Parents and Guardians As a parent or guardian, you are responsible for the activities and safety of your child. The Level is not designed for use by children under the age of 18. If you are carrying a passenger in a child safety seat, they should also be wearing a properly fitted and approved helmet.
-
Page 8: Specifications
* Range Per Chager is measured under the conditions that power is su cient, with a 75kg load, at 86°F(30°C), 70% humidity, on a level road, in pure electric riding mode. Actual results may vary based on di erences in temperature, load, wind speed, road conditions and other factors. -
Page 9: Assembly Instruction
REAR BRAKE SUSPENSION REAR WHEEL HUB MOTOR PEDAL FRONT WHEEL WHAT’ S IN THE BOX 1* Level ebike 1* Left pedal 1* Right pedal 1* Bag of spare screws 1* Charger 1* Front reflector 1* Derailleur hanger 1* Spare derailleur hanger... - Page 10 Step 1. Unpack the bike. Open the bike box and remove the small box inside. With the help of another person capable of safely lifting a heavy object, remove the Level from the bike box. Carefully remove the packaging material protecting the bike frame and components. Please recycle packaging materials especially cardboard and foam whenever possible.
- Page 11 Rubber Cover Step 4. Front wheel installation. B. Use 6mm hex key to loosen front fork barrel shaft A. Take out front wheel, remove black protection bolt, take out barrel shaft. guard. Barrel Shaft 6mm Hex Key Black Protection Guard C.
- Page 12 E. Use the 6mm hex key to tighten the barrel shaft bolt with strength of 8-10N 6mm Hex Key Step 5: Put down kickstand. Step 6: Front fender installation. A. Use 4mm hex key to loosen front fork screws.(3pcs) B. Align front fender to the screw holes.
- Page 13 D. Use 4mm hex key to tighten front fork screws. (3pcs) Step 7: Connect the display main line. A. Remove rubber cover on display main line. B. Connect the display line by aligning the arrows on the outer housing. Note: When connecting the display line, align the arrows on the outer housing with each other to ensure proper alignment.
- Page 14 Grease Wrench Step 9: Remove motor protector and install the motor protection guards on both sides of back wheel. Note: Part of plastic motor protector will likely brake and leave a piece of plastic inside the flywheel. Use a pair of pliers to carefully remove it. Protector...
- Page 15 Step 10: Inflate the tires. Check that the tire beads and tires are evenly seated on the rims. Use a pump with a Schrader valve and pressure gauge to inflate each tire to the recommended pressure indicated on the tire, min as 50 PSI , max as 80 PSI. Do not overinflated or underinflate tires. Step 11: Install saddle.
- Page 16 Step 12: Adjusting the seat position and angle To change the angle and horizontal position of the seat: A.Use a 6mm Allen wrench to loosen the seat adjustment bolt on the clamp positioned immediately underneath the seat, above the rear wheel. Do not completely remove the bold. B.Move the seat backward or forward and tilt to adjust the angle.
- Page 17 B. Sit on the saddle, adjust display and handlebar to the desired position and tighten the screws which secure it to the handlebar. C. Adjust the handlebar height/angle to the desired position then use a 3mm hex key to tighten the screws securing it to the frame.
- Page 18 Step 14: Powering on the display. A. Press and hold the power button for about 3 seconds B. Press and hold the up arrow button to switch on the to turn on the display. backlight of the display. Up Arrow Button Power ON/OFF Button...
- Page 20 Battery Knob...
- Page 21 Distance Travelled Es�mated Time to Fully Recharge 8 km (5 mi) 1 hour 16 km (10 mi) 1.5 hours 24 km (15 mi) 2.5 hours 32 km (20 mi) 3.5 hours 40 km (25 mi) 4.5 hours 48 km (30 mi) 5.5 hours 72 km (45 mi) 7 hours...
-
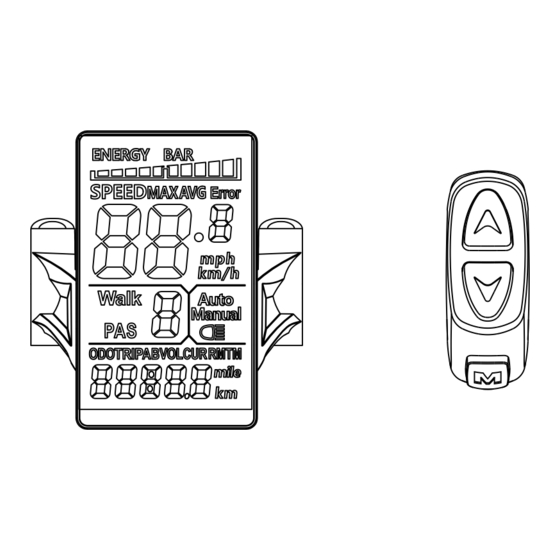
Page 23: Quick Start Guide
LEVEL QUICK START GUIDE BATTERY LEVEL INDICATOR (Current / Max / Average) ERROR CODE INDICATOR (In the Event of a Problem) SPEED INDICATOR (Current / Max / Average) 5 LEVELS OF ASSIST (0: No Assist. 5: Max Assist) WALK MODE... -
Page 24: Operation
First, tap the power button on the battery to turn on. The current or release the throttle. Simply start pedaling again to re-engage the charge level will be flashed upon four green LEDs (4 = full, 1 = near motor. - Page 25 We suggest that you select a lower assistance level when you first get your bike from Aventon Bikes to get to know your bike and travel routes. Once you become familiar with the range requirements of your travel routes and the capabilities of your bike, you can then adjust your riding characteristics if you so desire.
-
Page 26: Maintenance
Basic Bike Care Recommended Service Intervals Regular inspection and maintenance are key to ensure Aventon Bikes function as intended, and to reduce wear and tear on their systems. Recommended service intervals are meant to be used as guidelines. Real world wear and tear, and the need for service, will vary with conditions of use. We generally recommend inspections, service, and necessary replacements be performed at the time or mileage interval that comes first in the following table. - Page 27 Safety Check Basic Steps 1. Brakes Ensure front and rear brakes work properly. Check brake pads for wear and ensure they are not overworn. Ensure brake pads are correctly posi�oned in rela�on to the rims. Ensure brake cables are lubricated, correctly adjusted, and display no obvious wear. Ensure brake levers are lubricated and �ghtly secured to the handlebar.
- Page 28 Tire Information LEVEL uses 27.5’’ x 2.2’’ rubber tires with inner tubes. The tires are designed for durability and safety for regular cycling activities and to be checked before each use for proper inflation and condition. Proper inflation, care, and timely replacement will help to ensure that your bike’ s operational characteristics will be maintained, and unsafe conditions avoided.
-
Page 29: Troubleshooting
Components of LEVEL are subject to higher wear when compared to bikes without power assistance. This is because LEVEL can travel at higher average speeds than regular bicycles and has a greater weight. Higher wear is not a defect in the product and is not subject to warranty. Typical components a ected are... -
Page 30: Limited Warranty
(purchases in Canada and the European Union shall be subject to their respective warranty terms) and in accordance with the following terms: Only the original owner of an ebike purchased from Aventon online or physical storefront is covered by this Limited Warranty. The Warranty Period begins upon your receipt of the ebike and shall end immediately... - Page 31 Claims Process: Aventon will not replace any covered components under this limited warranty without first seeing photos or video of the damaged covered components. In order to exercise your right to receive a replacement for a Covered Component under this Limited Warranty, you must: Contact the Aventon Product Support team by email at info@aventon.com or by phone at(866) 300-3311.
-
Page 32: Link To Assembly Video And Online Resources
( https://www.aventon.com/pages/support) to view the o cial LEVEL Assembly Video. Online Resources For more information on best practices, please visit the Aventon Bikes website (www.aventon.com), Help Center ( https://www.aventon.com/pages/support), or contact Aventon Bikes Product Support with any questions. We are here to help! If you have questions, please: Access Aventon Bikes Help Center ( https://www.aventon.com/pages/support),...
Need help?
Do you have a question about the LEVEL and is the answer not in the manual?
Questions and answers
We're is the magnet ring located on Aventon level 1 bike