Viavi ONX-580 Quick Start Manual
Hide thumbs
Also See for ONX-580:
- Manual (22 pages) ,
- Quick start manual (2 pages) ,
- User manual (333 pages)
Advertisement
Quick Links
ONX-580
Quick Start Guide
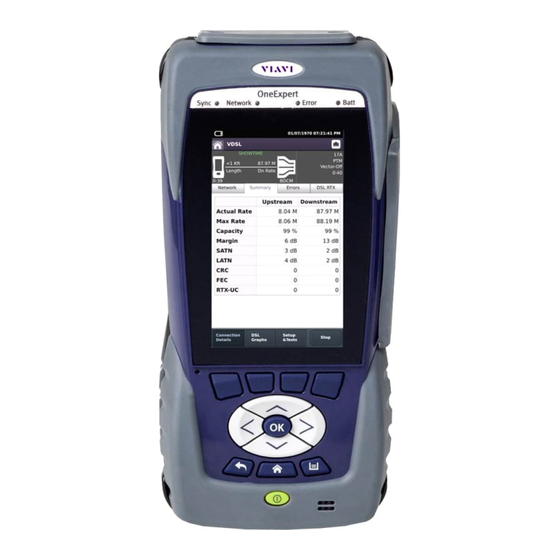
Status indicators
Touchscreen
Shortcut buttons
Arrows /OK buttons
Back, Home, and Tray buttons
Power button
Features
• Multitouch, friendly user interface is similar to smart devices
• Mobile-connectivity iOS app provides remote control, job management, data
enhancements, and technical support content, including tutorials
• Bluetooth and WiFi connectivity
• StrataSync™ cloud-enabled architecture for easy asset and test data management
• Model numbers ONX-580 / ONX-580A
– G.fast, ADSL2+/VDSL2 testing, including bonded and vectored pairs (requires
supporting test module)
– HPNA, WiFi, IP Video, and VoIP testing; fiber inspection
– RFC 6349 TCP TrueSpeed testing
– Coax testing, including SmartID™ Plus smart-probe testing
• Model Number ONX-580:
– Copper Multimeter, TDR (including OneCheck™ TDR), Opens, Balance, Load Coil,
and POTS call testing
– OneCheck™ Copper, which automates field tests and simplifies copper results
– RFL, K-Test, Spectral, Noise, Impulse Noise testing
Preparation for use
When you unpack the OneExpert, do the following:
• Inspect the unit for damage. If damaged, put back in box and contact VIAVI customer
service (see the Technical Assistance section on the next page).
• If undamaged, save the box and packing materials in case you need to ship the unit in
the future.
• Remove the protective film from the LCD. This film is in place for protection during
shipment. There is tab in the lower right corner for easy removal.
Before using the OneExpert for the first time, do the following:
• Turn the unit ON (use the green button on the front of the unit), and then verify that
it is operating properly by navigating through a few menus.
• If the Batt. LED is red, charge the battery.
Status indicators
Sync – Reports the status of G.fast/xDSL modem synchronization.
• Blinking green indicates that the modems are training.
• Solid green indicates that the modems are synchronized (reached Showtime).
Network – Indicates the status of network connectivity.
• Blinking green indicates that the unit is acquiring an IP address.
• Solid green indicates an IP address has been acquired.
• Blinking amber indicates a timeout—the unit was unable to acquire an IP address.
• If the LED is not illuminated, the network is not active (either the unit is not connected
or it is logged off).
Error – Solid red indicates error and alarm conditions. The type of error varies depending on
the application.
Batt – A multi-color LED that indicates the battery status.
• Solid green indicates that either the battery charge is higher than 30%, or that an
external source is powering the unit.
• Solid red indicates that the battery charge is critically low, less than 10%.
• Solid amber indicates that the battery is getting low; the charge is between 10% and
30%.
Touchscreen display
The touchscreen display operates similar to a smart phone or tablet, where you swipe to go
to the next page or zoom in/out by pinching or opening your fingers. Touch the screen to
select options or navigate menus.
System buttons
The Back, Home, and Tray buttons are found under the arrow buttons.
Back/Cancel – Go back to the previous menu
Home – Return to the main/home screen
Tray – Launch the Tray menu. From the Tray menu you can save test reports,
turn on/off Bluetooth, or enable/disable Remote Operation (see
Tray Menu" section
on the next page)
Right side panel
The right side panel provides the following input / output ports.
Note: The POTS and wiring ports are only available on the ONX-580 and ONX-580P; they are
not provided on the ONX-580A.
Two USB ports
There are also two home wiring ports, one RJ11, one RJ45, one RJ11 POTS connector, and one
RJ45 DSL connector (under the flap on the bottom module).
Back panel
The upper area of the back panel on the ONX-580 provides connectors for Copper or G.fast/
xDSL testing.
Note: These connectors are not provided on the ONX-580A.
Bottom panel
The DC power input, located on the bottom of the OneExpert, is used to connect the AC
adapter.
Charge indicator
The Charge indicator, located next to the charge connector, is a multi-color indicator
that shows the charge status.
• Solid green – Charging is complete
• Solid amber – Battery is charging
• Slow flashing red – Battery charge is critically low (less than 10%)
• Fast flashing red – Charging was suspended due to a fault and user intervention is
necessary (for example, the wrong charger may be attached)
• Solid red – Charging was suspended due to overheating. The unit can continue to run,
"Using the
no user intervention is necessary
Two Ethernet/
Network ports
DSL/G.fast
connector
Charge indicator
DC power input
Advertisement

Subscribe to Our Youtube Channel
Related Manuals for Viavi ONX-580


Summary of Contents for Viavi ONX-580
- Page 1 • Inspect the unit for damage. If damaged, put back in box and contact VIAVI customer Note: The POTS and wiring ports are only available on the ONX-580 and ONX-580P; they are service (see the Technical Assistance section on the next page).
- Page 2 To remove the shortcut, drag it off of the shortcut bar. • ONX-580 Files and Mobile Tech Files – Manage the files on the unit you can save to your phone or tablet. Use the ONX-580 Files menu to manage files stored The user interface of the OneExpert is designed to be intuitive and easy to use.
Need help?
Do you have a question about the ONX-580 and is the answer not in the manual?
Questions and answers