
Related Manuals for Empava EMPV-30GC0A2


Summary of Contents for Empava EMPV-30GC0A2
- Page 1 INSTRUCTION MANUAL GAS COOKTOP Appliance Class: 3 Empava Item #: 30 " :EMPV-30GC0A2 EMPV-30GC0A5 36" : EMPV-36GC202 EMPV-36GC881 EMPV-36GC888 EMPV-36GC901 Distributed by: Empava Appliances Inc. 15253 Don Julian Rd, City of Industry, CA 91745 USA www.empava.com...
- Page 2 The instructions shall be marked with directions to the installer to leave them with the appliance and to the consumer to retain them for future reference.
- Page 3 WARNING: This appliance can be used by children aged from 8 years and above and persons with reduced physical, sensory or mental capabilities or lack of experience and knowledge if they have been given supervision or instruction concerning use of the appliance in a safe way and understand the hazards involved.
-
Page 4: Table Of Contents
Contents Cooktop Description Important Information Operation Maintenance and Cleaning Troubleshooting Instructions for the Installer Important safety requirements Installation... - Page 5 This appliance shall be installed in accordance with the regulations in force and only used in a well- ventilated space. Read the instructions before installing or using this appliance. The installation must conform with local codes or, in the absence of local codes, with the National Fuel Gas Code, ANSI Z223.1/NFPA 54 or, in Canada, the Natural Gas and Propane Installation Code, CSA B149.1.
-
Page 6: Cooktop Description
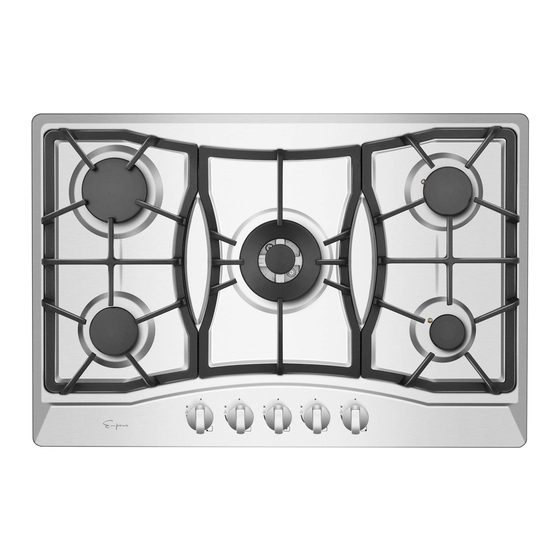
Cooktop Description Operating Instructions: EMPV-30GC0A2 Knob 1 is for burner 10 Knob 2 is for burner 9 Knob 3 is for burner 8 Knob 4 is for burner 7 Knob 5 is for burner 6 Figure 1 1.burner 6—6000Btu/hr in 2.56"... - Page 7 Total heat input: 37600Btu/hr EMPV-36GC881 Operating Instructions: Knob 1 is for burner 10 Knob 2 is for burner 9 Knob 3 is for burner 8 Knob 4 is for burner 7 Figure 4 Knob 5 is for burner 6 1.burner 6—10200Btu/hr in 3.74"...
-
Page 8: Important Information
Total heat input: 37600Btu/hr EMPV-36GC901 Operating Instructions: Knob 1 is for burner 10 Knob 2 is for burner 9 Knob 3 is for burner 8 Knob 4 is for burner 7 Knob 5 is for burner 6 Figure 6 1.burner 6—10200Btu/hr in 3.74"... - Page 9 necessary instructions concerning modification of the appliance to the conditions of use of the country. Installation Prior to installation, ensure that the local distribution conditions (nature of the gas and gas pressure) and the adjustment of the appliance are compatible. The adjustment conditions for this appliance are stated on the label (or data plate).
- Page 10 The gas cooktop gets hot when it is in use. Children should be kept away until it has cooled. Children can also injure themselves by pulling pans or pots off the gas cooktop. CAUTION: This appliance is for cooking purposes only. It must not be used for other purposes, for example, room heating.
-
Page 11: Operation
correctly, you will help prevent potential negative consequences for the environment and human health, which could otherwise be caused by inappropriate waste handling of this product. For more detailed information about recycling of this product, please contact your local city office, your household waste disposal service or the shop where you purchased the product. - Page 12 If you cannot light the flame even after several attempts, check the "cap" and “crown” (see diagram – figure 10) if they are in the correct position. To put the flame out, turn the knob to the symbol “O” Description: 1.
-
Page 13: Maintenance And Cleaning
Figure 11 Re-ignition: If the flame is out for certain reasons, the safety device will cut off the gas power automatically. Turn the switch to " largest flame " position, then ignite again, you should wait for 30 seconds when you do that; Due to the air in the tong, there may be unsmooth ignition, revolve the switch to "... -
Page 14: Troubleshooting
The electric ignition is obtained through a ceramic "electrode" and a metal electrode. Keep these components very clean, to avoid lighting difficulties, and check that the burner crown holes are not obstructed. Thermocouple The thermocouple is very crucial for cutting gas supply in case of flame out during cooking, be sure to keep them in very clean condition. -
Page 15: Instructions For The Installer
• Check the burner cap and crown have been replaced correctly, e.g. after cleaning. Instructions for the Installer Overall dimensions For Model Width Depth EMPV-30GC0A2 EMPV-30GC0A5 29.90in 20.08in EMPV-36GC202 EMPV-36GC881 EMPV-36GC888 36.02in 20.67in EMPV-36GC901 Cut out dimensions... -
Page 16: Important Safety Requirements
Important safety requirements Location The cooktops may be located in a kitchen, a kitchen/diner or bed sitting room, but not in a bathroom, shower room or garage. Before making the cut out in the worktop ensure that there is a minimum distance of 2.17”... - Page 17 A manual valve be installed in an accessible location in the gas line external to the appliance for the purpose of turning on or shutting off gas to the appliance. Warning: Turn the knob counterclockwise to adjust the flame, size, so that the flame does not float out of the container rim.
- Page 18 Figure 14 Gas type (Parts list) (Parts list) Nozzles Dia. (mm) Power (Btu/hr) Quantity Nozzles Dia. (mm) Power (Btu/hr) Quantity 1.00 13600 1.50 13600 Wok burner(Triple ring burner) 0.85 10200 1.28 10200 Rapid burner 0.65 6000 0.97 6000 Semi rapid burner 0.50 3400 0.72...
-
Page 19: Installation
Similarly, when use in NG status, turn the marked NG arrow upwards and tighten it to the screw cap (see Figure 18). Repeat the above operation. The outlet pressure requires to be 4 ± 1in wc. After the conversion is completed, the conversion label in the accessory bag needs to be attached next to the original label. - Page 20 WHEN THE GAS COOKTOP IS FIRST INSTALLED Once the gas cooktop has been installed, it is important to remove any protective materials, which were put on in the factory. Any gas installation must be carried out by a competent person. Important: When installing the gas cooktop above a built-in oven, the oven should be placed on two wooden strips;...
- Page 21 Cut Out dimensions The dimensions of the cut-out are given in the diagram. (Dimensions are given in inch.) For model: 36GC202 36GC881 For model:30GC0A2, 30GC0A5 36GC888 36GC901 Figure 18 Figure 19 Electrical connections Any electrical work required to install this gas cooktop should be carried out by a qualified electrician or competent person.
- Page 22 the grounding prong from this plug. Circuit Diagram Figure 22(for the appliance with four burners) Figure 23(for the appliance with three burners)
- Page 23 Figure 24(for the appliance with five burners) Use with D.C battery When your cooktop is the one fitted with D.C supply device only, you are suggested to use one 1.5V battery. Be sure that the battery is well fixed then you can follow the “Lighting” procedure. Take off the battery if you won’t use the cooktop for a long time.
- Page 24 Simply fill in the fields below and print form. Send Completed Form Customer Service:(888)-682-8882 Empava Appliances Inc. Warranty/ Registration Dept. 15253 Don Julian Rd City of Industry,CA,91745 WARRANTY CARD PLEASE READ AGREEMENT BEFORE SIGNING Click Here Keep this copy for yourself.
- Page 25 My signature above acknowledges that I have read, fully understand, and accept this limitedwarranty agreement. Must return within 14 days of purchase with copy of dated register receipt. WARRANTY CARD COPY (For your records) Empava Appliances Inc. Warranty/ Registration Dept. 15253 Don Julian Rd City of Industry,CA,91745...
Need help?
Do you have a question about the EMPV-30GC0A2 and is the answer not in the manual?
Questions and answers