Advertisement
INSTRUCTION MANUAL
GAS COOKTOP
Appliance Class: 3
Empava Item #:
12 " : EMPV-12GC29
Distributed by:
Empava Appliances Inc.
15253 Don Julian Rd, City of Industry, CA 91745 USA
www.empava.com
The instructions shall be marked with directions to the installer to leave them with
the appliance and to the consumer to retain them for future reference.
Advertisement

Related Manuals for Empava EMPV-12GC29


Summary of Contents for Empava EMPV-12GC29
- Page 1 INSTRUCTION MANUAL GAS COOKTOP Appliance Class: 3 Empava Item #: 12 " : EMPV-12GC29 Distributed by: Empava Appliances Inc. 15253 Don Julian Rd, City of Industry, CA 91745 USA www.empava.com The instructions shall be marked with directions to the installer to leave them with...
- Page 2 WARNING:This appliance can be used by children aged from 8 years and above and persons with reduced physical, sensory or mental capabilities or lack of experience and knowledge if they have been given supervision or instruction concerning use of the appliance in a safe way and understand the hazards involved.
-
Page 3: Table Of Contents
Contents ◆ Cooktop Description ◆ Important Information ◆ Operation ◆ Maintenance and Cleaning ◆ Troubleshooting ◆ Instructions for the Installer ◆ Important safety requirements ◆ Installation This appliance shall be installed in accordance with the regulations in force and only used in a well- ventilated space. -
Page 4: Cooktop Description
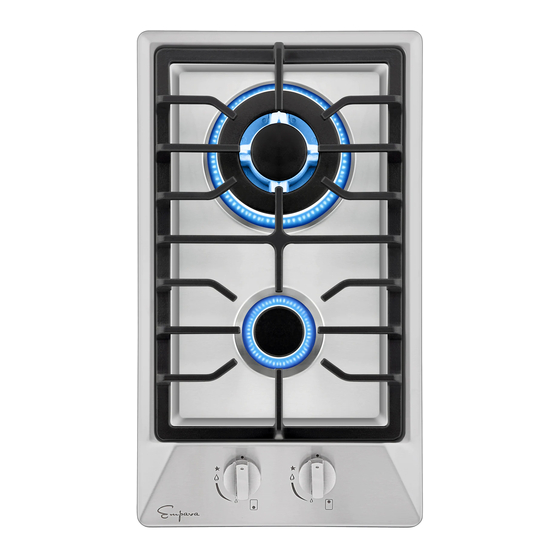
Cooktop Description EMPV-12GC29 Operating Instructions: Knob 1 is for burner 4 Knob 2 is for burner 3 Figure 1 1.burner 4—11500Btu/hr in 5.15" 2.burner 3—4000Btu/hr in 1.77" Total heat input: 15500Btu/hr Important Information Read the instructions before installing or using this appliance. - Page 5 ➢ The appliance must be isolated from the gas supply piping system by closing its individual manual shut-off valve during any pressure testing of the gas supply piping system at test pressures equal to or less than 1/2 psi (3.5 kPa). ➢...
-
Page 6: Operation
Service ➢ The gas cooktop should only be repaired or serviced by an authorized Service person and only genuine approved spare parts should be used. Environmental Information ➢ After installation, please dispose of the packaging with due regard to safety and the environment. ➢... - Page 7 CAUTION: Accessible parts may be hot when the grill is in use. Young children should be kept away" As shown in Figure 12, place the burner onto the burner base one by one and stuck, rotate left and right to check if the burners are in place, the burner is placed correctly when it cannot be rotated. Finally center placed the burner cap on the burner.
-
Page 8: Maintenance And Cleaning
Re-ignition: If the flame is out for certain reasons, the safety device will cut off the gas power automatically. Turn the switch to " largest flame " position, then ignite again, you should wait for 30 seconds when you do that; Due to the air in the tong, there may be unsmooth ignition, revolve the switch to "... -
Page 9: Troubleshooting
• Check the burner cap and crown have been replaced correctly, e.g. after cleaning. Instructions for the Installer Overall dimensions For Model Width Depth EMPV-12GC29 12in 21in Cut out dimensions For Model Width Depth EMPV-12GC29 10.62in... -
Page 10: Important Safety Requirements
Maximum Gas Supply Pressure: 14 in wc. Gas supply pressure for checking regulator setting: NG gas pressure at 5.0 in wc LPG gas pressure at 11 in wc. Important safety requirements Location The cooktops may be located in a kitchen, a kitchen/diner or bed sitting room, but not in a bathroom, shower room or garage. - Page 11 WARNING: The use of a gas cooking appliance results in the production of heat and moisture in the room in which it is installed. Ensure that the kitchen is well ventilated especially when the appliance is in use. Keep natural ventilation holes open or install a mechanical ventilation device.
- Page 12 3) Remove the burners, burner caps, and screw out the nozzles from the burner bases. Then install those nozzles in the Conversion Kit bag (part no. GX90-12A ASSY NOZZLE KIT ON EMPV-12GC29.) to each burner base correspondingly. Save the orifices removed from the appliance for future use.
-
Page 13: Installation
Similarly, when use in NG status, turn the marked NG arrow upwards and tighten it to the screw cap (see Figure 18). Repeat the above operation. The outlet pressure requires to be 4 ± 1in wc. 9) After the conversion is completed, the conversion label in the accessory bag needs to be attached next to the original label. - Page 14 wooden strips; in the case of a joining cabinet surface, remember to leave a space of at least 1.77” x 22.05” at the back. When installing on a built-in oven without forced ventilation, ensure that there are air inlets and outlets for ventilating the interior of the cabinet adequately.
- Page 15 Electrical connections Any electrical work required to install this gas cooktop should be carried out by a qualified electrician or competent person. Check the last letter of your model to know the electrical supply type: A is for AC,D is for DC. See PAGE 1 to check the electrical supply of your model The GAS COOKTOP MUST BE EARTHED If the cooktops to be connected to a 120V, 60 Hz AC electrical supply.
- Page 16 Simply fill in the fields below and print form. Send Completed Form Customer Service:(888)-682-8882 Empava Appliances Inc. Warranty/ Registration Dept. 15253 Don Julian Rd City of Industry,CA,91745 WARRANTY CARD PLEASE READ AGREEMENT BEFORE SIGNING Click Here Keep this copy for yourself.
Need help?
Do you have a question about the EMPV-12GC29 and is the answer not in the manual?
Questions and answers
Can not turn heat low
The Empava EMPV-12GC29 requires you to turn the knob toward "off" to achieve a low flame. If not done properly, it may be difficult to set the heat to a low level.
This answer is automatically generated