Table of Contents
Advertisement
Quick Links
Advertisement
Table of Contents

Related Manuals for QNAP TVS-h 88X Series


Summary of Contents for QNAP TVS-h 88X Series
- Page 1 TVS-hx88X TVS-h1288X TVS-h1688X User Guide Document Version: 1 19/11/2020...
-
Page 2: Table Of Contents
TVS-hx88X User Guide Contents 1. Preface About This Guide............................3 Audience...............................3 Document Conventions..........................3 2. Product Overview About the TVS-hx88X........................... 4 Hardware Specifications..........................4 Package Contents............................7 Components..............................7 Front Panel............................... 7 Rear Panel..............................9 Left Panel..............................11 Right Panel............................. 12 Drive Numbering.............................14 Safety Information............................14 Installation Requirements........................... - Page 3 Hot-swapping Failed Drives........................75 Recovering Unintentionally Removed Healthy Drives................76 Support and Other Resources........................76 7. Glossary Cloud Key..............................77 myQNAPcloud Link.............................77 myQNAPcloud............................77 QNAP ID..............................77 Qfinder Pro..............................77 QuTS hero..............................77 8. Notices Limited Warranty............................78 Disclaimer..............................78 GNU Public License............................78 FCC Notice..............................
-
Page 4: Preface
TVS-hx88X User Guide 1. Preface About This Guide This guide provides information about the device and step-by-step instructions on installing the hardware. It also provides instructions on basic operations and troubleshooting information. Audience This document is intended for storage administrators. This guide assumes that the user is knowledgeable and qualified to install, maintain, and troubleshoot issues involving servers, server components, and storage systems. -
Page 5: Product Overview
Hardware Specifications Warning • If your QNAP product has hardware defects, return the product to QNAP or a QNAP- authorized service center for maintenance or replacement. Any attempt to repair or perform maintenance procedures on the product by you or an unauthorized third-party invalidates the warranty. - Page 6 TVS-h1288X-W1250-16G TVS-h1688X-W1250-32G Memory slots 4 x DDR4 Long-DIMM Note Use only QNAP memory modules to maintain system performance and stability. For NAS devices with more than one memory slot, use QNAP modules with identical specifications. Using unsupported modules may degrade performance, cause errors, or prevent the operating system from starting.
- Page 7 TVS-hx88X User Guide Component TVS-h1288X-W1250-16G TVS-h1688X-W1250-32G PCIe slots • 1 x PCIe 3.0 x8 Note This slot comes preinstalled with a 10 GbE network expansion card. • 2 x PCIe 3.0 x4 USB ports Front: Front: 1 x USB 3.2 Gen 2 Type-A 1 x USB 3.2 Gen 2 Type-A Note Note...
-
Page 8: Package Contents
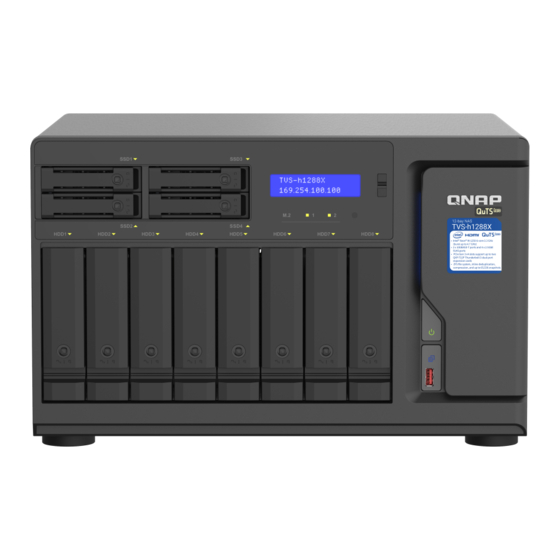
0˚C to 40˚C (32˚F to 104˚F) Relative humidity • Non-condensing relative humidity: 5% to 95% • Wet-bulb temperature: 27˚C (80.6˚F) Security slot Kensington security slot For the list of compatible expansion cards, go to https://www.qnap.com/compatibility. Package Contents Item Quantity TVS-h1288X or TVS-h1688X NAS Power cord... - Page 9 TVS-hx88X User Guide Component Component LCD panel USB One Touch Copy button Enter button USB 3.2 Gen 2 (10Gbps) Type-A port Select button Drive LEDs M.2 LEDs SSD LEDs Power button TVS-h1688X Component Component Enter button USB One Touch Copy button Select button USB 3.2 Gen 2 (10Gbps) Type-A port M.2 LEDs...
-
Page 10: Rear Panel
2.5 Gigabit Ethernet speed COM port Type-A ports LEDs Note This port is for engineering purposes only. Power switch Reset button PCIe 3.0 x4 slot 3 Note Only the PCIe 3.0 x4 slot supports the QNAP QXP-T32P Thunderbolt 3 expansion card. Product Overview... - Page 11 Component Component Component Power port HDMI 1.4b port PCIe 3.0 x4 slot 2 Note Only the PCIe 3.0 x4 slot supports the QNAP QXP-T32P Thunderbolt 3 expansion card. Speakers 2.5 Gigabit Ethernet ports TVS-h1688X Component Component Component PCIe 3.0 x8 slot 1 Speaker 2.5 Gigabit Ethernet speed...
-
Page 12: Left Panel
Component Component Component Power switch HDMI 1.4b port PCIe 3.0 x4 slot 2 Note Only the PCIe 3.0 x4 slot supports the QNAP QXP-T32P Thunderbolt 3 expansion card. Power port 2.5 Gigabit Ethernet activity LEDs Left Panel TVS-h1288X Product Overview... -
Page 13: Right Panel
TVS-hx88X User Guide TVS-h1688X Component Component PCIe 3.0 x8 slot Note This slot comes preinstalled with a NIC. Right Panel TVS-h1288X Product Overview... - Page 14 TVS-hx88X User Guide Component Component M.2 SSD slot 2 Memory slot 3 M.2 SSD slot 1 Memory slot 4 Memory slot 1 PCIe 3.0 x4 slot 3 Memory slot 2 PCIe 3.0 x4 slot 2 TVS-h1688X Component Component M.2 SSD slot 1 Memory slot 3 M.2 SSD slot 2 Memory slot 4...
-
Page 15: Drive Numbering
TVS-hx88X User Guide Drive Numbering TVS-h1288X TVS-h1688X Safety Information The following instructions help ensure personal safety and environmental safety. Read these instructions carefully before performing any operations. General Instructions • The device should be stored in a secure location with restricted access, controlled through the use of a tool, lock and key, or any means of security. -
Page 16: Installation Requirements
TVS-hx88X User Guide • To avoid potential injury or damage to components, ensure that the drives and other internal system components have cooled before touching them. • Observe electrostatic discharge (ESD) procedures to avoid potential injury or damage to components. Power •... -
Page 17: Setting Up The Nas
TVS-hx88X User Guide Category Item Hardware and peripherals • Storage drives For the list of compatible drive models, go to https:// www.qnap.com/compatibility. • Network cable Tools • Phillips #1 or #2 screwdriver • Anti-static wrist strap Setting Up the NAS Important... -
Page 18: Installation And Configuration
TVS-hx88X User Guide 3. Installation and Configuration This chapter provides specific hardware and operating system installation and configuration steps. Hardware Installation This section provides information on installing drives, memory modules, and expansion cards. Drive Installation The TVS-h1288X and the TVS-h1688X are compatible with 3.5-inch hard drives, 2.5-inch hard drives, and 2.5-inch solid-state drives. - Page 19 TVS-hx88X User Guide b. Pull the handle to release the tray. c. Pull the tray out. Note The preinstalled drive trays come unlocked. Important Ensure the drive tray keys are stored in a safe place. 3. Install a drive on the tray. a.
- Page 20 TVS-hx88X User Guide b. Place the drive on the tray so that the holes on the sides of the drive are aligned with the holes on the sides of the tray. c. Attach the fastening panels to lock the drive to the tray. d.
- Page 21 TVS-hx88X User Guide Note Attaching screws provides futher security and stability for the drives. 4. Load the tray into the bay. a. Insert the tray into the bay. b. Push the handle. c. Lock the tray. Installation and Configuration...
- Page 22 TVS-hx88X User Guide 5. Power on the NAS. Installing 2.5-inch or Solid-State Drives on 3.5-inch Trays Warning • Installing a drive deletes all data on the drive. • Observe electrostatic discharge (ESD) procedures to avoid damage to components. • Moving fan blades: Keep your hands and other body parts away from moving fan blades.
- Page 23 TVS-hx88X User Guide b. Pull the handle to release the tray. c. Pull the tray out. Note The preinstalled drive trays come unlocked. Important Ensure the drive tray keys are stored in a safe place. 3. Install a drive on the tray. a.
- Page 24 TVS-hx88X User Guide b. Place the drive on the tray so that the holes on the sides of the drive are aligned with the holes on the sides of the tray. c. Attach the screws. 4. Load the tray into the bay. a.
- Page 25 TVS-hx88X User Guide c. Lock the tray. 5. Power on the NAS. Installing 2.5-inch Hard Drives on 2.5-inch Drive Trays Warning • Installing a drive deletes all data on the drive. • Observe electrostatic discharge (ESD) procedures to avoid damage to components. 1.
- Page 26 TVS-hx88X User Guide TVS-h1288X TVS-h1688X b. Pull the handle to release the tray. c. Pull the tray out. Installation and Configuration...
- Page 27 TVS-hx88X User Guide TVS-h1288X TVS-h1688X Note The preinstalled drive trays come unlocked. Important Ensure the drive tray keys are stored in a safe place. 3. Install a drive on the tray. a. Align the SATA connector on the drive with the opening at the end of the tray. b.
- Page 28 TVS-hx88X User Guide 4. Load the tray into the bay. a. Insert the tray into the bay. b. Push the handle. TVS-h1288X Installation and Configuration...
- Page 29 TVS-hx88X User Guide TVS-h1688X c. Lock the tray. TVS-h1288X Installation and Configuration...
- Page 30 • Other moving components: Keep your hands and other body parts away from other moving components. Note • QNAP recommends installing heatsinks on the M.2 SSD controllers to enhance cooling efficiency and to ensure consistent performance. Installation and Configuration...
- Page 31 TVS-hx88X User Guide • Before installing non-QNAP heatsinks, ensure that they are of the appropriate size and shape. 1. Power off the device. 2. Disconnect the power cord from the electrical outlet. 3. Disconnect all cables and external attachments. 4. Remove the case cover.
- Page 32 TVS-hx88X User Guide b. Remove the screw that secures the module to the chassis. c. Press the clip and then pull the module away from the system board. 6. Install a heatsink on the M.2 SSD. a. Locate the controller on the M.2 SSD. Note The controller location varies depending on the model and manufacturer of the M.2 SSD.
- Page 33 TVS-hx88X User Guide c. Install the heatsink on the controller. 7. Install the M.2 SSD. a. Optional: To install the M.2 22110, move the pushpin. Installation and Configuration...
- Page 34 TVS-hx88X User Guide M.2 22110 b. Pull out the pushpin. Installation and Configuration...
- Page 35 TVS-hx88X User Guide M.2 2280 c. Insert the M.2 SSD into the slot. d. Insert the pushpin to secure the drive. Installation and Configuration...
- Page 36 TVS-hx88X User Guide 8. Attach the fan module. a. Align the protruding part of the module with the hole on the chassis below the M.2 SSD slot. b. Push the module toward the system board until the clip locks the module into place. c.
- Page 37 TVS-hx88X User Guide 9. Attach the case cover. a. Place the cover on the device. b. Slide the cover forward. c. Tighten the screws. 10. Connect all cables and external attachments. 11. Connect the power cord to the electrical outlet. 12.
-
Page 38: Installing Expansion Cards
Other moving components: Keep your hands and other body parts away from other moving components. • Observe electrostatic discharge (ESD) procedures to avoid damage to components. 1. Check the expansion cards and brackets supported by your model on the QNAP website. a. Go to www.qnap.com/compatibility. b. Click Search by NAS. - Page 39 TVS-hx88X User Guide 6. Optional: Remove the existing expansion card. a. Remove the screw that secures the cover to the chassis. b. Hold the card by the edges. c. Carefully pull the card out of the slot. 7. Remove the PCIe cover. a.
- Page 40 For details, go to https://shop.qnap.com/. a. Remove all screws of the existing bracket. b. Carefully pull the bracket away from the card. c. Attach the QNAP bracket to the card using the same screws. Installation and Configuration...
- Page 41 TVS-hx88X User Guide d. Verify that the bracket does not move. 9. Install the expansion card. a. Hold the card by the edges. b. Insert the card into the slot. c. Attach the screw. PCIe 3.0 x8 Installation and Configuration...
- Page 42 TVS-hx88X User Guide PCIe 3.0 x4 Note Only the PCIe 3.0 x4 slots support the QNAP QXP-T32P Thunderbolt 3 expansion card. d. Optional: Attach the PCIe power connector to the expansion card. Note • Larger expansion cards may require you to attach the PCIe power connector before inserting the card into the slot.
-
Page 43: Replacing Memory Modules
Slide the cover forward. c. Tighten the screws. Replacing Memory Modules Use only QNAP memory modules to maintain system performance and stability. You can purchase QNAP memory modules from authorized resellers. Important • QNAP recommends installing modules in pairs. - Page 44 TVS-hx88X User Guide • Other moving components: Keep your hands and other body parts away from other moving components. 1. Power off the device. 2. Disconnect the power cord from the electrical outlet. 3. Disconnect all cables and external attachments. 4.
- Page 45 TVS-hx88X User Guide b. Remove the screw that secures the fan module to the chassis. c. Press the clip and then pull the fan module away from the right panel. 7. Optional: Remove an existing module. a. Push the retention clips outward simultaneously to release the module. b.
- Page 46 TVS-hx88X User Guide d. Carefully slide the module out of the slot. Warning • Do not touch the internal components, particularly the metal connectors. • Do not bend the module. 8. Install a new module. a. Align the notch with the ridge in the slot. b.
- Page 47 TVS-hx88X User Guide 9. Attach the fan module. a. Align the protruding part of the fan module with the hole on the chassis below the M.2 SSD slot. b. Push the fan module toward the system board until the clip locks the fan module into place. c.
-
Page 48: Replacing Cpu Fans
TVS-hx88X User Guide 10. Place the device in its normal upright position. 11. Attach the case cover. a. Place the cover on the device. b. Slide the cover forward. c. Tighten the screws. Replacing CPU Fans Warning Installation and Configuration... - Page 49 TVS-hx88X User Guide • Moving fan blades: Keep your hands and other body parts away from moving fan blades. • Other moving components: Keep your hands and other body parts away from other moving components. 1. Power off the device. 2.
- Page 50 TVS-hx88X User Guide b. Remove the screw that secures the fan module to the chassis. c. Press the clip and then pull the fan module away fom the system board. 6. Remove an existing fan. a. Remove the screws that secure the fan to the fan chassis. Installation and Configuration...
- Page 51 TVS-hx88X User Guide b. Remove the fan cable from the openings of the cable clips on the fan chassis. c. Detach the fan from the fan chassis. 7. Install a new fan in the same location. a. Position the fan chassis so that the cable clips face upward. b.
- Page 52 TVS-hx88X User Guide d. Attach the fan cable to openings of the cable clips on the fan chassis. 8. Attach the fan module. a. Align the protruding part of the fan module with the hole on the chassis below the M.2 SSD slot. b.
- Page 53 TVS-hx88X User Guide d. Connect the fan cable to the system board. 9. Attach the case cover. a. Place the cover on the device. b. Slide the cover forward. c. Tighten the screws. Installation and Configuration...
-
Page 54: Installing Expansion Units
The device supports SATA JBOD expansion units and USB expansion units. For details, please see table below. You can purchase storage expansion accessories from QNAP or an authorized reseller. For details, go to https://shop.qnap.com/. For the list of compatible expansion units and the maximum number of applicable expansion units, go to http://www.qnap.com/go/compatibility-expansion. - Page 55 TVS-hx88X User Guide Expansion Unit Model Description Required Accessories TL-R400S • Uses a SAS 6 Gbps • 1 x SFF-8088 connector cable (SFF-8088) interface • QXP-400eS-A1164 host bus • Supports SATA/HDD/SSD adapter • RAIL-B02 TL-R1200S-RP • Uses a SAS 6 Gbps •...
- Page 56 2. Install a host bus adapter on the PCIe slot. Note The QNAP QXP host bus adapter is required for connecting the SATA JBOD enclosure to a host device. Third-party host bus adapters are not compatible with QNAP JBOD enclosures.
- Page 57 To use SAS expansion units, an SAS-12G2E storage expansion card must be installed on the NAS and connected to the expansion units using mini-SAS SFF-8644 cables. You can purchase storage expansion accessories from QNAP or an authorized reseller. For details, go to https://shop.qnap.com/.
- Page 58 TVS-hx88X User Guide 3. Power on the expansion units. 4. Verify that the expansion units are recognized by the device. a. Log on to QuTS hero as administrator. b. Go to Main Menu > Storage & Snapshots > Overview > System . c.
-
Page 59: Quts Hero Installation
3. Run Qfinder Pro on a computer that is connected to the same local area network. Note To download Qfinder Pro, go to https://www.qnap.com/utilities. 4. Locate the NAS in the list and then double-click the name or IP address. The Smart Installation Guide opens in the default web browser. - Page 60 ASCII characters. 8. Click Next. 9. Specify the time zone, date, and time. QNAP recommends connecting to an NTP server to ensure that the NAS follows the Coordinated Universal Time (UTC) standard. 10. Click Next. The Configure the network settings screen appears.
-
Page 61: Installing Quts Hero Using The Cloud Key
1. Power on the device. 2. Connect the device to the internet. 3. Go to the QNAP Cloud Installation page using one of the following methods: • On your computer, go to http://install.qnap.com/. • Scan the QR code on the NAS using a mobile device. - Page 62 ASCII characters. 12. Click Next. 13. Specify the time zone, date, and time. QNAP recommends connecting to an NTP server to ensure that the NAS follows the Coordinated Universal Time (UTC) standard. 14. Click Next. The Configure the network settings screen appears.
- Page 63 TVS-hx88X User Guide 20. Click Apply. A confirmation message appears. Warning Clicking Confirm deletes all data on the drive before installing QuTS hero. 21. Click Confirm. QuTS hero is installed. 22. Optional: Click Go to NAS Management. Click Go to NAS Management to set more advanced QuTS hero configurations and settings. For details, see QuTS hero User Guide.
-
Page 64: Basic Operations
TVS-hx88X User Guide 4. Basic Operations This chapter describes basic NAS operations. Power Button Operation User Action Result Power on Press the button once. The device powers on. Power off Press and hold the button for 1.5 The device powers off. seconds. -
Page 65: Usb One Touch Copy Button
TVS-hx88X User Guide USB One Touch Copy Button The USB One Touch Copy button allows you to copy data backups from a USB device to the NAS or from the NAS to a USB device. This feature supports incremental backups. The NAS only copies files that were modified or added after the last backup. -
Page 66: Configuring Tcip/Ip Settings
TVS-hx88X User Guide Configuring TCIP/IP Settings You can configure the following settings for each network adapter on the device: • IP address • Subnet mask • Default gateway • Primary DNS • Secondary DNS 1. Press Enter or Select. The panel displays the NAS name and QuTS hero version. 2. -
Page 67: Viewing System Information
TVS-hx88X User Guide 3. Press Enter repeatedly until the panel displays Main Menu 3. Volume. 4. Press and hold Enter. The panel displays the name and capacity of the first volume. 5. Press and hold Select. Repeat this step as necessary. The panel displays the name and capacity of the next volume. -
Page 68: Lcd Error Messages
TVS-hx88X User Guide The panel displays the NAS name and QuTS hero version. 2. Press and hold Enter for two seconds. The panel displays Main Menu 1. TCP/IP. 3. Press Enter repeatedly until the panel displays Main Menu 7. Password. 4. -
Page 69: Leds
TVS-hx88X User Guide LEDs LEDs indicate the system status and related information when the device is powered on. The following LED information applies only when the drive is correctly installed and when the device is connected to the network or to a host. For details on the location of the LEDs, see Components. - Page 70 TVS-hx88X User Guide Status Description System Status Flashes green and red • The drive is being formatted. alternately every 0.5 • The device is being initialized. seconds • The operating system is being updated. • RAID rebuilding is in progress. •...
-
Page 71: Audio Alert
TVS-hx88X User Guide Status Description Drive Flashes red The data is being accessed and a read/write error occurs during the process. A drive read/write error occurred. Flashes green Data is being accessed. Green The drive is ready. No drive was detected. 2.5 Gigabit Green The network connection is operating at 2.5 Gbps. - Page 72 TVS-hx88X User Guide Duration Frequency Description Long beep (1.5 seconds) 3 (every 5 minutes) • A power error occurred. • The system fan is not functioning. • The fan module has been removed. • The NAS data cannot be copied to the external storage device connected to the front USB port.
-
Page 73: Nas Migration
NAS Migration Requirements You can only migrate drives and system settings to specific NAS models, depending on your source NAS. For the list of NAS models compatible with direct NAS migration, see https://www.qnap.com/en/nas- migration. Your device must meet the following requirements: •... -
Page 74: Migrating A Nas
1. Power off the source NAS and the destination NAS. 2. Remove the drives. Important QNAP recommends following the source NAS drive order when installing the drives. Take note of the drive tray order when removing the drives. NAS Migration... - Page 75 TVS-hx88X User Guide a. Remove the drives from the source NAS. b. Remove the drive trays from the destination NAS. 3. Install the drives. a. Install source NAS drives onto the destination NAS drive trays. b. Insert the drive trays into the destination NAS. 4.
-
Page 76: Troubleshooting
TVS-hx88X User Guide 6. Troubleshooting This chapter describes basic troubleshooting information. Forcing Qfinder Pro or myQNAPcloud to Locate the NAS If Qfinder Pro or myQNAPcloud is unable to locate the NAS during QuTS hero installation, the drives or data may be faulty. 1. -
Page 77: Recovering Unintentionally Removed Healthy Drives
Triple Mirror Multiple of 3. (For example, 3, 6, 9, 12 disks and so forth.) RAID-TP ≥ 5 Support and Other Resources QNAP provides the following resources: Resource Documentation https://docs.qnap.com Compatibility List https://www.qnap.com/compatibility/ NAS Migration Compatibility https://www.qnap.com/en/nas-migration Expansion Unit Compatibility http://www.qnap.com/go/compatibility-expansion... -
Page 78: Glossary
User account that enables you to use myQNAPcloud remote access and other QNAP services Qfinder Pro QNAP utility that lets you locate and access QNAP NAS devices in your local area network QuTS hero QNAP NAS operating system featuring ZFS file system... -
Page 79: Notices
No license, express or implied, by estoppels or otherwise, to any intellectual property rights is granted by this document. Except as provided in QNAP's terms and conditions of sale for such products, QNAP assumes no liability whatsoever, and QNAP disclaims any express or implied warranty, relating to sale and/or use of QNAP products including liability or warranties relating to fitness for a particular purpose, merchantability, or infringement of any patent, copyright or other intellectual property right. - Page 80 TVS-hx88X User Guide Free Software Foundation, use the GNU General Public License for most of our software; it applies also to any other work released this way by its authors. You can apply it to your programs, too. When we speak of free software, we are referring to freedom, not price. Our General Public Licenses are designed to make sure that you have the freedom to distribute copies of free software (and charge for them if you wish), that you receive source code or can get it if you want it, that you can change the software or use pieces of it in new free programs, and that you know you can do these things.
- Page 81 TVS-hx88X User Guide tells the user that there is no warranty for the work (except to the extent that warranties are provided), that licensees may convey the work under this License, and how to view a copy of this License. If the interface presents a list of user commands or options, such as a menu, a prominent item in the list meets this criterion.
- Page 82 TVS-hx88X User Guide You may convey verbatim copies of the Program's source code as you receive it, in any medium, provided that you conspicuously and appropriately publish on each copy an appropriate copyright notice; keep intact all notices stating that this License and any non-permissive terms added in accord with section 7 apply to the code;...
- Page 83 TVS-hx88X User Guide the object code. If the place to copy the object code is a network server, the Corresponding Source may be on a different server (operated by you or a third party) that supports equivalent copying facilities, provided you maintain clear directions next to the object code saying where to find the Corresponding Source.
- Page 84 TVS-hx88X User Guide a. Disclaiming warranty or limiting liability differently from the terms of sections 15 and 16 of this License; or b. Requiring preservation of specified reasonable legal notices or author attributions in that material or in the Appropriate Legal Notices displayed by works containing it; or c.
- Page 85 TVS-hx88X User Guide An “entity transaction” is a transaction transferring control of an organization, or substantially all assets of one, or subdividing an organization, or merging organizations. If propagation of a covered work results from an entity transaction, each party to that transaction who receives a copy of the work also receives whatever licenses to the work the party's predecessor in interest had or could give under the previous paragraph, plus a right to possession of the Corresponding Source of the work from the predecessor in interest, if the predecessor has it or can get it with reasonable efforts.
- Page 86 TVS-hx88X User Guide If conditions are imposed on you (whether by court order, agreement or otherwise) that contradict the conditions of this License, they do not excuse you from the conditions of this License. If you cannot convey a covered work so as to satisfy simultaneously your obligations under this License and any other pertinent obligations, then as a consequence you may not convey it at all.
-
Page 87: Fcc Notice
• Consult the dealer or an experienced radio/television technician for help. Important Any modifications made to this device that are not approved by QNAP Systems, Inc. may void the authority granted to the user by the FCC to operate this equipment. -
Page 88: Sj/T 11364-2006
TVS-hx88X User Guide SJ/T 11364-2006 本产品符合中国 RoHS 标准。以下表格标示此产品中某有毒物质的含量符合中国 RoHS 标准规定的限量要求。 本产品上会附有”环境友好使用期限”的标签,此期限是估算这些物质”不会有泄漏或突变”的年限。本产品 可能包含有较短的环境友好使用期限的可替换元件,像是电池或灯管,这些元件将会单独标示出来。 部件名称 有毒有害物质或元素 铅 汞 镉 六价铬 多溴联苯 多溴二苯醚 (Pb) (Hg) (Cd) (CR(VI)) (PBB) (PBDE) 壳体 显示 印刷电路板 金属螺帽 电缆组装 风扇组装 电力供应组装 0 电池 O: 表示该有毒有害物质在该部件所有物质材料中的含量均在 SJ/T11363-2006 标准规定的限量要求以下。 X: 表示该有毒有害物质至少在该部件的某一均质材料中的含量超出 SJ/T11363-2006 标准规定的限量要求。 Notices...
Need help?
Do you have a question about the TVS-h 88X Series and is the answer not in the manual?
Questions and answers