Table of Contents
Advertisement
Quick Links
Download this manual
See also:
User Manual
Advertisement
Table of Contents

Related Manuals for QNAP QG-103N


Summary of Contents for QNAP QG-103N
-
Page 1: User Manual
QNAP Mobile NAS User Manual (Version: 1.2) This manual is applicable to the following Mobile NAS models: QG-103N © 2014 QNAP Systems, Inc. All Rights Reserved. -
Page 2: Table Of Contents
Table of Contents ........................7 1. How to use 1.1 Read this first ......................8 1.2 Product overview ......................8 1.2.1 What you can do with QGenie ..........................9 1.2.2 Supported devices ..........................10 1.2.3 Appearance ..........................12 1.3 Getting started ...................... - Page 3 1.5.5 Access and manage files (Advance) ..........................46 1.5.6 Backup & restore phonebooks to/from QGenie ..........................49 1.5.7 Setup Qfile ..........................51 1.6 Setup/use QGenie with Qfinder ......................57 1.6.1 Login from Web Interface ..........................57 1.6.2 Use My Network Places (Samba) to access QGenie content ..........................
- Page 4 2.1.3 The battery discharges very quickly, even when QGenie is off..........................80 2.1.4 The battery does not charge from a computer..........................80 2.1.5 The battery indicator icon does not appear as charging..........................80 2.1.6 It takes a long time to charge the battery..........................
- Page 5 2.7 Other ......................83 2.7.1 How many wireless networks (SSIDs) can be registered as external access points ..........................83 for the Internet connection? 2.7.2 How many users can connect to QGenie at the same time? ..........................83 2.8 File operation ......................
- Page 6 2.10.3 Files cannot be edited using Qfile..........................86 2.10.4 How can I check the version of Qfile? ..........................86 2.10.5 I can not login QGenie by Qfile ..........................87 2.11 myQNAPcloud ......................87 2.11.1 I can not register my QGenie to myQNAPcloud ..........................
-
Page 7: How To Use
1. How to use Read this first Disclaimer, copyright notices, and other important information about QGenie. Product overview Overview of the functions provided by QGenie and supported products. Getting started How to get started using mobile devices. Getting started using a PC How to get started using a PC or Mac. -
Page 8: What You Can Do With Qgenie
Also, QNAP will not recover, restore, duplicate (etc) any of the content on this device in any situation. -
Page 9: Supported Devices
Automatically upload photos and videos taken with mobile devices to QGenie. Supports external multimedia players accessing the contents on QGenie. Lightweight (only 112g/4oz). Use Qsync on a PC to transfer files to a QNAP Turbo NAS. Wireless Access Point / Wi-Fi hotspot... - Page 10 Supports up to 20 devices. Maximum wireless range of up to 50m/164 feet. Share network access during travel and in office. (How?) Create a Wi-Fi hotspot from wired Internet. (How?) Create a Wi-Fi hotspot from 3G/4G USB modems. (How?) Connect Android or iOS for tethering. (How?) Power bank Provides 7 measures to protect your mobile devices from damage when using as a power bank.
- Page 11 Windows PC Windows XP (with SP3) Windows Vista (with SP2) Windows 7 (with SP1) Windows 8 iOS 5.0 (or later) Mac OS X 10.6 (or later) Compatible SD cards SD card SDHC card SDXC card microSD card (needs converter) microSDHC card (needs converter) microSDXC card (needs converter) Full compatibility list Compatible USB devices...
-
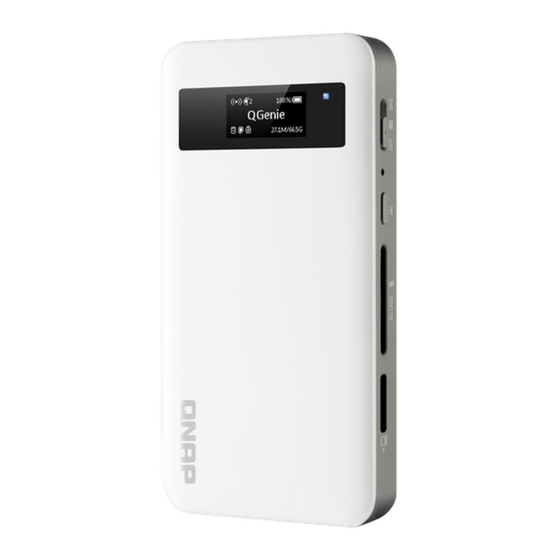
Page 12: Appearance
1.2.3 Appearance Product Picture OLED Power LED Color Status Description Blue Blinking System starting Blue Wi-Fi sharing ready Battery LED Color Status Description Green Full battery Blinking Low battery... -
Page 13: Side View
Orange Charging battery Side view Ports/Switch Icon Description USB to PC/Charge SD Card Slot Information Button Reset Button Off Mode Power Bank Mode Wi-Fi Sharing Mode Bottom view Ports Description Wired Internet USB 3.0 Port Hardware installation NOTE Please ensure you insert the SD card/USB device correctly, as forcing it into place may damage... - Page 14 QGenie. Insert SD card Insert the SD card with its front side facing up. If an SD card is correctly inserted, the QGenie OLED screen will show an SD icon on the storage indicator. Users can access the data on the SD card after SD icon appears. Insert USB storage Insert USB storage to the bottom USB port.
-
Page 15: Getting Started
Connect your mobile device to QGenie using the wireless connection. 1.3.1 Bundled items Make sure that you have received these items. If any are missing, contact your seller. 1. QGenie (QG-103N) 2. USB 3.0 cable 3. Quick installation guide 1.3.2 Charging QGenie Charging with a USB AC adaptor 1. - Page 16 2. Battery LED indicator will display the orange on. 3. The OLED battery indicator will show 100% when QGenie is fully charged. 4. When charging is complete, disconnect the USB AC adaptor from QGenie. 5. The approximate charging time is 3 hours. NOTE Be sure to insert the cable correctly.
- Page 17 If an abnormality (increased temperature, insufficient power supply, etc) occurs while charging, the OLED screen may show an error, the battery LED will blink orange, and charging may stop. If this occurs when QGenie is on, please turn it off or try with a different USB adaptor. Charging with a PC 1.
- Page 18 port and result in malfunction. For optimum performance of the rechargeable lithium-ion battery, it is recommended to charge in an ambient temperature between 10 °C – 35 °C (50 °F - 95 °F). If an abnormality (increased temperature, insufficient power supply, etc) occurs while charging, the OLED screen may show an error, the battery LED will blink orange, and charging may stop.
- Page 19 2. Select Qfile, and tap the [INSTALL] button. 3. Check the required permissions, and press [ACCEPT] to install Qfile to your device.
- Page 20 1.3.5 Setting up an iOS device 1. Open the App Store and search for “Qfile,” or scan the below QR code.
- Page 21 2. Locate and select Qfile. Tap the [FREE] button. 3. After selecting [FREE], the blue button will turn to green and change to [INSTALL]. Tap this button again to install "Qfile." 1.3.6 Connecting a device via wireless LAN 1. Turn on QGenie by sliding its power switch to the top and wait until the progress bar disappears.
- Page 22 2. Go to the [Settings] of your mobile device (the below example uses an iPhone). 3. QGenie’s wireless name (SSID) is the same as the name on QGenie’s OLED screen. Find it and connect to it.
-
Page 23: Getting Started Using A Pc
1.4 Getting started using a PC Install Qfinder How to install Qfinder on your PC. Connecting PCs to QGenie Connecting a PC or Mac to QGenie using a wireless connection. 1.4.1 Install Qfinder 1. Go to http://www.qnap.com/ and then “Support”> “Download”> “Utilities”. - Page 24 2. Download Qfinder based on what operating system you are using. 3. Run the Qfinder installation program.
- Page 25 4. Read the license agreement, check [I accept the terms of the License Agreement], and click [Next]. 5. Select what components you want to install and click [Next].
- Page 26 6. Choose where to install Qfinder, and click [Install].
- Page 27 1.4.2 Connecting PCs to QGenie Connecting to QGenie with Windows 1. Turn on QGenie by sliding its power switch to the top and wait until the progress bar disappears. 2. Go to your list of available network connections (in Windows 7, by clicking on the icon on the taskbar).
- Page 28 NOTE Internet connections will be temporarily interrupted after connecting to QGenie. Please refer to below sections for how to configure an outbound network. Setup QGenie’s Internet connection Connecting to QGenie with Mac 1. Turn on QGenie by sliding its power switch to the top and wait until the progress bar disappears. 2.
-
Page 29: Setup/Use Qgenie With Qfile
4. Click the Wi-Fi icon to check if the Mac is already connected to QGenie. 1.5 Setup/use QGenie with Qfile Login from Qfile Use Qfile from mobile devices to access QGenie Home Screen How to use Qfile after connecting to QGenie. Setup QGenie Check and set QGenie's settings: Device name, wireless security, admin password, how QGenie connects to the Internet, and how to update QGenie's firmware. -
Page 30: Backup & Restore Phonebooks To/From Qgenie
Use Qfile to check detailed information of each file, and perform sharing actions. Backup & restore phonebooks to/from QGenie How to back up and restore contacts by Qfile Setup Qfile Settings to configure Qfile: Cache size, auto upload, and auto login policy. 1.5.1 Login from Qfile 1. - Page 31 1.5.2 Home Screen Icon Description Browse QGenie's downloaded files QGenie's settings Phonebook restore and backup Qfile settings Refresh Add a folder Upload files from the mobile device to QGenie...
- Page 32 Show the current file transfer status 1.5.3 Setup QGenie After logging in to QGenie using the Admin account, Qfile can configure QGenie’s settings. 1. Turn on QGenie in Wi-Fi sharing mode and launch [Qfile]. 2. After the mobile device has connected to QGenie, select [ ] and choose [ 3.
- Page 33 Setup QGenie’s Name QGenie’s Name (also used as its SSID) can be changed by using Qfile. Please refer to the below instructions (using the iOS app as an example). 1. Choose [Device] 2. Select [Name], enter a new name, and select [YES] to confirm the change. NOTE Changing QGenie's name will also change the Wireless name (SSID).
- Page 34 IMPORTANT Change your password IMMEDIATELY upon using QGenie for the first time, and also change it periodically. 1. Choose [Admin Password] 2. Enter and confirm the new admin password. 3. Select [Done] and reconnect to QGenie using the new password.
- Page 35 NOTE Please reset QGenie if you have forgotten your password. Setup QGenie’s Wireless security IMPORTANT To prevent unauthorized access, please set up adequate wireless security. 1. Choose [Wireless Security] 2. Select the security type (WEP/WPA/WPA2) to be used. It is recommended to use WPA2 as it is more secure.
- Page 36 3. Enter and confirm the wireless password. 4. After the new password has been set, you will need to reconnect to QGenie’s wireless LAN using the new password. NOTE...
- Page 37 If “Disable” is selected, the wireless LAN will have no password protection. After changing QGenie's wireless security settings, users must reconnect to QGenie using the new wireless password. If you forget the password, please reset QGenie. The valid password length for WPA/WPA2 is 8-63 characters long. The valid password length for WEP is either 5 or 13 characters long.
- Page 38 Setup Wireless Internet 1. Choose [Internet] ’ [Wireless Internet] 2. QGenie will scan nearby wireless networks and display them in a list.
- Page 39 3. Select the wireless network you want to use and enter the password if necessary. Settings will be applied to QGenie once you select [OK]. Please note: QGenie cannot connect to wireless networks that use "WPA-Enterprise" or "WPA2- Enterprise" password protection. Setup USB Internet 1.
- Page 40 3. Select the type of USB device, and select connect. You will need to reconnect your device to QGenie once these settings are changed. Upgrade the Firmware It is strongly recommended to keep QGenie's firmware up-to-date as new updates may contain security fixes.
- Page 41 4. Select [Firmware check] and [OK]. The QGenie will begin updating the firmware. If QGenie's firmware is up to date, Qfile will show “The current firmware is latest.” 5. The QGenie OLED screen will display “Upgrading” and indicate its progress. 6.
-
Page 42: Access And Manage Files (Basic)
1.5.4 Access and manage files (Basic) Home page The edit menu will appear when you tap the [ ] icon. Icon Description Copy the selected file(s) or folder(s). Move the selected file(s) or folder(s). Download the selected file(s). Please note: Subfolders will not be downloaded. Delete the selected file(s) or folder(s) (you can also swipe a file to delete it). - Page 43 2. Select the destination folder then tap [Copy] Move files/folders 1. Click [ ] select the items you want to move and then tap [...
- Page 44 2. Select the destination folder then tap [Move] Download files/folders to local folder 1. Click the [ ] , select the files you want to download and then tap [...
- Page 45 2. After downloading is completed, the files will appear in the [Download folder]. Delete files/folders 1. Click [ ], select the items you want to delete and then tap [...
-
Page 46: Access And Manage Files (Advance)
2.Deleted files/folders cannot be recovered, so to prevent accidental deletion you will need to confirm this action. 1.5.5 Access and manage files (Advance) Checking the file information Tap [ ] next to a file/folder and its information will be displayed. - Page 47 Download files/folders to local folder 1. Tap [ ] next to the file you want to download and then select [Download to download folder]. 2. Downloaded files will appear in the [Download folder].
- Page 48 Share a file via email attachment 1. Tap [ ] next to the file you want to email, then select [Share by email attachment]. 2. Enter the contact details of the recipients, modify the subject and body text if necessary and select [Send].
- Page 49 Please note: Files must be smaller than 20MB in size. 1.5.6 Backup & restore phonebooks to/from QGenie 1. Turn on QGenie and connect your mobile device to QGenie’s wireless LAN. 2. Open Qfile and connect to QGenie 3. Select [ ]’...
- Page 50 Phonebook restore Select [Restore now] and select the phonebook backup file that want to restore then choose [Create New Contacts] or [Merge with Contacts]. NOTE Qfile will not import duplicate contacts. Phonebook auto backup You can set QGenie to automatically backup contacts [Weekly] or [Monthly]. The backup files will be stored in \Qsync\Phonebook\...
-
Page 51: Setup Qfile
1.5.7 Setup Qfile Local Storage Specify the storage space that can be used by Qfile on phone/tablet. This includes the total size of the Local Folder and cache. Clear Cache Previewed files are cached in the Local Folder. Tap [Clear Cache] to clear the temporary data from the Local Folder. - Page 52 Default action for file conflicts when uploading/downloading You can select whether to [Overwrite] a file or to [Skip] it if a file already exists in the destination. Default file exists action for downloads: Select to [Overwrite] a file or [Skip] downloading if a file already exists on phone/tablet.
- Page 53 Auto Login Enable automatic login to QGenie. File list sorting Select to sort files by [File Name], [Data modified], [File size].
- Page 54 Browsing photo setting Select whether to browse photos using [Thumbnail size] or [Original size]. Automatically upload photos Upload the photo library from your mobile device to QGenie. Set up auto upload photo 1. Select [Set up now], select the photo upload destination and then tap [Select]...
- Page 55 2. Tap [Yes] to upload all of the photos on your mobile device. Choose [Skip] to upload all future photos. Change/Remove auto upload photo To change the destination, select [Change], choose the new destination folder, tap [Select] and tap [Yes] to confirm the change.
- Page 56 To remote this setting, select [Remove] and tap [OK] to remove the auto upload photo setting.. Upload from inbox settings Upload the mail inbox from your mobile device to QGenie. To setup the upload folder, select [Set up now], select the upload destination and then tap [Select] To remove the upload folder, tap [Remove] and select [OK].
-
Page 57: Setup/Use Qgenie With Qfinder
1.6 Setup/use QGenie with Qfinder QGenie supports Qfinder for users to access files and to check QGenie's status. Login from Web Interface Locate QGenie and access the login page using a web browser. Use My Network Places (Samba) to access QGenie content Locate QGenie using My Network Places. - Page 58 2. Go to Qfinder and choose [Login]. 3. It will open your web browser to http://192.168.60.1/. You will see a welcome page as seen below.
- Page 59 4. Users can log in with the Admin account or a Guest account. The differences are listed below: Admin Account Guest Account Password Required Only view the current status of Account permission Change QGenie setting QGenie Folder access Qsync/SD card/USB SD card/USB Please note: The Guest Account is disabled by default.
- Page 60 3. Choose Qsync, SD or USB and access the stored content. Use a Mac to access QGenie's content 1. Connect QGenie to the Mac via wireless LAN. 2. There are two methods to access QGenie's content using a Mac. Method 1: [Go] ’ [Connect to Server] and enter “smb://192.168.60.1”.
- Page 61 Method 2: Launch Qfinder and tap [Network Drive]. 3. Choose Qsync, SD or USB and access the stored content.
- Page 62 NOTE Unconnected devices will appear in the list, but they will be inaccessible. Guests cannot access the "Qsync" folder. 1.6.3 Checking QGenie's Network Details 1. Connect QGenie to a PC via wireless LAN. 2. Launch Qfinder and tap [Details].
-
Page 63: Setup/Use Qgenie With A Web Browser
3. QGenie's network details will be displayed. 1.7 Setup/use QGenie with a Web Browser QGenie provides a web interface for users to setup basic functions, allowing users to use a web browser to change its settings. Setting Page Use browser to configure QGenie's security settings, name, or admin password. Setup QGenie’s Internet connection Use browser to establish wired, wireless, or USB Internet connection from QGenie. - Page 64 3. Enter a new name on the [Device Name] field. 4. Select [Save] to apply new Device name and QGenie will restart with a new Device Name. NOTE After change device name, please reconnect to the QGenie’s Wireless LAN by using the new Device Name.
- Page 65 4. After entering the password twice, select [Save] to apply new security settings. NOTE After change Wireless security, please reconnect to the QGenie by using the new password. WPA/WPA2, the valid password length is between 8 ~ 63 characters long. WEP, the valid password length is between 5 or 13 characters long.
- Page 66 4.[Firmware] will show in the settings page. Choose the firmware to apply from PC, and select [Update]. 5.The QGenie OLED screen will display “Upgrading” and indicate its progress. Setup an Admin Password with Web Interface 1. Login to the Web Interface using the Admin account and select [Setting] from the navigation panel.
- Page 67 2. Go to [Admin Password] and after entering your new password twice, select [Save]. NOTE After changing the Admin Password, you will need to log in with new password. Allow or Deny guest access (Available in firmware version 3.1.1 or later) 1.
- Page 68 3. Set to "Allow" to accept guest account logins from My Network Places (Samba), Web File Manager, and Qfile. 1.7.2 Setup QGenie's Internet connection QGenie supports 3 methods to connect to Internet: 1. Wired Internet Plug an Ethernet cable to QGenie and use Ethernet internet connection. 2.
- Page 69 * If doesn’t know kind of connection type are using, please contact the network administrator or internet service provider for assistance. Setup Wireless Internet 1. Login to the Web Interface with Admin account. 2. Select [Internet] from the navigation panel. 3.
- Page 70 2. Select [Internet] from the navigation panel. 3. Select the type of USB device, and press [Connect]. 1.7.3 Access QGenie's contents 1. Connect the PC to QGenie’s Wireless LAN, open your browser and go to http://192.168.60.1/. Log in to the Web Interface using the Admin or Guest account. 2.
-
Page 71: Myqnapcloud Service
4. Begin browsing files on SD card and USB storage device. NOTE If the Web Folder does not appear in the Web Interface, please ensure that the storage device is properly connected. 1.8 myQNAPcloud service (Available on QGenie with firmware 3.1.1+) The myQNAPcloud service provides host name registration, mapping of a dynamic NAS IP to a domain name, and auto port mapping of a UPnP router on the local network. - Page 72 Create a myQNAPcloud ID This step can be skipped if you already have a myQNAPcloud ID. Click [sign up now!] and complete the required fields to create a myQNAPcloud ID. Register QGenie to myQNAPcloud Enter your myQNAPcloud ID, password, and device name to register the QGenie to myQNAPcloud.
- Page 73 Please note: Registering and configuring the router's UPnP may take several minutes. Please wait after selecting [Sign In] After registering, the QGenie will appear in your myQNAPcloud portal.
-
Page 74: Precautions
Remove QGenie from myQNAPcloud Click [Sign Out], and QGenie will be removed from myQNAPcloud. Please note that the device name from removed devices will be available for others to use. 1.9 Precautions General use Things need to pay attention when using QGenie. Maintenance Cleaning instructions. -
Page 75: Specifications
1.9.2 Maintenance Clean QGenie using a soft cloth that is free of any cleansers or product. Take care if using water to clean its appearance. 1.9.3 Notes on external storage 1. Do not remove SD cards or other storage devices when being accessed by QGenie as this may result in data corruption or loss. - Page 76 0 °C to 45 °C (32 °F to 112 °F) (During normal operation) Operating temperatures 0 °C to 45 °C (32 °F to 112 °F) (When charging the built-in battery) Software Windows XP, Vista, Windows 7 (32/64-bit), Windows 8 (32/64-bit), Windows Server 2003/2008 Supported Client OS R2/2012 Apple Mac OS X...
- Page 77 Guest/Admin Mode Access Right Management Access Password Protection Photos: JPG, GIF, PNG, TIFF, BMP Documents: DOC, DOCX, PPT, PPTX, XLS, XLSX, KEY, NUMBERS, PAGES, TXT, RTF, PDF Audio: MP3, AAC, M4A, AIF, WAV, WMA, OGG, APE, FLAC Multimedia Formats (**) Video: WMV, AVI, MKV, RM, RMVB, XVID, MP4, MOV, 3GP, MPG, M4V (**) The support of all formats comes from the mobile...
-
Page 78: Recovery Mode
iPhone Tethering (iOS 6, iOS7) USB Internet Sharing Android Tethering (4.0/4.1/4.2/4.3/4.4) 4G/3G/LTE USB Modem Multilingual Support English/Chinese Firmware Upgrade Management Factory Default Dashboard-based Resource Monitor 1.11 Recovery Mode QGenie will enter recovery mode if it fails to start due to system errors or an incorrect firmware update. -
Page 79: Troubleshooting
6. QGenie will restart after this process is completed. Please disconnect the Ethernet cable between QGenie and PC. 7. After reboots, please download and install the latest firmware to QGenie. NOTE This should only be performed when the system is unable to start correctly. Please make sure that QGenie has enough battery power, otherwise the recovery may fail. -
Page 80: The Battery Discharges Very Quickly, Even When Qgenie Is Off
When the air temperature is below 5 °C, the battery may be discharged quickly. This is a characteristic of the battery and is not a malfunction. 2.1.3 The battery discharges very quickly, even when QGenie is off. If QGenie has not been used in a long time, please recharge the battery sufficiently for optimum use. -
Page 81: The Battery Does Not Charge From A Computer
The battery indicator lamp does not light while charging. The battery indicator lamp blinks while charging. It takes a long time to charge the battery. The wireless LAN function cannot be used while charging. 2.3.1 The battery does not charge from a computer. Use the supplied USB cable to charge this unit. -
Page 82: A Wireless Lan Connection To A Mobile Device Or Computer Cannot Be Established
device, refer to its instruction manual. The maximum output current of QGenie's USB port is 1.5A. If the supply output current exceeds 1.5A, the power is stopped for safety. Before supplying power to another device, be sure to check the voltage and current ratings of the device. -
Page 83: The Wireless Lan Connection Has Stopped
2.5.3 The wireless LAN connection has stopped. If QGenie is connected to a computer with the USB cable, the wireless connection will be stopped and a USB connection will be established. When changing from a wireless LAN connection to USB connection, make sure that data is not being copied via wireless LAN. -
Page 84: Data Playback/Display
2.8 File operation Data playback/display Copying and deleting data 2.8.1 Data playback/display Data cannot be played back or displayed. It takes time to play back or display data. What file formats are supported by "Qfile"? Files cannot be edited by "Qfile." The Camera Roll cannot be accessed (iOS device). -
Page 85: It Takes Too Long To Copy Data
2.8.2.1 It takes too long to copy data. Ambient conditions (obstacles between QGenie and your device including conflicting 2.4 GHz signals, solid walls and interference) may adversely affect the wireless communication range. Change QGenie's location, or move the involved devices closer together. 2.8.2.2 Data cannot be copied to external storage (SD card, USB storage, m obile dev ices) Check to see if your external storage is write-protected. -
Page 86: Qfile Cannot Be Installed
2.10 Qfile Qfile cannot be installed. What file formats are supported by Qfile? Files cannot be edited using Qfile. How can I check the version of "Qfile"? I can not login QGenie by Qfile 2.10.1 Qfile cannot be installed. Check the free space on your device as it may not be enough. 2.10.2 What file formats are supported by "Qfile"? Please refer to [Specifications] ->... -
Page 87: I Can Not Login Qgenie By Qfile
2.12.2.1 Are wireless security settings really necessary? Security for wireless devices is incredibly important. Without adequate security, QGenie's contents and services may be openly accessed by anyone. QNAP fully recommends that you set adequate security settings. 2.12.2.2 What wireless security settings are av ailable for QGenie? WEP, WPA, or WPA2 can be selected, with WPA2 being strongly recommended due to its higher security level. -
Page 88: About Updating Qgenie's Software
QGenie and try again. 3. You may find a solution to your problem on the Troubleshooting section of the QNAP website,. 4. Check the QNAP Forum for any solutions or answers. You may also post your questions on the forum. -
Page 89: Gnu General Public License
If your problems cannot be solved using these steps, please contact QNAP for immediate assistance. Please submit an online support request from the QNAP Helpdesk. We will get back to you as soon as we can. USA & Canada Tech Support Service Hours: 07:00–18:00 (Pacific Time), Mon. - Fri. - Page 90 is not allowed. Preamble The GNU General Public License is a free, copyleft license for software and other kinds of works. The licenses for most software and other practical works are designed to take away your freedom to share and change the works. By contrast, the GNU General Public License is intended to guarantee your freedom to share and change all versions of a program--to make sure it remains free software for all its users.
- Page 91 addressed as “you”. “Licensees” and “recipients” may be individuals or organizations. To “modify” a work means to copy from or adapt all or part of the work in a fashion requiring copyright permission, other than the making of an exact copy. The resulting work is called a “modified version” of the earlier work or a work “based on”...
- Page 92 irrevocable provided the stated conditions are met. This License explicitly affirms your unlimited permission to run the unmodified Program. The output from running a covered work is covered by this License only if the output, given its content, constitutes a covered work. This License acknowledges your rights of fair use or other equivalent, as provided by copyright law.
- Page 93 compilation and its resulting copyright are not used to limit the access or legal rights of the compilation's users beyond what the individual works permit. Inclusion of a covered work in an aggregate does not cause this License to apply to the other parts of the aggregate. 6.
- Page 94 any third party retains the ability to install modified object code on the User Product (for example, the work has been installed in ROM). The requirement to provide Installation Information does not include a requirement to continue to provide support service, warranty, or updates for a work that has been modified or installed by the recipient, or for the User Product in which it has been modified or installed.
- Page 95 8. Termination. You may not propagate or modify a covered work except as expressly provided under this License. Any attempt otherwise to propagate or modify it is void, and will automatically terminate your rights under this License (including any patent licenses granted under the third paragraph of section 11). However, if you cease all violation of this License, then your license from a particular copyright holder is reinstated (a) provisionally, unless and until the copyright holder explicitly and finally terminates your license, and (b) permanently, if the copyright holder fails to notify you of the violation by some...
- Page 96 Each contributor grants you a non-exclusive, worldwide, royalty-free patent license under the contributor's essential patent claims, to make, use, sell, offer for sale, import and otherwise run, modify and propagate the contents of its contributor version. In the following three paragraphs, a “patent license” is any express agreement or commitment, however denominated, not to enforce a patent (such as an express permission to practice a patent or covenant not to sue for patent infringement).
- Page 97 14. Revised Versions of this License. The Free Software Foundation may publish revised and/or new versions of the GNU General Public License from time to time. Such new versions will be similar in spirit to the present version, but may differ in detail to address new problems or concerns.
Need help?
Do you have a question about the QG-103N and is the answer not in the manual?
Questions and answers