Advertisement
Quick Links
Advertisement

Related Manuals for Creality LD-006


Summary of Contents for Creality LD-006
- Page 1 3D Printer User Manual 3D 打 印机使用说明书 LD-006 V1.1...
- Page 2 Assemble the 3D Printer in the following ways: View the accompanied instructions and videos in the U disk. Visit our official website www.creality.com to find relevant software/hardware 组装 3D 打印机 information, contact details and operation and maintenance instructions. Use the 3D Printer 尊敬的创想三维用户:...
- Page 3 NOTES 使用须知 1. Do not use the printer any way other than described herein in order to avoid personal injury or property damage. 2. Do not place the printer near any heat source or flammable or explosive objects. We suggest placing it in a well-ventilated, low-dust environment. 3.
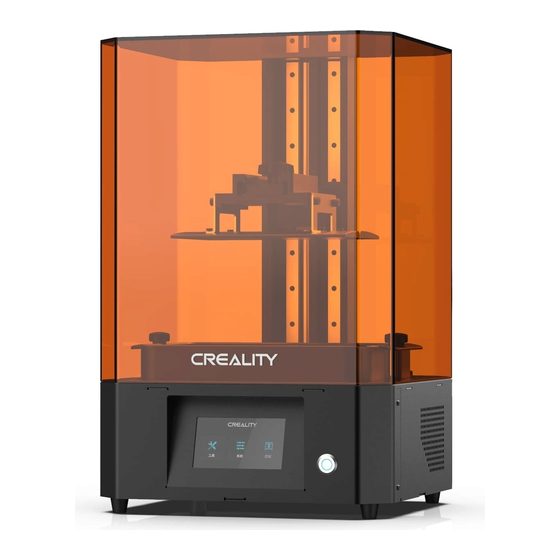
- Page 4 Equipment Introduction 设备简介 Leveling screw Touch screen Power socket 调平螺丝 显示屏 电源插座 Buliding platform Limit sensor conductor USB port 成型平台 限位感应片 USB接口 Air filter Thumb screw 空气过滤器 胶头手拧螺丝 Resin vat Power switch 料盘 电源开关...
- Page 5 Equipment Parameters 设备参数 Basic Parameters 基本参数 Model | 型号 LD-006 Software language | 中英切换 English | 中文 Print method | 打印方式 U disk | U盘 X/Y-axis resolution | X、 Y分辨率 3840*2400 | 50μm Z-axis precision | Z轴精度 0.01mm-0.1mm(layer thickness | 即层厚) Print speed | 打印速度...
- Page 6 Package Content 零部件清单 Tool list 工具包清单 U disk x 1 Screwdrivers x 1set Brush x 1 Plastic blade x 1 U盘 螺丝刀工具包 油漆刷 塑胶铲刀 Resin filter x 4 Release film x 1 Metal blade x 1 Power cord x 1 离型膜...
- Page 7 Assemble the 3D Printer 组装3D打印机 Machine body |主机 Note: Put the plastic cover on the machine body and the installation is completed. 注意:上盖嵌入主机即安装完成。 Plastic cover|上盖...
- Page 8 Interface Information 界面信息 Tools 10mm 0.10mm 1.00mm 10.00mm ① ② ③ ④ ⑤ Home Down Stop Back 工具 0.10mm 1.00mm 10.00mm ① ② ③ ④ ⑤ 上升 返回原点 下降 Note: The UI information is only for reference, the actual UI may be different. 注意:...
- Page 9 Interface Information 界面信息 System LD-006 004c0026-554d5002-20363643-17f V4.3.17_LCDMI/3840x2400/F2.18 系统 LD-006 004c0026-554d5002-20363643-17f V4.3.17_LCDMI/3840x2400/F2.18 Note: The UI information is only for reference, the actual UI may be different. 注意: 界面仅供参考, 实际以UI为准。...
- Page 10 Interface Information 界面信息 Print ① ① .ctb ② ② .ctb .ctb ③ ③ .ctb .ctb ④ Refresh file Turn up Turn down Back Delete Print/stop Back 打印 ① ① .ctb ② ② .ctb .ctb ③ ③ .ctb .ctb ④ 刷新文件 上翻...
- Page 11 Level Platform 1 调平平台 1 1. First raise the platform, then loosen rubber screws on the left 2. Place the calibracation card on the printing screen, go “ Tools → Manual → Home”with the touch screen, and check whether the platform sticks into thecalibration and right sides of the resin vat, and take out the resin vat.
- Page 12 Level Platform 2 调平平台 2 If the platform does not stick to the print screen, do as the following: 如果没有贴紧打印屏, 请进行如下操作: 0.10mm 1.00mm 10.00mm 10mm 1. After unscrewing the leveling screws, press“Home" to 2. Gently press the platform and tighten 4 screws clockwise, and the platform can be leveled keep the platform and the print screen parallel.
- Page 13 调平平台 2 Level Platform 2 If the platform does not stick to the print screen, do as the following: 如果没有贴紧打印屏, 请进行如下操作: 0.10mm 1.00mm 10.00mm 1. 拧松调平螺丝后,按触摸屏“原点”,保持平台与底板部分平衡。 2. 轻轻压平台两端,顺时针拧紧4个平台螺丝,即平台调平成功。 0.10mm 1.00mm 10.00mm 控制Z轴上移,至合适位置,将校准卡纸取出,放入料盘,对准料盘两端螺孔后,旋紧两端的料盘固定螺丝。...
- Page 14 Load Resin 装料 Pour the UV photosensitive resin into the resin vat. The slot capacity is 500ml/1000ml. 将3D打印机 UV 光敏树脂倒入料盘, 槽位容量分别: 500ml/1000ml。 Please pay attention to the orientation marks and keep the printing platform assembled in the right direction. Otherwise it may lead to leveling faliure! 请按照标识正确安装固定成型平台,...
- Page 15 Release Film Instructions 离型膜安装说明 Installation steps 安装步骤 First, remove the 14 screws at the bottom of the vat and take down the old release film. 首先拆卸料槽底部的14颗螺丝,取出坏的离型膜。 Parameters 规格参数 Prepare the new release film, peel off the the protective films on both sides of the release film. Align the holes and fit the release film on the clamping ring.
- Page 16 3. Click icon ①→click ② “Setting” →setting slice parameters “ ” → i l s fi → ( recommend to set parameters of bottom layer as 5-20). sliced file( You are welcome to find more details of slicing tutorial on the official website www.creality.com).
- Page 17 Start Printing 首次打印 1. 切片 ① ctb(.ctb) ② ctb(.ctb) 1. 打开LCD光固化3d打印切片软件, 界面左方点击 “打开” 添加模型文件; 2. 根据模型如需添加支架, 点击右上方图标, 设置相应参数; .ctb .ctb ① 1.-Eiffel Tower.ctb .ctb .ctb ③ ② 3. 点击图标①→点开切片设置②→设置切片参数 (底层数量建议设置5-20) ; 4. 点击切片→等待完成切片后→另存切片好的文件。 (*切片教程详见官网切片视频www.cxsw3d.com)
- Page 18 Start Printing 首次打印 .ctb .ctb 2. Print USB port 2. Insert the U disk → press the print button. 1. Generate CTB file, and save the file to U disk. .ctb .ctb 2. 打印 U盘接口 2. 插入U盘→按下打印按键 1. 生成 CTB文件→保存文件到U盘...
- Page 19 Start Printing 首次打印 ① .ctb ② .ctb .ctb Eiffel Tower 8S.ctb ③ .ctb .ctb .ctb 00h40m 1h00m 972/2430 “ ” “ ” fi fi “ . ” 5. Printing. .ctb .ctb .ctb _埃菲尔铁塔 8S.ctb .ctb .ctb .ctb 00h40m 1h00m 972/2430 3.
- Page 20 Clean the Resin Vat 料盘清理 Please confirm that the printing platform has been removed, and there are moderate consumables in the vat. Please set the exposure time of the test image: 15 s Next *If there is residue in resin vat before printing, please clean resin vat first. The cleaning time is generally set to 15 seconds and then shovel it off with a plastic blade. 请确认打印平台已经取下,料盘里面有适量耗材。...
- Page 21 Wiring Connection 电路接线 Z endstop(minimum position) Z endstop(maximum position) Z motor Mainboard fan port UV LED fan port UV LED port Power supply Z 轴电机最小限位开关接口 Z 轴电机最大限位开关接口 Z 轴电机接口 主板散热风扇装置接口 LED 灯源散热风扇装置接口 LED 灯源装置接口 直流电源输入接口 Ethernet port 有线网络接口 USB 2.0 port USB 2.0 装置接口...
- Page 22 Troubleshooting Workflow Fault diagnosis Fault cause Fault handling Result feedback 1. Wipe U disk U-disk 2. Format U disk Start 3. Replace U disk By memory card print 1 . Move model position and slice again Other files can be File identified Slice 2.Use the repair software to repair model.
- Page 23 故障检修 工作流程 故障诊断 故障原因 故障处理 结果反馈 1. 擦拭U盘 否 U盘 2.格式化u盘 开始 3.更换U盘 由存储卡打 印 1 . 移动模型位置并重新切片 是/否 文件是否 其他文件是否 切片 否 是 是 2.使用修复软件修复模型 识别 打印正常 是 1 . 重连电路 回零 轴电机 否 2.用替换法检查 1 . 重连电路 越过零点 是/否...
- Page 24 SHENZHEN CREALITY 3D TECHNOLOGY CO.,LTD.
Need help?
Do you have a question about the LD-006 and is the answer not in the manual?
Questions and answers