
Related Manuals for Proceq ZAA 2300


Summary of Contents for Proceq ZAA 2300
- Page 1 Proceq ZAA 2300 Heatable Automatic Film Applicator (versions: Proceq ZAA 2300.H / Proceq ZAA 2300.FH / Proceq ZAA 2300.FFH) Instruction Manual...
-
Page 3: Table Of Contents
3.1 Damages during carriage ................9 3.2 Shipment .......................9 3.3 Standard delivery ..................10 3.4 Options for all Proceq ZAA 2300 versions ........... 10 3.5 Modification set „Heatable Application“ ............11 4 Device overview ....................12 5 Assembly and starting up .................. 14 5.1 Disassembly .................... -
Page 4: Exclusion Of Liability
Illustrations, descriptions as well as the technical specifications conform to the instruction manual on hand at the time of publishing or printing. However, Proceq SA policy is one of continuous product development. All changes resulting from technical progress, modified construction or similar are reserved without obligation for Proceq SA to update. -
Page 5: Deiscription Of Device
Deiscription of device Automatic laboratory equipment for accurate and reproducible application of coating materials, adhesives and similar products with almost all film applicators. Field of application: • Laboratory apparatus for the paint, printing and adhesive industries, as well as for research and development and the chemical industry in general. •... -
Page 6: Safety Information
2.2 Safety notes and hints It is strictly forbidden to open the housing of the Proceq ZAA 2300. If not observed, all the guarantee and liability claims to Proceq SA will be void. - Page 7 All maintenance and repair not explicitly allowed and described in this manual (see. Chapter 8.1 “Maintenance and cleaning work that can be carried out by the user” on page 24), shall only be carried out by Proceq SA or your authorised Proceq agent, failure to comply voids warranty.
- Page 8 Risk of burning on hot surfaces. Touching such marked surfaces is prohibited. Danger of electric shock. Risk of inflammation of substances through heat (heating plate). Page 8...
-
Page 9: Delivery Of Device
7 days. However, the period could vary depending on the courier. Hence, it is recommended to check the exact time limit when receiving the goods. If there are any damages also inform your authorised Proceq agent or Proceq SA immediately. 3.2 Shipment Should the device be transported again, it must be packaged properly. -
Page 10: Standard Delivery
Allen key (2.5 mm and 3 mm) • certificate of manufacturer • Instruction manual 3.4 Options for all Proceq ZAA 2300 versions Precision-vacuumplates: with a series of holes of 1 mm (0.04”) with a series of holes of 0.5 mm (0.02”) Vacuum pumps with hose... -
Page 11: Modification Set „Heatable Application
Heating plates for temperature up to 150 °C 230 V 115 V Proceq SA refuses all warranty and liability claims for damages caused by usage of the Proceq ZAA 2300 in combination with non-original accessories, or accessories from 3 party suppliers. -
Page 12: Device Overview
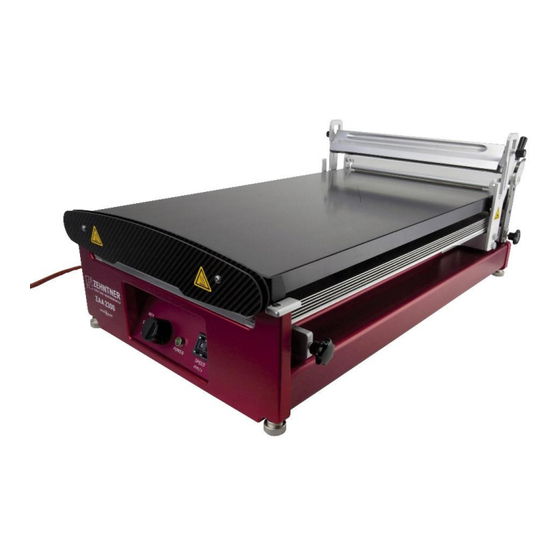
Device overview Page 12... - Page 13 (24) (23) Start stop End stop Clamping grip Release lever Clamping device for the substrate Lifting and lowering device for weight (7) Weight Swivelling holders for fixing the base plate Holding device for wire-bars and profile rods (10) Levelling feet (11) Knurled screw (12) Fixing screw of the holding device (13) FWD-STOP-REV button...
-
Page 14: Assembly And Starting Up
Assembly and starting up Before the first use the apparatus has to be assembled: • Place the device on a solid, even surface at its intended location. Loosen the start stop (1). • Open the clamping device (5), by pressing the release lever (4) and the clamping grip (3) together until you hear a click, then tilt the clamping grip (3) backwards. - Page 15 • Level the apparatus using the included spirit level. To do so, place the spirit level and adjust the levelling feet (10) until the Proceq ZAA 2300 levels perfectly. The plate must be firmly in place. To protect persons and the apparatus, proper care must be taken when lifting or carrying it.
-
Page 16: Disassembly
5.1 Disassembly To prevent transport damage, the weight (7) and the glass plate / heating plate have to be removed: • Loosen and remove the knurled screw (11) to remove the weight (7). First turn the weight upwards by 90 ° and – in reversed order as at the assembly - first take one side of the weight then the other out of the guides. - Page 17 • which type of applicator you will be using • which substrate you will be using • which base plate you will be using precision-vacuumplate heatable precision-vacuumplate (only versions with special isolation plate) heating plate (only versions with special isolation plate) or glass plate The heatable precision-vacuumplate and the heating plate can be used with all rods.
-
Page 18: Application With Wire-Bar Or Profile Rod
6.2 Application with wire-bar or profile rod When using the glass plate (i.e. in case of non-heatable applications) note the followings: • Make sure that the printing blanket side of the glass plate is facing up. • Ensure that the printing blanket is covered with the polyester mat. •... - Page 19 Hint: Place a piece of paper at the end of your substrate to absorb any excess coating material. • Set the desired drawing speed in mm/s with the SPEED button. • Apply the desired quantity of coating material on the substrate in front of the applicator rod.
-
Page 20: Fixing Unit For Profile Rods And Wire-Bar Applicators
6.2.1 Fixing unit for profile rods and wire-bar applicators • Put the wire-bar or profile rod into the holder (9). • Fix the fixing unit for profile rods and wire-bar applicators as shown below. 6.3 Application with gap applicator When using the glass plate (i.e. in case of non-heatable applications) note the followings: •... - Page 21 • Lock the end stop (2) by refastening the screw. • Move the drawing unit (22) back to the starting position and place the applicator in front of the weight (7) again. Refer to the separate instruction manuals of the applicators you are using (e.g. ZUA 2000) for any applicator specific considerations.
- Page 22 For substrates between 4 mm and 11 mm thickness, use the included weight lifter. To install it, remove the weight (7) and place the weight lifter in the holding device (9) with the top marker facing up, then place the weight (7) back in the holding device (9). If the weight (7) needs to be lifted even higher, place the weight lifter with the top marker facing down in the holding device (9).
-
Page 23: Turning The Glass Plate
Turning the glass plate • Make sure that the start stop (1) and the drawing unit (22) are positioned in the very back of the device and that the clamping device (5) is released. • Lift the weight (7) and hinge it into the top position of the holding device (9). •... -
Page 24: Maintenance And Cleaning
Replacing of the fuse (see chapter 8.4 on page 25. • Inspection (see chapter 8.5 on page 26). All other maintenance and repair work shall only be carried out by Proceq SA or your authorised Proceq agent otherwise all guarantee and liability claims are void. -
Page 25: Lubrication Of The Guide Rods
From time to time it can be necessary to lubricate the guide rods with some sewing machine oil or something similar. Before lubricating the guide rods of the Proceq ZAA 2300, always switch off the apparatus and unplug it. No oil shall be sprayed into the apparatus. The function of electrical or mechanical components could be impaired. -
Page 26: Inspection
Should it still be impossible to switch on the apparatus, please contact Proceq SA or your authorised Proceq agent. 8.5 Inspection The instrument should be checked for proper condition by a qualified electrician at an interval of 2 years. Alternatively, this test may also be performed by Proceq SA. Page 26... -
Page 27: Technical Specifications
Technical specifications Tolerance of Drawing speed Resolution Version drawing speed Proceq ZAA 0 - 90 mm/s: ±1 % 2300 0-99 mm/s 1 mm/s Proceq ZAA 2300.H for > 90 mm/s: ±3 % heatable plates Proceq ZAA 0 - 225 mm/s: ±1 % 2300.F... - Page 28 Ambient conditions for the operation: Temperature range: 0°C bis +45°C (32 °F to 113 °F) Relative humidity: 20% to 80%, no condensation Sunlight: Do not expose to strong sunlight for long period Ambient conditions for transport and storage: Temperature range: -20°C bis +85°C (-68 °F to 185 °F) Relative humidity: 20% to 80%, no condensation...
-
Page 29: Glossary
Glossary Fixing unit for profile rods and wire- bar applicators......20 Fuse ..........27 Ambient condition Replacing ........25 Operation ........28 Ambient conditions Storage ........28 Transport ........28 Guide rods Apparatus Lubrication ......... 25 Standard delivery ....... 10 Application ........ - Page 30 Setting the speed ......21 Transportation Shipment ......... 9 Damages ........9 Speed of drawing ......19 Turning the glass plate ....23 Start stop ......... 18, 20 Storage .......... 28 Switching on and off ...... 16 Vacuumplate ......... 10 Technical specifications ....
- Page 32 Subject to change. Copyright © 2017 by Proceq SA, Schwerzenbach. All rights reserved. www.proceq.com Version 2.9 dated 31.10.2019...
Need help?
Do you have a question about the ZAA 2300 and is the answer not in the manual?
Questions and answers