Table of Contents
Advertisement
Quick Links
Advertisement
Table of Contents

Related Manuals for Proceq ZAA 2600.C


Summary of Contents for Proceq ZAA 2600.C
- Page 1 Proceq ZAA 2600.C Automatic Crockmeter Instruction Manual...
-
Page 3: Table Of Contents
3.3 Standard delivery ..................10 3.4 Options for crockmeter tests ................ 10 3.5 Options for scratch and mar resistance tests ..........12 3.6 Options for Proceq ZAA 2600.C ..............12 4 Device overview ....................13 5 Assembly and starting up .................. 15 5.1 Assembly ..................... - Page 4 8.1.2 Zero the equipment ................31 8.1.3 Crockmeter tests ................32 8.1.4 Scratch and mar resistance tests ............32 8.1.5 Pause ....................32 8.1.6 Select layout..................32 8.1.7 Setting the cycle speed ..............33 8.1.8 Setting the stroke length ..............33 8.1.9 Position .....................
-
Page 5: Exclusion Of Liability
Illustrations, descriptions as well as the technical specifications conform to the instruction manual on hand at the time of publishing or printing. However, Proceq SA policy is one of continuous product development. All changes resulting from technical progress, modified construction or similar are reserved without obligation for Proceq SA to update. -
Page 6: Description Of Device
Description of device The Proceq ZAA 2600 is an automatic linear abrasion tester with touchscreen and stepless adjustable stroke length for reproducible rubbing tests. In particular, this instrument has the following features: • Thanks to its modular construction, the automatic universal unit can be equipped with different kits for carrying out also application, scrub resistance and washability tests as well as recording of the drying time. -
Page 7: Safety Notes And Hints
2.2 Safety notes and hints It is strictly forbidden to open the housing of the Proceq ZAA 2600. If not observed, all the guarantee and liability claims to Proceq SA will be void. Place the device on a solid, even surface before operation and ensure that the separator (power socket) is accessible and that the instrument can be separated from the power supply at any time. - Page 8 All maintenance and repair not explicitly allowed and described in this manual shall only be carried out by Proceq SA or your authorized Proceq agent, failure to comply voids warranty. Proceq SA refuses all warranty and liability claims for damages caused by...
-
Page 9: Delivery Of Device
7 days. However, the period could vary depending on the courier. Hence, it is recommended to check the exact time limit when receiving the goods. If there are any damages also inform your authorized Proceq agent or Proceq SA immediately. 3.2 Shipment Should the device be transported again, it must be packaged properly. -
Page 10: Standard Delivery
3.3 Standard delivery The following parts are included in the delivery: • automatic Crockmeter with touchscreen • tool holder • reversible, double sided glass plate: printing blanket and glass surface • 4 rubber feet • spirit level • power cable •... - Page 11 2 sets cellular rubber Weight for test force 9 N The test weight is only achieved with a Proceq friction finger set. Weight for test force 22 N The test weight is only achieved with a Proceq friction finger set.
-
Page 12: Options For Scratch And Mar Resistance Tests
ZST 2095 Mar Resistance Tester Adapter for scratch and mar resistance tests (Holder for ZHT 2093 and ZST 2095) 3.6 Options for Proceq ZAA 2600.C Modification set „Application“ Modification set „Heatable Application“ Modification set „Scrub Tester“ Maintenance Proceq ZAA 2600... -
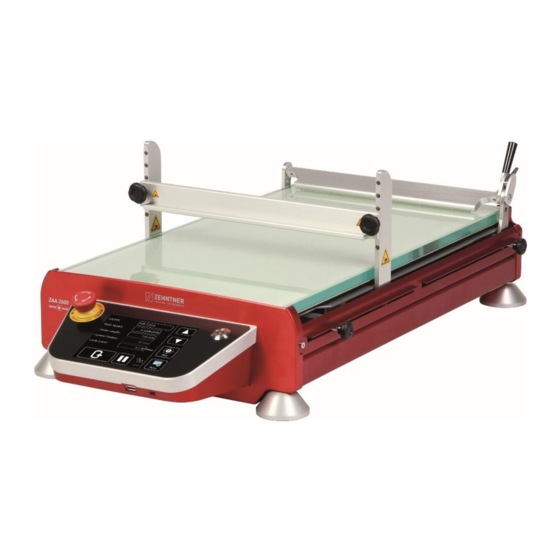
Page 13: Device Overview
Device overview (11) (10) (15) (17) (18) (16) (14) (12) (13) Page 13... - Page 14 Start stop End stop Glass plate Tool holder bridge Tool holder side part Height adjustment for tool holder Friction finger set Levelling feet Power button (10) Emergency stop button (11) Touchscreen (12) Power supply 100 V – 240 V / 50 Hz – 60 Hz (13) Delay-action fuse 0.8 A / 250 V (14) Main switch (On / Off) (15) Side panel...
-
Page 15: Assembly And Starting Up
Assembly and starting up 5.1 Assembly Before the first use the apparatus has to be assembled or converted from another application: • Check if the four rubber feet are mounted. • Place the glass plate (3) with the required side facing up in the unit. •... -
Page 16: Startup
To protect persons and the apparatus, proper care must be taken when lifting or carrying it. It is recommended to hold and carry the Proceq ZAA 2600 on both sides of the housing. Always remove the glass plate before lifting or tilting the device. -
Page 17: Disassembly For Transport
5.4 Disassembly for transport Always switch off the device and unplug the power cable before dissembling. To prevent transport damage, the device must be disassembled as follows: • Remove all friction finger sets from the tool holder bridge (4). • Remove the start stop (1) and the end stop (2). -
Page 18: Crockmeter Tests
For available options for crockmeter tests please refer to chapter 3.4 “Options for crockmeter tests” on page 10. A guideline for selecting the suitable equipment according to the desired standards can be found in the document „Equipment for crockmeter tests“. Available at: www.proceq.com Page 18... -
Page 19: Mounting The Friction Finger Set A
6.2.1 Mounting the friction finger set A 1) Place the felt stamp. 2) Place the rubbing cloth on the felt stamp with one corner (circled in red) facing the holder screw (circled in green). 3) Clamp the rubbing cloth 4) Slide on the weight and screw it in place. smoothly. -
Page 20: Mounting The Friction Finger Set B
6.2.2 Mounting the friction finger set B Compress the ring to enlarge it’s Slide on the weight and screw it diameter and push it over the in place. rubbing cloth. The test load of 9 N will only be reached if the knurled nut is mounted. To avoid ejection of weights (accidentally falling down) they have to be screwed to the holder. -
Page 21: Mounting The Friction Finger Set C
6.2.3 Mounting the friction finger set C 1) Check the cellular rubber for 2) Place the rubbing cloth on the cellular damages. rubber with one corner (circled in red) facing the holder screw (circled in green). 3) Clamp the rubbing cloth smoothly. 4) Slide on the weight and screw it in place. If your friction finger set does not look like picture 3, meaning one corner of the rubbing cloth (circled in red) does not face the holder screw (circled in green), you need to redo step 2. -
Page 22: Carry Out Crockmeter Tests
Level the apparatus using the included spirit level. To do so, place the spirit level on the sample tray and adjust the levelling feet (8) until the Proceq ZAA 2600 is levelled perfectly. The glass plate must be firmly in place. - Page 23 • Adjust the correct height of the tool holder-bridge (4) with the height adjustment for tool holder (6). The friction finger must be able to move up and down – as shown on the picture – it must not sag. Make sure that the tool holder-bridge (4) is mounted horizontally.
- Page 24 • Press the „Zero“ symbol on the touchscreen to set the start position. Note: Do not zero directly at the start stop (1), but at least ca. 3 mm in front. • Set the number of double strokes and stroke length on the touchscreen. (refer to chapter 8.1.8 “Setting the stroke length”...
-
Page 25: Scratch And Mar Resistance Tests
Scratch and mar resistance tests 7.1 Preparation To carry out scratch and mar resistance tests, at least one scratching set is needed. Some standards or test procedures require additional equipment and auxiliary material. For available options for scratch and mar resistance tests please refer to chapter 3.5 “Options for scratch and mar resistance tests”... -
Page 26: Carry Out Scratch And Mar Resistance Tests
• Insert the spring with the pin ahead into the grip. • Insert the grip into the black telescope bar of the adapter. • Screw the head onto the grip and fasten it. • Turn the head clockwise until the wheels point in the direction of movement in relation to the grip. - Page 27 Level the apparatus using the included spirit level. To do so, place the spirit level on the sample tray and adjust the levelling feet (8) until the Proceq ZAA 2600 is levelled perfectly. The glass plate must be firmly in place.
- Page 28 • Adjust the height of the tool holder-bridge (4) with its height adjustment (6). The scratching tool has to bear on the wheels and must not be at the telescopic stop. Make sure that the tool holder-bridge (4) is mounted horizontally. It must not be tilted.
- Page 29 • Fix the scratching set onto the tool holder-bridge (4) and fasten it with the screw. The holder has to bear on the bridge horizontally. The holder has to be vertical when fixing it. • If necessary, adjust the position of the scratching set above the sample by lifting the adapter and moving it on the tool holder-bridge (4).
- Page 30 • Set the spring load. • Set the stroke length on the display (see chapter 8.1.8 “Setting the stroke length” on page 33). Set the right scratching length: The testing head has to remain on the sample over the whole stroke length. Check the correct fit of the scratching set before starting the procedure.
-
Page 31: Operation And Menu
Operation and Menu 8.1 Main screen The Proceq ZAA 2600 is equipped with a capacitive touch screen with a glass front. The touch screen is configured to allow operation with gloves up to 1 mm thickness. The most important settings can be accessed directly from the main screen. The menu is used for any additional settings. -
Page 32: Crockmeter Tests
The current position of the tool holder (18) can be set to 0 by pressing the „Zero“ symbol Confirm the appearing message with „yes. Should this button be pressed accidentally during the procedure, you can abort the process by pressing “no”. Note: Do not zero directly at the start stop (1), but at least ca. -
Page 33: Setting The Cycle Speed
Proceq ZAA 2600 universal unit. To carry out scratching tests the application mode has to be used. To get back to the machine mode „Crock / Scrub“... -
Page 34: Lock
8.1.11 Lock The lock blocks all movement commands of the tool holder (18). It can be activated and deactivated by tapping the lock button. If the button is in the „armed“ setting, all functions are active. If the button is in the „locked“ setting, the functions „Crock”, “Manual forward”... -
Page 35: Menu Structure In Crock / Scrub Mode
8.2 Menu structure in Crock / Scrub mode Name Length Current Name Cycle count Layout Length Cycle per minute Cycle count Cycle per minute All Layouts Layout 1-10 Applicator Machine mode Crock / Scrub Manual speed Speed mode Motor settings Acceleration mode Unit of length (mm, cm, inch) -
Page 36: Menu Structure In Application Mode
8.3 Menu structure in Application mode Name Current Speed Layout Length Name Speed Length All Layouts Layout 1-10 Applicator Machine mode Crock / Scrub Single Moving mode Reverse Return speed Manual speed Motor settings Speed mode Acceleration mode Setup Unit of length (mm, cm, inch) Units Speed unit... -
Page 37: Using Layouts
Open the menu by pressing the „Menu“ button. Go back a level by pressing the „Back“ button. Return to the main screen by pressing the „Home“ button. 8.4 Using layouts Layouts are memory slots with a custom set name which store a saved application profile (cycle speed and stroke length). -
Page 38: Motor Settings
8.5 Motor settings Various settings for the drive motor can be changed via „Settings“ -> „Motor settings“ in the menu 8.5.1 Manual speed Manual drive speed sets the speed at which the tool holder (18) moves when using the „manual back“ or “manual forward”... -
Page 39: Reset
8.6 Reset With the „Reset“ button the cycle counter (double stroke counter) will be reset. This cannot be undone. If the „Reset“ button has been tapped this message appears which has to be either confirmed or rejected. 8.7 Status messages 8.7.1 Overload "Motor has stopped because of overload. -
Page 40: The Motor Is Overheated
The fields for cycle speed and stroke length are marked red. After tapping on the information symbol a message will appear that either the cycle counts or the cycle speed are too high. Solution: The motor cannot reach the preset number of double strokes with the preset stroke length and speed. -
Page 41: Lubrication The Guide Rods
(18) can be moved by hand. The touchscreen and control unit of the Proceq ZAA 2600 remain active since only the power supply is interrupted. To unlock the Emergency Stop button (10), turn it counterclockwise. -
Page 42: Converting From Crockmeter Into Basic Unit
Converting from crockmeter into basic unit Thanks to its modular construction, the automatic universal unit can be equipped with different kits for carrying out applications, washability, crocking and scratch resistance tests. Before mounting an optional modification set, the device has to be converted to basic unit. -
Page 43: Converting From Basic Unit Into Crockmeter
10 Converting from basic unit into crockmeter Always unplug the power cable before assembling and/or converting the unit. • Check that the four rubber feet are mounted. • Place the glass plate (3) in the unit with the required side facing up. •... - Page 44 To protect persons and the apparatus, proper care must be taken when lifting or carrying it. It is recommended to hold and carry the Proceq ZAA 2600 on both sides of the housing. Always remove the glass plate before lifting or tilting the device.
-
Page 45: Turning The Glass Plate
12.2 Cleaning In order to ensure a perfect function, the Proceq ZAA 2600 should be kept as clean as possible. Remove eventual stains caused by friction media, coating materials or adhesives immediately before they can dry. Later they can often only be removed with difficulty. -
Page 46: Lubrication Of The Guide Rods
The guide rods have to be lubricated latest if this message appears or at least once per year. Before lubricating the guide rods of the Proceq ZAA 2600, always switch off the apparatus and unplug it. -
Page 47: Replacing The Fuse
Should it still be impossible to switch on the apparatus, please contact Proceq SA or your authorized Proceq agent. 12.5 Inspection The instrument should be checked for proper condition by a qualified electrician at an interval of 2 years. Alternatively, this test may also be performed by Proceq SA. Page 47... -
Page 48: Technical Specifications
13 Technical specifications Traverse speed: 1-600 mm/s, (0.04-23.62”) up to 100 double strokes / min Resolution: 1 mm/s Traverse speed accuracy: ±1 % 5.7“, TFT (LCD) colour, VGA resolution Touchscreen-display: LED backlight Material: Housing: red anodized aluminium 695 x 355 x 210 mm (27.36 x 13.98 x 8.27”) Dimensions device (LxWxH): 553 x 300 x 15 mm (21.77 x 11.81 x 0.59”) Dimensions glass plate (LxWxH) - Page 49 General: Excess voltage category: II Degree of soiling: Protection class: Altitude: up to 2.000 m above sea level For indoor use only. Page 49...
-
Page 50: Glossary
Glossary Exclusion of liability ......5 Extent of delivery ......10 Acceleration mode ......38 Ambient condition Operation ........48 Features .......... 6 Ambient conditions Friction finger sets Storage ........48 Assembly ........18 Transport ........48 Fuse Assembly Replacing ........47 Crockmeter ........ - Page 51 Application mode ....... 36 Carry out ........27 Crock / Scrub mode ....35 Preparation ........ 25 Motor settings ........ 38 Select layout ........32 Mounting Setting Friction finger set A ....19 Cycle speed ....... 33 Friction finger set B ....20 Stroke length ......
- Page 52 Subject to change. Copyright © 2017 by Proceq SA, Schwerzenbach. All rights reserved. www.proceq.com Version 1.2 dated 15.01.2018...
Need help?
Do you have a question about the ZAA 2600.C and is the answer not in the manual?
Questions and answers