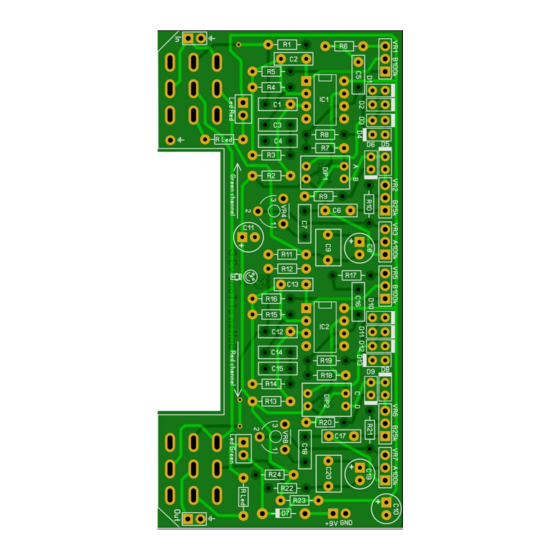
Lithium Grim Sultan of Tone Building Instructions
Hide thumbs
Also See for Sultan of Tone:
- Building instructions (12 pages) ,
- Building instructions (9 pages)
Table of Contents
Advertisement
Quick Links
Advertisement
Table of Contents

Summary of Contents for Lithium Grim Sultan of Tone
- Page 1 Sultan of Tone Building instructions V3.0.3...
-
Page 2: Table Of Contents
Sultan of Tone v3.0.3 Table of contents Components ............................3 Bill of Materials ............................4 PCB layout ............................... 5 Building sequence ........................... 6 Modifications ............................7 Off board wiring and drilling ........................7 Diode switch settings ..........................9 Troubleshooting ............................ 10 Schematic .............................. -
Page 3: Components
Sultan of Tone v3.0.3 Components Name Value Comment Name Value Comment 100p Ceramic/SML 100n 220k Electrolyte 35V 100u Electrolyte 100u Electrolyte 100p Ceramic/SML 100n 220k Electrolyte 35V JRC4580D JRC4580D L Green Orange!! L Red MA856 R led For Red LED... -
Page 4: Bill Of Materials
Sultan of Tone v3.0.3 Bill of Materials Capacitors Value Amount Type Rating 10 SMF 35V or higher 100n 2 SMF 35V or higher 2 SMF 35V or higher 100p 2 Ceramic Multi Layer 35V or higher 2 Electrolyte 35V or higher... -
Page 5: Pcb Layout
Sultan of Tone v3.0.3 PCB layout NB. There are some mistakes made in the channel and LED descriptions on the PCB. Green channel on the PCB should be Red channel, Red Channel on the PCB should be Orange channel. Led Green should be Led Orange. -
Page 6: Building Sequence
Sultan of Tone v3.0.3 General guideline for components Capacitors: All values under 1nF should be ceramic disks or silver mica. From 1nF up to 1uF should be SMF (Panasonic stacked metal film) or MKT (Metallized plastic polyester) and values over 1uF use electrolyte caps 16V+ rated and watch out for polarity! I rated them at 35V+ in case you plan on using a charge pump. -
Page 7: Modifications
You can also try different OpAmps like TL072, OPA2134, AD712, NE5532, JRC4558 etc. Off board wiring and drilling This version of the Sultan of Tone has integrated 3PDT print. This will save you time for off board wiring, but It will require you to drill more precise! Before you start you must drill the 2 footswitch holes in your enclosure. - Page 8 Sultan of Tone v3.0.3 Orange Sleeve Ring Sleeve Output Jack Input Jack Blue = pin 1 White = pin 2 Yellow = pin 3 The wiring diagram is a copy of the latest original version. You should use a RED LED in the slots of Led Red in the (R Led=3k3 for 9V/18V) and an ORANGE LED in the Led Green (R Led=3k3 for 9V/18V).
-
Page 9: Diode Switch Settings
Sultan of Tone v3.0.3 Diode switch settings Instead of using the dipswitches, you can make either 4 external SPDT switches for or 2 DP3T switches. If you choose 4 separate switches, it will look something like this: Switches A, B, C, D can all be connected the same way as shown in the picture above. All ways of connecting both wires to the switch are valid as long as you do not connect it to both outer lugs. -
Page 10: Troubleshooting
Sultan of Tone v3.0.3 Troubleshooting All PCB’s have been 100% factory e-tested and out of every batch I receive I build a effect to double check, so there should not be a connection problem on the PCB itself. The board is not working (at all), what now? ... -
Page 11: Schematic
Sultan of Tone v3.0.3 Schematic...


Need help?
Do you have a question about the Sultan of Tone and is the answer not in the manual?
Questions and answers