Lithium Grim Sultan of Tone Building Instructions
Hide thumbs
Also See for Sultan of Tone:
- Building instructions (9 pages) ,
- Building instructions (11 pages)
Table of Contents
Advertisement
Quick Links
Advertisement
Table of Contents

Subscribe to Our Youtube Channel
Related Manuals for Lithium Grim Sultan of Tone


Summary of Contents for Lithium Grim Sultan of Tone
- Page 1 Sultan of Tone Building instructions V4.1...
-
Page 2: Table Of Contents
Sultan of Tone v4.1 Table of contents Components ............................3 Bill of Materials ............................4 PCB layout ............................... 5 Power section ............................6 Building sequence ........................... 7 Modifications ............................8 Off board wiring and drilling ........................9 Diode switch settings ..........................10 Troubleshooting ............................ -
Page 3: Components
Sultan of Tone v4.1 Components All Components must be rated 25V+ Name Value Comment Name Value Comment 100p Ceramic/SML 100n 220k Electrolyte 100u Electrolyte 100p Ceramic/SML 100n Electrolyte 220k 100u Electrolyte Electrolyte 100n R led1 For Red LED Led Orange... -
Page 4: Bill Of Materials
Sultan of Tone v4.1 Bill of Materials Capacitors Value Amount Type Rating 10 SMF 25V or higher 100n 2 SMF 25V or higher 100n 1 MKT 25V or higher 2 SMF 25V or higher 100p 2 Ceramic Multi Layer 25V or higher... -
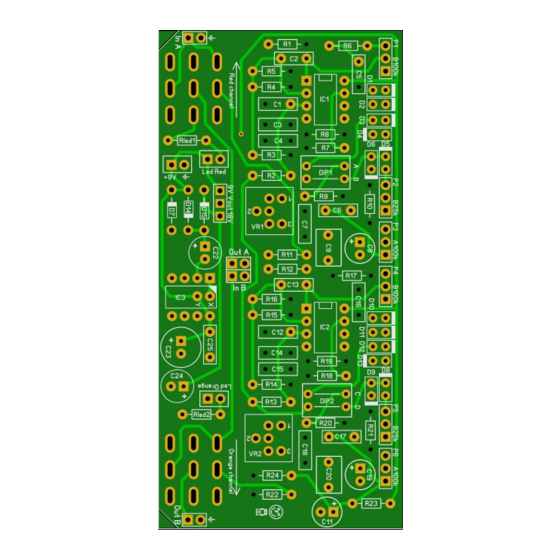
Page 5: Pcb Layout
Sultan of Tone v4.1 PCB layout... -
Page 6: Power Section
Sultan of Tone v4.1 Power section This board has a built-in charge pump which can feed the board with 18V. This can be made into a switchable option! If you look at the 3 power pins (marked 9V/Vout/18V), you can use a 3 pin male header and a shunt to choose between the two voltage (9V/18V). -
Page 7: Building Sequence
Sultan of Tone v4.1 Building sequence Soldering this board can be very complicated for some people since the solder pads are very close together. Use a magnifying glass to make the job easier. If you want to experiment with other diodes than you could socket them instead of soldering them to the board. -
Page 8: Modifications
Sultan of Tone v4.1 Besides the components mentioned in the bill of materials, you will need: • 2 input jacks. 2 mono jacks if you are not going to use a battery but only the 9V adapter. 1 mono (for output) and 1 stereo jack (for input) if you will be using both a 9V battery and the 9V adapter. -
Page 9: Off Board Wiring And Drilling
Sultan of Tone v4.1 Off board wiring and drilling This version of the Sultan of Tone has integrated 3PDT print. This will save you time for off board wiring, but It will require you to drill more precise! Before you start you must drill the 2 footswitch holes in your enclosure. Heart to heart distance of the footswitch holes is 76,65 mm. -
Page 10: Diode Switch Settings
Sultan of Tone v4.1 Diode switch settings Instead of using the dipswitches, you can make either 4 external SPDT switches for or 2 DP3T switches. If you choose 4 separate switches, it will look something like this: Switches A, B, C, D can all be connected the same way as shown in the picture above. All ways of connecting both wires to the switch are valid as long as you do not connect it to both outer lugs. -
Page 11: Troubleshooting
Sultan of Tone v4.1 Troubleshooting All PCB’s have been 100% factory e-tested and out of every batch I receive I build a effect to double check, so there should not be a connection problem on the PCB itself. The board is not working (at all), what now? •... -
Page 12: Schematic
Sultan of Tone v4.1 Schematic...
Need help?
Do you have a question about the Sultan of Tone and is the answer not in the manual?
Questions and answers