Advertisement
Quick Links
™
™
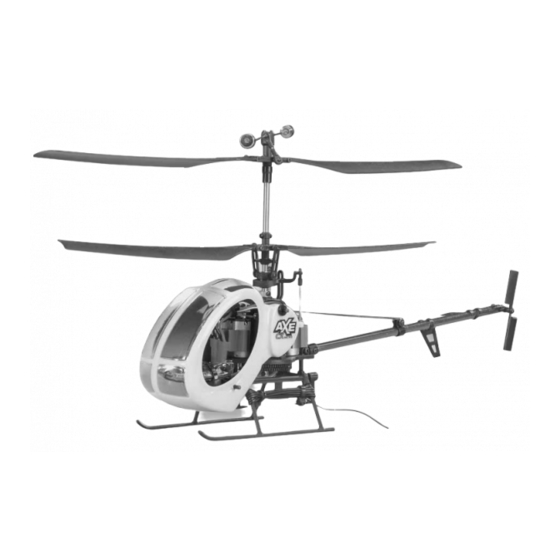
Heli-Max Axe CX Micro
PRE-FLIGHT CHECKS and REPAIR
Before each fl ight it is necessary to pre-fl ight model
helicopters to check for loose screws and damaged or worn
parts. This is a normal procedure that should be performed
on all helicopters. After a crash you must also perform a
thorough check of all parts to ensure that they have not
been damaged. Following these steps will help to ensure
your enjoyment of the Heli-Max Axe CX Micro radio
controlled helicopter. Please use the guide below to help
perform repairs if necessary. Thank you for purchasing
Heli-Max products.
Although the Heli-Max Axe CX Micro is extremely crash
resistant, on occasion it will be necessary to replace
damaged parts after a crash. Please follow the instructions
below to replace damaged parts. The Heli-Max Axe CX
Micro is a very small helicopter. Due to the small size we
recommend using the DTXR0170 DuraTrax
Phillips Screwdriver 00x75mm.
REPLACING
REPLACING
HMXE8530 Heli-Max Lower Rotor Blades Axe CX Micro
HMXE8531 Heli-Max Upper Rotor Blades Axe CX Micro
PRE-FLIGHT CHECK
PRE-FLIGHT CHECK
REPAIR
REPAIR
®
Precision
MAIN BLADES
MAIN BLADES
THE
THE
❏
The main rotor blades are retained by two screws as
shown (at bottom left.) Please notice that the upper and
lower main rotor blades rotate in opposite directions and
the blades are shaped differently. Always ensure that you
have the correct rotor blades before placing them onto the
helicopter. Please use the picture shown to ensure that
the blades are installed correctly.
❏
Remove any linkages from the two blades you need to
change. Remove the two retention screws and the main
blades will slide off the head block. Slide the new blades onto
the head block and reinstall the two retention screws. Attach
any linkages you removed previously. Review your work to
ensure that all steps have been completed. Once you have
completed a pre-fl ight check, your model is ready to fl y.
REPLACING
REPLACING
HMXE8526 Heli-Max Inner Rotor Shaft Axe CX Micro
❏
Remove the fl ybar linkage from the main rotor blades.
Remove the fl ybar from the upper head by simply pulling the
carrier upwards while rotating the fl ybar carrier and pressing
outward on the head block.
1
INNER MAIN SHAFT
INNER MAIN SHAFT
THE
THE
Advertisement

Related Manuals for Heli-Max Axe CX Micro


Summary of Contents for Heli-Max Axe CX Micro
- Page 1 Following these steps will help to ensure change. Remove the two retention screws and the main your enjoyment of the Heli-Max Axe CX Micro radio blades will slide off the head block. Slide the new blades onto controlled helicopter. Please use the guide below to help the head block and reinstall the two retention screws.
- Page 2 ❏ Before installing the new inner main shaft, locate the fl at spot ground on the bottom of the shaft. This fl at spot must be aligned with one of the lower main gear screws before the lower main gear bolts can be tightened. Once you have the fl...
Need help?
Do you have a question about the Axe CX Micro and is the answer not in the manual?
Questions and answers