Table of Contents

Related Manuals for Heli-Max Comanche CX


Summary of Contents for Heli-Max Comanche CX
-
Page 1: Instruction Manual
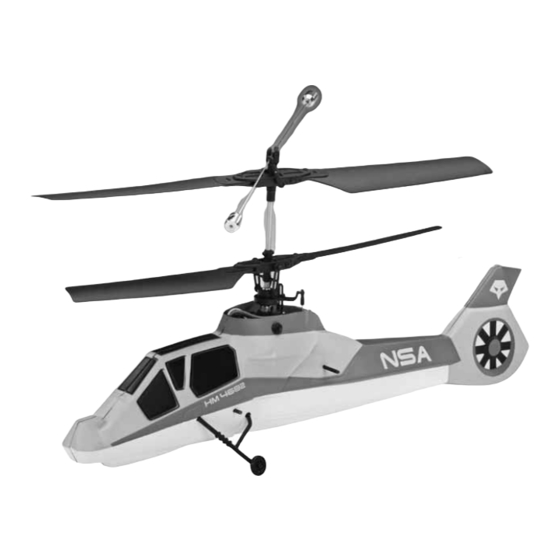
INSTRUCTION MANUAL Specifi cations Length: 12.5 in [318mm] Rotor Span: 10.6 in [270mm] Width: 2.7 in [69mm] Weight: 5.1 oz [145g] (with supplied fl ight battery) Height: 6.3 in [160mm] Entire Contents © Copyright 2009 HMXE14✶✶... -
Page 2: Important Precautions
IMPORTANT PRECAUTIONS IMPORTANT PRECAUTIONS ● Only use the included charger with the included battery or replacement part (GPMP0407). ● Do not attempt to use this charger with NiCd or NiMH battery packs. ● Never charge in excess of 4.20V per cell. ●... -
Page 3: Warranty
In that Heli-Max has no control over the fi nal assembly or material used for fi nal assembly, no liability shall be assumed nor accepted for any damage resulting from the use by the user of the fi... -
Page 4: Table Of Contents
CAUTION: Be aware that the Comanche CX operates on the same frequency band as larger R/C models. If fl ying your Comanche CX within fi ve miles of an R/C site, there is a real possibility that you could be operating your model on the same frequency (channel) as another R/C pilot. -
Page 5: Safety Precautions
The spinning blades of a model helicopter can cause serious injury. When choosing a fl ying site for your Comanche CX, stay clear of buildings, trees and power lines. AVOID fl ying in or near crowded areas. DO NOT fl y close to people, children or pets. -
Page 6: Additional Items Required
KIT INSPECTION KIT INSPECTION Before starting assembly, take an inventory of the Comanche CX to make sure it is complete, and inspect the parts to make sure they are of acceptable quality. If any parts are missing or are not of acceptable quality, or if you need assistance with assembly, contact Product Support. -
Page 7: Assembly Instructions
ASSEMBLY INSTRUCTIONS ASSEMBLY INSTRUCTIONS Install Batteries in the Transmitter ❏ Remove the battery cover from the back of transmitter, remove the battery box and install eight (8) “AA” batteries into the battery box. Double- check the polarity of each battery before placing the battery box back into the transmitter and replacing the battery cover. -
Page 8: Electric Motor Warning
The charging process may take up to four hours. The fl ight pack used to power the Comanche CX contains protective circuitry. If you experience any diffi culties while charging or using the battery, please allow the battery to rest for two hours as this will allow the protection circuit to reset. -
Page 9: Install The Battery
Do not hold onto the model and run it up. A safe start is built into the Comanche CX that prevents the motor from activating unless the collective stick has been lowered to its lowest position. If the motor won’t run and turn the main blades, please make sure the collective stick is all the way down and leave it there for a couple of seconds. -
Page 10: Controls
respond correctly, do not fl y! Find and correct the problem fi rst. Look for loose servo connections or broken wires, corroded wires on old servo connectors, poor solder joints in your battery pack or a defective cell or a damaged receiver crystal from a previous crash. - Page 11 Moving the cyclic stick right will cause the helicopter to tilt right and it will start moving that direction. Moving the cyclic stick left will cause the helicopter to tilt left and start moving in that direction. Moving the cyclic stick backwards (towards you) will cause the helicopter to tilt backwards and start...
- Page 12 Moving the cyclic stick forward (away from you) will cause the helicopter to tilt forward and start moving that direction. Moving the collective stick up (away from you) will cause the helicopter to climb higher. Moving the collective stick down (towards you) will cause the helicopter to descend.
-
Page 13: Flying
FLYING FLYING The Heli-Max Comanche CX is an extremely lightweight model helicopter. Taking that into consideration, you should only fl y the Comanche CX indoors or in calm wind. Takeoff Slowly add power and observe the model. If you feel it needs trimming do so before lift off. -
Page 14: Ordering Parts
It’s normal to drift around a little in a hover until you get used to fl ying the model. The cyclic controls on the Comanche CX are fairly sensitive so only small movements are necessary. Hovering Once the helicopter is up in the air, simply try to hold the helicopter in one spot. - Page 15 Parts List. Payment by credit card or personal check only; no C.O.D. If additional assistance is required for any reason contact Product Support by e-mail at helihotline@hobbico.com, or by telephone at (217) 398-8970. Comanche CX Replacement Parts List Stock # Description...
-
Page 16: Exploded View
HMXM2010 E Board Rx/Esc/Gy HMXE7399 Fuselage Comanche CX HMXM2011 X-Tal Ch 36 HMXM2014 X-Tal Ch 40 HMXM2015 X-Tal Ch 42 HMXM2016 X-Tal Ch 44 HMXM2017 X-Tal Ch 54 HMXM2018 X-Tal Ch 56 HMXE7407 Fuselage Secure Tubes GPMP0407 LiPo Battery HMXE7391... - Page 17 Landing Gear Landing Gear Mounts PART # HMXE7955 PART # HMXE7929 EVPL # EVPL # 1 set 2 pcs Battery Box Upper Rotor Gear PART # HMXE7204 PART # HMXE8031 EVPL # EVPL # 1 set 1 set Screw Set Lower Rotor Gear PART # HMXE7332...
- Page 18 Swashplate Outer Shaft Collar PART # HMXE8523 PART # HMXE8522 EVPL # EVPL # 1 set 1 set Servo Mount Pushrod PART # HMXE7939 PART # HMXE8534 EVPL # EVPL # 1 pc. 2 set Outer Rotor Shaft Lower Rotor Head PART # HMXE8532 PART #...
- Page 19 Inner Rotor Shaft Blade Grip PART # HMXE8565 PART # HMXE8329 EVPL # EVPL # 1 set 2 pcs Upper Blades Flybar Link PART # HMXE8327 PART # HMXE8527 EVPL # EVPL # 2 pcs 1 set Flybar Assenbly Flybar Weights PART # HMXE8529 PART #...
- Page 20 Crystal Fuselage Secure Tubes PART # HMXE2011 - Ch36 PART # HMXE7407 HMXE2014 - Ch40 EVPL # HMXE2015 - Ch42 HMXE2016 - Ch44 HMXE2017 - Ch54 HMXE2018 - Ch56 EVPL # 1 set 2 pcs LiPo Battery Canopy Grommets PART # HMXE0407 PART # HMXE7391...
Need help?
Do you have a question about the Comanche CX and is the answer not in the manual?
Questions and answers