Table of Contents
Advertisement
Quick Links
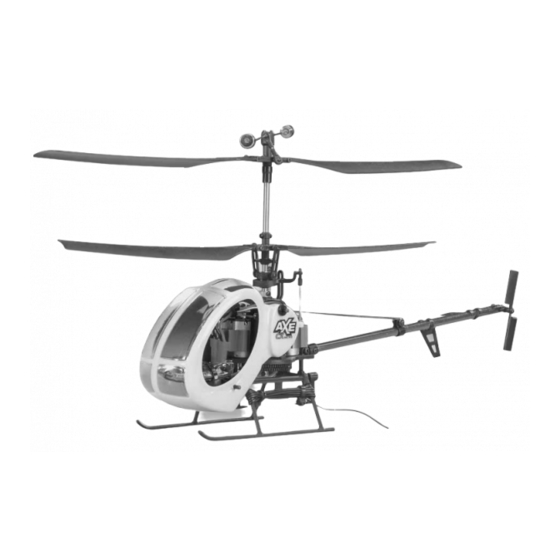
Rotor Span: 10.6 in [270mm]
Height: 5.9 in [150mm]
Length: 10.8 in [275mm]
Width: 2.5 in [65mm]
Weight: 2.65 oz [75g] no battery
Flying Weight: 4.26 oz [121g] with supplied fl ight battery
• Only use the included charger with the included battery
or replacement part (GPMP0407).
• Do not attempt to use this charger with NiCd or NiMH
battery packs.
• Never charge in excess of 4.20V per cell.
• If the battery should become damaged, discard the
battery. Do not attempt to use a damaged battery.
• Do not leave the charger unattended while charging.
Disconnect the battery and remove input power from the
charger immediately if either becomes hot! However, it is
normal for the charger to get warm.
• Disconnect the battery from the charger and carefully
move the battery to a fi reproof location if the battery
begins to swell or smoke!
• Never charge at currents greater than 1C.
• Always charge in a fi reproof location.
• Never trickle charge.
• Never allow the battery temperature to exceed 150° F
[65° C].
READ THROUGH THIS MANUAL BEFORE STARTING CONSTRUCTION.
IT CONTAINS IMPORTANT INSTRUCTIONS AND WARNINGS
CONCERNING THE ASSEMBLY AND USE OF THIS MODEL.
™
IMPORTANT PRECAUTIONS
INSTRUCTION MANUAL
• Never disassemble or modify pack wiring in any way or
puncture cells.
• Never discharge below 2.5V per cell.
• Do not allow water, moisture or foreign objects into
the charger.
• Do not block the air intake holes, which could cause the
charger to overheat.
• Do not place the charger or any battery on a fl ammable
surface or near a combustible material while in use.
• Do not charge on a carpet, cluttered workbench, paper,
plastic, vinyl, leather, wood, or inside an R/C model.
• Never charge inside a full-sized vehicle.
• Always disconnect the battery from the charger and the
power supply from the charger when not in use.
• Do not attempt to charge a battery if it is swollen or hot.
• ALWAYS KEEP OUT OF REACH OF CHILDREN.
Champaign, Illinois
(217) 398-8970
helihotline@hobbico.com
Advertisement
Table of Contents

Related Manuals for Heli-Max Axe CX Micro


Summary of Contents for Heli-Max Axe CX Micro
-
Page 1: Instruction Manual
™ Rotor Span: 10.6 in [270mm] Height: 5.9 in [150mm] Length: 10.8 in [275mm] Width: 2.5 in [65mm] Weight: 2.65 oz [75g] no battery INSTRUCTION MANUAL Flying Weight: 4.26 oz [121g] with supplied fl ight battery IMPORTANT PRECAUTIONS • Only use the included charger with the included battery •... -
Page 2: Table Of Contents
R/C models. If fl ying Code refer to Model Aviation magazine, the AMA web site or your AXE CX Micro within fi ve miles of an R/C site, there the Code that came with your AMA license. -
Page 3: Safety Precautions
WARRANTY The spinning blades of a model helicopter can cause serious injury. When choosing a fl ying site for your AXE CX Micro, stay ™ Heli-Max guarantees this kit to be free from defects in both clear of buildings, trees and power lines. -
Page 4: Ordering Replacement Parts
In that Heli-Max has no control over the fi nal assembly or ORDERING REPLACEMENT PARTS material used for fi nal assembly, no liability shall be assumed nor accepted for any damage resulting from the use by the user of the fi nal user-assembled product. By the act of using the user-assembled product, the user accepts all resulting liability. -
Page 5: Assembly Instructions
The charging process may take up to four (4) hours. The fl ight pack used to power the AXE CX Micro contains protective circuitry. If you experience any diffi culties while charging or using the battery, please allow the battery to rest for two hours as this will allow the protection circuit to reset. - Page 6 ELECTRIC MOTOR WARNING the battery into the ESC. The AXE CX Micro will need to sit still for 10 seconds so the gyro can initialize and determine Electric motors are very dangerous. Do not work on the center. Once the gyro has initialized the indicator light will model while the fl...
-
Page 7: Controls
CONTROLS TRANSMITTER CONTROLS Moving the cyclic stick left will cause the helicopter to tilt left and start moving in that direction. All controls described as follows are with the tail pointing Moving the cyclic stick backwards (towards you) will cause the directly toward you. -
Page 8: Flying
It’s normal to drift around a little in a hover until you get used to fl ying the model. The cyclic controls on the AXE CX Micro are fairly sensitive so only small movements are necessary. HOVERING Once the helicopter is up in the air, simply try to hold the helicopter in one spot. -
Page 9: Ordering Parts
22 HMXE8533 ..Main Blade Control Link ....2 23 HMXE8534 ..Servo Pushrods .........2 24 HMXE7939 ..Servo Mount ........1 Replacement parts for the Heli-Max AXE CX Micro are 25 HMXE8427 ..Tail Rotor ........1 set available using the order numbers in the Replacement 26 HMXE8651 .. -
Page 10: Exploded View
EXPLODED VIEW... - Page 12 Entire Contents © Copyright 2008 HMXE09**MNL01...
Need help?
Do you have a question about the Axe CX Micro and is the answer not in the manual?
Questions and answers