Advertisement
Quick Links
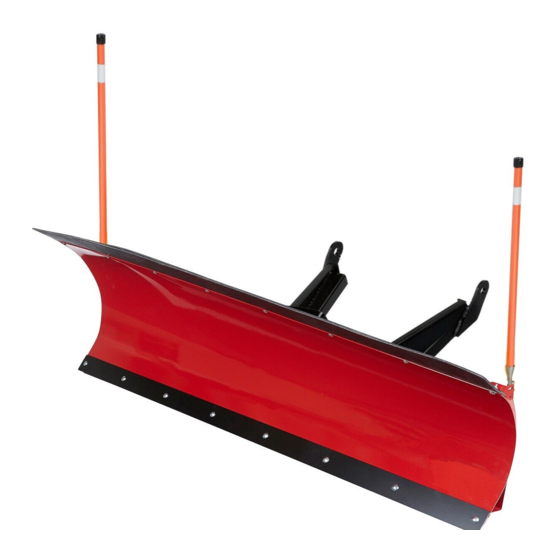
DENALI Professional Series Snow Plow Blade Installation
Thank you for purchasing MotoAlliance's top-of-the-line Professional Series UTV Snow Plow System! We've paid
attention to all the fine details and believe you now have a plow that will last for years to come. Please feel free to contact
us with any questions.
Warning And User Caution
-
Never allow passengers to ride on the blade while plowing
-
Stay clear of bystanders while plowing
-
Do not exceed 10 MPH with blade installed
-
Always wear safety gear (helmet, glasses, etc) when plowing
-
Always put your vehicle in Park before changing the angle of
the plow blade
-
Use extreme caution when plowing and riding on sloped
surfaces
-
Avoid all fixed objects and always wear a seatbelt
-
Be cautious of the blade when lowering it from an upright
position
-
Always store your blade resting on the ground
866.527.7637 (toll free)
23001 Industrial Blvd, Rogers, MN 55374
www.motoalliance.com. 1-866-527-7637
1
motoinfo@motoalliance.com
Advertisement

Related Manuals for Motoalliance DENALI Professional Series


Summary of Contents for Motoalliance DENALI Professional Series
- Page 1 1-866-527-7637 Thank you for purchasing MotoAlliance’s top-of-the-line Professional Series UTV Snow Plow System! We’ve paid attention to all the fine details and believe you now have a plow that will last for years to come. Please feel free to contact us with any questions.
- Page 2 DENALI Professional Series Snow Plow Blade Installation ITEM NO. Part Description Quantity 72’’ Pro Series Plow Blade 72’’ Pro Series Wear Bar 72’’ Rubber Flap 72’’ Hold Down Bar UTV Skid Foot Skid Foot Rubber Bushings 5/8’’ Flat Washers 3/16’’ x 1.5’’ Cotter Pin (Split pin) 28’’...
- Page 3 DENALI Professional Series Snow Plow Blade Installation Plow Blade Assembly 1) Install the 72’’ Wear Bar to the 72’’ Plow Blade as shown in Figure 1 Figure 1 2) Install the 72’’ Rubber Flap and 2pc Rubber Flap Hold Down Bars as shown in...
- Page 4 DENALI Professional Series Snow Plow Blade Installation 3) Install the 28’’ Flag markers to the sides of the plow blade as shown in Figure 3 Figure 3 4) Install the Skid Feet with Rubber Bushings and 5/8’’ Flat Washers as shown in Figure 4 .
- Page 5 DENALI Professional Series Snow Plow Blade Installation DENALI UTV Pushtube Component List ITEM Part Description Quantity Lift Arm Weldment Swivel Plate Weldment Winch Attachment Bracket Pivot Lock Lever Pivot Lever Support Bracket Pivot Lever Riser 5/8’’-11 x 2’’ G8 Hex Bolt Pivot Ring 5/8’’...
- Page 6 DENALI Professional Series Snow Plow Blade Installation 866.527.7637 (toll free) motoinfo@motoalliance.com...
-
Page 7: Lift Arm Assembly
DENALI Professional Series Snow Plow Blade Installation Lift Arm Assembly 1) Attach the Swivel Plate to the Lift Arm using the 5/8’’ Hex Bolt, 5/8’’ Flat Washer, 5/8’’ Nylock Nut and Pivot Ring as Figure 5 shown Figure 5 2) Attach the Pivot Lever Support Bracket to the Lift Arm using four 3/8’’ x 1.00’’ Hex Bolts and 3/8’’ Washers as shown Figure 6 . - Page 8 DENALI Professional Series Snow Plow Blade Installation 3) Attach the Pivot Lever Risers to the Lift Arm using four 3/8’’ x 1.00’’ Hex Bolts and 3/8’’ Flat Washers as shown in Figure 7 Figure 7 4) Attach the Pivot Lock Lever to the Pivot Lever Risers using the ¼’’ x 1.5’’ Hex bolt, ¼’’ Washers, ¼’’ Aluminum Spacer and ¼’’...
- Page 9 DENALI Professional Series Snow Plow Blade Installation 5) Install the Lock Lever Spring between the Pivot Lock Lever and Pivot Lever Support Bracket using a needle nose Figure 9 pliers as shown Figure 9 6) Install the Stop Blocks using the 3/8’’ x 1.5’’ Hex Bolts, 3/8’’ Flat Washers, and 3/8’’ Nylock Nuts. Note that the hole in the Stop Block is a different distance from each of the four edges of the Stop Block.
- Page 10 DENALI Professional Series Snow Plow Blade Installation 7) Install the Winch Attachment Bracket to the Lift Arm using the 3/8’’ x 1.00’’ Hex Bolts and 3/8’’ Flat Washers as shown Figure 11. Figure 11 8) Attach the completed Pushtube assembly to the Snow Plow using the ½’’ x 2.00’’ Hex Bolts, ½’’ Flat Washers, and ½’’...
- Page 11 DENALI Professional Series Snow Plow Blade Installation 9) Attach the 10’’ Springs to the Swivel Plate with the hook pointed toward the blade as shown in Figure 13. Figure 13 10) Attach the top end of the 10’’ Spring to the 3/8’’ Eye Bolt and then insert the threads of the 3/8’’ Eye Bolt through the mount plate welded to the Plow Blade.
- Page 12 DENALI Professional Series Snow Plow Blade Installation 11) Attach the Plow System to the Plow Mount (sold and installed separately) using the 5/8’’ Quick Release Pins, 5/8’’ Flat Washers and R-Clips as shown in Figure 15. Figure 15 866.527.7637 (toll free)
- Page 13 Your plow requires a winch to raise and lower your blade. Simply install a winch and attach the clevis hook to the eye bolt in the center of your lift arm assembly. We suggest using our MotoAlliance Plow Strap, which is designed to spread the weight of the plow blade over a 2’’...
Need help?
Do you have a question about the DENALI Professional Series and is the answer not in the manual?
Questions and answers