Table of Contents
Advertisement
Quick Links
EN
Digital Camera
User's Guide
Thank you for purchasing this CASIO product.
• Before using it, be sure to read the precautions contained in this User's Guide.
• Keep the User's Guide in a safe place for future reference.
• For the most up-to-date information about this product, visit the official CASIO Website
at http://dc.casio.com/
Advertisement
Table of Contents

Subscribe to Our Youtube Channel
Related Manuals for Casio GZE-1


Summary of Contents for Casio GZE-1
- Page 1 • Before using it, be sure to read the precautions contained in this User’s Guide. • Keep the User’s Guide in a safe place for future reference. • For the most up-to-date information about this product, visit the official CASIO Website at http://dc.casio.com/...
-
Page 2: Accessories
Accessories As you unpack your camera, check to make sure that all accessories shown below are included. If anything is missing, contact your original retailer. Rechargeable lithium ion Attachment adaptor Micro USB cable battery (NP-150) Basic Reference • Items actually included depend on the camera model you purchase. -
Page 3: Read This First
CASIO COMPUTER CO., LTD. is forbidden under copyright laws. • CASIO COMPUTER CO., LTD. shall not be held liable for any damages or lost profits suffered by you or any third party due to the use or malfunction of this product. -
Page 4: Table Of Contents
G’z EYE App and Optional Controllers ....... 8 What you can do with your CASIO camera ......10 First, charge the battery prior to use.. - Page 5 Configuring Camera Settings REC Menu Reference ......... . . 40 Recording Beautiful Portraits .
- Page 6 Power Supply..........84 Charging .
-
Page 7: General Guide
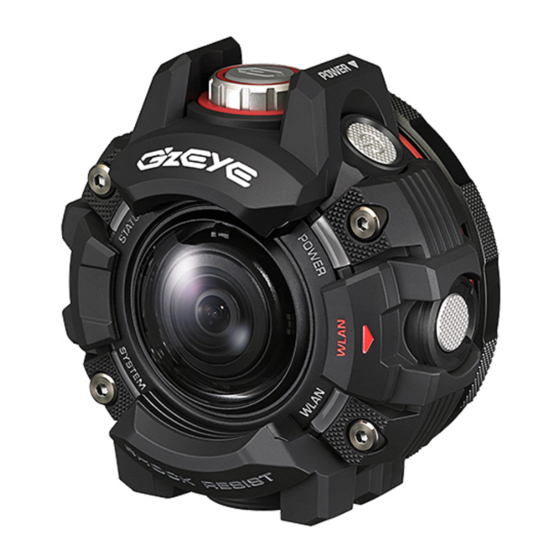
General Guide The numbers in parentheses indicate the pages where each item is explained. (3 (4 (5 [STATUS] lamp [POWER] lamp [USB] port (page 30) (pages 17, 15) (pages 16, 14) [r/SLOW] button [WLAN] button Battery compartment ... -
Page 8: Quick Start Basics
Quick Start Basics G’z EYE App and Optional Controllers Your camera can connect with a smartphone and with the optionally available controllers described below. . Connectable Devices Smartphone Installing the G’z EYE app on a smartphone enables remote control of the camera from the smartphone. - Page 9 . Controllable Camera Functions Camera Recording Camera Combination Recording Angle Mode Playback Setting Monitoring Selection Configuration Camera Only Available Limited Available Available Available Camera + G’z EYE app Available Limited Available Available Available G’z EYE Camera + Controller With LCD Available Available Available...
-
Page 10: What You Can Do With Your Casio Camera
What you can do with your CASIO camera This section explains the basic functions of the camera. . REC Dramatic Slow Motion Shooting Dramatic Slow Motion records sections within a movie in slow motion, highlighting them and making them more dramatic. - Page 11 . Connecting the Camera to a Smartphone Shoot with phone Remotely control and shoot with the camera using a smartphone. For details, see the G’z EYE app User’s Guide (page 23). Send to phone Send snapshots and movies recorded with your camera to your smartphone.
-
Page 12: First, Charge The Battery Prior To Use
Note that the battery of a newly purchased camera is not charged. Perform the steps below to load the battery into the camera and charge it. • Your camera requires a special CASIO rechargeable lithium ion battery (NP-150) for power. Never try to use any other type of battery. - Page 13 To replace the battery Hold down the [POWER] button for about two seconds to turn off power, and then remove the battery cover (page 12). Remove the current battery and load a new one. As shown in the illustration, pull up the edge of the battery to remove it.
-
Page 14: Charge The Battery
USB-AC adaptors with different standards that must be met in specific countries. CASIO COMPUTER CO., LTD. shall be held in no way liable for any malfunction or failure of the camera due to the use of inferior devices or devices that do not meet required standards. - Page 15 IMPORTANT! • A battery that has not been used for a long time and/or ambient temperature can cause charging to take longer than normal. These conditions may also cause the [POWER] lamp to flash red. If this happens, refer to page 84. •...
- Page 16 . To charge using a USB connection to a computer Charging time: Approximately 2 hours 55 minutes USB connection lets you charge the battery while it is loaded in the camera. While the camera is turned off, connect in the sequence shown below ( ...
- Page 17 [POWER] Lamp Operation [POWER] lamp Lamp Status Description Lit Red, (Lit Amber) Charging Abnormal ambient temperature, Flashing Red charging taking abnormally long, or battery problem (page 84) Off, (Lit Green) Charging complete • The information in parentheses in the above table shows the lamp status while the camera is turned on during charging.
-
Page 18: Checking The Current Battery Level
Checking the Current Battery Level While the camera is turned on, you can determine the current charge level by checking the color of the [POWER] lamp. [POWER] Lamp Color Green Amber Remaining Power High • An amber [POWER] lamp indicates that remaining battery power is low. Charge the battery as soon as possible. -
Page 19: Turning Power On And Off
Turning Power On and Off . To turn on power Press the [POWER] button. [STATUS] lamp Turning on power causes the camera’s [POWER] lamp [POWER] lamp to light, indicating the current state of the battery (page 18). This indicates [POWER] button that image recording is enabled. -
Page 20: Preparing A Memory Card
Preparing a Memory Card Though the camera has built-in memory that can be used to store images and movies, you probably will want to purchase a commercially available memory card for greater capacity. The camera does not come with a memory card. Images recorded while a memory card is loaded are saved to the memory card. -
Page 21: To Load A Memory Card
• Should water or any foreign object ever get into the card slot, immediately turn off the camera, and contact your retailer or nearest CASIO authorized service center. . To replace the memory card Press the memory card and then release it. -
Page 22: Connecting The Camera With A Smartphone
IMPORTANT! • Turn off the camera before replacing the memory card. Replacing the card while the camera is on can result in recorded images not being saved and even damage the memory card. Connecting the Camera with a Smartphone (Wireless Connection) Your camera has Bluetooth wireless technology and wireless LAN functionality built- ®... - Page 23 • Note that to view the G’z EYE app User’s Guide (PDF), you will have to install Adobe Reader. Consult CASIO authorized service center if you are unable to open to display the PDF format User’s Guide. • Note that G’z EYE app User’s Guides may not be available in all languages. If you cannot find a G’z EYE app User’s Guide in your native language, please use a...
-
Page 24: Installing The G'z Eye App On Your Smartphone
Installing the G’z EYE App on Your Smartphone Search the G’z EYE app on Google Play or App Store and install it on your ™ smartphone. For information about OS versions (Android and iOS) supported by the G’z EYE app, visit the Google Play or the App Store download site. . -
Page 25: Registering The Camera On The G'z Eye App
Registering the Camera on the G’z EYE app (Pairing) To use the camera with a Bluetooth wireless technology capable smartphone, perform the procedure below to register the camera on the G’z EYE app. • Registering on the G’z EYE app causes the camera’s time and date settings to be synchronized with the smartphone’s settings. -
Page 26: Establishing A Wireless Lan Connection Between
On the G’z EYE app, tap “OK”. This causes the G’z EYE app top screen to appear, with “Bluetooth” displayed in red. • In the case of an iPhone (iOS), a message will appear asking if you want to allow use of location information. Specify whether or not you want to allow use of location information. - Page 27 Camera SSID and Password • The camera SSID (which cannot be changed) and password (initial default) are shown below. SSID: Refer to the separate “[Important] About the camera’s SSID” sheet that comes with the camera. Password: 00000000 • While there is a Bluetooth wireless technology connection between the camera and a smartphone, tapping “Wi-Fi”...
-
Page 28: Terminating A Wireless Lan Connection
Terminating a Wireless LAN Connection Hold down the camera’s [WLAN] button for about two [WLAN] button seconds until the [WLAN] lamp goes out. This terminates the connection between the camera and [POWER] button smartphone. The connection between the camera and smartphone is also terminated if you turn off the camera by holding down its [POWER] button for about two seconds. -
Page 29: To Format (Initialize) A New Memory Card
To format (initialize) a new memory card Before using a memory card with this camera, establish a wireless LAN connection between the camera and a smartphone and use the G’z EYE app (page 23) to format On the smartphone, go to the “G’z EYE” app top screen and tap “Setting”. -
Page 30: Shooting With The Camera Alone
Shooting with the Camera Alone Shooting a Snapshot or a Movie Use the procedure below to shoot with the camera. Turn on the camera (page 19). [r/SLOW] button The camera will start up in the same recording ] button mode it was in the last time you turned it off. •... - Page 31 • Shooting movies for long periods in areas where temperature is relatively high can cause digital noise (dots of light) to appear in the movie image. A rise in the camera’s internal temperature also may force movie recording to stop automatically.
-
Page 32: Changing To Slow Motion Shooting While Recording A Movie
Changing to Slow Motion Shooting while Recording a Movie (Dramatic Slow Motion) Dramatic Slow Motion records sections within a movie in slow motion, highlighting them and making them more dramatic. You can use the G’z EYE app or the optional Controller with LCD to change the camera settings below. - Page 33 ] button [r/SLOW] button ] button Normal Shooting Slow Motion Shooting Normal Shooting Turn on the camera (page 19). [r/SLOW] button • Under initial settings, the camera will enter the ] button Auto mode. [POWER] button Hold down the [ ] button for about 2 seconds.
- Page 34 NOTE • You can also change the recording mode using the G’z EYE app or the optional controller with LCD. • A movie file can be up to 4 GB in size. Recording will stop automatically when this value is reached. •...
-
Page 35: Other Recording Functions
Other Recording Functions If the camera is connected with a smartphone or optional Controller With LCD, you can also shoot with Continuous Shutter (CS) or Time Lapse by changing the recording mode. For information about G’z EYE app or Controller with LCD operations, refer to the applicable User’s Guide. -
Page 36: Shooting With High Speed Cs
Shooting with High Speed CS Up to 30 images can be recorded for a single High Speed CS operation. You can use the G’z EYE app or the optional Controller with LCD to change the camera settings below. High Speed CS Specifies the CS shooting speed in frames per second (fps). -
Page 37: Shooting With Prerecord Cs
Shooting with Prerecord CS Prerecord CS saves images of what occurred before the [r/SLOW] button is pressed. You can use the G’z EYE app or the optional Controller with LCD to change the camera settings below. High Speed CS Specifies the CS shooting speed in frames per second (fps). 10fps, 15fps, 30fps Specifies the number of images shot by a single High Speed Maximum CS... -
Page 38: Shooting A Time Lapse Movie
Shooting a Time Lapse Movie Time Lapse shoots a movie that appears like a high-speed rendition of the action by splicing together a series of photos shot over a fixed period. You can use the G’z EYE app or the optional Controller with LCD to change the camera settings below. Specifies the number of seconds between shots. -
Page 39: Snapshot Shooting Precautions
Snapshot Shooting Precautions Operation • If unwanted light is shining onto the lens, shade the lens with your hand when shooting an image. Shooting Indoors under Fluorescent Lighting • Minute flickering of fluorescent lighting can affect the brightness or color of an image. -
Page 40: Configuring Camera Settings
Configuring Camera Settings You can use the G’z EYE app or the separately available Controller With LCD to change camera settings. For information about G’z EYE app or Controller with LCD operations, refer to the applicable User’s Guide. REC Menu Reference Recording Beautiful Portraits (Make-up) Make-up enables adjustment of human skin tone hues and texture, and softening of facial shadows caused by harsh sunlight for better looking portraits. -
Page 41: Movie Image Quality Settings
Movie Image Quality Settings (Movie Quality) This setting can be used to configure movie image quality settings and to select either normal movie recording or High Speed Movie recording. Movie Frame Image Size Description Quality Rate (Pixels) Select this setting to record full high-definition 30fps 1920 1080... -
Page 42: Adjusting White Balance
Adjusting White Balance (White Balance) You can adjust white balance to match the source of light available where you are shooting and avoid the blue cast that results when shooting outdoors when it is cloudy, and the green cast that results when shooting under fluorescent lighting. Setting Description Configures the camera to adjust white balance... -
Page 43: Specifying Iso Sensitivity
Specifying ISO Sensitivity (ISO) ISO sensitivity is a measure of sensitivity to light. Setting Description Auto Adjusts sensitivity automatically according to conditions Lower Slow shutter speed Less noise ISO80 sensitivity ISO100 ISO200 ISO400 ISO800 Fast shutter speed (Set ISO1600 Some coarseness for shooting in dimly lit Higher (increased digital noise) -
Page 44: Camera Setup Menu Reference
Camera Setup Menu Reference Adjusting the Camera Lamp Brightness (Camera LED Setting) Available camera lamp brightness settings are “Bright” and “Standard”. Locking the Camera Orientation (Rotation Lock) Use this setting to control whether the camera should detect its orientation when shooting and store orientation information along with the image data. -
Page 45: Formatting Built-In Memory Or A Memory Card
Formatting Built-in Memory or a Memory Card (Format) If a memory card is loaded in the camera, this operation will format the memory card. If a memory card is not loaded in the camera, this operation will format its built-in memory. -
Page 46: Wireless Setting Menu Reference
Wireless Setting Menu Reference Having Images Shot with the Camera Sent to a Smartphone Automatically (Auto Send) While “On” is selected for this setting, snapshots shot with the camera are sent wirelessly to the smartphone when certain conditions are satisfied. The camera’s [WLAN] lamp will be flashing or lit while an image send operation is in progress. -
Page 47: Resizing Snapshots Before Sending Them To A Smartphone
Resizing Snapshots before Sending Them to a Smartphone (Resize When Sending) Camera images can be resized when they are sent to a smartphone. Images are converted to 3M size before being sent. • If an original image is 3M size or smaller, it is sent without resizing. -
Page 48: Changing The Camera Password For Wireless Lan Connection
Changing the Camera Password for Wireless LAN Connection (WLAN password) You can change the password you use when establishing a wireless LAN connection between the camera and a smartphone. IMPORTANT! • To change the wireless LAN password, unregister the camera from the G’z EYE app (page 48). -
Page 49: Printing
Printing Professional Print Service You can take a memory card that contains the images you want to print to a professional print service and have them printed. Printing on a Home Printer You can use a printer equipped with a memory card slot to print images directly from a memory card. -
Page 50: Using The Camera With A Computer
Using the Camera with a Computer Things you can do using a computer... You can perform the operations described below while the camera is connected to a computer. Save images to a • Save images and view them manually computer and (USB connection) (pages 51, 54). -
Page 51: Viewing And Storing Images On A Computer
Viewing and Storing Images on a Computer You can connect the camera to your computer in order to view and store images (snapshot and movie files). Never use your computer to modify, delete, move, or rename any image files that are in the camera’s built-in memory or on its memory card. Doing so can cause problems with the camera’s image management data, which will make it impossible to play back images on the camera and can drastically alter remaining memory capacity. - Page 52 Windows 10 users: Click “Start” and then “Explorer”. Next, in the sidebar, click “PC”. Windows 8.1 users: Click “Desktop” and then “Explorer”. Windows 7 users: Click “Start” and then “Computer”. Double-click “Removable Disk”. • Your computer recognizes the memory card loaded in the camera (or built-in memory if there is no card) as a removable disk.
- Page 53 . To view images you copied to your computer Double-click the copied “DCIM” folder to open it. Double-click the folder that contains the images you want to view. Double-click the image file you want to view. • For information about file names, see “Memory Folder Structure” on page 58. .
-
Page 54: Using The Camera With A Macintosh
Using the Camera with a Macintosh Operating When you want to do this: Required Software System Version Save images to your Macintosh and view them OS X Installation not required. there manually Save images to your Photos or iPhoto, which comes Macintosh automatically/ OS X bundled with some Macintosh... - Page 55 . To connect the camera to your computer and save files Hold down the [POWER] button for about two seconds to turn off power, and then remove the cover (page 12). Next, use the micro USB cable [USB] port that comes with the camera to connect it to your computer’s USB port.
- Page 56 . To view copied images Double-click the camera’s drive icon. Double-click the “DCIM” folder to open it. Double-click the folder that contains the images you want to view. Double-click the image file you want to view. • For information about file names, see “Memory Folder Structure” on page 58. .
-
Page 57: Files And Folders
Folders Folders are named from 100CASIO to First folder name: 999CASIO. 1 00 CASIO There can be up to 900 folders in memory. Serial number (3 digits) • You can view folder and file names on your computer. • The total number of folders and files allowed depends on the image size and quality, and capacity of the memory card being used for storage. -
Page 58: Memory Card Data
File System (DCF). . About DCF The following operations are supported for DCF-compliant images. Note, however, that CASIO makes no performance guarantees concerning these operations. • Transferring this camera’s DCF-compliant images to another manufacturer’s camera and view them. • Printing this camera’s DCF-compliant images on another manufacturer’s printer. -
Page 59: Appendix
• The battery is intended for use with a CASIO Digital Camera only. Use with any other device creates the risk of the battery damage, or deterioration of battery performance and service life. - Page 60 DANGER • Failure to observe any of the following precautions creates the risk of battery overheating, fire, and explosion. – Never use or leave the battery near open flame. – Do not expose the battery to heat or fire. – Make sure the battery is oriented correctly when charging it. –...
- Page 61 Also, remove the battery from the camera, taking care to protect yourself against burn injury. 3. Contact your retailer or nearest CASIO authorized service center. . Keep Away From Fire • Never expose the camera to fire, which can cause it to explode and creates the risk of fire and personal injury.
- Page 62 Also, remove the battery from the camera, taking care to protect yourself against burn injury. 3. Contact your retailer or nearest CASIO authorized service center. . Disassembly and Modification • Never try to take it apart or modify it in any way. Doing so creates the risk of electric shock, burn injury, and other personal injury.
- Page 63 Also, remove the battery from the camera, taking care to protect yourself against burn injury. 3. Contact your retailer or nearest CASIO authorized service center. . Memory Cards • Memory cards are small and present a risk of accidentally being swallowed by infants and young children.
- Page 64 . Rechargeable Battery • If battery charging does not end normally within the specified charging time, stop charging anyway and contact your local CASIO authorized service center. Continued charging creates the risk of battery overheating, fire, and explosion.
- Page 65 CAUTION . Locations To Be Avoided • Never leave the camera in any of the following types of locations. Doing so creates the risk of fire and electric shock. – Areas subject to large amounts of humidity or dust – Food preparation areas or other locations where oil smoke is present –...
-
Page 66: Shock Resistant, Splashproof, Dustproof
IMPORTANT! • The shock resistance, splashproofing, and dustproofing of this product are based on CASIO test results, and do not constitute any guarantee that the product will perform, will not be damaged, or will not malfunction under such conditions. . Precautions before Underwater Use This camera can be used to shoot images underwater up to a depth of 50.0 meters... - Page 67 • Check the contact surfaces of the cover gaskets for dirt, sand, and any other foreign matter. Clean contact surfaces by wiping them with a soft, clean, dry cloth. Note that a single strand of hair or a single grain of sand can allow water to get into the camera.
- Page 68 • In order to maintain splashproofing, replacement of the camera’s gaskets is recommended once each year. Note that you will be charged for gasket replacement. Contact a CASIO authorized service center or your original retailer for gasket replacement. Appendix...
- Page 69 • CASIO COMPUTER CO., LTD. shall not be held liable for any accident that may occur while the camera is being used underwater. • CASIO COMPUTER CO., LTD. shall not be held liable for any damages or for any accident (personal injury, etc.) that occurs while using the camera.
-
Page 70: Precautions During Use
Precautions During Use . Data Error Precautions Your digital camera is manufactured using precision digital components. Any of the following creates the risk of corruption of data in camera memory. – Removing the memory card while the camera is performing some operation –... - Page 71 The radio waves that are used to send and receive data can be intercepted by third parties. Unauthorized access CASIO COMPUTER CO., LTD. shall be held in no way liable for any unauthorized access and/or use of the access point equipped on this product if the product is ever lost or stolen.
- Page 72 Use of this camera in a country or area other than where it was originally purchased runs the risk of being in violation of local radio laws and other laws. Note that CASIO COMPUTER CO., LTD. shall not be held in any way liable for any such violations.
- Page 73 Note that CASIO COMPUTER CO., LTD. shall not be held liable for use of this product in any way that infringes on the copyrights of others or that violates copyright laws.
- Page 74 • The Bluetooth word mark and logos are registered trademarks owned by ® Bluetooth SIG, Inc. and any use of such marks by CASIO COMPUTER CO., LTD. is under license. Other trademarks and trade names are those of their respective owners.
- Page 75 . Open Source Software This product includes software that is licensed under the license conditions below. OpenVG 1.1 Reference Implementation Copyright (c) 2007 The Khronos Group Inc. Permission is hereby granted, free of charge, to any person obtaining a copy of this software and /or associated documentation files (the "Materials "), to deal in the Materials without restriction, including without limitation the rights to use, copy, modify, merge, publish, distribute, sublicense, and/or sell copies of the Materials,...
- Page 76 and distribution as defined by Sections 1 through 9 of this document. "Licensor" shall mean the copyright owner or entity authorized by the copyright owner that is granting the License. "Legal Entity" shall mean the union of the acting entity and all other entities that control, are controlled by, or are under common control with that entity.
- Page 77 "Contributor" shall mean Licensor and any individual or Legal Entity on behalf of whom a Contribution has been received by Licensor and subsequently incorporated within the Work. 2. Grant of Copyright License. Subject to the terms and conditions of this License, each Contributor hereby grants to You a perpetual, worldwide, non-exclusive, no-charge, royalty-free, irrevocable copyright license to reproduce, prepare Derivative Works of, publicly display, publicly perform, sublicense, and distribute the...
- Page 78 within a display generated by the Derivative Works, if and wherever such third-party notices normally appear. The contents of the NOTICE file are for informational purposes only and do not modify the License. You may add Your own attribution notices within Derivative Works that You distribute, alongside or as an addendum to the NOTICE text from the Work, provided that such additional attribution notices cannot be construed as modifying the License.
- Page 79 9. Accepting Warranty or Additional Liability. While redistributing the Work or Derivative Works thereof, You may choose to offer, and charge a fee for, acceptance of support, warranty, indemnity, or other liability obligations and/or rights consistent with this License. However, in accepting such obligations, You may act only on Your own behalf and on Your sole responsibility, not on behalf of any other Contributor, and only if You agree to indemnify, defend, and hold each Contributor harmless for any liability...
- Page 80 See the License for the specific language governing permissions and limitations under the License. Apache License Version 2.0, January 2004 http://www.apache.org/licenses/ TERMS AND CONDITIONS FOR USE, REPRODUCTION, AND DISTRIBUTION 1. Definitions. "License" shall mean the terms and conditions for use, reproduction, and distribution as defined by Sections 1 through 9 of this document.
- Page 81 to that Work or Derivative Works thereof, that is intentionally submitted to Licensor for inclusion in the Work by the copyright owner or by an individual or Legal Entity authorized to submit on behalf of the copyright owner. For the purposes of this definition, "submitted" means any form of electronic, verbal, or written communication sent to the Licensor or its representatives, including but not limited to communication on electronic mailing lists, source code control systems,...
- Page 82 attribution notices from the Source form of the Work, excluding those notices that do not pertain to any part of the Derivative Works; and (d) If the Work includes a "NOTICE" text file as part of its distribution, then any Derivative Works that You distribute must include a readable copy of the attribution notices contained within such NOTICE file, excluding those notices that do not pertain to any part of the Derivative Works, in at least one...
- Page 83 8. Limitation of Liability. In no event and under no legal theory, whether in tort (including negligence), contract, or otherwise, unless required by applicable law (such as deliberate and grossly negligent acts) or agreed to in writing, shall any Contributor be liable to You for damages, including any direct, indirect, special, incidental, or consequential damages of any character arising as a result of this License or out of the use or inability to use the...
-
Page 84: Power Supply
If problems persist after you perform the above steps or if the battery fails to charge after 5 hours, it could mean that the battery is faulty. Contact your nearest CASIO authorized service center. Appendix... -
Page 85: Battery Precautions
Battery Precautions . Precautions During Use • Operation provided by a battery under cold conditions is always less than operation under normal temperatures. This is due to the characteristics of the battery, not the camera. • Charge the battery in an area where the temperature is within the range of 15°C to 35°C (59°F to 95°F). -
Page 86: Using A Memory Card
Using a Memory Card See page 20 for information about supported memory cards and how to load a memory card. . Using a Memory Card • If a memory card starts to behave abnormally during image playback, you can restore normal operation by reformatting it (page 29). However, it is recommended that you always take along multiple memory cards whenever using the camera far away from the home or office. -
Page 87: Reset Initial Default Settings
Reset Initial Default Settings The tables in this section show the initial default settings after a reset operation is performed with the G’z EYE app or the Controller With LCD. • A dash (–) indicates an item whose setting is not reset or an item for which there is no reset setting. -
Page 88: When Things Don't Go Right
Check to make sure that the battery is charged and try turning power on again a number of times. If power still does not turn on, contact your retailer or a CASIO authorized service center. Power will not turn Remove the battery from the camera and then reload them. - Page 89 Problem Possible Cause and Recommended Action There is digital Sensitivity may have been increased automatically for a dark noise in images. subject, which increases the chance of digital noise. Use a light or some other means to illuminate the subject. A recorded image Camera power may have been turned off before the save was not saved.
-
Page 90: [System] Lamp
Problem Possible Cause and Recommended Action Other Images cannot be 1)The USB cable may not be connected securely to the transferred over a camera. Check all connections. USB connection. 2)If the camera is not turned on, turn it on. 3)Your computer may not be able to recognize the camera if you connect via a USB hub. -
Page 91: Number Of Snapshots/Movie Recording Time
Number of Snapshots/Movie Recording Time Snapshot microSD Image Size Approximate Built-in Memory Memory Card (Pixels) File Size Recording Capacity Recording Capacity 6M (3008 2256) 4.10 MB 2508 Movies Maximum Built-in Recording File Size of Maximum File Image Size / Approximate Data Memory Time with 1-minute... - Page 92 Built-in memory capacity after formatting (Approximately 14.8MB) When using a 16GB microSDHC memory card (SanDisk Corporation). Number of image and recording time values depend on the memory card you are using. You can use the G’z EYE app or a separately available controller with LCD to configure settings.
-
Page 93: Specifications
Specifications File Format Snapshots: JPEG (Exif Version 2.3), DCF 2.0 standard Movies: MOV format, H.264/AVC standard, IMA-ADPCM (stereo) Recording Media Built-in Memory (Image Storage Area: 14.8MB) microSD, microSDHC, microSDXC Recorded Image Sizes Snapshots: 6M (3008 2256) Movies: FHD (1920 1080 30 fps), STD (640 480 30 fps* HS240 (512 384 240 fps*... - Page 94 • Recording Medium: 16GB microSDHC memory card (SanDisk Corporation) In accordance with CIPA (Camera and Imaging Products Association) standards In accordance with CASIO standards • The above values are based a new battery, starting from a full charge. Repeated charging shortens battery life.
- Page 95 . Rechargeable Lithium Ion Battery (NP-150) Rated Voltage 3.7 V Rated Capacitance 950 mAh Operating Temperature 0 to 40°C (32 to 104°F) Requirements Dimensions 34.2 (W) 39.8 (H) 6.9 (D) mm (1.35" (W) 1.57" (H) 0.27" (D)) (excluding projections) Weight Approximately 20 g (0.7 oz) Appendix...
- Page 96 – Bluetooth LE(2.4GHz)≤8.5dBm Hereby, Casio Europe GmbH, Casio-Platz 1, 22848 Norderstedt, Germany, declares that the radio equipment type Digital Camera Model GZE-1 is in complaiance with Directive 2014/53/EU. The full text of the EU declaration of conformity is available at the following internet address:http://doc.casio.com...
- Page 97 GZE-1 Trade Name: CASIO Responsible party: Industrial Handheld Division Casio America, Inc. Address: 570 Mt. Pleasant Avenue, Dover, New Jersey 07801, USA Telephone number: 973-361-5400 This device complies with Part 15 of the FCC Rules. Operation is subject to the...
- Page 98 CASIO COMPUTER CO., LTD. 6-2, Hon-machi 1-chome Shibuya-ku, Tokyo 151-8543, Japan MA1711-A 2017...
Need help?
Do you have a question about the GZE-1 and is the answer not in the manual?
Questions and answers