Table of Contents
Advertisement
Quick Links
GV-20 User Documentation Files
• The GV-20 user documentation available here has been divided among a number of files in order to facilitate downloading. You
can download the entire manual, or you can save time by using the table of contents below to find specific information and then
download only the files you need.
File 1 (File name : gv20_e_1.pdf)
2
INTRODUCTION
Unpacking .................................................................... 2
Quick Reference .......................................................... 6
Getting Ready
Recording an Image
Playback
Deleting Images
Features ...................................................................... 11
Water Resistance and Dust Resistance .................... 12
Operating Environment
Operating Precautions
Wipe the camera dry after it becomes wet.
Location Precautions
General Precautions
Inspecting the Cover O-rings
If you find dirt on an O-ring...
Before putting your camera away after using it...
Precautions ................................................................ 18
General Precautions
Data Error Precautions
Operating conditions
Condensation
About the camera's backlight...
Lens Precautions
22
GETTING ACQUAINTED
General Guide ............................................................ 22
Front
Back
Terminals and Ports
Bottom
Monitor Screen Indicators .......................................... 25
Changing the Contents of the Monitor Screen
Indicator Lamps .......................................................... 27
Using the Bundled Accessories ................................. 28
Attaching the Strap
Attaching the Lens Cap
Power Requirements ................................................. 30
Loading Batteries
Battery Handling Precautions
Low Battery Indicator
Using AC Power
Turning the Camera On and Off
Power Save Settings
Memory Cards ............................................................ 38
Inserting a Memory Card into the Camera
Removing a Memory Card from the Camera
Formatting a Memory Card
Memory Card Precautions
Setting the Current Date and Time ............................ 42
Setting the Date and Time
Selecting the Date Format
File 2 (File name : gv20_e_2.pdf)
45
RECORDING IMAGES
Recording a Simple Snapshot ................................... 45
About the REC Mode Monitor Screen
Recording Precautions
6
Image Recording when Batteries are Low
7
Using Zoom ................................................................ 47
8
9
Using the Flash .......................................................... 48
Flash Status Indicators
Precautions when Using Flash
Recording Macro Images ........................................... 50
13
13
Using the Optical Viewfinder ...................................... 51
14
Recording Consecutive Images
14
(Continuous Shutter Mode) ........................................ 52
15
16
Recording with the self-timer ..................................... 53
16
Recording an Image Using a
17
Best Shot Mode Scene .............................................. 53
18
Recording a Movie (Movie Mode) .............................. 55
19
Specifying Image Size and Quality ............................ 56
19
20
Exposure Compensation ............................................ 57
20
Selecting White Balance ............................................ 58
20
61
PLAYBACK
Basic Playback Operation .......................................... 60
Playing a Movie .......................................................... 61
22
23
Enlarging the Playback Image ................................... 61
24
Displaying the 9-image View ..................................... 62
24
Selecting a Specific Image in the 9-image View
27
65
DELETING IMAGES
Deleting the Displayed Image .................................... 64
28
Deleting All Images .................................................... 65
29
30
67
MANAGING IMAGES
34
34
Folders and Files ........................................................ 66
35
Folders
37
Files
37
DPOF .......................................................................... 67
To configure printing for a particular image
38
To print all images
39
41
PRINT Image Matching .............................................. 69
42
71
OTHER SETTINGS
43
44
Changing the Display Language ............................... 70
Turning the Confirmation Beep On and Off ............... 70
Specifying the Opening Screen ................................. 71
Selecting the USB Mode ............................................ 71
1
46
46
47
49
49
63
66
66
67
68
Advertisement
Table of Contents

Related Manuals for Casio GV-20


Summary of Contents for Casio GV-20
- Page 1 GV-20 User Documentation Files • The GV-20 user documentation available here has been divided among a number of files in order to facilitate downloading. You can download the entire manual, or you can save time by using the table of contents below to find specific information and then download only the files you need.
-
Page 2: Connecting To External Equipment
CONNECTING TO EXTERNAL EQUIPMENT Transferring Images to a Computer ......73 USB Connection To connect to a computer Disconnecting the USB Cable Using a Memory Card to Transfer Image Data ..75 Memory Card Data DCF Protocol Memory Card File Structure Image Files Supported by the Camera Precautions when Using a Memory Card on a Computer... -
Page 3: Digital Camera
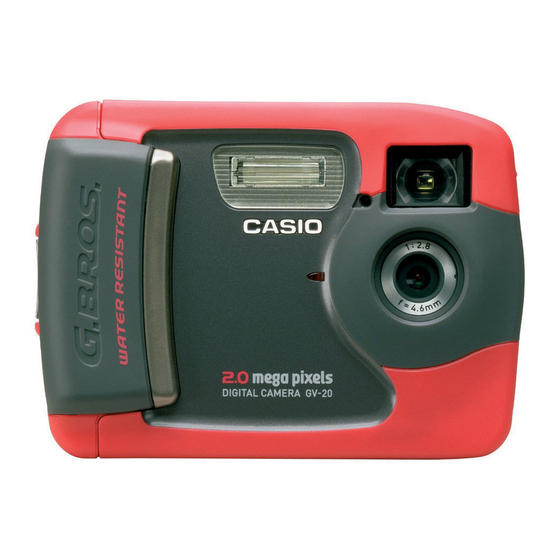
Digital Camera GV-20 User’s Guide Thank you for purchasing this CASIO compact type digital camera with built-in color monitor you can use for both image recording and playback. Before using this camera, be sure to read the Safety Precautions contained in this User’s Guide, and keep it in a safe place for future reference. -
Page 4: Unpacking
INTRODUCTION INTRODUCTION Unpacking Check to make sure that all of the items shown below are included with your camera. If something is missing, contact your dealer as soon as possible. Camera Memory card (8 MB CompactFlash card ) Lens cap/cap holder Loaded in the camera when you purchase it. -
Page 5: Table Of Contents
INTRODUCTION GETTING ACQUAINTED Contents General Guide ............22 Front INTRODUCTION Back Terminals and Ports Unpacking ..............2 Bottom Quick Reference ............6 Monitor Screen Indicators .......... 25 Getting Ready Changing the Contents of the Monitor Screen Recording an Image Indicator Lamps ............27 Playback Deleting Images Using the Bundled Accessories ......... - Page 6 INTRODUCTION RECORDING IMAGES PLAYBACK Recording a Simple Snapshot ........45 Basic Playback Operation .......... 60 About the REC Mode Monitor Screen Playing a Movie ............61 Recording Precautions Enlarging the Playback Image ........61 Image Recording when Batteries are Low Displaying the 9-image View ........
- Page 7 INTRODUCTION OTHER SETTINGS REFERENCE Changing the Display Language ....... 70 SET UP Menu ............81 Turning the Confirmation Beep On and Off ....70 Troubleshooting ............82 Messages Specifying the Opening Screen ......... 71 Specifications ............. 87 Selecting the USB Mode ..........71 CONNECTING TO EXTERNAL EQUIPMENT Transferring Images to a Computer ......
-
Page 8: Quick Reference
INTRODUCTION Quick Reference Getting Ready Load batteries and the memory card. (pages 30, 38) * Check for and wipe any sand, dirt, or other foreign matter from the O-ring and its contact surfaces. Set the current time and date. (page 42) -
Page 9: Recording An Image
INTRODUCTION Recording an Image (page 45) Point the camera at the subject and use the monitor screen or optical viewfinder to Press the shutter compose the image. release button. Align the dial with Move the POWER (snapshot mode). ON/OFF switch to ON. -
Page 10: Playback
INTRODUCTION Playback (page 60) Use [+] (forward) and [–] (back) to scroll through the images. Align the dial with (play mode). Move the POWER ON/OFF switch to ON. -
Page 11: Deleting Images
INTRODUCTION Deleting Images (page 64) Press WB Press the shutter release button to delete Use [+] and [–] to the image. display the image you want to delete. Align the dial with Check to make sure you (play mode). really want to delete the currently displayed image. - Page 12 • The contents of this manual are subject to change others. without notice. • CASIO COMPUTER CO., LTD. assumes no responsi- bility for any damage or loss resulting from the use of this manual. • CASIO COMPUTER CO., LTD. assumes no responsi- bility for any loss or claims by third parties which may arise through the use of the GV-20.
-
Page 13: Features
INTRODUCTION • Fixed focus lens for quick operation Features Fixed focus eliminates the need for lens movement, which • Water-resistant and dust-resistant shortens startup time and shooting time. Zoom operations Your camera conforms to IEC 60529 [Degrees of protec- are performed digitally. tion provided by enclosures (IP Code)] IP66/IP67. -
Page 14: Water Resistance And Dust Resistance
INTRODUCTION • EPSON PRINT Image Matching Water Resistance and Dust Resistance This product supports PRINT Image Matching. Combina- tion of use PRINT Image Matching and PRINT Image The camera is designed to conform to the following water resistance and dust resistance standard. However, perfor- Matching 2 enabled digital still cameras, printers and soft- mance is not guaranteed under the conditions described be- ware help photographers to produce images which are... -
Page 15: Operating Environment
INTRODUCTION Operating Environment This is not an underwater camera! Since this camera is water-resistant, dust-resistant, and Do not use this camera in shock-resistant, you can handle it while your hands are wet, areas where it is exposed to you can wash it with water, and even use it in the areas listed high water pressure, never below. -
Page 16: Wipe The Camera Dry After It Becomes Wet
INTRODUCTION Wipe the camera dry after it becomes wet. • Washing The camera can be washed with a relatively weak stream • Water remaining on the camera after it becomes wet can clean water from a standard household tap under the fol- collect in the seams between controls and the camera lowing conditions. -
Page 17: General Precautions
O-ring replacement. Contact your nearest cover O-ring can result in incomplete sealing and problems authorized CASIO maintenance service provider to have when the camera is immersed in water. Whenever closing the O-rings replaced. -
Page 18: Inspecting The Cover O-Rings
You should also have O-rings Contact replaced every two years, regardless of their condi- surface tion. Take your camera to your nearest CASIO main- O-ring tenance service provider to have O-rings replaced. Contact Note that you will be charged for O-ring replacement. -
Page 19: Before Putting Your Camera Away After Using It
• Never try to wash the camera in a washing machine. IMPORTANT! • If your camera becomes very dirty, contact your near- est authorized CASIO maintenance service provider. • Use plain tap water that is 30°C or lower to wash the camera. -
Page 20: Precautions
After making sure there is no more smoke com- • Never try to take pictures or use the built-in display while ing from the camera, take it to your nearest CASIO service operating a motor vehicle or while walking. Doing so cre- provider for repair. -
Page 21: Data Error Precautions
INTRODUCTION • Never open the battery compartment cover, disconnect the Operating conditions AC adaptor from the camera or unplug it from the wall • This camera is designed for use in temperatures ranging socket while recording images. Doing so will not only make from 0°C to 40°C. -
Page 22: Condensation
• Should the LCD image appear abnormally dark, take the ditions that might cause condensation. camera to your dealer or an authorized CASIO service pro- • To keep condensation from forming, place the camera into vider to have the light source replaced. Note that you will a plastic bag before moving it into a location that is much be charged for this replacement. -
Page 23: Declaration Of Conformity
(2) this device must accept any interference received, in- cluding interference that may cause undesired operation. Model Number: GV-20 Trade Name: CASIO COMPUTER CO.,LTD. NOTICE Responsible party: CASIO INC. This equipment has been tested and found to comply with the limits for Address: 570 MT. -
Page 24: Contents
GETTING ACQUAINTED GETTING ACQUAINTED This section contains important information you should know when trying to operate the camera. General Guide The following illustrations show the names of each component, button, and switch on the camera. Front Normal/Macro selector [+] / [–] buttons (page 50) Shutter release button... -
Page 25: Back
GETTING ACQUAINTED (Flash/Nine (Zoom/ Back Image) button Enlarge) button (pages 48, 62) (pages 47, 61) Operation lamp (page 28) (White Balance/ Delete) button (pages 58, 64) Viewfinder (page 51) Battery cover (page 30) Monitor screen (page 25) Battery cover knob (page 30) POWER ON/OFF switch... -
Page 26: Terminals And Ports
GETTING ACQUAINTED Terminals and Ports Bottom Tripod screw hole USB port (pages 72, 73, 78) DC IN 6V terminal (page 35) Opening and Closing the Terminal Cover ! Open ! Close Terminal cover Pull here to open. release Terminal cover... -
Page 27: Monitor Screen Indicators
GETTING ACQUAINTED Monitor Screen Indicators The following describes the different indicators and markings that appear on the camera’s monitor screen. " Recording Modes This camera is equipped with the following recording modes: snapshot mode, continuous shutter mode, self-timer mode, movie mode, Best Shot mode Focus Mode indicator White balance indicator... -
Page 28: Play Mode
GETTING ACQUAINTED " Play Mode " SET UP Mode Playback zoom File number Quality F : Fine N : Normal Item Image size 1600 x1200 pixels 800 x 600 pixels Operation Date/Time guidance indicator Battery capacity... -
Page 29: Changing The Contents Of The Monitor Screen
GETTING ACQUAINTED Changing the Contents of the Monitor Screen Indicator Lamps Each press of DISP in a recording mode or the play mode The camera has three indicator lamps, an operation lamp, a changes the contents of the monitor screen as shown below. power lamp, and a self-timer lamp. -
Page 30: Using The Bundled Accessories
GETTING ACQUAINTED ! Operation Lamp Using the Bundled Accessories When the lamp is this: It means this: Attaching the Strap Flashing amber Flash unit is charging. Lit amber Flash is ready to fire. Attach the strap to the strap bar as shown in the illustration. Flashing green Movie is recording or self-timer countdown is in progress. -
Page 31: Attaching The Lens Cap
GETTING ACQUAINTED ! Using the Strap Attaching the Lens Cap The strap easily connects to and disconnects from the Attach the lens cap to the lens whenever you are not using buckle. The end of the strap also has a snap, which means the camera. -
Page 32: Power Requirements
GETTING ACQUAINTED Battery cover knob Slide the battery cover Power Requirements release in the direction Your camera features a two-way power supply that lets you indicated by the arrow. use either AA-size batteries or household AC current. A set of AA-size alkaline batteries is supplied with the cam- Rotate the battery era. - Page 33 • Whenever an O-ring becomes damaged or deformed, take your camera to the nearest authorized CASIO • Rotate the knob until the maintenance service provider to have it replaced. battery cover lock clicks Note that you will be charged for O-ring replacement.
- Page 34 GETTING ACQUAINTED " Battery Life Guidelines • Battery life is greatly affected by how much you use flash, zoom and other functions, and how long you leave power The battery life guideline values given below indicate the turned on. amount of time at standard temperature (25°C) until power automatically turns off due to battery failure.
- Page 35 GETTING ACQUAINTED " About rechargeable batteries The following examples show how alkaline battery life changes under different conditions. Use only the nickel-metal hydride batteries (NP-H3) that are available from your dealer as options for this camera. Proper Example 1: Intermittent use of the camera shortens battery camera operation is not guaranteed when other recharge- life.
-
Page 36: Battery Handling Precautions
GETTING ACQUAINTED " Do not expose batteries to direct heat or dis- Battery Handling Precautions pose of them by burning. Doing so can create the danger of explosion. " Incorrect use or handling of batteries can " Dead batteries are susceptible to leakage, cause them to leak or burst and create the which can cause serious damage to your cam- danger of serious damage to your camera. -
Page 37: Using Ac Power
GETTING ACQUAINTED Using AC Power Use the adaptor as shown below to power the camera from a AC Adaptor household power outlet. Before opening the terminal cover, carefully wipe any sand or moisture from the camera to ensure that none of it gets inside the camera. DC IN 6V (AC power terminal) Move the terminal cover release to the... - Page 38 Doing so creates the danger of fire and electric shock. • Should the cord of the AC adaptor become damaged (exposed internal wiring), request a replacement from an authorized CASIO ser- vice provider. A damaged AC adaptor cord creates the danger of fire or electric shock.
-
Page 39: Turning The Camera On And Off
GETTING ACQUAINTED Turning the Camera On and Off Power Save Settings Use the POWER ON/OFF switch to turn the camera on and Auto Power Off off. Auto Power Off conserves battery power by automatically turning off the camera if you do not perform any operation POWER ON/OFF for a preset amount of time. -
Page 40: Memory Cards
GETTING ACQUAINTED Inserting a Memory Card into the Camera Memory Cards This camera supports use of a CompactFlash memory card Before opening the Battery cover knob (CF TYPE I) for image storage. battery cover, carefully wipe any sand or IMPORTANT! moisture from the •... -
Page 41: Removing A Memory Card From The Camera
GETTING ACQUAINTED Notches Making sure that the Removing a Memory Card from the Camera notches in the memory card (indicating the back Before opening the battery of the card) are facing cover, carefully wipe any towards the front of the sand or moisture from the camera, carefully insert camera to ensure that none... - Page 42 • Should water or any other foreign matter get into the memory card slot, immediately turn off power, unplug the AC adaptor, and contact your dealer or nearest CASIO Service Provider. • Never eject the memory card while the card slot is fac- Remove the memory card ing downwards.
-
Page 43: Formatting A Memory Card
GETTING ACQUAINTED Formatting a Memory Card To do this: Select this option: Cancel the procedure without You can format a memory card to delete all of the data formatting stored on it. Format the memory card IMPORTANT! • Data deleted by a memory card format operation can- not be recovered! Be sure to carefully check and con- firm that you no longer need the data stored on a memory card before formatting it. -
Page 44: Memory Card Precautions
• Be sure to use only CASIO brand CompactFlash cards. The date and time kept by the camera’s clock is used for file Proper operation with other memory cards is not guaran- names, file information, and other purposes. -
Page 45: Setting The Date And Time
GETTING ACQUAINTED Setting the Date and Time To do this: Press this button: Move the highlighting between Shutter release settings Turn on the camera, and then align the dial Change the number at the currently with SET UP. [+] or [–] highlighted position Use [+] and [–] to select “DATE”... -
Page 46: Selecting The Date Format
GETTING ACQUAINTED Selecting the Date Format Turn on the camera, and then align the dial with SET UP. Use [+] and [–] to select “DATE” and then press the shutter release button. Use [+] and [–] to select “STYLE” and then press the shutter release button. -
Page 47: Recording Images
RECORDING IMAGES RECORDING IMAGES This section describes the basic procedure for recording an Compose the image on the monitor screen. image. Recording a Simple Snapshot Use the snapshot mode to record simple snapshots. Your camera automatically adjusts shutter speed and aperture settings in accordance with the brightness of the subject. -
Page 48: About The Rec Mode Monitor Screen
RECORDING IMAGES • When performing this About the REC Mode Monitor Screen step, take care so your • The image shown on the monitor screen in the REC mode fingers do not block the is a simplified image for composing purposes. The actual lens or any of the image is recorded in accordance with the image quality sensors. -
Page 49: Image Recording When Batteries Are Low
RECORDING IMAGES Image Recording when Batteries are Low Using Zoom Normally, the camera temporarily stores images you record You can use the digital zoom feature of your camera to zoom into buffer memory, and then transfers them to the memory in on the center of an image. -
Page 50: Using The Flash
RECORDING IMAGES Using the Flash To do this: Select this setting: Have the flash fire automatically The following describes various flash settings you can make No display when required (Auto Flash) to suit the type of image you are trying to record. Always fire the flash (Flash On) Turn off the flash (Flash Off) In a recording mode,... -
Page 51: Flash Status Indicators
RECORDING IMAGES Flash Status Indicators Precautions when Using Flash You can find out the current flash unit status by checking the • Make sure that you do not touch or block the flash or the monitor screen and the operation lamp. exposure sensor with your fingers. -
Page 52: Recording Macro Images
RECORDING IMAGES • The flash unit does not charge when battery power is too Recording Macro Images low to charge the flash. The (Flash Off) indicator ap- pears to warn you that the flash will not fire correctly, which You can select either normal or macro (close-up) recording using the selector located on the left side of the camera. -
Page 53: Using The Optical Viewfinder
RECORDING IMAGES • Selecting the macro mode causes the indicator to ap- Using the Optical Viewfinder pear on the monitor screen. • Normally, you should leave the Norma/lMacro selector set- Note the following points whenever you use the optical viewfinder to compose images. ting at When subject is Viewfinder frame... -
Page 54: Recording Consecutive Images (Continuous Shutter Mode)
RECORDING IMAGES The frame that is visible inside of the viewfinder indicates the Recording Consecutive Images image recorded at a distance of about three meters (9.8´). (Continuous Shutter Mode) When the subject is closer or further away than three meters The continuous shutter mode records images as long as you (9.8´), the recorded image will be different from what you see keep the shutter release button depressed. -
Page 55: Recording With The Self-Timer
RECORDING IMAGES Recording an Image Using a Best Shot Recording with the self-timer Mode Scene The self-timer counts down for 10 seconds before releasing Selecting one of the 18 Best Shot scenes automatically sets the shutter. up the camera for recording a similar type of image. Align the dial with (self-timer mode). - Page 56 RECORDING IMAGES Align the dial with (Best Shot mode). NOTES • Best Shot scenes were not recorded using this cam- era. They are provided as samples only. • Images recorded using a Best Shot scene may not produce the results you expected due to shooting con- ditions and other factors.
-
Page 57: Recording A Movie (Movie Mode)
RECORDING IMAGES IMPORTANT! Recording a Movie (Movie Mode) • The flash does not fire during movie recording. You can record movies up to 10 seconds long. • To view an AVI file under Windows 98 or 2000, install DirectX from the CD-ROM that comes bundled with •... -
Page 58: Specifying Image Size And Quality
RECORDING IMAGES IMPORTANT! Specifying Image Size and Quality • The values in the table above are all approximate, and You can specify the image size and image quality to suit the are affected by the types of images you record and type of image you are recording. -
Page 59: Exposure Compensation
RECORDING IMAGES [+]: Increases the EV value. A higher EV value is best Exposure Compensation used for light-colored subjects and backlit subjects. Whenever program AE, shutter speed priority AE, or aper- ture priority AE is selected as the exposure mode, you can adjust the exposure compensation value (EV value) within the range shown below in order to compensate for current lighting conditions. -
Page 60: Selecting White Balance
RECORDING IMAGES IMPORTANT! Selecting White Balance • When shooting under very dark or very bright condi- Selecting the right type of white balance can help to make tions, you may not be able to obtain satisfactory re- the colors of a subject appear most natural under the type of sults even after performing exposure compensation. - Page 61 RECORDING IMAGES None (auto) : White balance adjusted automatically. (Sunlight) : For shooting outdoors in sunlight (Shade) : For shooting outdoors in the shade (Light Bulb) : For shooting under reddish bulb lighting (Fluorescent) : For shooting under fluorescent lighting...
-
Page 62: Playback
PLAYBACK PLAYBACK You can use the camera’s built-in monitor screen to play NOTE back recorded images. • In order to allow for faster playback image scrolling, the image that initially appears on the monitor screen is a preview image, which is of somewhat lower quality Basic Playback Operation than the actual display image. -
Page 63: Playing A Movie
PLAYBACK Playing a Movie Enlarging the Playback Image Use the following procedure to play back a movie recorded Perform the following procedure to zoom the image currently in the movie mode. on the monitor screen. Align the dial with (play mode). Align the dial with (play mode). -
Page 64: Displaying The 9-Image View
PLAYBACK To do this: Press this button: Displaying the 9-image View Scroll the enlarged image to the The following procedure displays nine images on the monitor right. screen at the same time. Scroll the enlarged image to the [–] left. Align the dial with (play mode). -
Page 65: Selecting A Specific Image In The 9-Image View
PLAYBACK Selecting a Specific Image in the 9-image Use [+] and [–] to move the selection frame to the image you want to display, and then press View the shutter release button. • This displays the full-size version of the image you se- Display the 9-image screen. -
Page 66: Deleting Images
DELETING IMAGES DELETING IMAGES You can delete images individually (displayed image), or you Deleting the Displayed Image can delete images in memory that are not protected. Use the following procedure when you want to delete the image that is currently on the monitor screen. IMPORTANT! •... -
Page 67: Deleting All Images
DELETING IMAGES Press the shutter release button to delete the Deleting All Images image. The following procedure deletes all unprotected images cur- rently in memory. NOTE • The camera does not maintain open spaces in its Align the dial with SET UP. memory. -
Page 68: Managing Images
MANAGING IMAGES MANAGING IMAGES This section contains information about how images are Files stored in memory. It also explains how you can specify print The names assigned to files are based on the current date, settings. as shown below. Example: 26th image shot on November 7 Folders and Files Month Your camera automatically creates a directory of folders on... -
Page 69: Dpof
MANAGING IMAGES To configure printing for a particular im- DPOF The letters “DPOF” stand for “Digital Print Or- der Format”, which is a format for recording on Align the dial with SET UP. a memory card or other medium which digital camera images should be printed and how many copies of the image should be printed. -
Page 70: To Print All Images
MANAGING IMAGES If the memory card is already configured with To print all images DPOF settings, use [+] and [–] to select “RESET” or “EDIT” and then press the shutter Align the dial with SET UP. release button. Use [+] and [–] to select “PRINT ORDER” and To do this: Select this option: then press the shutter release button. -
Page 71: Print Image Matching
MANAGING IMAGES Use [+] and [–] to specify the number of copies PRINT Image Matching you want to print and then press the shutter release button. This product supports PRINT Image Matching. Combination of use PRINT Use [+] and [–] to specify whether or not you Image Matching and PRINT Image want to insert a date stamp into the image and Matching 2 enabled digital still cam-... -
Page 72: Changing The Display Language
OTHER SETTINGS OTHER SETTINGS Changing the Display Language Turning the Confirmation Beep On and Off You can use the following procedure to select one of six lan- Perform the following steps to turn the button confirmation guages as the display language. beep on and off. -
Page 73: Specifying The Opening Screen
OTHER SETTINGS Specifying the Opening Screen Selecting the USB Mode Use the following procedure to specify the format of the The USB port of your camera supports both mass storage opening screen that appears whenever the camera is turned class and image class. Use the following procedure to select on or off. - Page 74 • This camera does not support cable transfer of data with other CASIO digital cameras. • You cannot connect this camera to a computer’s serial port (RS-232C or RS-422).
-
Page 75: Transferring Images To A Computer
CONNECTING TO EXTERNAL EQUIPMENT IMPORTANT! Transferring Images to a Computer • The PC mode of this camera may not be compatible The CD-ROM that comes bundled with your camera con- with certain computers. tains a copy of Photo Loader, which is an application that lets •... - Page 76 CONNECTING TO EXTERNAL EQUIPMENT USB cable Import the images to the computer. Small connector (bundled) (Mini-B) After image data transfer is complete, discon- nect the USB cable. USB port • For details, see “Disconnecting the USB Cable” (page 75). USB port •...
-
Page 77: Disconnecting The Usb Cable
CONNECTING TO EXTERNAL EQUIPMENT Disconnecting the USB Cable Using a Memory Card to Transfer Image Data Windows XP, Me, or 98 In addition to the cable connections described in the previ- ous sections, you can also exchange data between your Disconnect the USB cable from the camera, and then turn off camera and computer by reading it directly from the memory the camera. -
Page 78: Memory Card Data
DCF camera or printed on a DCF printer. In addition to sup- To access the contents on the memory card on a computer port for the DCF protocol, your CASIO digital camera also that does not have a CompactFlash card slot or PC card slot,... -
Page 79: Memory Card File Structure
CONNECTING TO EXTERNAL EQUIPMENT Memory Card File Structure Image Files Supported by the Camera • Image files recorded with the CASIO GV-20 Digital Camera <¥DCIM¥> (Parent Folder) • DCF protocol image files 100_MMDD (Image Folder) MMDD0001.JPG (Image File) MMDD0002.JPG (Image File) * Certain DCF functions may not be supported. -
Page 80: Using The Camera As A Pc Camera
CONNECTING TO EXTERNAL EQUIPMENT • We also strongly recommend that after transferring data Using the Camera as a PC Camera from a memory card to other external storage you reformat the memory card and delete its contents before using it to You can connect your camera to a PC and use it as a PC camera for video conferencing, Web chatting, etc. -
Page 81: Other Requirements
CONNECTING TO EXTERNAL EQUIPMENT USB cable After you are finished, disconnect the USB Small connector (bundled) (Mini-B) cable. • For details, see “Disconnecting the USB Cable” (page USB port 75). Other Requirements USB port You also need to obtain and install video conferencing soft- Large connector ware in order to use the camera as a PC camera. -
Page 82: Pc Camera Mode Precautions
CONNECTING TO EXTERNAL EQUIPMENT PC Camera Mode Precautions • This camera is not supplied with power from your computer over the USB cable. The camera must be supplied power from its own power supply. • Make image size and frame rate settings on your com- puter. - Page 83 REFERENCE REFERENCE SET UP Menu The following shows the settings available on the SET UP menu. Item Settings DELETE / FORMAT DELETE ALL / FORMAT SIZE / QUALITY 1600 x 1200 / FINE 1600 x 1200 / NORMAL 800 x 600 / FINE 800 x 600 / NORMAL BUZZER ON / OFF...
-
Page 84: Troubleshooting
REFERENCE Troubleshooting Problem Possible Cause Action Power does not turn on. 1. Batteries are not oriented correctly. 1. Orient batteries correctly (page 30). 2. Batteries are dead. 2. Replace batteries with a full set of new ones (page 30). 3. Wrong AC adaptor type being used. 3. - Page 85 REFERENCE Problem Possible Cause Action Recorded images are not 1. Camera powers down before the save operation 1. If the indicator is on the monitor screen, re- saved in memory. is complete. place batteries with a full set of new ones as soon as possible.
- Page 86 REFERENCE Problem Possible Cause Action Cannot transfer images or 1. Wrong USB mode is selected. 1. Select the USB mode that suits the operation perform PC camera opera- you are trying to perform (page 71). tions after connecting to a 2.
-
Page 87: Messages
REFERENCE Messages Battery power is low. DIAL ERROR Indicates that the dial is positioned between two set- tings (icons). Correctly position the dial at the set- ting you want to use. NO IMAGES ON THIS There are currently no images in memory. MEMORY CARD! MEMORY FULL •... - Page 88 REFERENCE MEMORY CARD Some problem occurred with the memory card. Per- ERROR! form the following steps to correct it. RESTART CAMERA.. FORMAT IF THIS Important! MESSAGE APPEARS Performing this procedure deletes all files on the AGAIN., memory card. Before proceeding, try transferring FORMAT recoverable files to a computer or some other SHUTTER...
-
Page 89: Specifications
REFERENCE Movie (320 x 240 pixels) Specifications Storage Capacity Approximately 300KB/second Recording Time 10 seconds per movie Description ......Digital camera • The above figures are approximations only. Model ........GV-20 Image Deletion ....Single image; all images in memory (with Recorded Image image protection) File Format ...... - Page 90 REFERENCE Aperture ......F2.8, F9.7, auto switching Battery Life The values noted below indicate the number of hours before battery failure White Balance ....Automatic, fixed (4 modes) under normal operating temperature (25°C). These values are for reference only, and do not guarantee that any particular set of batteries actually will Self-timer ......
- Page 91 0.01% of the pixels can be expected to fail to light or to remain lit at all times. IMPORTANT! Please keep your manual and all information handy for future reference. CASIO ELECTRONICS CO., LTD. Unit 6, 1000 North Circular Road London NW2 7JD. U.K.
Need help?
Do you have a question about the GV-20 and is the answer not in the manual?
Questions and answers