
Related Manuals for Lycoming YO-233-B2A


Summary of Contents for Lycoming YO-233-B2A
- Page 1 Engine Maintenance Manual YO-233-B2A Engine February 2021 Part No. MM-YO-233-B2A (Supersedes Maintenance Manual LM-YO-233, dated June 2012) © 2021 Avco Corporation. All Rights Reserved.
- Page 2 Visit us Online: www.lycoming.com NOTE: Lycoming recommends that owners of this manual sign up for email notification on the Technical Publications page of our website https://www.lycoming.com/contact/knowledge-base/publications. By submitting your email address, you will receive notification whenever Lycoming publishes a new...
-
Page 3: Record Of Revisions
RECORD OF REVISIONS Revision Revision Date Revised By Revision Description Original Release of Maintenance Manual – MM-YO-233-B2A Original (Supersedes Maintenance Manual LM-YO-233, dated June 2012). MM-YO-233-B2A has been formatted and incorporates changes included in recently released and FAA approved maintenance manuals. - Page 4 YO-233-B2A Engine Maintenance Manual TEO-540-A1A Engine Maintenance Manual This page intentionally left blank. Record of Revisions © 2021 Avco Corporation. All Rights Reserved Page ii February 2021...
-
Page 5: Service Document List
NOTICE: The following is a list of service documents referenced in or incorporated into the information in this manual. Although the YO-233-B2A is not currently certified by the FAA it is recommended that all inspections, procedures, and guidelines in the latest revision of any service document (including any supplements) be followed to maintain continued airworthiness. - Page 6 YO-233-B2A Engine Maintenance Manual TEO-540-A1A Engine Maintenance Manual SERVICE DOCUMENT LIST (CONT.) Incorporation Number Subject Date ® S.L. L162 02/21 Heli-Coil Service Repair Kit S.L. L171 02/21 General Aspects of Spectrometric Oil Analysis S.L. L192 02/21 Spark Plug Fouling S.L. L197...
-
Page 7: Table Of Contents
25-Hour Engine Inspection for YO-233-B2A Engines............15 — 50-Hour Engine Inspection for YO-233-B2A Engines............18 — 100-Hour or Annual Engine Inspection for YO-233-B2A Engines ........24 — 400-Hour Engine Inspection for YO-233-B2A Engines ............29 — 500-Hour Engine Inspection for YO-233-B2A Engines ............ - Page 8 ......05-50 — Lightning Strike - After a lightning strike ................43 — Engine Overspeed ........................43 — Table 1 - Overspeed Values for YO-233-B2A Engines ............ 44 — Incorrect Fuel or Fuel Contamination ..................45 — Soaked Engine......................... 46 —...
- Page 9 YO-233-B2A Engine Maintenance Manual TEO-540-A1A Engine Maintenance Manual Subject Page Servicing - Replenishing ....................12-10 — Refueling ..........................59 — Oil Level Check ........................59 — Oil Consumption ........................60 — Oil Type and Viscosity ......................60 — Add Oil to the Engine ......................
- Page 10 YO-233-B2A Engine Maintenance Manual TEO-540-A1A Engine Maintenance Manual Subject Page Reciprocating Engine – Crankcase ................72-20 — Crankcase System Description....................93 — Crankcase Maintenance ......................93 — Crankcase Inspection Procedure ..................... 93 Reciprocating Engine – Cylinder Inspections ............72-30 —...
- Page 11 YO-233-B2A Engine Maintenance Manual TEO-540-A1A Engine Maintenance Manual Subject Page Reciprocating Engine – Lubrication ................72-50 — System Description ....................... 149 — Lubrication Maintenance ...................... 149 Reciprocating Engine – Accessory Drives ..............72-60 — 100-Hour Accessory Drive Inspection Procedure ..............151 Reciprocating Engine –...
- Page 12 YO-233-B2A Engine Maintenance Manual TEO-540-A1A Engine Maintenance Manual Subject Page Ignition System – Spark Plug Maintenance (Cont.) ..........74-20 — Clean the Spark Plugs ......................166 — Set Spark Plug Gap ....................... 166 — Spark Plug Rotation ......................166 —...
-
Page 13: Abbreviations And Acronyms
Foreign Object Debris ft.-lb Foot Pound (torque) Hour Inside Diameter in.-lb Inch Pound (torque) Inch, inches YO-233-B2A Engine Installation and Operation Manual Max. Maximum Methyl-Ethyl-Ketone Original Equipment Manufacturer Direct Drive Overhaul Manual Pounds per square inch Quart Revolutions per Minute... - Page 14 YO-233-B2A Engine Maintenance Manual TEO-540-A1A Engine Maintenance Manual SMOH Since Major Overhaul Supplemental Type Certificate Time Between Overhaul Top Dead Center Volt, Voltage Abbreviations and Acronyms © 2021 Avco Corporation. All Rights Reserved Page xii February 2021...
-
Page 15: Introduction
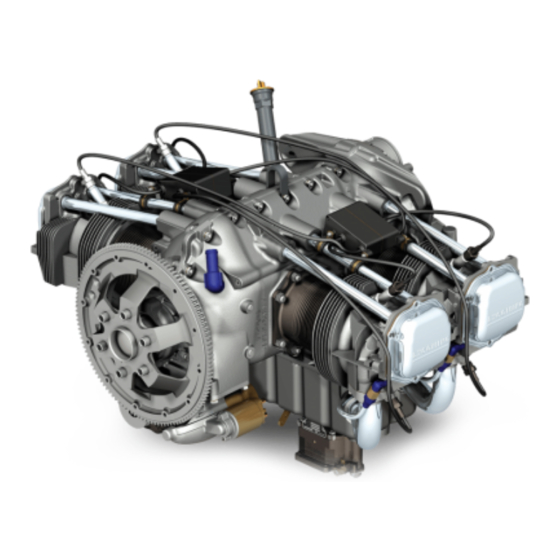
TEO-540-A1A Engine Maintenance Manual INTRODUCTION Engine Description The Lycoming YO-233-B2A Series Engine (Figure 1) is an ASTM F2339 compliant direct drive, four cylinder, carbureted, horizontally opposed, wet sump, air cooled engine. Refer to Figure 1. Figure 1 YO-233-B2A Series Engine Engine Model Nomenclature This table shows the definition of each letter and number in the basic engine model number. - Page 16 YO-233-B2A Engine Maintenance Manual TEO-540-A1A Engine Maintenance Manual Engine Serial Number Every engine sent from the factory is identified by a unique serial number. The engine serial number is identified on the engine data plate (Figure 2). Do not remove the engine data plate.
- Page 17 PROCEDURES IN THIS MANUAL MUST BE DONE BY QUALIFIED PERSONNEL WITH THE REQUISITE CERTIFICATIONS. Before you do maintenance on the YO-233-B2A engine, read this manual in its entirety. Obey all procedures and inspections in this manual. NOTICE: If you do not obey the maintenance procedures in this manual for this engine, you can void the engine warranty.
- Page 18 For reference, the Service Document List at the front of this manual shows the service documents referenced or included in this manual. List of Publications Refer to the latest revision of Service Letter No. L114 for a list of Lycoming Engines' publications. Introduction © 2021 Avco Corporation. All Rights Reserved...
- Page 19 Copyright This publication is a copyrighted work. All rights reserved by Lycoming Engines. Content in this manual cannot be changed or released as a reprint, electronic media output, or web communiqué without written permission from Lycoming Engines.
- Page 20 YO-233-B2A Engine Maintenance Manual TEO-540-A1A Engine Maintenance Manual This page intentionally left blank. Introduction © 2021 Avco Corporation. All Rights Reserved Page xviii February 2021...
-
Page 21: General
YO-233-B2A Engine Installation and Operation Manual. 2. List of Tools for Maintenance A. -
Page 22: Engine Overhaul Vs. Engine Rebuild
A. Engine overhaul – Completed by an authorized mechanic using technical data provided by Lycoming, overhauled to serviceable limits maintaining the engine total time in service. B. Engine rebuild – Completed only by Lycoming Engines at the factory using (design) data, returning a zero time in service engine to the customer. - Page 23 YO-233-B2A Engine Maintenance Manual TEO-540-A1A Engine Maintenance Manual D. Remove all traces of dirt, dust, debris and accumulated matter from parts. All parts must be clean before they are installed on the engine. For specific cleaning guidelines, refer to Chapter 05-30.
-
Page 24: General Engine Inspection Criteria
• Replace any bent, damaged, or stripped studs, refer to Appendix A 8. Requirements for Engine Maintenance A. These engines must be maintained using Lycoming Engines’ approved methods and procedures. B. Refer to the latest revision of Service Bulletin No. SB-240 for a list of parts must be replaced whenever they are removed. -
Page 25: Required Maintenance
Instruction No. SI-1059. 11. Painting the Engine and Engine Components Lycoming Engines recommends that the basic engine be painted as an assembly (without accessories, intake tubes, fluid lines, wiring harness). However, if it is necessary to paint an individual component: •... - Page 26 YO-233-B2A Engine Maintenance Manual TEO-540-A1A Engine Maintenance Manual Table 2 (Cont.) Paint Stripping and Painting Guidelines for Components Magnesium Parts (1) Clean all traces of oil and grease from the part using a neutral, non- corrosive, degreasing medium followed by a rinse.
-
Page 27: Limits And Clearances
YO-233-B2A Engine Maintenance Manual TEO-540-A1A Engine Maintenance Manual Table 2 (Cont.) Paint Stripping and Painting Guidelines for Components (4) Apply a very light sprayed coat of zinc chromate primer to a Cylinders (Cont.) maximum thickness of (0.0005 in. (0.0127 mm) on the cylinder flange. - Page 28 YO-233-B2A Engine Maintenance Manual TEO-540-A1A Engine Maintenance Manual B. Gear Inspection (1) Examine the involutes of the gear teeth for pitting and excessive wear. (2) If pit marks are found, discard the gear and replace it with a new one.
-
Page 29: Time Limits / Inspections
YO-233-B2A Engine Maintenance Manual TEO-540-A1A Engine Maintenance Manual 05-10 - TIME LIMITS General A. Engine maintenance inspections are based on time intervals as shown in the Engine Inspection Schedule. All inspections must be completed no later than 10 hours after the specified time interval for the inspection. - Page 30 YO-233-B2A Engine Maintenance Manual TEO-540-A1A Engine Maintenance Manual This page intentionally left blank. 05-10 © 2021 Avco Corporation. All Rights Reserved Page 10 February 2021...
-
Page 31: Time Limits / Maintenance Checks-Scheduled Maintenance Checks
YO-233-B2A Engine Maintenance Manual TEO-540-A1A Engine Maintenance Manual 05-20 - TIME LIMITS / MAINTENANCE CHECKS – SCHEDULED MAINTENANCE CHECKS NOTICE: Obey and follow inspection checklists and instructions in this chapter in addition to maintenance guidelines from the airframe manufacturer or component manufacturers. - Page 32 YO-233-B2A Engine Maintenance Manual TEO-540-A1A Engine Maintenance Manual FUEL AND OIL HOSES MUST BE INTACT AND HELD SECURELY IN PLACE TO PREVENT LEAKS DURING FLIGHT WHICH CAN CAUSE CATASTROPHIC ENGINE FAILURE. Examine fuel and oil hoses for secure attachment, leaks or wear. Tighten any loose connections.
- Page 33 YO-233-B2A Engine Maintenance Manual TEO-540-A1A Engine Maintenance Manual NOTICE: After it has been operated in dusty conditions, clean the induction filter. For servicing procedures refer to the airframe manufacturer’s instructions. (16) Examine all engine controls for general condition, full travel, and freedom of operation in accordance with the airframe manufacturer’s instructions.
-
Page 34: 10-Hour Initial Engine Inspection For Yo-233-B2A Engines
YO-233-B2A Engine Maintenance Manual TEO-540-A1A Engine Maintenance Manual 2. 10-Hour Initial Engine Inspection Complete this inspection after the first 10 hours of initial operation of the engine. Complete the 10-Hour Initial Engine Inspection Checklist for this inspection. WARNING BEFORE ANY ENGINE INSPECTION OR SERVICE PROCEDURE, MAKE SURE THE IGNITION SWITCH IS SET TO OFF AND THAT ALL POWER TO THE ENGINE IS DISCONNECTED. -
Page 35: 25-Hour Engine Inspection For Yo-233-B2A Engines
YO-233-B2A Engine Maintenance Manual TEO-540-A1A Engine Maintenance Manual 3. 25-Hour Initial and Routine Engine Inspection A. The purpose of this inspection is to measure the oil level and oil consumption, and identify any oil leaks. B. Complete the 25-Hour Engine Inspection at the following times: —... - Page 36 YO-233-B2A Engine Maintenance Manual TEO-540-A1A Engine Maintenance Manual 25-Hour Initial and Routine Engine Inspection Checklist (Cont.) Inspection Item Comments Results/Notes Done Refer to the section “Oil Calculate oil consumption. Consumption” in Chapter 12- If oil consumption has increased, complete the “Cylinder Borescope Inspection...
- Page 37 YO-233-B2A Engine Maintenance Manual TEO-540-A1A Engine Maintenance Manual 25-Hour Initial and Routine Engine Inspection Checklist (Cont.) Inspection Item Comments Results/Notes Done Examine the engine and Remove any dirt, particulate, nacelle for dirt, particulate, sand, or other contamination. sand, or other contamination.
-
Page 38: 50-Hour Engine Inspection For Yo-233-B2A Engines
YO-233-B2A Engine Maintenance Manual TEO-540-A1A Engine Maintenance Manual 4. 50-Hour Engine Inspection A. The purpose of this inspection is to make sure that the engine operates correctly and agrees with operational specifications. B. Complete the 50-Hour Engine Inspection after every 50 hours of engine operation or every 4 months, whichever occurs first. - Page 39 YO-233-B2A Engine Maintenance Manual TEO-540-A1A Engine Maintenance Manual 50-Hour Inspection Checklist (Cont.) Inspection Item Comments Results/Notes Done Look for any fuel or oil leaks before cleaning the engine. Clean the engine. Engine and Cowling Examine all hoses, lines, Tighten any loose hardware.
- Page 40 YO-233-B2A Engine Maintenance Manual TEO-540-A1A Engine Maintenance Manual 50-Hour Inspection Checklist (Cont.) Inspection Item Comments Results/Notes Done Champion Electronic Ignition System (Cont.) Make sure that the ignition harness mounting clamps are tight. Examine the Electronic Ignition System for damage. Refer to the Direct Drive Overhaul Manual.
- Page 41 YO-233-B2A Engine Maintenance Manual TEO-540-A1A Engine Maintenance Manual 50-Hour Inspection Checklist (Cont.) Inspection Item Comments Results/Notes Done Fuel System Refer to the “Fuel System Complete the Fuel System Inspection. Inspection Procedure” section In Chapter 73-10. Induction System Refer to the “Induction Complete the Induction System Inspection.
- Page 42 YO-233-B2A Engine Maintenance Manual TEO-540-A1A Engine Maintenance Manual 50-Hour Inspection Checklist (Cont.) Inspection Item Comments Results/Notes Done Engine Cylinders (Cont.) Examine the cylinders for heat If you find burnt paint on a damage i.e. burnt paint and cylinder, then you must damaged fins.
- Page 43 YO-233-B2A Engine Maintenance Manual TEO-540-A1A Engine Maintenance Manual 50-Hour Inspection Checklist (Cont.) Inspection Item Comments Results/Notes Done General Correct any discrepancies found before returning the engine to service. Complete the operational Look for leaks. Identify ground check in accordance and correct the cause of with Chapter 72-00.
-
Page 44: 100-Hour Or Annual Engine Inspection For Yo-233-B2A Engines
YO-233-B2A Engine Maintenance Manual TEO-540-A1A Engine Maintenance Manual 5. 100-Hour or Annual Engine Inspection A. The purpose of this inspection is to examine the engine, cylinders, hardware, and components. B. Complete the 100-Hour Engine Inspection after the first 100 hours of operation since the engine has been in service and then after every 100 hours of operation or during each annual aircraft inspection (whichever occurs first). - Page 45 YO-233-B2A Engine Maintenance Manual TEO-540-A1A Engine Maintenance Manual 100 Hour or Annual Engine Inspection Checklist (Cont.) Inspection Item Comments Results/Notes Done Ignition System (Cont.) Examine each spark plug for Refer to Chapter 74-20. chafing, corrosion, wear, and cracking. Refer to the “Examine the Examine the ignition lead Ignition Lead Routing”...
- Page 46 YO-233-B2A Engine Maintenance Manual TEO-540-A1A Engine Maintenance Manual 100-Hour or Annual Engine Inspection Checklist (Cont.) Inspection Item Comments Results/Notes Done Power Make sure the alternator belt Tighten all loose hardware per support bracket and mounting torque values in the latest are tight.
- Page 47 YO-233-B2A Engine Maintenance Manual TEO-540-A1A Engine Maintenance Manual 100-Hour or Annual Engine Inspection Checklist (Cont.) Inspection Item Comments Results/Notes Done Engine Accessories Refer to the “100-Hour Complete the Accessory Drive Inspection Accessory Drive Inspection Procedure” in Chapter 72-60. Examine engine controls for security, safety/locking devices, and full range of travel.
- Page 48 YO-233-B2A Engine Maintenance Manual TEO-540-A1A Engine Maintenance Manual 100-Hour or Annual Engine Inspection Checklist (Cont.) Inspection Item Comments Baffle Inspection Complete the Visual Baffle Inspection per instructions in the section “Visual Baffle Inspection Procedure” in Chapter 72-30. Record the results for each cylinder below.
-
Page 49: 400-Hour Engine Inspection For Yo-233-B2A Engines
YO-233-B2A Engine Maintenance Manual TEO-540-A1A Engine Maintenance Manual 6. 400-Hour Engine Inspection A. Complete the 400-Hour Engine Inspection after every 400 hours of operation since the engine has been in service. B. Complete the 400-Hour Engine Inspection Checklist for this inspection. - Page 50 YO-233-B2A Engine Maintenance Manual TEO-540-A1A Engine Maintenance Manual 400-Hour Engine Inspection Checklist (Cont.) Inspection Item Comments Results/Notes Done General Correct any discrepancies found before returning the engine to service. Complete the operational Look for leaks. Identify ground check in accordance and correct the cause of with Chapter 72-00.
-
Page 51: 500-Hour Engine Inspection For Yo-233-B2A Engines
YO-233-B2A Engine Maintenance Manual TEO-540-A1A Engine Maintenance Manual 7. 500-Hour Engine Inspection A. Complete the 500-Hour Engine Inspection after every 500 hours of operation since the engine has been in service. B. Complete the 500-Hour Engine Inspection Checklist for this inspection. -
Page 52: 1000-Hour Engine Inspection For Yo-233-B2A Engines
YO-233-B2A Engine Maintenance Manual TEO-540-A1A Engine Maintenance Manual 8. 1000-Hour Engine Inspection A. The purpose of this checklist is to complete the exhaust valve and guide inspection. B. Complete the 1000-Hour Engine Inspection after every 1000 hours of operation since the engine has been in service. -
Page 53: Cleaning
HANDLING OF CLEANING MATERIALS AND THE USE OF PERSONAL PROTECTIVE EQUIPMENT. NOTICE: YO-233-B2A Series engines can be equipped with aluminum or magnesium oil sump or accessory housing. Be aware of the type of components installed on your engine before cleaning, completing maintenance, or replacing parts. - Page 54 YO-233-B2A Engine Maintenance Manual TEO-540-A1A Engine Maintenance Manual Table 1 Cleaning Guidelines for Engine Components Component or Part Cleaning Agent* Guidelines Refer to the “Soft Carbon Removal” Accessory Housing procedure in this chapter Refer to the “Cylinder Cleaning” Mineral spirits (MIL-PRF-...
-
Page 55: Grit-Blasting
YO-233-B2A Engine Maintenance Manual TEO-540-A1A Engine Maintenance Manual Table 1 (Cont.) Cleaning Guidelines for Engine Components Component or Part Cleaning Agent* Guidelines Oil cooler bypass valve Mineral spirits, MIL-PRF- CAUTION 680 or equivalent DO NOT USE RAGS OR ANY LINT degreasing solvent CLOTH TO CLEAN THIS VALVE. -
Page 56: Soft Carbon Removal
YO-233-B2A Engine Maintenance Manual TEO-540-A1A Engine Maintenance Manual A. Grit-Blast Media CAUTION DO NOT USE SAND OR METALLICALLY ABRASIVE MATERIALS TO GRIT-BLAST. During grit-blasting, for general cleaning of components not subject to Non-Destructive Testing (NDT), only use mildly abrasive blast media such as 17-grit walnut shells or equivalent. -
Page 57: Hard Carbon Removal
ALUMINUM PARTS. NOTICE: If you are not sure if the component is steel or contains magnesium, contact Technical Support at Lycoming Engines at the phone numbers in the front of the manual. CAUTION DO NOT USE WIRE BRUSHES OR METAL SCRAPERS ON BEARINGS OR CONTACT SURFACES. -
Page 58: Piston Cleaning
YO-233-B2A Engine Maintenance Manual TEO-540-A1A Engine Maintenance Manual E. Clean the cylinder head fin areas thoroughly with mineral spirits (MIL-PRF-680), kerosene or equivalent, to remove all traces of grease, dirt, or other foreign matter, and air dry with compressed air. -
Page 59: Steel, Aluminum, Or Magnesium Parts Cleaning
OF THE METAL AND CAUSE OIL FOAMING. NOTICE: If you are not sure if the component is steel or contains magnesium or aluminum, contact Technical Support at Lycoming Engines at the phone numbers in the front of this manual. A. Put the component fully immersed in mineral spirits or equivalent in a bath tank. -
Page 60: Lead Deposit Removal
YO-233-B2A Engine Maintenance Manual TEO-540-A1A Engine Maintenance Manual 9. Lead Deposit Removal A. Refer to the sections “Grit-Blast Media” and “Grit-Blast Procedure” in this chapter: (1) If Non-Destructive Testing is not to be done on the component, grit-blast (the component with lead deposits) with 17 grit walnut shells or equivalent at 35 to 45 psi (241 to 310 kPa). -
Page 61: Cleaning Methods For Non-Destructive Testing
YO-233-B2A Engine Maintenance Manual TEO-540-A1A Engine Maintenance Manual G. There must not be any cleaning agent residue on the metal surfaces. Any chemical that could either corrode the metal or create hydrogen gas which can cause hydrogen embrittlement during service. - Page 62 YO-233-B2A Engine Maintenance Manual TEO-540-A1A Engine Maintenance Manual This page intentionally left blank. 05-30 © 2021 Avco Corporation. All Rights Reserved Page 42 February 2021...
-
Page 63: Time Limits / Maintenance Checks - Unscheduled Maintenance
3 seconds. If the duration and amount of overspeed is less than 3 seconds, no further maintenance actions are necessary. NOTICE: Refer to the engine specifications in the YO-233-B2A Engine Installation and Operation Manual for rated engine speed. - Page 64 10% in excess of more Removal” procedure in Chapter 72-00. maximum rated engine for any b. It is recommended the engine be sent to Lycoming Engines rpm for any duration length for customized evaluation. Include a description of the of time overspeed incident, amount of overspeed, and duration.
-
Page 65: Incorrect Fuel Or Fuel Contamination
AVOID FLIGHT IF A LOWER OCTANE OR INCORRECT GRADE OF FUEL OR JET FUEL. (DIFFERENT FROM FUEL IDENTIFIED IN APPENDIX A IN THE YO-233-B2A INSTALLATION & OPERATION MANUAL) IS USED TO OPERATE THE ENGINE. UNUSUAL DETONATION CAN INCREASE ENGINE TEMPERATURE AND PRESSURE WHICH CAN DAMAGE THE ENGINE. -
Page 66: Soaked Engine
(d) Remove the engine in accordance with the “Engine Removal Procedure” section in Chapter 72-00. (e) At this point, the operator can either: 1 Send the engine to Lycoming for customized evaluation and advisory on whether an engine repair or overhaul is necessary. 2 Complete the following in the field: Disassemble and clean the engine in accordance with the Direct Drive Overhaul Manual. -
Page 67: Engine On Fire Or Near A Fire
Direct Drive Overhaul Manual. G. Volcanic Ash/Particulate Contamination (1) Given the dynamic conditions of volcanic ash, Lycoming recommends that engines not be operated in areas where volcanic ash is seen in the air or on the ground. Ash on the ground and runways can inadvertently get into the engine compartment and cause engine damage during landing or take-off. - Page 68 Identify and repair the cause of rough operation. (6) In the event that the engine has been in particulate-laden atmospheres, especially volcanic ash clouds or with ash on the ground, Lycoming recommends that you complete the standard actions shown in Table 2.
-
Page 69: Valve Sticking
YO-233-B2A Engine Maintenance Manual TEO-540-A1A Engine Maintenance Manual Table 2 (Cont.) Action to Take in Volcanic Ash Conditions Maintenance after flight… Maintenance after 10 hours of operation or the next flight Examine the external condition of the engine, Examine the external condition of the engine, all... -
Page 70: Oil Starvation/Sudden Loss Of Oil Pressure
YO-233-B2A Engine Maintenance Manual TEO-540-A1A Engine Maintenance Manual — Cooling air baffles and/or baffle strip deterioration — Sudden cool down of the engine that can occur with a rapid descent with reduced power or engine shutdown without sufficient engine cooling. -
Page 71: Metal Contamination Of The Lubrication System
BASED UPON THE ACCUMULATED ENGINEERING, TECHNICAL AND HISTORICAL DATA AVAILABLE, LYCOMING ENGINES PROHIBITS STRAIGHTENING OR GRINDING OF BENT CRANKSHAFT FLANGES TO RESTORE MAXIMUM RUN-OUT SPECIFICATION AS NOTED IN THE LATEST REVISION OF SSP- 1776, TABLE OF LIMITS. - Page 72 NOTICE: The agency that return the aircraft to service is responsible for the decision to operate and engine that had a propeller strike. Lycoming Engines does not take responsibility for the decision to return the engine to service after a propeller strike.
- Page 73 YO-233-B2A Engine Maintenance Manual TEO-540-A1A Engine Maintenance Manual Engine Inspection Checklist After Propeller Strike for YO-233-B2A Series Engines (Cont.) Corrective Action Sequential Task Additional Information Done/Comments Complete grit-blast cleaning* of Make sure there is no dirt, debris, the oil sump and engine mount...
- Page 74 YO-233-B2A Engine Maintenance Manual TEO-540-A1A Engine Maintenance Manual Engine Inspection Checklist After Propeller Strike for YO-233-B2A Series Engines (Cont.) Corrective Action Sequential Task Additional Information Done/Comments CAUTION BASED UPON ACCUMULATED ENGINEERING, TECHNICAL, HISTORICAL DATA AVAILABLE, LYCOMING ENGINES PROHIBITS STRAIGHTENING OR GRINDING OF BENT CRANKSHAFT PROPELLER FLANGES TO RESTORE MAXIMUM RUN-OUT SPECIFICATION.
- Page 75 YO-233-B2A Engine Maintenance Manual TEO-540-A1A Engine Maintenance Manual Engine Inspection Checklist After Propeller Strike for YO-233-B2A Series Engines (Cont.) Corrective Action Sequential Task Additional Information Done/Comments Refer to the “Connecting 18. Complete a check of the Parallelism Measurement Rod/Parallelism/Squareness Check” in...
- Page 76 YO-233-B2A Engine Maintenance Manual TEO-540-A1A Engine Maintenance Manual Engine Inspection Checklist After Propeller Strike for YO-233-B2A Series Engines (Cont.) Additional Corrective Action Sequential Task Information Done/Comments 24. Complete a magnetic particle inspection† on Record test the following internal parts made of steel: results.
- Page 77 YO-233-B2A Engine Maintenance Manual TEO-540-A1A Engine Maintenance Manual Engine Inspection Checklist After Propeller Strike for YO-233-B2A Series Engines (Cont.) Additional Corrective Action Sequential Task Information Done/Comments 34. Replace all of the roller tappets with new or Refer to Chapter serviceable roller tappets.
-
Page 78: Non-Destructive Testing
C. Requirements for NDT Personnel Personnel who complete the Magnetic Particle and Fluorescent Penetrant Inspections on Lycoming engine components must be qualified and certified to a written procedure in accordance with NAS-410, Certification and Qualification of NDT personnel. Also, personnel who make the "accept"... -
Page 79: Servicing - Replenishing
TEO-540-A1A Engine Maintenance Manual 12-10 - SERVICING – REPLENISHING 1. Refueling A. Refer to Appendix A of the YO-233-B2A Engine Installation and Operation Manual for approved fuel. B. To prevent refueling with incorrect fuel: (1) Know what fuel grades are specified for your engine and their color code. -
Page 80: Oil Consumption
4. Oils Type and Viscosity The correct oils to be used in the YO-233-B2A series engines are in Appendix A of the YO- 233-B2A Engine Installation and Operation Manual. -
Page 81: Add Oil To The Engine
YO-233-B2A Engine Maintenance Manual TEO-540-A1A Engine Maintenance Manual Ashless dispersant oil contains additives, one of which has a viscosity stabilizing effect, which removes the tendency of the oil to thin out at high oil temperatures and thicken at low oil temperatures. The additives in these oils extend operating temperature range,... -
Page 82: Oil Change Procedure
YO-233-B2A Engine Maintenance Manual TEO-540-A1A Engine Maintenance Manual Table 2 Recommended Engine Oil Change and Oil Filter Replacement Schedule Before an engine is put in for short-term storage For engine preservation To put an engine into service after storage Before installation of a new or rebuilt engine... - Page 83 YO-233-B2A Engine Maintenance Manual TEO-540-A1A Engine Maintenance Manual (4) Remove the oil drain plug (Figure 2). (5) Connect oil drain hose if available. (6) Allow a few ounces of oil to drain and collect an oil sample. Refer to the “Oil Sample Collection”...
-
Page 84: Oil Filter Replacement
Add oil to the engine. Refer to the “Add Oil to the Engine” procedure in this chapter. Operate the engine under usual conditions until the oil has reached the “Desired Oil Temperature” listed in Appendix A of the YO-233-B2A Engine Installation and Operation Manual. -
Page 85: Oil Suction Screen Removal/Installation
NOTICE: For spectrometric oil analysis to be an effective diagnostic tool, Lycoming Engines recommends that oil samples must be taken and analyzed at each oil change. Contact Lycoming Engines’ Technical Support at the phone numbers at the front of this manual, • The cause of the metal contamination cannot be found •... -
Page 86: Visual Inspection Of The Oil Filter Element And Oil Suction Screen
YO-233-B2A Engine Maintenance Manual TEO-540-A1A Engine Maintenance Manual 13. Visual Inspection of the Oil Filter Element and Oil Suction Screen When metallic particles are found on a filter element or screen, a visual inspection of the metallic particles on the filter element or oil suction screen is to be done to help identify and narrow the root source of affected engine components subject to wear or damage. - Page 87 The type of material (Table 3), regardless of quantity, and/or the quantity and size of metallic particles (Table 4) can help determine the corrective action (Table 5) to be taken. NOTICE: Table 3 only applies to engines that use genuine Lycoming Parts. Table 3 Guidelines for Identification of Metal Particulates and Chips & Corrective Action...
- Page 88 YO-233-B2A Engine Maintenance Manual TEO-540-A1A Engine Maintenance Manual Table 3 (Continued) Guidelines for Identification of Metal Particulates and Chips & Corrective Action Possible Source of Metals/ Tests & Characteristics Origin on Lycoming Next Step Alloys Engine Chrome Piston rings Refer to Table 4 for...
- Page 89 YO-233-B2A Engine Maintenance Manual TEO-540-A1A Engine Maintenance Manual Table 4 Guidelines for Particle Quantity and Size on Oil Filter or Oil Suction Screen Corrective Action Condition (Table 5) 1 to 9 pieces of metal (1/16 in. (1.2 mm)) diameter or less)
- Page 90 Coordinate with an appropriate oil analysis laboratory to have the material analyzed. For factory new, factory rebuilt or factory overhauled Lycoming engines within their hourly or 12 year required TBO cycle, if directed, send the oil filter element and metallic material to Lycoming Engines for analyses.
-
Page 91: Recommended Corrective Action Options
Chapter 72-30. Complete the “Engine Removal” procedure in Chapter 72-00 and send the engine to Lycoming Engines or an authorized repair facility for customized evaluation. Complete the “Engine Disassembly” procedure in Chapter 72-05 and examine engine components per the applicable chapters in this manual to identify and correct the cause. - Page 92 YO-233-B2A Engine Maintenance Manual TEO-540-A1A Engine Maintenance Manual Table 5 (Continued) Recommended Corrective Action Options Per Chapter 74-20, remove and examine the spark plugs. Per Chapter 72-30, complete a “Cylinder Borescope Inspection” on the cylinders. Remove the propeller governor to determine if metallic particles have spread to other parts of the engine.
-
Page 93: Fault Isolation
Continue from the simplest to the most complex possible causes. NOTICE: The "Ref." column includes reference to "IOM" for the YO-233-B2A Engine Installation and Operation Manual, "OHM" refers to the Direct Drive Overhaul Manual. A numeric entry such as "72-00" refers to a chapter in this manual. -
Page 94: Ignition System - Spark Plug Maintenance (Cont.)
YO-233-B2A Engine Maintenance Manual TEO-540-A1A Engine Maintenance Manual Table 1 (Cont.) Fault Isolation Guide Problem Cause Corrective Action Ref. Engine will not start No fuel flow 1. Disconnect the fuel hose. or starts with Blockage in fuel hose 2. Complete the check of the fuel difficulty (Cont.) - Page 95 YO-233-B2A Engine Maintenance Manual TEO-540-A1A Engine Maintenance Manual Table 1 (Cont.) Fault Isolation Guide Problem Cause Corrective Action Ref. Poor idle cut-off Incorrect rigging of mixture Adjust in accordance with control linkage airframe manufacturer's instructions. Mixture control valve is scored...
- Page 96 YO-233-B2A Engine Maintenance Manual TEO-540-A1A Engine Maintenance Manual Table 1 (Cont.) Fault Isolation Guide Problem Cause Corrective Action Ref. Cracked engine mounts or Replace in accordance with Rough Idle (Cont.) defective mount bushings airframe and part manufacturer’s instructions. Engine mount bushing Install in accordance with manufacturer’s instructions.
- Page 97 YO-233-B2A Engine Maintenance Manual TEO-540-A1A Engine Maintenance Manual Table 1 (Cont.) Fault Isolation Guide Problem Cause Corrective Action Ref. Engine will not idle Low fuel pressure Replace fuel pump. unless the boost pump Very lean idle mixture 1. Enrich idle mixture. Refer is on (Cont.)
- Page 98 YO-233-B2A Engine Maintenance Manual TEO-540-A1A Engine Maintenance Manual Table 1 (Cont.) Fault Isolation Guide Problem Cause Corrective Action Ref. Mixture control not Faulty power switches Replace the switches. working Faulty wiring in the Replace the harness. harness Ignition Switch faulty Check for faults on the ignition switch circuits.
- Page 99 YO-233-B2A Engine Maintenance Manual TEO-540-A1A Engine Maintenance Manual Table 1 (Cont.) Fault Isolation Guide Problem Cause Corrective Action Ref. Engine will not turn Fouled spark plugs Remove and clean spark plugs static rpm or will not Incorrect fuel flow Look for blocked fuel filters.
- Page 100 YO-233-B2A Engine Maintenance Manual TEO-540-A1A Engine Maintenance Manual Table 1 (Cont.) Fault Isolation Guide Problem Cause Corrective Action Ref. Engine will not supply Oil pressure too low 1. Tighten fittings. the rated power 2. Replace oil lines, or hoses. (Cont.) 3.
- Page 101 YO-233-B2A Engine Maintenance Manual TEO-540-A1A Engine Maintenance Manual Table 1 (Cont.) Fault Isolation Guide Problem Cause Corrective Action Ref. Irregular or low oil Low engine oil level Complete a check of the oil 12-10 pressure level. Add oil. Air leaks Look for air leaks at the oil sump gasket.
- Page 102 YO-233-B2A Engine Maintenance Manual TEO-540-A1A Engine Maintenance Manual Table 1 (Cont.) Fault Isolation Guide Problem Cause Corrective Action Ref. Irregular or low oil Failed or failing Disassemble the engine for pressure (Cont.) bearings bearing inspection and replacement. NOTICE: Metal in the...
- Page 103 YO-233-B2A Engine Maintenance Manual TEO-540-A1A Engine Maintenance Manual Table 1 (Cont.) Fault Isolation Guide Problem Cause Corrective Action Ref. High oil consumption Crankcase ventilation Examine the plumbing and (Cont.) system positive breather tube. Oil level too high Do not fill above the maximum oil 12-10 sump capacity.
- Page 104 YO-233-B2A Engine Maintenance Manual TEO-540-A1A Engine Maintenance Manual Table 1 (Cont.) Fault Isolation Guide Problem Cause Correction Steps Ref. High oil temperature Insufficient cooling air Make sure the air inlet and (Cont.) outlet ducting to the oil cooler are operating correctly.
- Page 105 YO-233-B2A Engine Maintenance Manual TEO-540-A1A Engine Maintenance Manual Table 1 (Cont.) Fault Isolation Guide Problem Cause Correction Steps Ref. Replace hydraulic lifters with the High manifold Incorrect hydraulic correct part number for lifters. pressure at idler lifters were installed Refer to the latest revisions of (Cont.)
- Page 106 YO-233-B2A Engine Maintenance Manual TEO-540-A1A Engine Maintenance Manual Table 1 (Cont.) Fault Isolation Guide Problem Cause Correction Steps Ref. Too much noise or Insufficient bearing 1. Supply the required oil. vibration lubrication 2. Clean or replace the oil hose; clean the oil strainer.
-
Page 107: Reciprocating Engine - Removal/Operational Ground Check
(1) Complete the prerequisites in the section “Engine Removal Prerequisites.” (2) If the engine is to be put back into service at a later date, complete the engine preservation procedure before engine removal. Refer to instructions in the YO-233-B2A Engine Installation and Operation Manual. - Page 108 YO-233-B2A Engine Maintenance Manual TEO-540-A1A Engine Maintenance Manual (10) Disconnect the positive terminal of the battery. (11) Disconnect the engine from the alternator. (12) Remove the baffling as required. (13) Drain the oil as described in the “Oil Change Procedure” in Chapter 12-10.
-
Page 109: Engine Installation Preparation Requirements
D. Lockwire. E. Lock washers, lock nuts, tab locks, tab washers, and cotter pins. F. Oil per specifications in Appendix A of the YO-233-B2A Engine Installation and Operation Manual. G. Fuel per specifications in Appendix A of the YO-233-B2A Engine Installation and Operation Manual. -
Page 110: Engine Installation
E. Use a test club during the ground tests. F. Put the aircraft in a position against the wind. G. Start the engine and complete the Pre-Flight Test. Refer to the YO-233-B2A Engine Installation and Operation Manual 6. Idle Speed Mixture Adjustment A. -
Page 111: Engine Mount Inspection
8. Return to Service Procedure Before you return a reciprocating engine-powered aircraft to service, operate the engine to make sure that it operates in accordance with specifications in Appendix A of the YO-233-B2A Engine Installation and Operation Manual. — Power output (static and idle rpm) —... - Page 112 YO-233-B2A Engine Maintenance Manual TEO-540-A1A Engine Maintenance Manual This page intentionally left blank. 72-00 © 2021 Avco Corporation. All Rights Reserved Page 92 February 2021...
-
Page 113: Reciprocating Engine - Crankcase
TEO-540-A1A Engine Maintenance Manual 72-20 - RECIPROCATING ENGINE – CRANKCASE 1. Crankcase System Description Refer to the YO-233-B2A Engine Installation and Operation Manual. 2. Crankcase Maintenance Table 1 shows the crankcase maintenance schedule of inspection and section reference. Table 1... - Page 114 YO-233-B2A Engine Maintenance Manual TEO-540-A1A Engine Maintenance Manual This page intentionally left blank. 72-20 © 2021 Avco Corporation. All Rights Reserved Page 94 February 2021...
-
Page 115: Reciprocating Engine - Cylinder Inspections
YO-233-B2A Engine Maintenance Manual TEO-540-A1A Engine Maintenance Manual 72-30 - RECIPROCATING ENGINE – CYLINDER INSPECTIONS 1. General Cylinder inspections include the regularly scheduled procedures in Table 1, and in this chapter. Complete the Inspection Checklists in Chapter 05-20 of this manual. -
Page 116: Cylinder Compression Check
• If a radial fin crack extends to the root of the fin, replace the cylinder. Figure 1 Engine Cylinder on YO-233-B2A Engines 3. Cylinder Compression Check A. The Cylinder Compression Check is done on an installed engine and measures pressure leakage through the combustion chamber using a regulated pressure source and tester. - Page 117 (1) Immediately before the Cylinder Compression Check: (a) Operate the engine at usual cylinder head and oil temperatures (specified in Appendix A of the YO-233-B2A Engine Installation and Operation Manual). (b) Move the throttle to the CLOSED position and the mixture control to the IDLE-CUT- OFF position to shut down the engine.
- Page 118 YO-233-B2A Engine Maintenance Manual TEO-540-A1A Engine Maintenance Manual (c) Move the Ignition switch to the OFF position. (d) Make sure that the aircraft master switch and fuel supply switches are all in the OFF position. (e) After the engine is shut down, complete the Cylinder Compression Check immediately to get an accurate measurement.
- Page 119 YO-233-B2A Engine Maintenance Manual TEO-540-A1A Engine Maintenance Manual WARNING IN THE NEXT STEP, HOLD THE PROPELLER FIRMLY WHEN OPENING THE AIR VALVE ON THE DIFFERENTIAL COMPRESSION TESTER. PENT-UP AIR PRESSURE IN THE CYLINDER COULD CAUSE THE CRANKSHAFT TO TURN. (12) Slowly open the air valve on the differential compression tester and increase the pressure to the cylinder to 15 to 20 psi (103 to 138 kPa).
- Page 120 YO-233-B2A Engine Maintenance Manual TEO-540-A1A Engine Maintenance Manual Table 2 Summary of Cylinder Compression Check Results and Corrective Action Results Indication Corrective Action Differential pressure of 70 psi (483 Satisfactory No corrective action necessary. kPa) or more for an engine cylinder...
-
Page 121: Intercylinder Baffle Inspection
YO-233-B2A Engine Maintenance Manual TEO-540-A1A Engine Maintenance Manual Table 2 (Cont.) Summary of Cylinder Compression Check Results and Corrective Action Results Corrective Action Indication Air discharge at cylinder head-to- Replace the cylinder with a cylinder kit. barrel juncture or between barrel fins. -
Page 122: Cylinder Borescope Inspection
YO-233-B2A Engine Maintenance Manual TEO-540-A1A Engine Maintenance Manual 5. Cylinder Borescope Inspection WARNING DURING A CYLINDER BORESCOPE INSPECTION, MAKE SURE THAT THE IGNITION SWITCH IS TURNED OFF AND THAT POWER TO THE ENGINE IS DISCONNECTED. AS A PRECAUTION, DO NOT STAND OR ALLOW ANYONE TO STAND WITHIN THE ROTATIONAL ARC RADIUS OF THE PROPELLER. -
Page 123: Exhaust Valve And Guide Inspection
6. Exhaust Valve and Guide Inspection On YO-233-B2A engines, this inspection is to be done after every 1000 hours of engine operation or earlier if valve sticking is suspected. NOTICE: If valve sticking is a problem, this inspection must be done every 400 hours. Refer to “Corrective Action for Valve Sticking”... - Page 124 YO-233-B2A Engine Maintenance Manual TEO-540-A1A Engine Maintenance Manual WARNING A STUCK VALVE CAN CAUSE ENGINE DAMAGE. NOTICE: If one valve is sticking, examine all intake and exhaust valves on all of the engine cylinders. The exhaust valve and guide must be examined to measure valve stem movement to identify excessive wear (bell-mouthing) of the exhaust valve guide and carbon build-up between the valve guide and valve stem which can cause valve sticking.
- Page 125 YO-233-B2A Engine Maintenance Manual TEO-540-A1A Engine Maintenance Manual (4) Turn the crankshaft to position the piston at Top Dead Center (TDC) of the compression stroke. (5) Remove the screws, rocker box cover (Figure 1) and gasket from the cylinder head.
- Page 126 YO-233-B2A Engine Maintenance Manual TEO-540-A1A Engine Maintenance Manual (12) Examine the exhaust valve key which tends to wear in uniform distinctive patterns. Replace a worn or damaged valve key. If the key does not need to be replaced, use a Valve Spring Compressor (ST-25) to compress the exhaust valve springs and install it in the same position from where it was removed.
- Page 127 YO-233-B2A Engine Maintenance Manual TEO-540-A1A Engine Maintenance Manual (20) Install the Gage Adapter (ST-71-8) over the top of the exhaust valve stem (Figure 7). Make sure it is tight. NOTICE: If you can move the Gage Adapter (ST-71-8) on the exhaust valve stem with your hand, it is incorrectly installed.
- Page 128 YO-233-B2A Engine Maintenance Manual TEO-540-A1A Engine Maintenance Manual (26) Insert the screwdriver between the Gage (ST-71) and valve spring on the opposite side and push the valve spring toward the dial indicator as shown in Figure 9. (27) Relax the screwdriver and record the reading on the dial indicator. For the exhaust valve guide to be acceptable, the measurement must be within the specified limits in the latest revision of the Service Table of Limits - SSP-1776.
-
Page 129: Cylinder Removal
(49) Enable power to the engine. (50) Complete the “Operational Ground Check” in Chapter 72-00 (51) Record all of the results in the 1000-Hour Inspection Checklist for YO-233-B2A Engines in Chapter 05-20. 7. Cylinder Removal A. Disable all power to the engine and disconnect the engine wiring harness from the airframe. - Page 130 NOTICE: There are different part numbers for some of the oil drain tube assemblies. Apply a label to identify the location of each oil drain tube, in case the drain tube is to be replaced. Refer to the YO-233-B2A Illustrated Parts Catalog for the correct part number for the oil drain tube.
- Page 131 YO-233-B2A Engine Maintenance Manual TEO-540-A1A Engine Maintenance Manual D. Intercylinder Baffle Removal (1) Turn the baffle retainer hook to disengage the retainer on the intercylinder baffle (Figure 14). (2) Remove the intercylinder baffle and Figure 14 hook from between the cylinders.
-
Page 132: Piston Removal
MAINTAIN THE PRE-LOAD ON THE MAIN BEARINGS. R. After piston removal, examine the connecting rod bushing for damage, wear, or distortion per the “Connecting Rod Inspection Checklist for YO-233-B2A Engines” in Chapter 72-20. 8. Piston Removal NOTICE: During removal of each piston pin (Figure 18), the piston will disconnect from the connecting rod. -
Page 133: Connecting Rod Removal
YO-233-B2A Engine Maintenance Manual TEO-540-A1A Engine Maintenance Manual CAUTION ANYTIME A CYLINDER IS REMOVED, INSTALL TORQUE HOLD- DOWN PLATES OR EQUIVALENT TO ENSURE A UNIFORM LOAD ON THE MAIN BEARINGS IN THE CRANKCASE. NOTICE: During piston removal, support the connecting rod to prevent damage to the connecting rods and crankcase: B. -
Page 134: Cylinder Assembly Inspection
YO-233-B2A Engine Maintenance Manual TEO-540-A1A Engine Maintenance Manual 10. Cylinder Assembly Inspection Copy and complete the Cylinder Assembly Inspection Checklist for YO-233-B2A Engine Models. Cylinder Assembly Inspection Checklist for YO-233-B2A Engine Models Engine Serial Number:________________________ Engine Hours: _____________________ Inspection Date:________________________Inspected by:_____________________________... - Page 135 YO-233-B2A Engine Maintenance Manual TEO-540-A1A Engine Maintenance Manual Cylinder Assembly Inspection Checklist for YO-233-B2A Engine Models (Cont.) Item to Examine and Corrective Cylinder Findings / Corrective Action Action Look for rust/pitting on: • Cylinder barrel fins and fin tips Cylinder 1 in power stroke areas •...
- Page 136 YO-233-B2A Engine Maintenance Manual TEO-540-A1A Engine Maintenance Manual Cylinder Assembly Inspection Checklist for YO-233-B2A Engine Models (Cont.) Item to Examine and Corrective Cylinder Findings / Corrective Action Action Look for any radial fin crack Cylinder 1 extending to the root of a fin.
- Page 137 YO-233-B2A Engine Maintenance Manual TEO-540-A1A Engine Maintenance Manual Cylinder Assembly Inspection Checklist for YO-233-B2A Engine Models (Cont.) Item to Examine and Corrective Cylinder Findings / Corrective Action Action Look for static seal leakage or Cylinder 1 leakage from the head-to-barrel seal or crack in the head or barrel.
- Page 138 YO-233-B2A Engine Maintenance Manual TEO-540-A1A Engine Maintenance Manual Cylinder Assembly Inspection Checklist for YO-233-B2A Engine Models (Cont.) Examine mounting pads for Cylinder 1 rocker box covers for nicks, scoring or dents. Corrective Action: Cylinder 2 Replace all nicked, scored, or dented mounting pads for rocker box covers.
-
Page 139: Piston Inspection
YO-233-B2A Engine Maintenance Manual TEO-540-A1A Engine Maintenance Manual 11. Piston Inspection A. Copy and complete the Piston Inspection Checklist for YO-233-B2A Engine Models. Piston Inspection Checklist for YO-233-B2A Engine Models Engine Serial Number:________________________ Engine Hours: _____________________ Inspection Date:________________________Inspected by:_____________________________ Inspection Item... - Page 140 YO-233-B2A Engine Maintenance Manual TEO-540-A1A Engine Maintenance Manual Piston Inspection Checklist for YO-233-B2A Engine Models (Cont.) NOTICE: Lycoming manufactures pistons with a taper that extends from the top to the bottom of the skirt with the smaller diameter at the top. Figure 22...
- Page 141 YO-233-B2A Engine Maintenance Manual TEO-540-A1A Engine Maintenance Manual Piston Inspection Checklist for YO-233-B2A Engine Models (Cont.) Figure 23 Checking Piston Ring Side Clearance Findings/Corrective Action Inspection Item Cylinder 1 Cylinder 2 Cylinder 3 Cylinder 4 Actual Measure the Top piston...
- Page 142 • Piston grooves worn to the extent that high ridges are on the lower lands • Excessive side clearance of piston rings in grooves NOTICE: Refer to the YO-233-B2A Illustrated Parts Catalog to identify a replacement piston and associated rings.
-
Page 143: Connecting Rod Inspection
Copy and complete the Connecting Rod Inspection Checklist is used to record the condition of all of the connecting rods and any corrective action. Connecting Rod Inspection Checklist for YO-233-B2A Engine Models Engine Serial Number:_________________________ Engine Time:______________________ Date Inspection Done: ____________________ Inspection done by:______________________... - Page 144 YO-233-B2A Engine Maintenance Manual TEO-540-A1A Engine Maintenance Manual Connecting Rod Inspection Checklist for YO-233-B2A Engine Models (Cont.) Item Comments Findings/Corrective Action Done Measure the Inner If the connecting rod Bushing ID Measurement Diameter (ID) of bushing is worn beyond Connecting Rod 1...
- Page 145 YO-233-B2A Engine Maintenance Manual TEO-540-A1A Engine Maintenance Manual Connecting Rod Inspection Checklist for YO-233-B2A Engine Models (Cont.) Item Findings Refer to the “Connecting Rods - Parallelism / Parallelism Squareness Squareness Check” in this chapter. Measurement Measurement Measure the distance between arbors (Figure Connecting Rod 1 29).
-
Page 146: Connecting Rod Bushing Replacement
Connecting Rod Inspection Checklist for TEO-540-EXP22 Engines. If replacement bushing is Lycoming P/N LW-13923 which must be burnished after installation, refer to the latest revision of Service Instruction No. 1575. A. Clamp the connecting rod on the Connecting Rod Bushing Replacement Block (P/N 64597) in such a manner that the small bushing in the rod is in alignment with the hole stamped "Remove Bushing". - Page 147 Service Table of Limits - SSP-1776. If using a carbide cutter when final boring the 01K28983 bushing, Lycoming recommends an approximate spindle speed of 730 RPM and a feed rate of .003 in. per revolution.
-
Page 148: Connecting Rod Parallelism/Squareness Check
I. Measure the distance between arbors. For exact parallelism or alignment, the distances measured on both sides must be the same. Record the parallelism measurement in the Connecting Rod Inspection Checklist for YO-233-B2A Engines earlier in this chapter. J. Remove the gage arm. -
Page 149: Connecting Rod Installation
Connecting Rod Assembly Lubrication NOTICE: Anytime either the connecting rod bolt and/or nut pairs are removed from a Lycoming engine, replace both the bolt and nut pairs with new “Service Use Only” hardware regardless of apparent condition. C. Refer to theYO-233-B2A Illustrated Parts Catalog to identify the correct P/Ns for the new connecting rods bolts. - Page 150 YO-233-B2A Engine Maintenance Manual TEO-540-A1A Engine Maintenance Manual E. Install the new lubricated matched set bearing pair on each connecting rod, one bearing on the connecting rod and the other bearing on the connecting rod cap. Ensure that the tang of each bearing fits and seats within the slot of the connecting rod as well as the connecting rod cap.
-
Page 151: Piston Ring Replacement
For new piston rings, refer to the YO-233-B2A Illustrated Parts Catalog to identify the correct new piston rings to be installed on the piston. New piston rings are shipped from Lycoming with the piston oil ring and the inner expander ring assembled. The inner expander ring must be separated from the piston oil ring before installing them on the piston. -
Page 152: Piston Installation
NOTICE: Engine break-in must be completed to seat newly installed piston rings. Refer to the latest revision of Service Instruction No. SI-1427 and the “Engine Initiation” chapter of the YO-233-B2A Engine Installation and Operation Manual. 17. Piston Installation NOTICE: If more than one piston is being installed, make sure you are installing the correct piston on the designated connecting rod in the engine. -
Page 153: Intake Valve Replacement
YO-233-B2A Engine Maintenance Manual TEO-540-A1A Engine Maintenance Manual 18. Intake Valve Replacement A. Intake Valve Removal (1) Remove the cylinder from the engine per the “Cylinder Removal” procedure in this chapter. (2) Put the cylinder on a Cylinder Block P/N 64526-2 or equivalent. -
Page 154: Cylinder Installation
20. Cylinder Installation NOTICE: Before cylinder installation, make sure that the connecting rod bushing was examined per the “Connecting Rod Inspection Checklist for YO-233-B2A Engines” in Chapter 72-20. Use a cylinder kit when installing a new cylinder. When installing a removed cylinder be sure you are installing the correct cylinder in the designated position on the engine. - Page 155 YO-233-B2A Engine Maintenance Manual TEO-540-A1A Engine Maintenance Manual D. Apply one or a combination of any of the following lubricants to the outer three threads (Figure 37A) on all of the crankcase thru-studs and cylinder hold-down studs (Figure 37B): • Parker Thread Lube •...
- Page 156 YO-233-B2A Engine Maintenance Manual TEO-540-A1A Engine Maintenance Manual F. Install the cylinder base hold-down nuts (Figures 16 and 40) on the thru-studs and cylinder hold-down studs. CAUTION TORQUE THE CYLINDER NUTS IN A SPECIFIC SEQUENCE. G. Torque the cylinder base hold-down nuts as follows: (1) Torque the 1/2 in.
- Page 157 YO-233-B2A Engine Maintenance Manual TEO-540-A1A Engine Maintenance Manual H. Shroud Tube Installation CAUTION BE SURE THERE IS NO OIL INSIDE THE TAPPET BODIES AND THAT THE PLUNGER ASSEMBLY AND CYLINDER ASSEMBLY ARE THOROUGHLY CLEAN AND DRY. WASH ANY LUBRICATING OR...
- Page 158 YO-233-B2A Engine Maintenance Manual TEO-540-A1A Engine Maintenance Manual I. Push Rod Installation (1) Use a brush and apply a mixture of 15% STP or equivalent and 85% SAE No. 50 mineral-based aviation-grade lubricating oil to 1 in. (2.54 cm) of both ends of the push rod.
- Page 159 NOTICE: If the clearance is not within the prescribed limit, insert a longer or shorter push rod to obtain the correct clearance. Refer to the latest revision of Service Instruction No. SI-1060 or the YO-233-B2A Illustrated Parts Catalog for available push rods.
- Page 160 YO-233-B2A Engine Maintenance Manual TEO-540-A1A Engine Maintenance Manual R. Intercylinder Baffle Installation (1) Engage the "S-Type" retaining hook (Figure 3) through the hole in the in the intercylinder baffle. (2) Put the baffle in position beneath and between the cylinders on the bottom of the engine as shown in Figure 49 and turn the hook up between the cylinder barrels.
- Page 161 NOTICE: Since there are different oil drain tube assemblies for the engine cylinders, refer to the YO-233-B2A Illustrated Parts Catalog for the correct part number for the oil drain tube assembly to ensure the correct oil drain tube assembly is installed on the corresponding engine cylinder.
-
Page 162: Corrective Action For Valve Sticking
YO-233-B2A Engine Maintenance Manual TEO-540-A1A Engine Maintenance Manual 21. Corrective Action for Valve Sticking NOTICE: If valve sticking is a problem, complete the 1000-hour Engine Inspection Checklist in Chapter 05-20 (regardless of the number of engine operating hours) (Figure 15). After correcting the cause of valve sticking, complete the 1000-hour inspection after the next 1000 hours of engine operation, unless valve sticking occurs again. -
Page 163: Intake And Exhaust Valve Guide Replacement
YO-233-B2A Engine Maintenance Manual TEO-540-A1A Engine Maintenance Manual J. Ream the valve guide as follows: (1) Apply force on the reamer to ensure the reamer has gone through the full length of the valve guide. The 1-in. (2.54 cm) pilot must be visible through the exhaust port or through the spark plug hole using an angled mirror. -
Page 164: Barrel Glaze And Varnish Removal From Interior Cylinder Barrel
® 25. Heli-Coil Replacement NOTICE: The YO-233-B2A has short reach spark plugs. ® A. Replace the spark plug Heli-Coil insert (Figure 56) in the cylinder head if the threads in the spark plug hole in the cylinder are damaged (usually occurs when hard carbon on the end of the spark plug causes the insert to unwind during spark plug removal). - Page 165 YO-233-B2A Engine Maintenance Manual TEO-540-A1A Engine Maintenance Manual ® NOTICE: Always install a larger 0.010 in. oversized Heli-Coil insert in the spark plug hole on ® the cylinder head to replace a standard sized Heli-Coil insert. Never replace a standard ®...
- Page 166 YO-233-B2A Engine Maintenance Manual TEO-540-A1A Engine Maintenance Manual ® (12) Install the new 0.010 in. oversized Heli-Coil insert into the spark plug hole as follows: (a) Use the T-shaped Inserting Tool P/N 64594 (Figure 60) and withdraw the mandrel portion of this tool beyond the recessed section of its sleeve.
- Page 167 YO-233-B2A Engine Maintenance Manual TEO-540-A1A Engine Maintenance Manual 2 Assemble the staking sleeve of the Expanding and Staking Tool P/N 64593 over the mandrel until the sleeve meets the boss. 3 Gently tap the top of the staking sleeve with a plastic mallet to make a slight chamfered edge around the periphery of the tapped hole.
- Page 168 YO-233-B2A Engine Maintenance Manual TEO-540-A1A Engine Maintenance Manual This page intentionally left blank. 72-30 © 2021 Avco Corporation. All Rights Reserved Page 148 February 2021...
-
Page 169: Reciprocating Engine - Lubrication
NOTICE: There is an adjustment screw (Figure 1) on the oil pressure relief valve housing. Rotation of this screw used to either increase or decrease the oil pressure to keep it within the specified operational limits in Appendix A of the YO-233-B2A Engine Installation and Operation Manual. - Page 170 YO-233-B2A Engine Maintenance Manual TEO-540-A1A Engine Maintenance Manual This page intentionally left blank. 72-50 © 2021 Avco Corporation. All Rights Reserved Page 150 February 2021...
-
Page 171: Reciprocating Engine - Accessory Drives
YO-233-B2A Engine Maintenance Manual TEO-540-A1A Engine Maintenance Manual 72-60 - RECIPROCATING ENGINE – ACCESSORY DRIVES 1. 100-Hour Accessory Drive Inspection Procedure A. Look for defects in engine-mounted accessories such as pumps. B. Make sure the fuel pump and any attached accessories are attached securely at the correct torque. - Page 172 YO-233-B2A Engine Maintenance Manual TEO-540-A1A Engine Maintenance Manual This page intentionally left blank. 72-60 © 2021 Avco Corporation. All Rights Reserved Page 152 February 2021...
-
Page 173: Reciprocating Engine - Electrical System
YO-233-B2A Engine Maintenance Manual TEO-540-A1A Engine Maintenance Manual 72-70 - RECIPROCATING ENGINE – ELECTRICAL SYSTEM 1. General The Electrical System includes the wiring harness. 2. 100-Hour Wiring Inspection A. Examine the airframe electrical wiring for correct routing, security, clamping, deterioration, and chafing in accordance with the airframe manufacturer’s instructions. -
Page 174: Alternator Belt Inspection
YO-233-B2A Engine Maintenance Manual TEO-540-A1A Engine Maintenance Manual 4. Alternator Belt Inspection A. Examine the alternator belt for any cracks, damage, or wear. B. Replace worn, cracked or damaged alternator as per instruction in the Direct Drive Overhaul Manual. C. Tighten any loose hardware on the... -
Page 175: Induction System
TEO-540-A1A Engine Maintenance Manual 72-80 - INDUCTION SYSTEM 1. System Description A. Refer to the YO-233-B2A Engine Installation and Operation Manual. 2. Induction System Inspection Procedure A. Examine the air intake ducts for leaks, security, and filter damage. B. Service in accordance with the manufacturer’s maintenance procedure. Evidence of dust or other solid material in the ducts is indicative of inadequate filter care or of a damaged filter. - Page 176 YO-233-B2A Engine Maintenance Manual TEO-540-A1A Engine Maintenance Manual This page intentionally left blank. 72-80 © 2021 Avco Corporation. All Rights Reserved Page 156 February 2021...
-
Page 177: Engine Fuel And Control - General
YO-233-B2A Engine Maintenance Manual TEO-540-A1A Engine Maintenance Manual 73-00 - ENGINE FUEL AND CONTROL – GENERAL 1. System Description Refer to the YO-233-B2A Engine Installation and Operation Manual. © 2021 Avco Corporation. All Rights Reserved 73-00 February 2021 Page 157... - Page 178 YO-233-B2A Engine Maintenance Manual TEO-540-A1A Engine Maintenance Manual This page intentionally left blank. 73-00 © 2021 Avco Corporation. All Rights Reserved Page 158 February 2021...
-
Page 179: Engine Fuel And Control - Distribution
YO-233-B2A Engine Maintenance Manual TEO-540-A1A Engine Maintenance Manual 73-10 - ENGINE FUEL AND CONTROL – DISTRIBUTION 1. Fuel System Inspection Procedure DO NOT SMOKE OR HAVE AN OPEN FIRE/FLAME OR USE ANY DEVICES THAT CAN MAKE SPARKS DURING THIS REPLACEMENT PROCEDURE. - Page 180 YO-233-B2A Engine Maintenance Manual TEO-540-A1A Engine Maintenance Manual This page intentionally left blank. 73-10 © 2021 Avco Corporation. All Rights Reserved Page 160 February 2021...
-
Page 181: Ignition System Maintenance
TEO-540-A1A Engine Maintenance Manual 74-00 - IGNITION SYSTEM MAINTENANCE 1. Ignition System Description A. Refer to the YO-233-B2A Engine Installation and Operation Manual. 2. Ignition System Maintenance A. Table 1 shows the maintenance schedule and section references for ignition system components. - Page 182 YO-233-B2A Engine Maintenance Manual TEO-540-A1A Engine Maintenance Manual This page intentionally left blank. 74-00 © 2021 Avco Corporation. All Rights Reserved Page 162 February 2021...
-
Page 183: Ignition System - Spark Plug Maintenance
YO-233-B2A Engine Maintenance Manual TEO-540-A1A Engine Maintenance Manual 74-20 - IGNITION SYSTEM - SPARK PLUG MAINTENANCE FAILURE TO MAINTAIN THE SPARK PLUGS AND IGNITION LEADS CAN CAUSE ENGINE DAMAGE OR FAILURE. The ignition leads are an all-weather, shielded wire constructed with over braid. -
Page 184: Examine Spark Plugs And Ignition Leads
YO-233-B2A Engine Maintenance Manual TEO-540-A1A Engine Maintenance Manual 3. Examine Spark Plugs and Ignition Leads A. Remove the spark plug connector nuts. B. Examine spark plug cable leads and ceramics for corrosion and deposits. C. Examine each ignition lead for chafing, insulation breakdown, frayed wiring, deterioration, heat damage, wear, and cracking during every 100-hour inspection. -
Page 185: Spark Plug Fouling
YO-233-B2A Engine Maintenance Manual TEO-540-A1A Engine Maintenance Manual F. To be acceptable, the spark plug must not have any of the following defects: (1) Fine wire plugs with loose center or ground electrodes. (2) Electrodes show signs of metal or impact change. -
Page 186: Clean The Spark Plugs
YO-233-B2A Engine Maintenance Manual TEO-540-A1A Engine Maintenance Manual 6. Clean the Spark Plugs Clean the ignition lead, cable ends, spark plug walls, and ceramic of the spark plugs (new or reused) as per the spark plug manufacturer’s instructions. Wipe the spark plug lead connector clean using a lint-free cloth moistened with MEK, acetone, wood alcohol or naphtha. - Page 187 YO-233-B2A Engine Maintenance Manual TEO-540-A1A Engine Maintenance Manual Use a 6-point deep recess socket to install the spark plug in the engine cylinder head with a new gasket. A new gasket must be installed whether the spark plug is new or is acceptable and being reused.
- Page 188 YO-233-B2A Engine Maintenance Manual TEO-540-A1A Engine Maintenance Manual This page intentionally left blank. 74-20 © 2021 Avco Corporation. All Rights Reserved Page 168 February 2021...
-
Page 189: Electronic Ignition System
2. Install the EIS per the latest edition of the Champion Instruction CH42PR20A. Light Speed Plasma III and Magneto Ignition System Lycoming has approved an alternate ignition system for the YO-233-B2A. This system consists of a single magneto P/N 66GP-0RANN, ignition harness P/N 67P20440, and a single Light Speed Engineering, LLC Plasma III kit P/N 66K29678-Y. -
Page 190: Magneto Inspection
YO-233-B2A Engine Maintenance Manual TEO-540-A1A Engine Maintenance Manual Instructions for Magneto Inspection, Magneto-to-Engine Timing Check, Magneto-to-Engine Timing Adjustment Procedure, Magneto Replacement Procedure, are as follows: 1. Magneto Inspection Examine the magneto in accordance with the magneto manufacturer's instructions after every 500 hours of engine operation. -
Page 191: Magneto-To-Engine Timing Adjustment Procedure
YO-233-B2A Engine Maintenance Manual TEO-540-A1A Engine Maintenance Manual NOTICE: The advance timing specification in degrees is stamped on the engine data plate. Turn the crankshaft in the direction of normal rotation until the correct advance timing mark on the starter ring gear support assembly aligns with the reference point on the engine (Figure 1 or 2). -
Page 192: Magneto Replacement Procedure
YO-233-B2A Engine Maintenance Manual TEO-540-A1A Engine Maintenance Manual F. Apply torque seal to the torqued hold-down nuts on the magneto clamps. G. Turn the crankshaft a few degrees in the direction opposite normal rotation. The timing lights are to indicate the magneto is not firing. - Page 193 YO-233-B2A Engine Maintenance Manual TEO-540-A1A Engine Maintenance Manual (5) Install a new cotter pin through the gear nut and magneto driveshaft. Bend the top prong on the cotter pin over the stud and bend the bottom prong of the cotter pin down.
- Page 194 YO-233-B2A Engine Maintenance Manual TEO-540-A1A Engine Maintenance Manual (16) Spray mold release compound on rubber coated leads of the magneto harness. (17) Connect the harness cap to the respective magneto with three screws shown in Figure 6. Tighten the three screws until all screws are touching the harness cap to ensure that there is an even gap around the cap.
Need help?
Do you have a question about the YO-233-B2A and is the answer not in the manual?
Questions and answers