Table of Contents
Advertisement
Quick Links
! $Instruments
Applent Instruments Inc.
Baolong International FL3,Chahua Road,
Zhonglou district ,Changzhou City, Jiangsu
Province, China [213014]
Tel: 0519-88805550 Fax: 0519-86922220
http://www.applent.com
Sales Email:
sales@applent.com
Tech Email:
tech@applent.com
©2005-2018 Applent Instruments, Inc.
English
Rev.A0
[
AT47xx
Multi-channel Temperature Meter
User's Guide
]
Advertisement
Table of Contents

Subscribe to Our Youtube Channel
Related Manuals for Applent Instruments anbai AT47 Series


Summary of Contents for Applent Instruments anbai AT47 Series
- Page 1 ! $Instruments Applent Instruments Inc. Baolong International FL3,Chahua Road, Zhonglou district ,Changzhou City, Jiangsu Province, China [213014] Tel: 0519-88805550 Fax: 0519-86922220 http://www.applent.com Sales Email: sales@applent.com Tech Email: tech@applent.com ©2005-2018 Applent Instruments, Inc. English Rev.A0 AT47xx Multi-channel Temperature Meter User’s Guide...
-
Page 2: Safety Summary
Failure to comply with these precautions or with specific WARNINGS elsewhere in this manual may impair the protection provided by the equipment. In addition it violates safety standards of design, manufacture, and intended use of the instrument. The Applent Instruments assumes no liability for the customer's failure to Disclaimer comply with these requirements. -
Page 3: Certifiaction, Limited & Limitation Of Liability
Unpacking and Inspection CERTIFIACTION, LIMITED & LIMITATION OF LIABILITY Applent Instruments, Inc. (shortened form Applent)certifies that this product met its published specifications at the time of shipment from the factory. Applent further certifies that its calibration measurements are traceable to the People’s Republic of China National Institute of Standards and Technology, to the extent allowed by the... -
Page 4: Table Of Contents
AT47xx User's Guide Contents Safety Summary ................................2 CERTIFIACTION, LIMITED & LIMITATION OF LIABILITY ..................... 3 Contents ................................... 4 Unpacking and Inspection ..........................6 Packing List ................................6 Power Supply ................................ 6 Operation Environment ............................6 Cleaning ................................6 Instrument Handle .............................. 6 Overview ................................ - Page 5 Unpacking and Inspection Command Reference ............................24 Terminator ................................. 24 Notation Conventions and Definitions ....................... 24 Command Structure ............................24 Header and Parameters ............................. 25 Command Reference ............................26 9.5.1 MEAS SUBSYSTEM ............................26 9.5.2 SYST SUBSYSTEM ............................28 9.5.3 FETCH SUBSYSTEM ............................29 9.5.4 ERROR SUBSYSTEM ............................
-
Page 6: Unpacking And Inspection
AT47xx User's Guide Unpacking and Inspection This chapter provides the following information: ⚫ Packing List ⚫ Power Supply ⚫ Operation Environment ⚫ Cleaning ⚫ Instrument Handle 1.1 Packing List After you receive the instrument, carry out checks during unpacking according to the following procedure. Check that the packing box or shock-absorbing material used to package the instrument has not been damaged. - Page 7 Unpacking and Inspection Figure 1‑1 The instrument handle (schematics, panel graphics and is not) View 1: Position of a both hands holding the handles on both sides , gently pill to the sides until you can rotate freely ,and the switch to the View 2 ...
-
Page 8: Overview
AT47xx User's Guide Overview This chapter provides the following information: ⚫ Overview ⚫ Main Specification ⚫ Main Function 2.1 Introduction Thank you for purchasing AT47xx Multi-channel Temperature Meter The Applent AT47xx adopts high-performance ARM microprocessor control, collects multi-channel temperature data simultaneously. -
Page 9: Startup
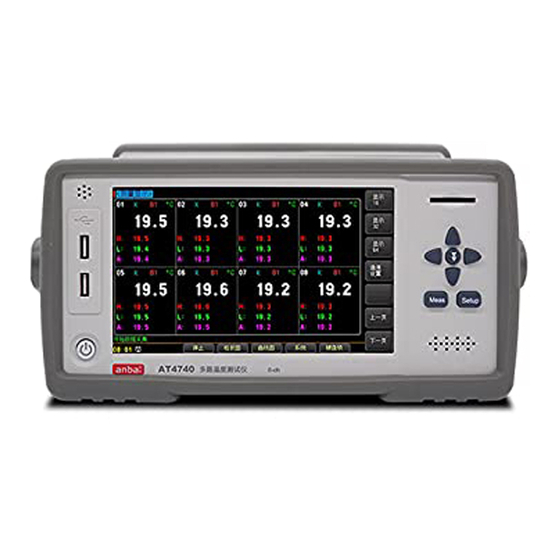
Startup Startup This chapter provides the following information: ⚫ A tour of front and back panel ⚫ Connection of the thermocouple 3.1 A tour of front and back panel Figure 3‑1 Front panel description Description USB Disk Port (USB-Host) Power Switch LCD Display Meas and Setup key Cursor Key... -
Page 10: Connection Of The Thermocouple
AT47xx User's Guide Figure 3‑2 Back panel description Description Connection port US-232C interface Power outlet 3.2 Connection of the thermocouple Figure 3‑3 Thermocouple Terminals PIN 1 Channel 1, positive pole of the thermocouple PIN 2 Channel 1, negative pole of the thermocouple PIN 3 Channel 2, positive pole of the thermocouple PIN 4... - Page 11 Startup PIN 15 Channel 8, positive pole of the thermocouple PIN 16 Channel 8, negative pole of the thermocouple Channel segregation between voltage of 350 v dc, ac 230 v...
-
Page 12: Meas] Page
AT47xx User's Guide [Meas] Page This chapter provides the following information: ⚫ <Measure Display> Page ⚫ <GRAPH Display> Page ⚫ <HISTOGRAM Display> Page ⚫ <CHAN SETUP> Page 4.1 <MEASURE DISPLAY> Page When press the [Meas] key, the <MEAS DISPLAY> page appears. <MEASURE DISPLAY>... - Page 13 [Meas] Page Figure 4‑2 Display 16 Page Figure 4‑3 Display 32 Page Figure 4‑4 Display 64 Page According Buttom key "start" to start data collection, according "stop" termination of data collection.
-
Page 14: Graph Display> Page
AT47xx User's Guide 4.2 <GRAPH DISPLAY> Page Press[Meas] key and then side soft key [GRAPH] to enter <GRAPH DISPLAY> page Figure 4‑5 <GRAPH DISPLAY> Page 4.2.1 [01] Setting ◼ Steps to set ON/OFF: Step 1 Press [Meas] key to enter <MEASURE DISPLAY> page Step 2 Press [GRAPH] soft key to enter <GRAPH DISPLAY>... -
Page 15: Chan Setup> Page
[Meas] Page Figure 4‑6 <HISTOGRAM DISPLAY> Page 4.4 <CHAN SETUP> Page Press[Meas] key and then side soft key [CHAN SET] to enter <CHAN SETUP> page Note: Measurement data and sorting results only validity in the page of <Measure Display> Figure 4‑7 <CHAN SETUP> Page 4.4.1 [SENSOR] Setting ◼... -
Page 16: High] Setting
AT47xx User's Guide Step 1 Press [Meas] key to enter <MEASURE DISPLAY> page Step 2 Press [CHAN SET] soft key to enter <CHAN SETUP> page Step 3 Use soft keys to select [-200.0] field Step 4 Use numeric key to input low value, then press [Enter] to end Soft Key Function RESET... -
Page 17: Setup] Page
[Setup] Page [Setup] Page This chapter provides the following information: ⚫ <SETUP> Page ⚫ <CHAN SET> (refer to < MEASURE DISPLAY>) ⚫ <GUEST CAL> Page 5.1 <Setup> Page At any time, press [Setup] key to enter <Setup> page <Setup> page can complete all settings concerned with the measurement, measurement and sorting results will not displayed and the instrument is in waiting state. -
Page 18: Beep] Setting
AT47xx User's Guide Step 1 Press [Setup] key to enter < SETUP > page Step 2 Use cursor keys to select [RATE] field Step 3 Use function key to select Soft Key Function SLOW Set the sampling rate 1s Set the sampling rate 0.5s FAST Set the sampling rate 0.2s, 16 channels below optional 5.1.3 [BEEP] Setting... -
Page 19: Prefix] Setting
[Setup] Page Step 1 Press Shortcut[Setup] to enter <SETUP> page Step 2 Use the cursor keys to select[SCALE]field Step 3 Use function key to select Function Function Keys Graph the timeline Setting Graph the timeline Setting Graph the timeline Setting Graph the timeline Setting Graph the timeline Setting Graph the timeline Setting... -
Page 20: System Configuration
AT47xx User's Guide System Configuration This chapter provides the following information: ⚫ <SYSTEM CONFIG> Page ⚫ <SYSTEM INFORMATION> Page ⚫ <SERVICE> Page 6.1 <SYSTEM CONFIG> Page In any place, just press shortcut [Setup] and select taskbar key [SYSTEM] to enter <SYSTEM CONFIG> page <System Configuration>... -
Page 21: Setting The System [Time]
System Configuration DAY DECR- -1 day 6.1.3 Setting the system [TIME] ◼ Steps to setup time Step 1 Press [Setup] key Step 2 Select bottom soft key [SYSTEM], enter <SYSTEM CONFIG> page Step 3 Use cursor key to select [TIME] field Step 4 Use soft key to set time Soft Key... -
Page 22: File Operation
AT47xx User's Guide File Operation This chapter provides the following information ⚫ <FILE> Page 7.1 < FILE > Page When press the [Setup] key followed by [FILE] bottom soft key, the <FILE> page appears. Some system settings will be saved into this file. The file will be loaded at power up. <FILE>... -
Page 23: Remote Control
Remote Control Remote Control This chapter provides the following information to remotely control the AT47xx via the USB-232C interface.This chapter provides the following information ⚫ About USB-232C Interface ⚫ Select Baud Rate. ⚫ About SCPI 8.1 About USB-232C Due to elimination of RS232 interface, which makes communication with PC difficult, so our company provides USB-232C interface, to make it easy to connect to PC by USB interface. -
Page 24: Command Reference
AT47xx User's Guide Command Reference This chapter contains reference information on programming AT47xx with the SCPI commands. ⚫ Terminator ⚫ Notation Conventions and Definitions ⚫ Header and Parameters ⚫ Command Reference This chapter provides descriptions of all the AT47xx's available RS-232 commands which correspond to Standard Commands for Programmable Instruments (SCPI) command sets, listed in functional subsystem order. -
Page 25: Header And Parameters
Command Reference • Letter case (upper and lower) is ignored. For example, ROOT:COMMAND3 = root:command3 • Spaces (_ used to indicate a space) must not be placed before and/or after the colon (:). For example, root_:_command3 root:command3 •... -
Page 26: Command Reference
AT47xx User's Guide 1E-9 (NANO) 1E-12 (PICO) 1E-15 (PEMTO) 1E-18 (ATTO) 9.5 Command Reference All commands in this reference are fully explained and listed in the following functional command order. ⚫ MEAS Subsystem ⚫ SYST Subsystem ⚫ FETCH Subsystem ⚫ ERROR Subsystem ⚫... - Page 27 Command Reference Query Response <on,off><NL> Example SEND> MEAS:KEYLOCK?<NL> RET> on<NL> 9.5.1.4 MEAS:START The :START command sets the sample. Command Syntax MEAS:START <on,off> Example SEND> MEAS:START //Set to start sample off<NL> Query Syntax MEAS:START? <on,off><NL> Query Response Example SEND> MEAS:START?<NL> RET> on<NL>...
-
Page 28: Syst Subsystem
AT47xx User's Guide 9.5.1.9 MEAS:HIGH The :HIGH command sets the high value of all channel. Command Syntax MEAS:HIGH <float> Example SEND> MEAS:HIGH <1800.0> //Set the all channel high limit 1800.0 Query Syntax MEAS:HIGH? < float,float > Query Response SEND> MEAS:HIGH?<NL> Example RET>... -
Page 29: Fetch Subsystem
Command Reference Example SEND> SYST:beep on //Set to open beep <NL> Query Syntax MEAS:beep? <on,off><NL> Query Response Example SEND> SYST:beep?<NL> RET> on<NL> 9.5.2.3 SYST:UNIT The :UNIT command sets the unit feature. Command Syntax MEAS:UNIt <cel,kel,fah> Parameter <cel,kel,fah> cel: Degrees Celsius kel: Degrees Kelvin fah: Fahrenheit Example SEND>... -
Page 30: Accuracy
AT47xx User's Guide 10. Accuracy This chapter provides the following information: ⚫ Accuracy 10.1 Accuracy Instrument Accuracy does not include the standard contact compenstation Precision. Model Range(℃) Accuracy(℃) -150℃ to 0℃ ±1.0℃ 0℃ to 400℃ ±0.8℃ -100℃ to 0℃ ±1.2℃ 0℃... -
Page 31: Specification
Specification 11. Specification This chapter provides the following information: ⚫ General Specification ⚫ Specifications ⚫ Dimension 11.1 General Specification The Data is Achieved under the Following Conditions: ⚫ Temperature: 23℃± 5℃ Humidity: 65% R.H. ⚫ ⚫ Warm-up Time: > 60 minutes ⚫... -
Page 32: Specifications
7.0 inches, 800×600, TFT-LCD touch screen ⚫ Comparator (Sorting) Function. ⚫ Keypad Lock Function ⚫ Language: English and Chinese ⚫ Build-in USB-232C interface ⚫ Compatible SCPI Instruction Set 11.3 Dimension 293.76 315.91 290.30 308.39 Applent Instruments AT47xx User’s Manual English Edition...
Need help?
Do you have a question about the anbai AT47 Series and is the answer not in the manual?
Questions and answers