Table of Contents
Advertisement
Advertisement
Table of Contents

Related Manuals for Applent Instruments AT4202


Summary of Contents for Applent Instruments AT4202
- Page 1 !$Instruments Applent Instruments Inc. DangnanIndustrial Park, Tianning District, ChangzhouCity, Jiangsu Province, China [213014] Tel: 0519-88805550 / 89966117/89966227/89966337 Fax: 0519-89966550 AT4202/4204/4208 Multi-channel Temperature Meter User’s Guide...
-
Page 2: Safety Summary
Failure to comply with these precautions or with specific WARNINGS elsewhere in this manual may impair the protection provided by the equipment. In addition it violates safety standards of design, manufacture, and intended use of the instrument. The Applent Instruments assumes no liability for the customer's Disclaimer failure to comply with these requirements. -
Page 3: Certifiaction, Limited & Limitation Of Liability
Installation and Setup Wizard CERTIFIACTION, LIMITED & LIMITATION OF LIABILITY Applent Instruments, Inc. shortened form Applent certifies that this product met its published specifications at the time of shipment from the factory. Applent further certifies that its calibration measurements are traceable to the People’s Republic of China National Institute of Standards and Technology, to the extent allowed by the Institution’s calibration facility or by the calibration... -
Page 4: Table Of Contents
AT4202/4204/4208 User's Guide Contents Safety Summary ................................ 2 CERTIFIACTION, LIMITED & LIMITATION OF LIABILITY ................3 Contents ..................................4 1.Installation and Setup Wizard Packing List ............................. 6 Power Supply ........................... 6 Operation Environment ........................6 Cleaning ............................7 Replace Battery ..........................7 Adjusting Tilt Stand ......................... -
Page 5: Installation And Setup Wizard
Installation and Setup Wizard Command Reference ........................30 7.4.1 MODELSubsystem ......................30 7.4.2 BEEPSubsystem........................31 7.4.3 RATESubsystem ......................... 31 7.4.4 UNIT SubSystem ........................ 31 7.4.5 CHANON SubSystem ......................32 7.4.6 HIGH SubSystem ........................ 32 7.4.7 LOWSubSystem........................32 7.4.8 FETC? SubSystem ......................32 7.4.9 SYST System SubSystem.................... -
Page 6: Installation And Setup Wizard
AT4202/4204/4208 User's Guide Installation and Setup Wizard This chapter provides the following information: Packing List Power Requirements Operation Environment Cleaning Replace Battery Adjusting Tilt Stand Packing List After you receive the instrument, carry out checks during unpacking according to the following procedure. -
Page 7: Cleaning
Installation and Setup Wizard Cleaning Do not attempt to clean the internal of AT4202/4204/4208 Warning: Don’t Use Organic Solvents (such as alcohol or gasoline) to clean the Instrument. Use a dry cloth or a cloth slightly dipped in water to clean the casing. - Page 8 AT4202/4204/4208 User's Guide Folded up the bottom of the bracket to achieve degree 45 position Figure 1 3 Position of Degree 45...
-
Page 9: Overview
The AT4202/4204/4208 adopts high-performance ARM microprocessor control, collects multi-channel temperature data simultaneously. The AT4202/4204/4208 can be compatible with a variety of temperature sensors, fast response, data stability while with the burnout detection function. Also you can separately calibrate the data of each channel. True-color TFT liquid crystal display, keypad and touch screen double control. -
Page 10: Sorting Setting
AT4202/4204/4208 User's Guide 2.3.2 Sorting Setting Build-in sorting data, each temperature data can be set both up limit and low limit 2.3.3 Correction Function Each channel data can been corrected by the user. 2.3.4 System Setup Keypad Lock Function Switch in Both Chinese and English... -
Page 11: Startup
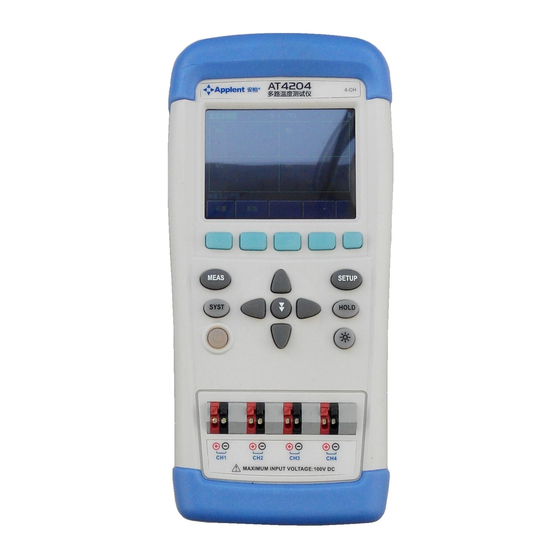
Startup Startup This chapter describes: Front Panel Summery LCD Screen Interface Extern power and Battery Power up Connection of the Thermocouple Front Panel Summery Figure 3-1 Front Panel... -
Page 12: Lcd Screen
AT4202/4204/4208 User's Guide Table 3-1 Description of the Front Panel TFT-LCD Screen Select Keys MEAS Measurement Key——Enter Measurement Page (Page 15:[MEAS] Page) SYST System Key ——Enter System Setting Page (Page 20: [SYSTEM] Page) Power On/Off Battery Charging Indicator Sensor access terminal Background Brightness——30%,50%,70%, 100%... -
Page 13: Interface
Startup Interface Figure 3-3 Interface panel Table 3-3 Interface panel description Remote Control Interface(USB-HID) USB Memory Interface Power Adapter Jack(+9VDC) RESET MICROSD Memory Interface Extern power and Battery The Battery can only be charged by Power Adapter ATL909 While using the external power supply, the power adapter is also charging the battery. -
Page 14: Charge Li Battery
The key is also orange which charging even when the LCR Attention! meter is off previously.) Power up Press the Power key softly to start it. Connection of the Thermocouple AT4202 having 2 input ports AT4204 having 4 input ports AT4208 having 8 input ports Figure 3-4 Thermocouple Terminals... -
Page 15: Meas] Page
[MEAS] Page Table 3-4 Interface baffle description “ ” positive pole of the thermocouple “ ”negative pole of the thermocouple 100V [MEAS] Page This section includes all measure result display information. <Measure Display>Page <MEAS DISPLAY> When press the [Meas] key, the <MEAS DISPLAY> page appears. <MEASURE DISPLAY>... -
Page 16: Chan 01
AT4202/4204/4208 User's Guide Figure 4-2 AT4204 <MEAS DISPLAY> Page Figure 4-3 AT4202 <MEAS DISPLAY> Page 4.1.1 CHAN 01 „ Steps to Set Sensor Model Step 1 Press[Meas] key to enter <MEASURE DISPLAY>page Step 2 Use the cursor keys to select[01]field... - Page 17 [MEAS] Page Step 3 Use side soft keys to select Close the current channel Open the current channel *The same steps to close or open other channels „ Step 1 Press[Meas] key to enter <MEASURE DISPLAY>page Step 2 Use the cursor keys to select[01]field Step 3 Use side soft keys to select Use touch screen to type in...
-
Page 18: Setup]Page
AT4202/4204/4208 User's Guide [SETUP]Page This section includes all setup functions At any time,press [SETUP]to enter <SETUP> page. <SETUP> Page <Setup>Page In < SETUP> page, the Instrument does not display any results,testing is not in progress. The setup includes MODEL –Chose the type of the thermocouple UNIT –Temperature Unit Setting... -
Page 19: Unit]Setting
[SETUP]Page TC-N Setting the thermocouple N type TC-R Setting the thermocouple R type TC-S Setting the thermocouple S type TC-E Setting the thermocouple E type TC-B Setting the thermocouple B type 5.1.2 [UNIT]Setting Units Includes:( ,(K),(F) „ Steps to set beep feature Step 1 Press [Setup] key to enter <SETUP>... -
Page 20: Low] Setting
AT4202/4204/4208 User's Guide Step 3 Use soft keys to select Soft Key Function UPPER Use touch screen to type in VALUE RESET Restore Defaults 5.1.6 [LOW] setting „ Steps to set Lowlimit Step 1 Press [Setup] key to enter < SETUP > page Step 2 Use cursor keys to select [-200.0] field... - Page 21 [SETUP]Page The data format is Float type, reserve 1 digit behind the decimal point, channels are separated by CH01 CH02 CH03 CH04 CH05 CH06 CH07 CH08 MODEL-TC-T 2013-12-04 15:00:00 28.0 28.1 100.5 19.2 32.4 54.3 21.6 41.9 2013-12-04 15:00:05 28.1 28.0 100.4 19.2...
-
Page 22: System]Page
AT4202/4204/4208 User's Guide [SYSTEM]Page This section includes all system information. At any time, press [SYST] key to enter [SYSTEM] page. <SYSTEM CONFIG> page Following information can be configured in the <SYSTEM CONFIG> page. System date and time configuration [DATE/TIME] LANGUAGE... -
Page 23: Time]
[SYSTEM]Page INCR+ -1Day DECR- 6.1.2 [TIME] „ Procedure to set time Step 1 Press [SYST] key to enter<SYSTEM CONFIG> page. Step 2 Select[TIME] Step 3 HOUR +1Hour INCR+ HOUR -1Hour DECR- MINUTE +1Minute INCR+ MINUTE -1Minute DECR- SECOND +1Second INCR+ SECOND -1Second DECR-... -
Page 24: Touch Panel]
AT4202/4204/4208 User's Guide 6.1.5 [TOUCH PANEL] The LCR meter can work well without touch panel. But you cannot type number without touch panel. When you need to input Tips numbers, the touch panel will be activated even it is shut down in system setting. -
Page 25: Dim Display [Dim]
[SYSTEM]Page Also, press [ ]to change the brightness. Figure6-2 The Brightness key „ Procedure to change brightness Step 1 Press [SYST] key to enter<SYSTEM CONFIG> page. Step 2 Select [BRIGHTNESS] field. Step 3 30% of full brightness 50% of full brightness 70% of full brightness 100% Full brightness... - Page 26 AT4202/4204/4208 User's Guide [APO]off Tips: Timer will be reset when press any keys or touch screen.
-
Page 27: Remotecontrol
RemoteControl RemoteControl This chapter provides the following information to remotely control the AT4202/4204/4208 via the USB interface. USB-HID The USB-Serial Interface allows you to connect AT824/825/826 to a USB port on you PC. You needn’t to install a driver in Windows system. -
Page 28: Command Set
AT4202/4204/4208 User's Guide &recvBytes, &ol); Use ReadFileto read HID equipment. Report based on the data fransferred from IN. WriteFile( hDev, reportBuf, OUT_REPORT_LEN, &sendBytes, &ol); WriteFile is used to transfer an output report to HID equipment. Communication Parameters VIP:0825 PID:0826 Packet size:64bits Any problems in programming, please contact our tech department, you can send an email to tech@applent.com. -
Page 29: Notation Conventions And Definitions
Instrument response pack is 64 bytes, not sufficient for 0x00fill out. (Not ASCII“0”) A response pack (from instrument): ASCII format: AT4202,REV A1.0,00000000,Applent Instruments Inc. To test instrument USB-HID, we have free “ApplentHID communication tester” software, you can download from:www.applent.com 7.3.2 Notation Conventions and Definitions A definition is not a part of a command, just used in interpretation and is not included in transfer. -
Page 30: Command Reference
AT4202/4204/4208 User's Guide Table7-3 Available data type Format Samples <NR1> Integer 100,+100,-100 <NR2> Rational 1.23,+1.23,-1.23 <NR3> Floating-point 1.23E4,+1.23E4,-1.23E4,-1.23e-4 Floating-point 1.23K,1.23N,1.23U (magnification in following <NR4> with Table) magnification Table7-4 Magnification Definition Suffix 1E18 (EXA) 1E15 (PETA) 1E12 (TERA) 1E9 (GIGA) 1E6 (MEGA) -
Page 31: Beepsubsystem
RemoteControl To set the model sHeader Model sPara <tc-t|tc-k|tc-j|tc-n|tc-e|tc-s|tc-r|tc-b> „ model? To check the current model sHeader Model? sPara Response <tc-t|tc-k|tc-j|tc-n|tc-e|tc-s|tc-r|tc-b> BEEPSubsystem 7.4.2 „ beep <on|off> To set the beep sHeader Beep sPara <on|off> „ beep? To check the current beep sHeader beep? sPara... -
Page 32: Chanon Subsystem
AT4202/4204/4208 User's Guide 7.4.5 CHANON SubSystem „ Chanon<integer> To set the channel status sHeader chanon sPara <integer> 8-bit data , each bit representing a channel 0: off 1: Open Example: 11111110 , channel 1 is closed , 2 to 8 channels is open „... -
Page 33: Syst System Subsystem
Tips: Power key cannot be locked 7.4.10 IDN? Subsystem „ IDN? To check version information sHeader IDN? sPara Response AT4202,REV A1.0,<Serial Number>,Applent Instruments Inc. 7.4.11 RST Subsystem „ To start in heat sHeader sPara 7.4.12 Error Subsystem „ ERR? To check the message sent previously... -
Page 34: Specification
AT4202/4204/4208 User's Guide Specification This chapter describes the specifications and supplemental performance characteristics of the AT4202/4204/4208: Specifications Dimension General Specification The Data is Achieved under the Following Conditions: Temperature: 23 ±5 Humidity: d65% R.H. Warm-up Time: >60 minutes Calibration Time 12months... -
Page 35: Dimension
Specification thermocouple R-type ~ 1750 thermocouple B-type ~ 1800 thermocouple Dimension Applent Instruments AT4202/4204/4208 User’s Manual English Edition...
Need help?
Do you have a question about the AT4202 and is the answer not in the manual?
Questions and answers