Table of Contents
Advertisement
Quick Links
Your new VHX-68C-VTA kit includes:
Universal Sender
Pack
Switch Assembly
Installation
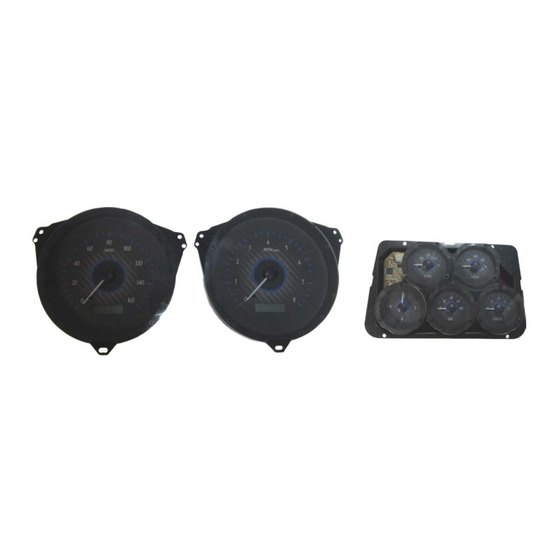
1. Remove the stock gauge clusters from the dash and save all hardware for reassembly.
VHX-68C-VTA
Dakota Digital VHX Instrument Installation
For 1968-'77 Corvette's
VHX Displays
Installation Manuals
(1) 60" CAT5 Cable
(1) 36" CAT5 Cable
(1) 12" CAT5 Cable
Extended ABS Mounting
Bracket
(2) ABS Mounting Brackets
(2) Thumb Nuts
Control Box
(3) Block-Off Lenses
Clock Power Harness
Washer
Manual # 650487B
Advertisement
Table of Contents

Related Manuals for Dakota Digital VHX-68C-VTA


Summary of Contents for Dakota Digital VHX-68C-VTA
- Page 1 VHX-68C-VTA Dakota Digital VHX Instrument Installation For 1968-’77 Corvette’s Your new VHX-68C-VTA kit includes: Extended ABS Mounting VHX Displays Bracket Washer Universal Sender Pack (2) ABS Mounting Brackets Installation Manuals (2) Thumb Nuts Control Box (3) Block-Off Lenses Clock Power Harness Switch Assembly (1) 60”...
- Page 2 2. Remove the stock gauges, separator plate, and lenses from the bezels. For the main cluster, reattach the lens spacer to the bezel after removing the lens as shown (white arrows). The only items to be reused are the original front bezels and gauge mounting hardware. Now is a good time to clean or refinish the bezels.
- Page 3 4. Once the VHX gauges are secured to the bezel; connect the 12” CAT5 cable to the Tachometer, and the other end to either port on the Speedometer, connecting the two halves. With the 36” CAT5 cable, connect one end to the open port on the Speedometer, and as the assembled cluster is installed into the dash, carefully route the other end of the cable to the control box mounting location.
- Page 4 7. Attach the provided 60” CAT5 cable and the clock constant power harness to the back of the VHX display. Carefully route the other ends to the control box mounting location. 8. The clusters are now ready to re-install into the vehicle using stock hardware. Refer to the main manual for wiring instructions to complete the VHX installation.
Need help?
Do you have a question about the VHX-68C-VTA and is the answer not in the manual?
Questions and answers