Table of Contents
Advertisement
Quick Links
Advertisement
Table of Contents

Related Manuals for Metrohm 902 Titrando


Summary of Contents for Metrohm 902 Titrando
- Page 1 902 Titrando Manual 8.902.8003EN / 2020-03-03...
- Page 3 Metrohm AG CH-9100 Herisau Switzerland Phone +41 71 353 85 85 Fax +41 71 353 89 01 info@metrohm.com www.metrohm.com 902 Titrando Manual 8.902.8003EN / 2020-03-03...
- Page 4 Technical Communication Metrohm AG CH-9100 Herisau techcom@metrohm.com This documentation is protected by copyright. All rights reserved. This documentation has been prepared with great care. However, errors can never be entirely ruled out. Please send comments regarding possible errors to the address above.
-
Page 5: Table Of Contents
Connecting a pH, metal or ion-selective electrode ....23 3.5.2 Connecting a reference electrode .......... 24 3.5.3 Connecting a temperature sensor or an electrode with inte- grated temperature sensor ............. 24 3.5.4 Connecting the iConnect ............25 ■■■■■■■■ 902 Titrando... - Page 6 4 Setting up the titration vessel General ................29 5 Operation and maintenance General notes ..............30 5.1.1 Care ..................30 5.1.2 Maintenance by Metrohm Service .......... 30 6 Troubleshooting General ................31 SET titration ................ 31 6.2.1 ..................... 31 7 Appendix Remote interface ..............
- Page 7 ■■■■■■■■■■■■■■■■■■■■■■ Table of figures Table of figures Figure 1 The Titrando system ................1 Figure 2 Front 902 Titrando ................7 Figure 3 Rear 902 Titrando ................8 Figure 4 Connecting the Touch Control ............10 Figure 5 Connecting the computer ..............13 Figure 6 MSB connections ................
-
Page 9: Introduction
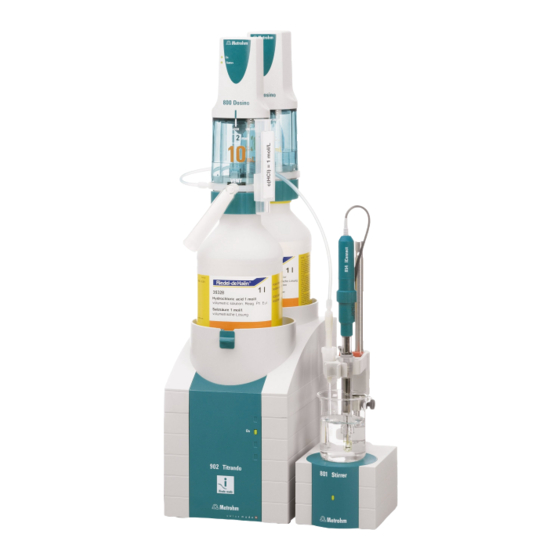
A Titrando system can contain numerous, various kinds of instruments. The following figure provides an overview of the peripheral devices you can connect to the 902 Titrando. Computer Sensors USB Sample Processor... -
Page 10: Instrument Description
Operation is carried out by means of a touch-sensitive Touch Control or with a high-performance PC software. MSB connectors ■ Four MSB connectors (Metrohm Serial Bus) for connecting dosing devi- ces (Dosimat with exchange unit or Dosino with dosing unit), stirrers, titration stands and Remote Boxes. USB connectors ■... -
Page 11: Titration Modes - Measuring Modes - Dosing Com- Mands
■■■■■■■■■■■■■■■■■■■■■■ 1 Introduction Titration modes – Measuring modes – Dosing com- mands The 902 Titrando supports the following titration modes, measuring modes and dosing commands: ■ Endpoint titration at one or two specified endpoints. Measuring modes: – pH (pH measurement) –... -
Page 12: About The Documentation
This symbol draws attention to a possible hazard due to heat or hot instrument parts. WARNING This symbol draws attention to a possible biological hazard. CAUTION This symbol draws attention to possible damage to instruments or instrument parts. ■■■■■■■■ 902 Titrando... -
Page 13: Safety Instructions
The electrical safety when working with the instrument is ensured as part of the international standard IEC 61010. WARNING Only personnel qualified by Metrohm are authorized to carry out service work on electronic components. WARNING Never open the housing of the instrument. The instrument could be damaged by this. -
Page 14: Working With Liquids
The correct disposal of your old instrument will help to prevent negative effects on the environment and public health. More details about the disposal of your old instrument can be obtained from your local authorities, from waste disposal companies or from your local dealer. ■■■■■■■■ 902 Titrando... -
Page 15: Overview Of The Instrument
9 0 2 T i t r a n iT ro de re ad M e tr o h m Figure 2 Front 902 Titrando Bottle holder "On" LED With holding clamps, for two reagent bot- Lights up when the Titrando is ready for tles. -
Page 16: Figure 3 Rear 902 Titrando
USB Sample Processor, etc. Connector (Controller) MSB connector (MSB 1 to MSB 4) For connecting a Touch Control or a PC with Metrohm Serial Bus. For connecting external installed PC software. Mini DIN, 9-pin. dosing devices, stirrers or Remote Boxes. Mini DIN, 9-pin. -
Page 17: Installation
Two different versions are available for operating the 902 Titrando: A Touch Control with touch-sensitive screen. It forms a "stand-alone ■ instrument" together with the 902 Titrando. A computer enables operation of the 902 Titrando with the help of a ■ PC software, e.g. tiamo. CAUTION... -
Page 18: Figure 4 Connecting The Touch Control
Automatic system tests are performed on both instruments at the time of activation. The On LED on the front of the Titrando lights up when the system test has been completed and the instrument is ready for operation. ■■■■■■■■ 902 Titrando... - Page 19 Unplug the power plug immediately if you suspect that moisture has ■ gotten inside the instrument. Only personnel who have been issued Metrohm qualifications may ■ perform service and repair work on electrical and electronic parts. Connecting the power cord...
- Page 20 3.2.1.3 Connecting a computer The 902 Titrando requires a USB connection to a computer in order to be able to be controlled by a computer software. Using a 6.2151.000 con- troller cable, the instrument can be connected directly, either to a USB socket on a computer, to a connected USB hub or to a different Metrohm control instrument.
-
Page 21: Figure 5 Connecting The Computer
3 Follow the instructions of the installation wizard. The "On" LED on the 902 Titrando lights up when the driver installa- tion has been completed and the instrument is ready for operation. If problems should occur during installation, contact your company's IT support team. -
Page 22: Connecting Msb Devices
In order to connect MSB devices, e.g. stirrers or dosing devices, Metrohm instruments are equipped with up to a maximum of four connectors on what is referred to as the Metrohm Serial Bus (MSB). Various kinds of peripheral devices can be connected in sequence (in series, as a "Daisy Chain") at a single MSB connector (8-pin Mini DIN socket) and con-... -
Page 23: Connecting A Dosing Device
1 Connecting a dosing device Exit the control software. ■ Connect the connection cable of the dosing device to one of the ■ sockets marked with MSB on the rear of the control device. Start the control software. ■ ■■■■■■■■ 902 Titrando... -
Page 24: Connecting A Stirrer Or Titration Stand
MSB on the rear of the control instrument. 804 Ti Stand only: Connect the rod stirrer to the stirrer connector ■ (socket with stirrer symbol) of the titration stand. Start the control software. ■ ■■■■■■■■ 902 Titrando... -
Page 25: Connecting A Remote Box
Instruments that are controlled via remote lines and/or that send control signals via remote lines can be connected via the 6.2148.010 Remote Box. In addition to Metrohm, other instrument manufacturers also use similar connectors that make it possible to connect different instruments together. -
Page 26: Connecting Usb Devices
3.4.1 General The 902 Titrando has two USB connectors (type A sockets) for peripheral devices with USB interfaces. The Titrando functions as a USB hub (distribu- tor) no matter how it is operated. If you wish to connect more than two devices to the USB, you can also use an additional, commercially available USB hub. -
Page 27: Connecting A Usb Hub
3 Installation CAUTION If you operate the 902 Titrando with the aid of the Touch Control, take care to ensure that the Touch Control is switched off when you set up or disconnect connections between the various instruments. If you use a PC software to control the 902 Titrando, you should exit the program before you set up or disconnect the USB connections. -
Page 28: Connecting A Balance
– You will need the 6.2148.050 USB/RS-232 adapter to connect a balance. The following table offers an overview of the balances that you can use together with the 902 Titrando and of which cable you will need for con- nection to the RS-232 interface: Balance... -
Page 29: Connecting A Pc Keyboard (Only For Operation With Touch Control)
Connect the balance as follows: 1 Plug in the USB plug of the USB/RS-232 adapter at the USB connec- tor of the 902 Titrando. 2 Connect the RS-232 interface of the USB/RS-232 adapter with the RS-232 interface of the balance (see table for cable). -
Page 30: Connecting A Barcode Reader
Connect the barcode reader as follows: 1 Insert the USB plug of the barcode reader into one of the USB sock- ets of the 902 Titrando. 2 Switch on the Touch Control. The barcode reader is recognized automatically and entered in the device manager. -
Page 31: Connecting Sensors
3.5.1 Connecting a pH, metal or ion-selective electrode Connect the pH, metal or ion-selective electrode as follows: 1 Plug the electrode plug into the Ind. socket of the 902 Titrando. Figure 12 Connecting a pH, metal or ion-selective electrode ■■■■■■■■... -
Page 32: Connecting A Reference Electrode
3.5.2 Connecting a reference electrode Connect the reference electrode as follows: 1 Plug the electrode plug into the Ref. socket of the 902 Titrando. Figure 13 Connecting a reference electrode 3.5.3 Connecting a temperature sensor or an electrode with integrated... -
Page 33: Connecting The Iconnect
The 854 iConnect can also be connected while the instrument is switched 1 Plug the plug of the 854 iConnect (3) into the socket of the mini USB adapter cable (2). Observe the correct orientation (markings). ■■■■■■■■ 902 Titrando... -
Page 34: Figure 16 Plugging In The 854 Iconnect
Figure 17 Removing the protective cap 2 Align the guide pin (5) of the electrode with the recess in the 854 iConnect (4). Figure 18 Aligning the guide pin 3 Attach the electrode to the 854 iConnect. ■■■■■■■■ 902 Titrando... -
Page 35: Figure 19 Attaching The Electrode
1 Unplug the 854 iConnect (3) from the socket of the mini USB adapter cable (2). Figure 20 Unplugging the 854 iConnect 2 Leave the mini USB adapter cable (2) plugged into the socket of the instrument (1). ■■■■■■■■ 902 Titrando... -
Page 36: Differential Potentiometry
If no reliable measurements are possible with these, then a 6.5104.030 (230 V) or 6.5104.040 (115 V) dif- ferential amplifier can be used. The differential amplifier is connected to the high-ohm measuring input (Ind.). ■■■■■■■■ 902 Titrando... -
Page 37: Setting Up The Titration Vessel
(counterclockwise or clockwise) when positioning electrode and buret tip (see figure below). Figure 21 Schematic configuration of magnetic stirrer, electrode and buret tip during a titration. a) stirring direction clockwise, b) stirring direction counterclockwise. Magnetic stirrer Electrode Buret tip ■■■■■■■■ 902 Titrando... -
Page 38: Operation And Maintenance
5.1.2 Maintenance by Metrohm Service Maintenance of the 902 Titrando is best carried out as part of an annual service, which is performed by specialist personnel of the Metrohm com- pany. A shorter maintenance interval may be necessary if you frequently work with caustic and corrosive chemicals. -
Page 39: Troubleshooting
The electrode responds too Replace the electrode. slowly. The titration time is The control parameters are Adjust the control parameters (see manual/ too long. unsuitable. help of the software used): Select Titration rate = optimal or fast. ■ ■■■■■■■■ 902 Titrando... - Page 40 The results are The minimum dosing rate is Select user-defined titration rate and decrease spread widely. too high. the minimum rate (see manual/help of the software used). The electrode responds too Replace the electrode. slowly. ■■■■■■■■ 902 Titrando...
-
Page 41: Appendix
For connecting instruments with a remote interface. 7.1.1 Pin assignment of the remote interface Figure 23 Pin assignment of remote socket and remote plug The above figure of the pin assignment applies for all Metrohm instru- ments with 25-pin D-Sub remote connector. ■■■■■■■■ 902 Titrando... - Page 42 Stop Input 2 Input 3 Quit Input 4 – Input 5 Input 6 Input 7 Output 0 Ready Output 1 Conditioning OK Output 2 Determination Output 3 Output 4 Output 5 Error Output 6 Warning Output 7 ■■■■■■■■ 902 Titrando...
- Page 43 The instrument performs a data-generating determination. End of Determination. Pulse (t = 200 ms) after a determination or pulse after a buffer/standard solution during calibration using a Sample Processor. Error The line is set for error message display. ■■■■■■■■ 902 Titrando...
- Page 44 ■■■■■■■■■■■■■■■■■■■■■■ 7.1 Remote interface Function Explanation Warning The line is set for warning message display. ■■■■■■■■ 902 Titrando...
-
Page 45: Technical Specifications
■■■■■■■■■■■■■■■■■■■■■■ 8 Technical specifications 8 Technical specifications Measuring interface The 902 Titrando has one galvanically isolated measuring interface. The measuring cycle is 100 ms for all measuring modes. 8.1.1 Potentiometry One high-ohm measuring input (Ind.) for pH, metal or ion-selective elec- trodes and one measuring input (Ref.) for separate reference electrodes. -
Page 46: Power Connection
(at a maximum of 85% humidity) Storage –20 - +60 °C Transport –40 - +60 °C Reference conditions +25 °C (±3 °C) Ambient tempera- ture ≤ 60 % Relative humidity Instrument status Instrument in operation at least 30 min Adjusting interval annual ■■■■■■■■ 902 Titrando... -
Page 47: Dimensions
USB ports 2 USB downstream ports (type A sockets), 500 mA each, for connect- ing peripheral devices such as printers, keyboards, barcode readers or RS-232/USB boxes (Metrohm order no. 6.2148.020). "Controller" connector Controller port USB upstream port with auxiliary power supply (Mini DIN socket) for connecting Touch Control or computer for controlling the 902 Titrando. -
Page 48: Accessories
The PDF file with the accessories data is created. NOTICE Once you have received your new product, we recommend download- ing the accessories list from the Internet, printing it out and keeping it together with the manual for reference purposes. ■■■■■■■■ 902 Titrando... -
Page 49: Index
Measuring mode ......3 Titration stand ....16 Titration vessel MEAS ........3 Equipping ......29 Touch Control ..... 10 Metrohm Serial Bus MSB, see also Touch Control USB hub ......19 "MSB" ........14 Connect ......10 Connector MSB ........2 Connect devices ....
Need help?
Do you have a question about the 902 Titrando and is the answer not in the manual?
Questions and answers