Table of Contents
Advertisement
Quick Links
R718PB13
Model:
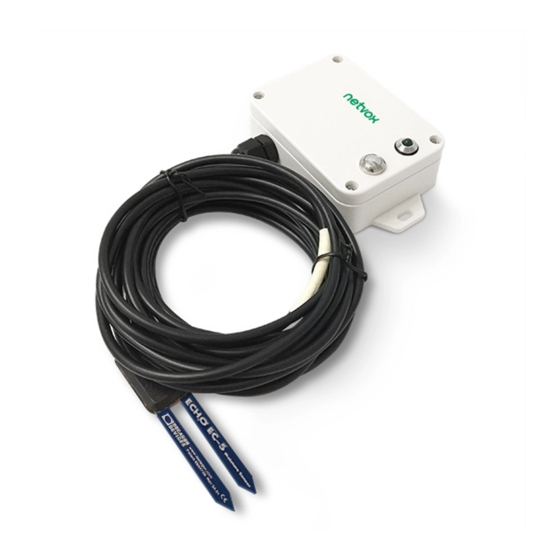
Wireless Soil Moisture Sensor
Wireless Soil Moisture Sensor
User manual
Copyright©Netvox Technology Co., Ltd.
This document contains proprietary technical information which is the property of NETVOX Technology. It shall be maintained
in strict confidence and shall not be disclosed to other parties, in whole or in part, without written permission of NETVOX
Technology. The specifications are subject to change without prior notice.
0
Advertisement
Table of Contents

Related Manuals for netvox R718PB13


Summary of Contents for netvox R718PB13
- Page 1 This document contains proprietary technical information which is the property of NETVOX Technology. It shall be maintained in strict confidence and shall not be disclosed to other parties, in whole or in part, without written permission of NETVOX Technology. The specifications are subject to change without prior notice.
- Page 2 Table of Content 1. Introduction ......................... 2 2. Appearance ......................... 2 3. Main Characteristics ....................2 4. Operation ........................3 5. Data Report ......................... 4 5-1 Data report configuration and sending period are as following ......4 5-2 Soil data collection calibration ................4 5-3 Select soil type ....................
- Page 3 1. Introduction The R718PB13 is a ClassA type device based on the LoRaWAN protocol. R718PB13 is connected with soil sensor (EC-5 soil sensor) As detectors for soil moisture, the value collected by the sensor are reported to the corresponding gateway.
- Page 4 4. Operation On/Off Power on Insert batteries. (users may need a flat blade screwdriver to open) Turn on Press and hold the function key for 3 seconds till the green indicator flashes once. Turn off (Restore to factory setting) Press and hold the function key for 5 seconds till the green indicator flashes for 20 times. Power off Remove batteries 1.
- Page 5 5-2 Soil data collection calibration The R718PB13 calibrates the acquired soil data by setting soil calibration values. When the soil calibration value in the issued command is 0, the collected data is the data actually collected by the soil sensor.
- Page 6 (2) Read device parameters Downlink: 0C58000000000000000000 Device returns: 8C580A0000000000000000 (device current configuration parameter) 5-3 Select soil type R718PB13 selects soil types by instruction. Soil types include mineral soil, potting soil, and rock wool. See the documentation for details. Description Device CmdID DeviceType...
- Page 7 6. Installation Method1. Horizontal Installation 1. Excavate a hole or trench a few centimeters deeper than the depth at which the sensor is to be installed. 2. At the installation depth, shave off some soil from the vertical soil face exposing undisturbed soil. 3.
Need help?
Do you have a question about the R718PB13 and is the answer not in the manual?
Questions and answers