
Related Manuals for Fimap MAXIMA BASE BT 2017


Summary of Contents for Fimap MAXIMA BASE BT 2017
- Page 1 MAXIMA 2017 BASE BT PROFESSIONAL SCRUBBING MACHINES USE AND MAINTENANCE MANUAL ORIGINAL INSTRUCTIONS DOC. 10077109 - Ver. AA - 01-2018...
-
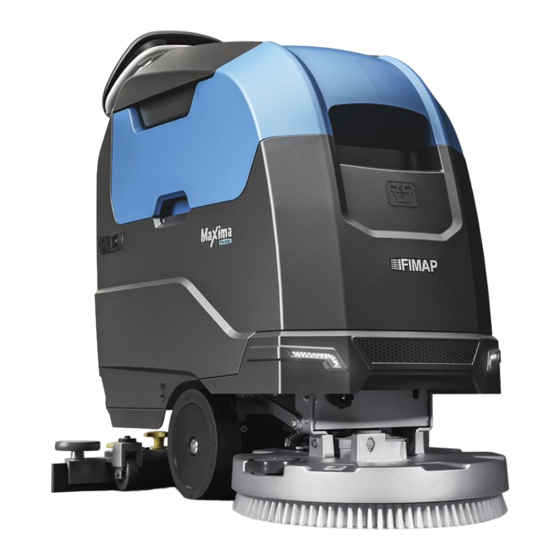
Page 3: Main Machine Components
Solution tank filler cap/measuring inlet. Brush uncoupling switch (50 BT version). Solution tank filler tube cap. Squeegee body control lever. Cover cap for FFF “FIMAP FAST FILL” quick coupling kit (optional). Brush head control pedal. Recovery tank. Support hook for recovery tank drainage tube. -
Page 4: Table Of Contents
CONTENTS MAIN MACHINE COMPONENTS ..........3 CLEANING THE RECOVERY TANK...........20 CONTENTS .................4 EMPTYING THE SOLUTION TANK ............21 GENERAL SAFETY REGULATIONS .........4 CLEANING THE WATER SYSTEM FILTER ........21 CLEANING THE VACUUM TUBE ............21 RECHARGING THE BATTERIES ............5 EXTRAORDINARY MAINTENANCE OPERATIONS ....21 USING THE MACHINE .................6 REPLACING THE BRUSH HEAD BRUSH (50BT VERSIONS) ..21 DEACTIVATION OF THE MACHINE .............8 REPLACING THE BRUSH HEAD BRUSH (60BT VERSIONS) ..22... -
Page 5: Recharging The Batteries
RECHARGING THE BATTERIES DANGER: • If the battery charger power cable is damaged or broken, it should be replaced by the manufacturer or authorised service personnel, or another qualified person, in order to protect against hazards. • The socket for the battery charger cable must have a prescribed earth connection. •... -
Page 6: Using The Machine
USING THE MACHINE DANGER: • In the event of danger, take prompt action by pressing the emergency button on the back of the machine (near the control handlebars). • Never collect gases, explosive/inflammable liquids or powders, nor acids and solvents! These include gasoline, paint thinners and fuel oil (which, when mixed with the vacuum air, can form explosive vapours or mixtures), and also non-diluted acids and solvents, acetones, aluminium and magnesium powders. - Page 7 CAUTION: • Children must be supervised to ensure they do not play with the machine. • During machine operation, pay attention to other people and especially to children. • The machine must only be powered with a voltage equal to that shown on the serial number plate.
-
Page 8: Deactivation Of The Machine
DEACTIVATION OF THE MACHINE WARNING: • Always protect the machine against sunlight, rain, and other atmospheric agents, both while it is stationary and while it is functioning. Store the machine in a dry, sheltered place: this machine is only designed for use under dry conditions, and must not be used or stored outdoors in humid conditions. -
Page 9: Transport
• If the machine needs to be pushed for maintenance purposes (batteries absent; discharged batteries; etc.), never exceed 4 km/h. • If there are any machine operation anomalies, check they are not due to a lack of proper maintenance. Otherwise, request the intervention of authorised personnel or an authorised service centre. -
Page 10: Symbols Used In The Manual
Disposal symbol: Carefully read the sections marked with this symbol for disposing of the appliance. Design by FIMAP Verona (Italy) Assembled in FIMAP Verona (Italy) Via Invalidi del Lavoro, 1 S. Maria di Zevio - Verona - Italy Symbol of the squeegee body vacuum tube position: Used to indicate the correct position of the squeegee body vacuum tube. -
Page 11: Technical Data
TECHNICAL DATA Unit of MAXIMA 2017 MAXIMA 2017 MAXIMA 2017 MAXIMA 2017 TECHNICAL DATA measurement BASE 50BT BASE 60BT BASE 50BTO BASE 50BTS symbol Rated machine power 1075 1575 1255 1275 Working capacity up to sq.m./h 1785 2118 1778 1771 Working width Squeegee width Brush head brush diameter (number - diameter) -
Page 12: Symbols Used On The Machine
SYMBOLS USED ON THE MACHINE Daily care warning label: Applied to the machine to remind the operator of the necessary procedures to Symbol of maximum temperature for filling the solution tank: properly care for the machine itself. Located on the front of the solution tank, to indicate the maximum temperature of the water for filling the solution tank safely. -
Page 13: Machine Preparation
CAUTION: do not fit the brush and the rear squeegee body before unloading the machine, and MACHINE PREPARATION avoid any violent jolts to the brush head and squeegee support. HANDLING THE PACKAGED MACHINE NB: the ramp gradient must not be such as to cause damage to the machine as it comes The machine is contained in specific packaging, and since the down. -
Page 14: Machine Safety Measures
INSERTING THE BATTERIES IN THE MACHINE MACHINE SAFETY MEASURES The batteries must be housed in the relative compartment beneath the recovery tank. They should be To ensure that work is carried out in the best safety conditions, proceed as follows: handled using lifting equipment that is suitable in terms of both the weight and the coupling system. -
Page 15: Assembling The Brush (50Bt Versions)
NB: carefully read the use and maintenance instructions of the battery charger used. Go to the back of the machine and remove the cap (2) from the battery charger socket (Fig.2). Connect the battery charger power cable connector (3) to the battery charger socket (4) (Fig.3). CAUTION: before connecting the batteries to the battery charger, make sure it is suitable for the batteries used. -
Page 16: Filling The Solution Tank With Water
HOUR METER The machine control panel contains the control display, which shows the total usage time. The numbers before the letter “h” identify the hours, while the numbers before the letter “m” identify the tenths of an hour (a tenth of an hour corresponds to six minutes). The flashing “:” symbol indicates that the hour meter is counting the machine functioning time. -
Page 17: Starting Work
14. Make sure the vacuum tube (11) is correctly connected to the sleeve in the squeegee body. If it SCRUBBING WITH DRYING isn't, connect it (Fig.10). To perform a scrubbing and drying program, proceed as follows: 15. Make sure the vacuum motor filter (12) is correctly connected and is clean (Fig.11). If it isn't, clean it (see “CLEANING THE RECOVERY TANK”). -
Page 18: Regulating The Flow Of Detergent Solution
NB: As soon as the button (3) is pressed, the word “BACK” will appear on the control display ADJUSTMENT OF THE DETERGENT SOLUTION FLOW (Fig.4). To adjust the flow of detergent solution during work, proceed as follows: Activate the dead man's levers (5) on the handlebars (Fig.4) to start moving the machine in reverse mode. -
Page 19: Recovery Tank Overflow
RECOVERY TANK OVERFLOW RECOMMENDED MAINTENANCE OPERATIONS The machine is equipped with a mechanical device (float) under the recovery tank lid that, when the recovery tank is full, shuts off the air to the vacuum motor intake to protect it; the sound of the vacuum motor will then be deeper. -
Page 20: Cleaning The Squeegee Body
Clean the brush under running water to remove any impurities from its bristles. Check the bristles CLEANING THE SQUEEGEE BODY are not worn; in the event of excessive wear, replace the brush (the bristles should be at least The careful cleaning of the whole vacuum unit ensures better drying and cleaning of the floor as well as 10mm long). -
Page 21: Emptying The Solution Tank
CLEANING THE VACUUM TUBE Careful cleaning of the vacuum tube guarantees better cleaning of the floor as well as a longer vacuum motor life. Proceed as follows to clean the vacuum tube: Take the machine to the maintenance area. Make sure the machine is in a safe condition (see “MACHINE SAFETY MEASURES”). -
Page 22: Replacing The Brush Head Brush (60Bt Versions)
REPLACING THE BRUSH HEAD BRUSH (60BT VERSIONS) REPLACING THE SQUEEGEE BODY RUBBER BLADES Ensuring the good condition of the squeegee body rubber blades guarantees better floor cleaning and The good condition of the brush guarantees better cleaning of the floor, as well as a longer brush head gearmotor lifespan. -
Page 23: Disposal
(Fig.5). Once the adjustment has been completed, tighten the retainer knob (3). EC DECLARATION OF CONFORMITY The undersigned manufacturer: FIMAP spa Via Invalidi del Lavoro, 1 37059 Santa Maria di Zevio (VR) declares under its sole responsibility that the products FLOOR SCRUBBING MACHINES mod. -
Page 24: Troubleshooting
TROUBLESHOOTING This chapter lists the most common problems linked with the use of the machine. If you are unable to resolve the problems with the information given here, please contact your nearest assistance centre. PROBLEM POSSIBLE CAUSE SOLUTION The main switch is set to “0”. Make sure the main switch is on “I”. - Page 25 NOTE...
- Page 26 NOTE...
- Page 28 FIMAP spa - Via Invalidi del Lavoro, 1 - 37059 S. Maria di Zevio - Verona - Italy Tel. +39 045 6060411 – Fax +39 045 6060417 – E-mail: fimap@fimap.com www.fimap.com...
Need help?
Do you have a question about the MAXIMA BASE BT 2017 and is the answer not in the manual?
Questions and answers