Table of Contents
Advertisement
Quick Links
Advertisement
Table of Contents

Subscribe to Our Youtube Channel
Related Manuals for Electrolux EOB53434AK


Summary of Contents for Electrolux EOB53434AK
- Page 1 EOB53434AK EOB53434AX Oven User Manual...
-
Page 2: Table Of Contents
15. ENERGY EFFICIENCY.................. 32 WE’RE THINKING OF YOU Thank you for purchasing an Electrolux appliance. You’ve chosen a product that brings with it decades of professional experience and innovation. Ingenious and stylish, it has been designed with you in mind. So whenever you use it, you can be safe in the knowledge that you’ll get great results every time. -
Page 3: Safety Information
ENGLISH SAFETY INFORMATION Before the installation and use of the appliance, carefully read the supplied instructions. The manufacturer is not responsible for any injuries or damage that are the result of incorrect installation or usage. Always keep the instructions in a safe and accessible location for future reference. -
Page 4: Safety Instructions
WARNING: The appliance and its accessible parts • become hot during use. Care should be taken to avoid touching heating elements. Always use oven gloves to remove or put in • accessories or ovenware. Before carrying out any maintenance, disconnect the •... - Page 5 ENGLISH • Do not let mains cables touch or come near the appliance door or the Height of the front of 594 mm niche below the appliance, especially the appliance when it operates or the door is hot. Height of the back 576 mm •...
- Page 6 2.3 Use • Use a deep pan for moist cakes. Fruit juices cause stains that can be WARNING! permanent. Risk of injury, burns and • This appliance is for cooking electric shock or explosion. purposes only. It must not be used for other purposes, for example room •...
-
Page 7: Installation
ENGLISH 2.7 Disposal • The type of light bulb or halogen lamp used for this appliance is for household appliances only. Do not WARNING! use it for house lighting. Risk of injury or suffocation. • Before replacing the lamp, disconnect •... - Page 8 550 min. 560 3.2 Securing the oven to the cabinet...
-
Page 9: Product Description
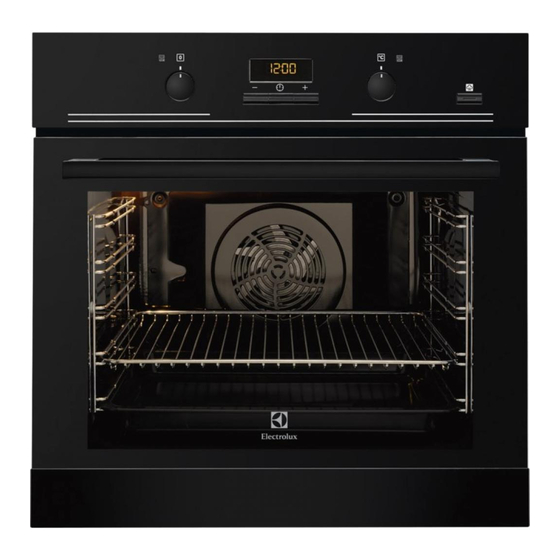
ENGLISH 4. PRODUCT DESCRIPTION 4.1 General overview Control panel Knob for the heating functions Power lamp / symbol Display Control knob (for the temperature) Temperature indicator / symbol Plus Steam Heating element Lamp Cavity embossment Shelf support, removable Shelf positions 4.2 Accessories •... -
Page 10: Before First Use
5.2 Display A. Clock functions B. Timer C. Clock function 6. BEFORE FIRST USE WARNING! For function: True Fan Refer to Safety chapters. Cooking PLUS refer to "Daily use" chapter, Setting the function: True Fan Cooking To set the Time of day refer PLUS". - Page 11 ENGLISH 7.3 Heating functions Oven func‐ Application tion Oven func‐ Application tion To bake cakes with crispy bottom and to The oven is off. preserve food. Bottom Heat Off position To defrost food (vegeta‐ bles and fruit). The de‐ To turn on the lamp frosting time depends without a cooking func‐...
- Page 12 1. Fill the cavity embossment with tap 2. Put food in the oven and close the water. oven door. 3. Set the function: 4. Press the Plus Steam button The Plus Steam button works only with this function. The indicator turns on.
-
Page 13: Clock Functions
ENGLISH 8. CLOCK FUNCTIONS 8.1 Clock functions table Clock function Application TIME OF DAY To set, change or check the time of day. DURATION To set how long the appliance operates. To set when the appliance deactivates. TIME DELAY To combine DURATION and END function. MINUTE MIND‐... -
Page 14: Using The Accessories
Appliance turns on automatically later on, The Minute Minder starts automatically works for the set DURATION time and after 5 seconds. stops at the set END time. At the set time 3. When the set time ends, an acoustic an acoustic signal sounds. -
Page 15: Additional Functions
ENGLISH 2. Put the wire shelf on the telescopic Small indentation at the top runners and carefully push them into increase safety. The the oven. indentations are also anti-tip devices. The high rim around the shelf prevents °C cookware from slipping of the shelf. -
Page 16: Hints And Tips
11. HINTS AND TIPS Baking cakes WARNING! Do not open the oven door before 3/4 of Refer to Safety chapters. the set cooking time is up. If you use two baking trays at the same The temperature and baking... - Page 17 ENGLISH Food Water in the cavity Temperature (°C) Time (min) embossment (ml) Plum cake, apple 100 - 150 160 - 180 30 - 60 pie, cinnamon rolls baked in a cake mould. Frozen ready meals Preheat the empty oven for 10 minutes. Use the second shelf position.
- Page 18 Food Top / Bottom Heat True Fan Cooking Time Com‐ (min) ments Tempera‐ Shelf po‐ Tempera‐ Shelf po‐ ture (°C) sition ture (°C) sition Short‐ 3 (2 and 20 - 30 In a cake bread mould dough Buttermilk 60 - 80 In a 26 cm cheese‐...
- Page 19 ENGLISH Food Top / Bottom Heat True Fan Cooking Time Com‐ (min) ments Tempera‐ Shelf po‐ Tempera‐ Shelf po‐ ture (°C) sition ture (°C) sition Biscuits / 140 - 150 2 and 4 35 - 40 In a baking pastry tray stripes - two levels...
- Page 20 Food Top / Bottom Heat True Fan Cooking Time Com‐ (min) ments Tempera‐ Shelf po‐ Tempera‐ Shelf po‐ ture (°C) sition ture (°C) sition Rye bread 190 30 - 45 In a bread Bread 2 (2 and 25 - 40 6 - 8 rolls in a bak‐...
- Page 21 ENGLISH Food Top / Bottom Heat True Fan Cooking Time Com‐ (min) ments Tempera‐ Shelf po‐ Tempera‐ Shelf po‐ ture (°C) sition ture (°C) sition English 50 - 60 On a wire roast beef, shelf rare English 60 - 70 On a wire roast beef, shelf...
- Page 22 Food Quantity Time (min) Pieces Quantity 1st side 2nd side (kg) Fillet steaks 12 - 15 12 - 14 Beef steaks 10 - 12 6 - 8 Sausages 12 - 15 10 - 12 Pork chops 12 - 16...
- Page 23 ENGLISH Food Tempera‐ Time (min) Food Tempera‐ Time (min) ture (°C) ture (°C) Knuckle of 160 - 180 120 - 150 Chicken, 190 - 210 50 - 70 veal, 1.5 - 2 poulard, 1 - 1.5 kg Duck, 1.5 - 180 - 200 80 - 100 Lamb...
- Page 24 Food Accessories Temperature Shelf po‐ Time (min) (°C) sition Sponge flan flan base tin on wire 35 - 45 base shelf Victoria Sand‐ baking dish on wire 35 - 50 wich shelf Poached fish, baking tray or dripping 35 - 45 0.3 kg...
- Page 25 ENGLISH 11.7 Defrost Food Quantity Defrosting Further defrost‐ Comments (kg) time (min) ing time (min) Chicken 100 - 140 20 - 30 Place the chicken on an upturned saucer placed on a large plate. Turn halfway through. Meat 100 - 140 20 - 30 Turn halfway through.
- Page 26 Food Temperature Time (h) Shelf position (°C) 1 position 2 positions Apple slices 60 - 70 6 - 8 1 / 4 Pears 60 - 70 6 - 9 1 / 4 11.9 Information for test institutes Tests according to IEC 60350-1.
-
Page 27: Care And Cleaning
ENGLISH Food Function Acces‐ Shelf Tem‐ Time (min) Comments sories posi‐ pera‐ tion ture (°C) Fatless‐ True Fan Wire 2 and 40 - 60 Use a cake ponge Cooking / shelf mould (26 cm di‐ cake Fan Cook‐ ameter). Diago‐ nally shifted. - Page 28 12.5 Removing the shelf If you have nonstick accessories, do not clean them using aggressive agents, supports sharp-edged objects or a dishwasher. It can cause damage to the nonstick To clean the oven, remove the shelf coating. supports. Moisture can condense in the oven or on CAUTION! the door glass panels.
- Page 29 ENGLISH WARNING! Make sure that the oven is cool before you touch it. There is a risk of burns. 12.7 Removing and installing door The oven door has two glass panels. You can remove the oven door and the internal glass panel to clean it. Read the whole "Removing and installing door"...
-
Page 30: Troubleshooting
12.8 Replacing the lamp sure the glass slides out of the supports completely. WARNING! Risk of electric shock. The lamp can be hot. 1. Turn off the oven. Wait until the oven is cooled down. 2. Disconnect the oven from the mains. - Page 31 ENGLISH Problem Possible cause Remedy The oven does not heat The fuse is blown. Make sure that the fuse is the cause of the malfunc‐ tion. If the fuse is blown again and again, contact a qualified electrician. The lamp does not oper‐ The lamp is defective.
-
Page 32: Technical Data
We recommend that you write the data here: Model (MOD.) ......... Product number (PNC) ......... Serial number (S.N.) ......... 14. TECHNICAL DATA 14.1 Technical data Voltage 220 - 240 V Frequency 50 - 60 Hz 15. ENERGY EFFICIENCY 15.1 Energy saving the duration of the cooking. - Page 33 ENGLISH...
- Page 34 www.electrolux.com...
- Page 35 ENGLISH...
- Page 36 www.electrolux.com/shop...
Need help?
Do you have a question about the EOB53434AK and is the answer not in the manual?
Questions and answers