Table of Contents
Advertisement
Advertisement
Table of Contents

Related Manuals for Electrolux EOB 21001


Summary of Contents for Electrolux EOB 21001
- Page 1 1 user manual Built-in oven EOB 21001...
- Page 3 Thank you for choosing a first class product from Electrolux, which hopefully will provide you with lots of pleasure in the future. The Electrolux ambition is to offer a wide variety of quality products that make your life more comfortable.
-
Page 4: Table Of Contents
4 electrolux Contents Warnings and Important Safety Information ............5 Description of the Appliance ................7 Controls......................8 Before using the Oven for the first time .............. 9 Using the Oven ....................10 Baking and Roasting Tables ................14 Cleaning and Maintenance ................16 If Something is wrong .................. -
Page 5: Warnings And Important Safety Information
5 Warnings and Important Safety Information Always keep these user instructions with the appliance. Should the appliance be passed on to third persons or sold, or if you leave this appliance behind when you move house, it is very important that the new user has access to these user instructions and the accompanying information. -
Page 6: Customer Service
6 electrolux • Regular cleaning prevents the Customer Service surface material from deteriorating. • Have checks and/or repairs carried • Before cleaning the oven, either turn out by the manufacturer’s service the power off or pull the mains plug department or by a service out. -
Page 7: Description Of The Appliance
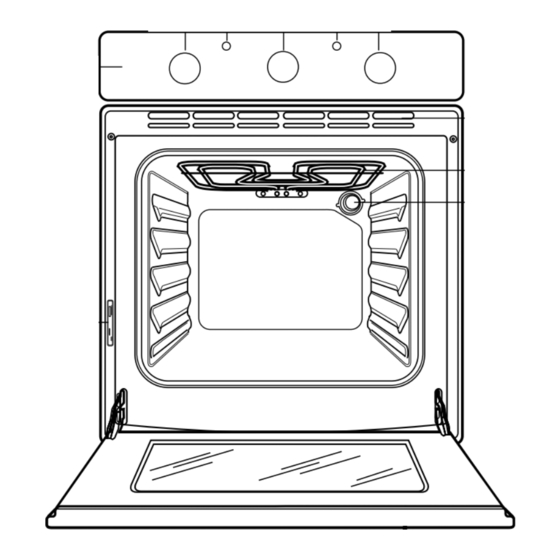
7 Description of the Appliance Control Panel Thermostat Control Indicator Oven Function Control Knob Air Vents for Cooling Fan Minute Minder Grill Thermostat Control Knob Oven Light Mains On Indicator 10. Rating Plate Oven accessories Grill Pan Grid Shelf... -
Page 8: Controls
8 electrolux Controls Oven Function Control Knob The oven is off. Conventional cooking - The heat comes from both the top and bottom element, ensuring even heating inside the oven. Bottom heating element - The heat comes from the bottom of the oven only. -
Page 9: Before Using The Oven For The First Time
9 to incorrect use of the appliance, it is Thermostat Control Indicator enough to remedy the error after the oven The thermostat control indicator will come has cooled down; if on the other hand, the on when the thermostat control knob is thermostat triggers because of a defective turned. -
Page 10: Using The Oven
10 electrolux Using the Oven The oven is supplied with an exclusive system which produces a natural circulation of air and the constant recycling of steam. This system makes it possible to cook in a steamy environment and keep the dishes soft inside and crusty outside. - Page 11 11 reflect the heat away and give less Grilling base browning. Most foods should be placed on the - Always place dishes centrally on the grid in the grill pan to allow maximum shelf to ensure even browning. circulation of air and to lift the food - Stand dishes on suitably sized baking out of the fats and juices.
- Page 12 12 electrolux On baking: Inner Grill element Cakes and pastries usually require a The inner grill provides quick direct heat medium temperature (150°C-200°C) and to the central area of the grill pan. By therefore it is necessary to preheat the using the inner grill element for cooking oven for about 10 minutes.
-
Page 13: Cooking Times
13 depressed, it is cooked through. Roast beef and fillet, which is to remain pink inside, must be roasted at a higher temperature in a shorter time. If cooking meat directly on the oven shelf, insert the roasting pan in the shelf level below to catch the juices. -
Page 14: Baking And Roasting Tables
14 electrolux Baking and Roasting Tables Conventional Cooking Timings do not include pre-heating. The empty oven should always be pre-heated for 10 minutes. Conventional Cooking Cooking time in NOTES TYPE OF DISH minutes temp °C CAKES Whisked recipies 45-60 In cake mould... - Page 15 15 Grilling Timings do not include pre-heating. The empty oven should always be pre-heated for 10 minutes. Cooking time in Quantity Grilling TYPE OF DISH minutes Pieces temp.°C 2nd side 1st side Fillet steaks 12~15 12~14 Beef-steaks 10~12 Sausages...
-
Page 16: Cleaning And Maintenance
16 electrolux Cleaning and Maintenance Before cleaning switch the Cleaners that contain bleach should NOT oven off and let it cool down. be used as they may dull the surface The appliance must not be finishes. Harsh abrasives should also be cleaned with a superheated avoided. -
Page 17: Oven Cavity
17 Oven Cavity The enamelled base of the oven cavity is best cleaned whilst the oven is still warm. Wipe the oven over with a soft cloth soaked in warm soapy water after each use. From time to time it will be... - Page 18 18 electrolux 6) place the door on a stable surface (Fig. 4) protected by a soft cloth to prevent the handle surface from being dam- aged; 7) release the locking system to remove the internal panes of glass (Fig. 5);...
- Page 19 19 The internal pane of glass must be put back into the right seats as shown in Fig. After the panes of glass have been reassembled in the oven door, perform the procedure described in point 8) in reverse to ensure they are locked.
-
Page 20: Replacing The Oven Light
20 electrolux Replacing the Oven Light Disconnect the appliance If the oven bulb needs replacing, it must comply with the following specifications: - Electric power: 15 W/25 W, - Electric rate: 230 V (50 Hz), - Resistant to temperatures of 300°C, - Connection type: E14. -
Page 21: If Something Is Wrong
21 If Something is wrong If the appliance is not working correctly, please check the following before contacting the Electrolux Service Centre. PROBLEM SOLUTION The oven is not switching on. Check that both a cookingfunction and temperature have been selected. -
Page 22: Technical Data
22 electrolux Technical Data Heating element Ratings Bottom oven element 1000 W Top heating element 800 W Full oven (Top+Bottom) 1800 W Grill 1650 W Full grill 2450 W Oven light 25 W Cooling Fan 25 W 2500 W Total rating... -
Page 23: Instructions For The Installer
23 Instructions for the Installer It is necessary that you install a double The oven is designed to be connected to pole switch between the oven and the 230 V (50 Hz) electricity supply. electricity supply (mains), with a minimum... -
Page 24: Instructions For Building In
24 electrolux Instructions for Building In For problem-free functioning of the built- in appliance, the kitchen unit or the recess into which the appliance is built must have suitable dimensions. In accordance with the regulations in force, all parts which ensure the shock protection of live and insulated parts must Fig. -
Page 25: Guarantee/Customer Service
Guarantee/Customer Service Standard guarantee conditions We, Electrolux, undertake that if within 12 months of the date of the purchase this Electrolux appliance or any part thereof is proved to be defective by reason only of faulty workmanship or materials, we will, at our option repair or replace the same FREE OF CHARGE for labour, materials or carriage on condition that: •... -
Page 26: European Guarantee
• The appliance is installed and used in accordance with instructions issued by Electrolux and is only used within the home, i.e. is not used for commercial pur- poses. • The appliance is installed in accordance with all relevant regulations in force within your new country of residence. - Page 27 27...
- Page 28 28 electrolux...
- Page 29 29...
- Page 30 30 electrolux...
- Page 31 31...
- Page 32 32 electrolux www.electrolux.co.uk 35694-4504 11/08 R.A...
Need help?
Do you have a question about the EOB 21001 and is the answer not in the manual?
Questions and answers